UWP: Working with Bluetooth devices (part 2: pairing)
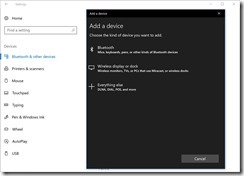
Implementing the previous example, I didn’t pair my device with my Windows 10 PC, but in the most cases you cannot omit pairing. Exactly thanks to pairing you can establish trust communications with a Bluetooth device that will allow your application get access to characteristics, lock the device to your computer and many other things. Windows 10 allows you to pair any device (not just Bluetooth) using Settings window:
But you can pair your devices directly from your application. In order to do it you can use the same DeviceInformation class that we used to track available devices.
Let’s modify our code. We will check the status and if the device is not paired we will pair it. You can use the following code in order to pair the device and navigate the application to the next page:
private async void deviceListView_ItemClick(object sender, ItemClickEventArgs e)
{
var item = e.ClickedItem as DeviceInformation;
if (item.Pairing.CanPair)
{
var result = await item.Pairing.PairAsync();
if ((result.Status == DevicePairingResultStatus.Paired) ||
(result.Status == DevicePairingResultStatus.AlreadyPaired))
{
this.Frame.Navigate(typeof(DevicePage), item);
}
}
else if (item.Pairing.IsPaired == true)
{
this.Frame.Navigate(typeof(DevicePage), item);
}
}
You can see that we used Pairing property to get a reference to an object of DeviceInformationPairing type. Using it we can check if the device is already paired, and pair the device if needed.
Pay attention that Windows is caching all paired devices. So, once your device is paired, you will be able to see it in the list, even if the device is not present physically. It’s a problem and it’s better to check if the device is still available.
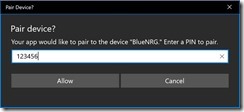
Of course, pairing process may require some actions from user side. For example, STEVAL-IDB007V1 evaluation board requires to inter a pin (123456 by default) to complete the pairing process. So, the PairAsync method will show all needed dialogs:
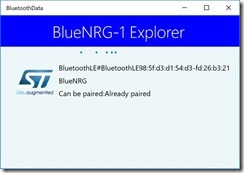
Once the device is paired, the application will display the next page with data. If you navigate your application back, you will be able to see that the device is already paired:
UWP API supports one more way for pairing: custom pairing mechanism. Using this way, you can create your own dialogs that will requires all needed pins or any additional information. In our case we can suppress the default pin dialog and hardcode the default pin in code. The following code demonstrates this feature:
private async void deviceListView_ItemClick(object sender, ItemClickEventArgs e)
{
var item = e.ClickedItem as DeviceInformation;
if (item.Pairing.CanPair)
{
//var result = await item.Pairing.PairAsync();
var customPairing = item.Pairing.Custom;
customPairing.PairingRequested += CustomPairing_PairingRequested;
var result =
await customPairing.PairAsync(DevicePairingKinds.ProvidePin);
customPairing.PairingRequested -= CustomPairing_PairingRequested;
if ((result.Status == DevicePairingResultStatus.Paired) ||
(result.Status == DevicePairingResultStatus.AlreadyPaired))
{
this.Frame.Navigate(typeof(DevicePage), item);
}
}
else if (item.Pairing.IsPaired == true)
{
this.Frame.Navigate(typeof(DevicePage), item);
}
}
private void CustomPairing_PairingRequested(
DeviceInformationCustomPairing sender, DevicePairingRequestedEventArgs args)
{
args.Accept("123456");
}
You can see that we used Custom property in order to invoke custom pairing process. Using this property and PairAsync method there we can activate pairing process. It will generate a special event PairingRequested where we can provide all needed information. In our case we simply use Accept method with the pin as a parameter.
Of course, Microsoft try to avoid any security issues with pairing. So, even in the case of custom pairing users will be able to see a notification window:
One more benefit due to pairing is ability to use a watcher to list services. In the previous example we used a snapshot of all services, but in the real life this process may take some time or some services may be available later. Using a watcher, you can control the process showing progress and all recognized services dynamically. Below you can find modified code that uses DeviceWatcher class to list all services for a selected device:
public async void StartReceivingData()
{
leDevice = await BluetoothLEDevice.FromIdAsync(device.Id);
string selector = "(System.DeviceInterface.Bluetooth.DeviceAddress:=\"" +
leDevice.BluetoothAddress.ToString("X") + "\")";
watcher = DeviceInformation.CreateWatcher(selector);
watcher.Added += Watcher_Added;
watcher.Removed += Watcher_Removed;
watcher.Start();
timer.Interval = new TimeSpan(0, 0, 1);
timer.Tick += Timer_Tick;
timer.Start();
}
private async void Watcher_Removed(DeviceWatcher sender,
DeviceInformationUpdate args)
{ }
private async void Watcher_Added(DeviceWatcher sender, DeviceInformation args)
{
var service = await GattDeviceService.FromIdAsync(args.Id);
if (service!=null)
{
switch (service.Uuid.ToString())
{
case SensorUUIDs.UUID_ENV_SERV:
InitializeTemperatureSensor(service);
InitializePressureSensor(service);
break;
case SensorUUIDs.UUID_ACC_SERV:
InitializeAccelerationSensor(service);
break;
}
}
}
You can see that code is not very complex, but you can extend your UI now showing progress.


