Intel® SCS Add-on 2.1 and SC2012 R2 ConfigMgr Integration (RCS Database mode) - Part 3
Intel AMT Profile Creation
For details about creating an Intel AMT profile, please refer to Intel(R)_SCS_Addon_SCCM_2012.pdf document included in the Intel SCS Add-on for Microsoft System Center Configuration Manager package.
1. Run [Intel SCS Console] and click on [Profiles].
2. Click on the “+” button.

3. Type as the following and click [OK].
[Profile Type] = “Intel AMT”
[Profile Name] = “Contoso_RCS_AMT_Profile”
Important Note: Don’t use spaces in the profile name.
4. Select [Configuration/Recofiguration and click [Next].
5. Check the next 3 options and click [Next].
- Active Directory Integration
- Access Control List (ACL)
- Transport Layer Security (TLS)

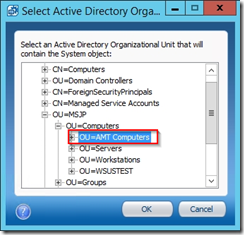
6. Select [Active Directory OU] by clicking on […] button.
7. Select the OU create in AD Configuration of Part 1 called [AMT Computers] then click [OK].

8. Click [Next].
9. Click [Add].
10. Click on [Browse]
11. Type the AMT admin group(SC2012CM R2 AMT Administrators) and click [OK].
12. Select [Both] for “Access type” and select [PT Administration] for “Realms”

13. Click [Next]
14. In the [Select the method for creating the certificate], select ”Request certificate from Microsoft CA”, as [Certificate Authority], select the CA server.
In the [Server Certificate Template], select “AMTClientConfigurationCertificate”. Click on [Next].

15. In the [Intel MEBX Password] field, type the password like ”P@ssw0rd”.
Select [Using the following password for all systems] and type the password ”P@ssw0rd”.
Check [Enable Intel AMT to respond to ping requests] and click [Next].
