Surfacing business data in Word 2010 using External Data Columns and the External Item Content Control.
Another post for BCS… this is Juan Balmori, I’ve being working in the SharePoint 2010 release on how to simplify customers lives by using data from external systems in Office client applications such as Word and Outlook. This time I am going to focus on how to pump business data into Word 2010. In order to be successful here you’ll need to understand the concept of External Data Columns (aka EDCs) and content controls.
In SharePoint 2010 there are three main artifacts you can use to play with external data: External Lists (which have being discussed in great detail on this blog), External Data Web Parts, and External Data Columns, the main subject of this blog entry. An External Data Column enables you to aggregate information from external systems into regular SharePoint lists, such as a document library. Typical scenario for this is to add a ‘Customer’ column (whose data lives in a CRM system) into document library that stores ‘Contracts’. This feature was previously shipped with MOSS 2007 as Business Data Column (or BDIL), but this time you can pick the desired external data in Microsoft Word 2010 inside the document content (and not just resolve on the document properties panel).
We also learned that many users require embedding data from external systems into Word documents (i.e. customer and/or product names, prices info into purchase orders documents). Typically this implies switching to a complex backend system, finding the data you are interested, copying that data, switch back to word and paste and format the information there. We aimed to simplify that experience by making external data columns available as content controls inside Word 2010.
It is the combination of both concepts (EDCs and Content Controls) which makes it possible to have external data into Word! Now let’s clarify the concepts with a simple example:
Assuming you already have an External Content Type ‘Customer’ (from your CRM system) you want to create a document library of ‘Contracts’ and you need to add customer information on it (such as name, address, phone, etc.). You’ll need to follow these steps to pick a ‘Customer’ for the contract directly from the CRM system and within Word:
Create a ‘Contracts’ document library based on Microsoft Word documents.
Create an External Data Column ‘Customer’ to the list and configure it to use the ‘Customer’ ECT.
- Select the primary field: represents the field to be shown in the column and content control.
- Select the secondary fields: additional fields to be automatically filled upon primary field selection.
Edit the template associated with the document library and insert the EDC fields (by navigating to the document library settings, then select ‘Advanced settings” and finally click on the ‘Edit template’ option).
- Once in Word, on the Insert Tab -> Quick Parts -> Document Property dropdown you’ll find the primary and secondary fields that where defined on the ‘Contracts’ document library.
- Notice that the primary field is represented by the external item content control on the document. Secondary fields are represented as read-only text boxes.
Save the template.
Create a new document on the ‘Contracts’ document library
Use the external item content control to indicate the customer for this contract. If you are familiarized with the people picker, the you are going to love this content control which will enable you to either:
- Pick a customer for the contract: by clicking on the ‘Select’ button of the external item content control you’ll pop the external item picker that will let you choose the item, in this case customer that will sign the contract. There are a few important points you need to consider while designing an ECT that is desired to be used for picking purposes that directly impact the data that is shown and the behavior of the picker dialog:
- How the picker retrieves data: As you know BCS provides functionality to work offline by storing external data on the BCS client cache. The picker tries to search data as fast as possible so if the cache has data it will show what’s available there. Depending on the nature of the problem you are working on, for example if ‘Customers’ are added very frequently, the cache may not have the latest data available, and you may not find the item you are looking for. You’ll see a ‘More Results’ button on the picker dialog that will enable you to search beyond the cache and find more items online. By hitting the ‘More results’ button you’ll also refresh the cache with the latest data, so in subsequent picking operations you can find refreshed cached data.
- Read List Method (aka Finder) : The query that is going to be executed to get the initial set of items to be shown on the picker will be the default read list method, in the way described above.
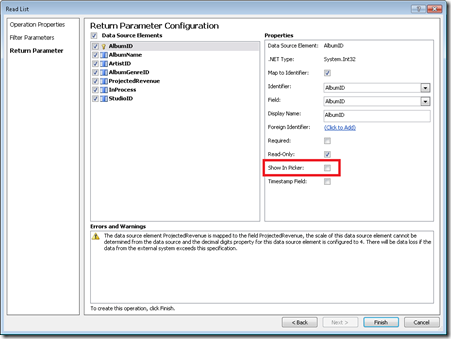
- Show in picker option: While designing an ECT you can configure which fields/columns are to be shown on the picker (for example Customer Name, Address, Phone, etc). Check those columns you would like to see by using the ‘Show in Picker’ option while designing your ECT on SharePoint Designer. If none is specified by default we’ll show all the columns of the ECT.

- Filter configuration: Always define filters so that you can narrow your search. Especially when working with high volume of items, there might be cases in which you may have millions of items to pick, we’ll show up to 200 items and if the query exceeds that, we’ll pop a warning to narrow your search criteria. We can only do this if you have defined filters on your finder, so use them, otherwise you can potentially not find the item you are looking for.
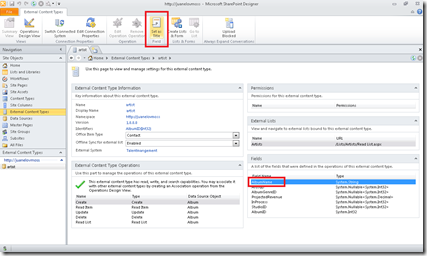
- Display name: Once you have picked (or resolved, see below) an item, the ‘Customer’ field that is going to appear in the content control is going to be the field specified as ‘Title’ (by default), unless in your model you have identified a display name field for that ECT. Set the title while designing your ECT on SPD o the operations design view, select the field and then click on the ‘Set as Title’ button.

- Resolve the customer: This option is useful if you know the identifier of the item of interest. For example you know in advance that customer Contoso’s ID is ‘123’ you can type it on the content control and hit resolve (or type ‘Ctrl + K’), if it exists it will show the field marked as ‘display name’. The other two options are that the item does not exist or that there are several items with that name, for example, ‘Contoso Inc’ and ‘Contoso Northwest’, if that’s the case a disambiguation dialog will be popped so that you can select the right item, this is when it’s important to have good fields to be ‘shown in picker’ so that you can decide which is the correct item to be selected. Whatever is used in the specific finder will serve as the key to match what you are looking for.
- Pick a customer for the contract: by clicking on the ‘Select’ button of the external item content control you’ll pop the external item picker that will let you choose the item, in this case customer that will sign the contract. There are a few important points you need to consider while designing an ECT that is desired to be used for picking purposes that directly impact the data that is shown and the behavior of the picker dialog:
That’s the basic functionality. You’ll probably have the following questions:
- Can I use Word to change the item values and update the external system? No, you cannot change the item on word. This is read only functionality. The columns on the list will be updated with the values picked in the document.
- How can I write back to the external systems on these scenarios then? What you can do is to create a workflow when the document is uploaded to the document library that will be capable of writing back to the LOB systems as JD describes on his workflow post.
- What happens if I forward the document to a colleague? The correct and recommended way to share a document is to provide the link to the document in the document library. That way, users will have full access to the functionality.If you copy the document in a share or send it as an e-mail the following scenarios may happen:
Scenario |
Behavior |
Recipient has Word 2010, BCS installed and data on the cache |
Users will be able to read the data in the document and pick and resolve from the cache, they can upload the document manually to the library. Document will replace existing copies. |
Recipient has Word 2010, BCS installed and an empty cache |
User will be able to read the data but will not be able to pick or resolve new data. |
Recipient has word but not BCS installed |
May receive prompts to install .NET framework 3.5. User will be able to read the data but will not be able to pick or resolve new data. |
User has Word 2007 |
User will be able to read the data but will not be able to pick or resolve new data, the external item picker control will not be shown. |
User has a previous version of Word. |
Data is read only as text. |
-Juan Balmori Labra, Program Manager
Comments
- Anonymous
February 18, 2010
These blogs are really helpful thanks for taking the time to share this information.In Office 2010 Professional Plus the Quick Part is fully functional however in Office 2010 Professional the "quick part" reports that I need to install the "BCS Rich Client Services"Will it be possible for Office 2010 Pro customers to download this installer or will they need to upgrade to Office Pro Plus?ThanksSteve Pearson - Anonymous
February 19, 2010
The comment has been removed
