Antimalware for Azure Cloud Services and Virtual Machines
 In a recent discussion the question was asked if we installed antimalware on the virtual machines that are used to provide Azure Cloud Services. This was a good question and probably one that you would ask yourself when planning and designing a PaaS solution in Microsoft Azure.
Do you know what the answer is? No fair if you read the title of this article ![]()
The answer is YES – we do support installing Microsoft Antimalware on the virtual machines that are used to support Cloud Services.
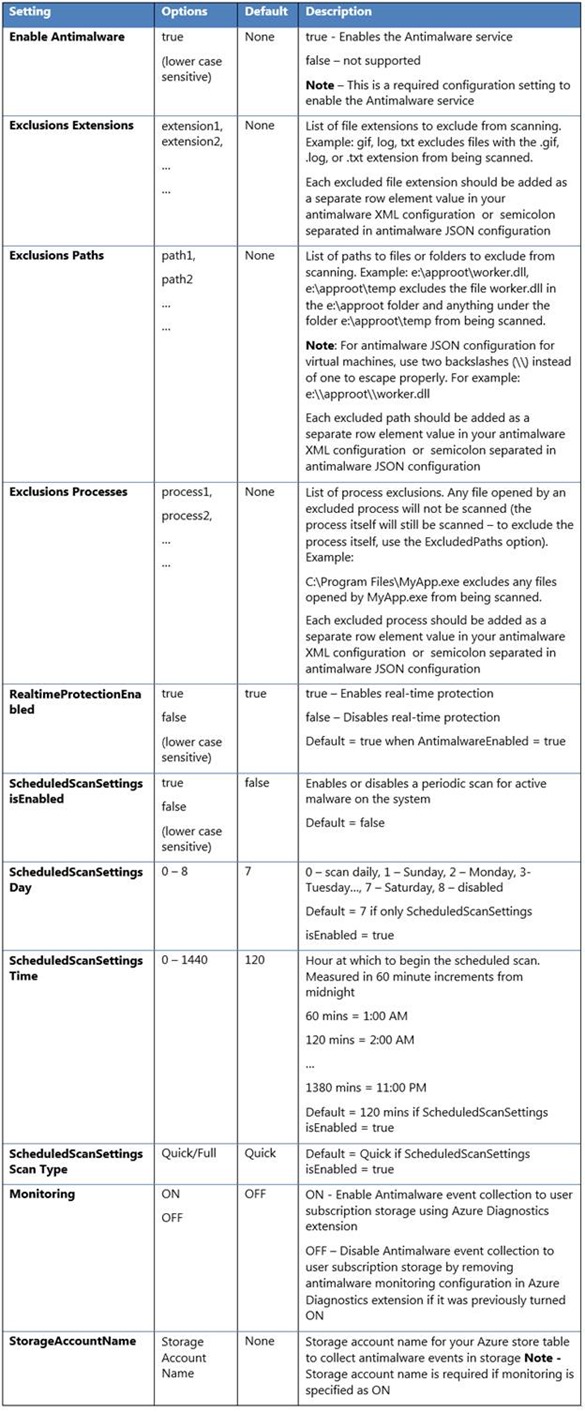
Default configuration settings, based on what we consider to be optimal for cloud environments, are applied when you enable Microsoft Antimalware on either Cloud Services or IaaS virtual machines. The figure below provides you details on the default settings:
Note that these are the default settings – you can customize them if the defaults don’t work for you.
There are a number of ways you can deploy Microsoft Antimalware into your Azure PaaS or IaaS environments:
- Use the Azure Portal and deploy to Azure Virtual Machines (IaaS)
- Use Visual Studio and deploy to Azure Virtual Machines (IaaS)
- Use PowerShell cmdlets and deploy to Azure Virtual Machines (Iaas)
- Use PowerShell cmdlets and deploy to Azure Cloud Services (PaaS)
- Use Azure Security Center and deploy to Azure Virtual Machines (IaaS)
You can get the details on how to deploy Microsoft Antimalware to Azure Cloud Services and Azure Virtual Machines in the paper Microsoft Antimalware for Azure Cloud Services and Virtual Machines. However, that paper was written prior to the public preview of Azure Security Center so it doesn’t cover how to use Azure Security Center to deploy Microsoft Antimalware.
Let’s take a look now at how easy it is to deploy Microsoft Antimalware to Azure Virtual Machines using Azure Security Center.
In the following example, I created a new Resource Group and then placed two new Windows based virtual machines into the Resource Group. I then enabled Azure Security Center data collection on my subscription so that Azure Security Center could install the agents required to get the information it needs to provide an assessment and recommendations. If you don’t know how to do this, check out the article Getting Started with Azure Security Center.
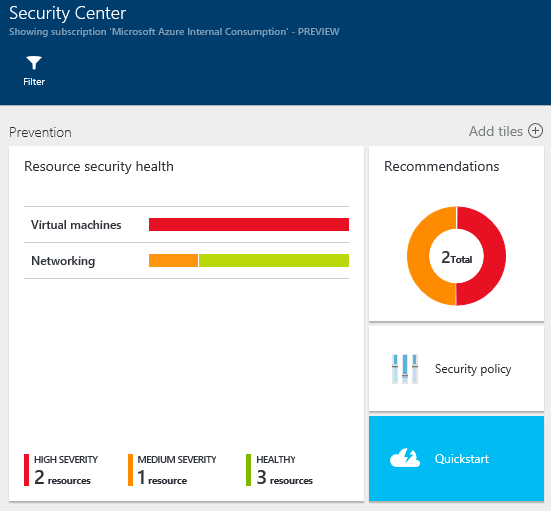
In the figure below, you’ll see that we’re in the Azure Security Center console and can see the Prevention pane. From this pane we can see that I have:
- Two high severity problems
- One medium severity problem
- Three health resources
I’m going to click on Recommendations and see what Azure Security Center thinks I should do with these new virtual machines.
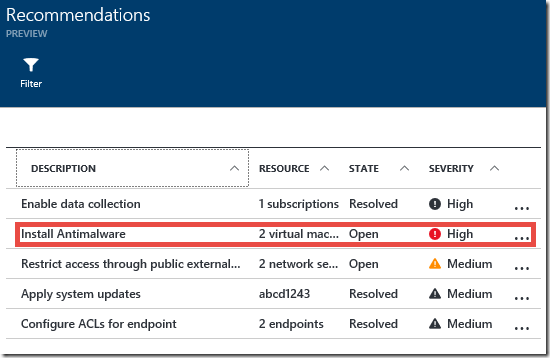
On the Recommendations blade we see that one of the recommendations is to Install Antimalware. We really want to do that since it’s labeled as High severity. Let’s click on that and see what happens.
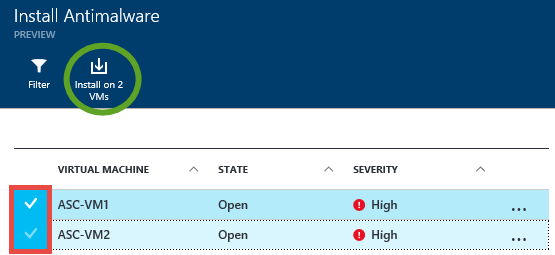
That brought up the Install Antimalware blade. Here we see the names of the two virtual machines that I installed in this subscription. One of the nice things about Azure Security Center is that you can install the antimalware on all the virtual machines in your subscription by just putting a checkmark to the left of the virtual machines names (I put a RED box around where you put the checkmarks).
After you put the checkmarks in, click the Install on 2 VMs button (which I’ve circled in GREEN; also note that the number will change based on the number of VMs that have checkmarks next to them).
On the New Resource blade, it looks like we have another decision to make: what brand of antimalware do we want to install? At the time I wrote this blog post, there were two choices:
- Deep Security Agent, from Trend Micro
- Microsoft Antimalware, from Microsoft
In this example we’ll select the Microsoft Antimalware (but feel free to select Deep Security Agent if you like that better).
Whoa! The Microsoft Antimalware blade has a lot of text on it. The good news is that this is a lot of useful text. Make a note of what is said here, because you’ll want to refer back to it when it comes time to customize the antimalware settings and to enable antimalware event collection. We’ll do another blog post on that soon (it’s not too complex – but I want to focus on the deployment in this article).
I’ll click on the Create button at the bottom of the page and let’s see what happens.
What happens is that the Add Extension blade appears. This is where you can customize the configuration of the antimalware agent. I’m not going to change anything here, so I’ll just click OK.
That begins the installation. I’ve only got two virtual machines to deploy the antimalware on, so this should go pretty quick. You can see in the upper right corner of the console that Azure Security Center has Started antimalware installation. Yay!
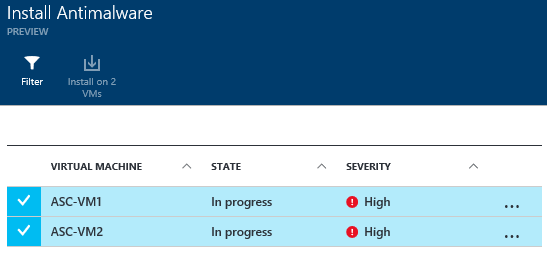
Let’s go back to the Install Antimalware pane and check on something. We still see the names of the two virtual machine and the State has changed to In progress. Sounds good to me! I did get curious and so I clicked on one of the virtual machines to see if I could get more info.
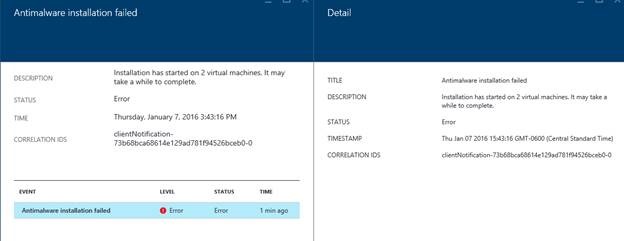
Yikes! I found an error that said that Antimalware installation failed. Oh no! But, remember, we are in PUBLIC PREVIEW now, and there are going to be some issues. So, let’s see if maybe we can end up with a happy ending.
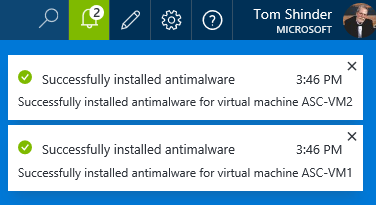
About 30 second later I saw what you see below. WHOOT! Like I said, during PREVIEW there might be minor glitches and you want to just go with the flow.
Just out of curiosity, I RDP’d into one of the virtual machines and voila! There was System Center Endpoint Protection listed as a new program in the virtual machine.
Of course, you could do this with PowerShell, and if you’re a well-heeled PowerShell pro you’re not going to have any problems with the deployment and customization. If you’re still working toward your PowerShell black belt, and want to get antimalware installed on a lot of virtual machines at the same time by just putting a checkmark next to their names, then Azure Security Center is a great way to go.
I hope you learned something new today about Azure antimalware and found this article useful. If you have any questions, just leave them in the Comments section below. We wait for this comments and check out inboxes many times a hoping to find an email saying that you left a comment.
Thanks!
Tom
Tom Shinder
Program Manager, Azure Security
@tshinder | Facebook | LinkedIn | Email | Web | Bing me! | GOOG me!
Comments
Anonymous
January 19, 2016
Hi Tom, I already have ConfigMgr 2012 R2 deploying Endpoint Protection to Azure IaaS VMs, but the portal doesn't show the VMs as having antimalware installed - is this a bug? I prefer to managed antimalware via ConfigMgr. Cheers, IanAnonymous
January 19, 2016
Hi Ian - Did you enable data collection? Thanks! -TomAnonymous
April 05, 2016
How can we uninstall this software? After installation it knocked out McAfee Enterprise Scan and we are unable to uninstall EndPoint Protection.- Anonymous
April 12, 2016
Hi Sri -Have you called Microsoft support services? That's the best way to start and they will route the issue to the correct people.Thanks!Tom
- Anonymous
Anonymous
June 03, 2016
Tom,Is there a github with what the default configuration is? If we go the custom route, are there specific exclusions we need from an Azure perspective (IE: do we need to exclude the other extensions from being scanned, etc)?Also, is there a way to export the current configuration from a VM?Thanks,--Shamir- Anonymous
June 03, 2016
It seems like the default configuration is just {"runtimeSettings":[{"handlerSettings":{"publicSettings":{ "AntimalwareEnabled":true }}}]}Are there no exceptions required for any of the Azure agents, etc? That would be awesome, but I just want to double check if there are recommendations for a base Azure VM.Thanks--Shamir- Anonymous
June 09, 2016
Hi Shamir - good question. I don't think so but let me confirm. Thanks! -Tom.
- Anonymous
- Anonymous
June 09, 2016
Hi Shamir - another good question. I'll see if I can find out. Thanks! -Tom.
- Anonymous
