How to register U-SQL Assemblies in your U-SQL Catalog
U-SQL's extensibility model heavily depends on your ability to add your own custom code. Currently, U-SQL provides you with easy ways to add your own .Net-based code, in particular C#, but you can also add custom code written in other .Net languages, such as VB.Net or F#. You can even deploy your own runtime for other languages, although you will need to still provide the interoperability through a .Net layer yourself (I have a blog post on how to do this for another language like JavaScript in my backlog). If you want us to support a specific language, please file a feature request and/or leave a comment below.
In this blog post we will cover the following aspects:
- What is the difference between Code behind and Assembly registration through ADL Tools in Visual Studio?
- How do I register assemblies via ADL Tools in Visual Studio and in U-SQL scripts?
- How do I register assemblies that use other .Net assemblies (based on the JSON and XML sample library)?
- How do I register assemblies that use native C++ assemblies (using the SQL Server 2016 Spatial Type assembly from the feature pack)?
- Some comments on Assembly versioning and other interesting tidbits
What is the difference between Code behind and Assembly registration through ADL Tools in Visual Studio?
The easiest way to make use of custom code is to use the ADL Tools for VisualStudio's code-behind capabilities.
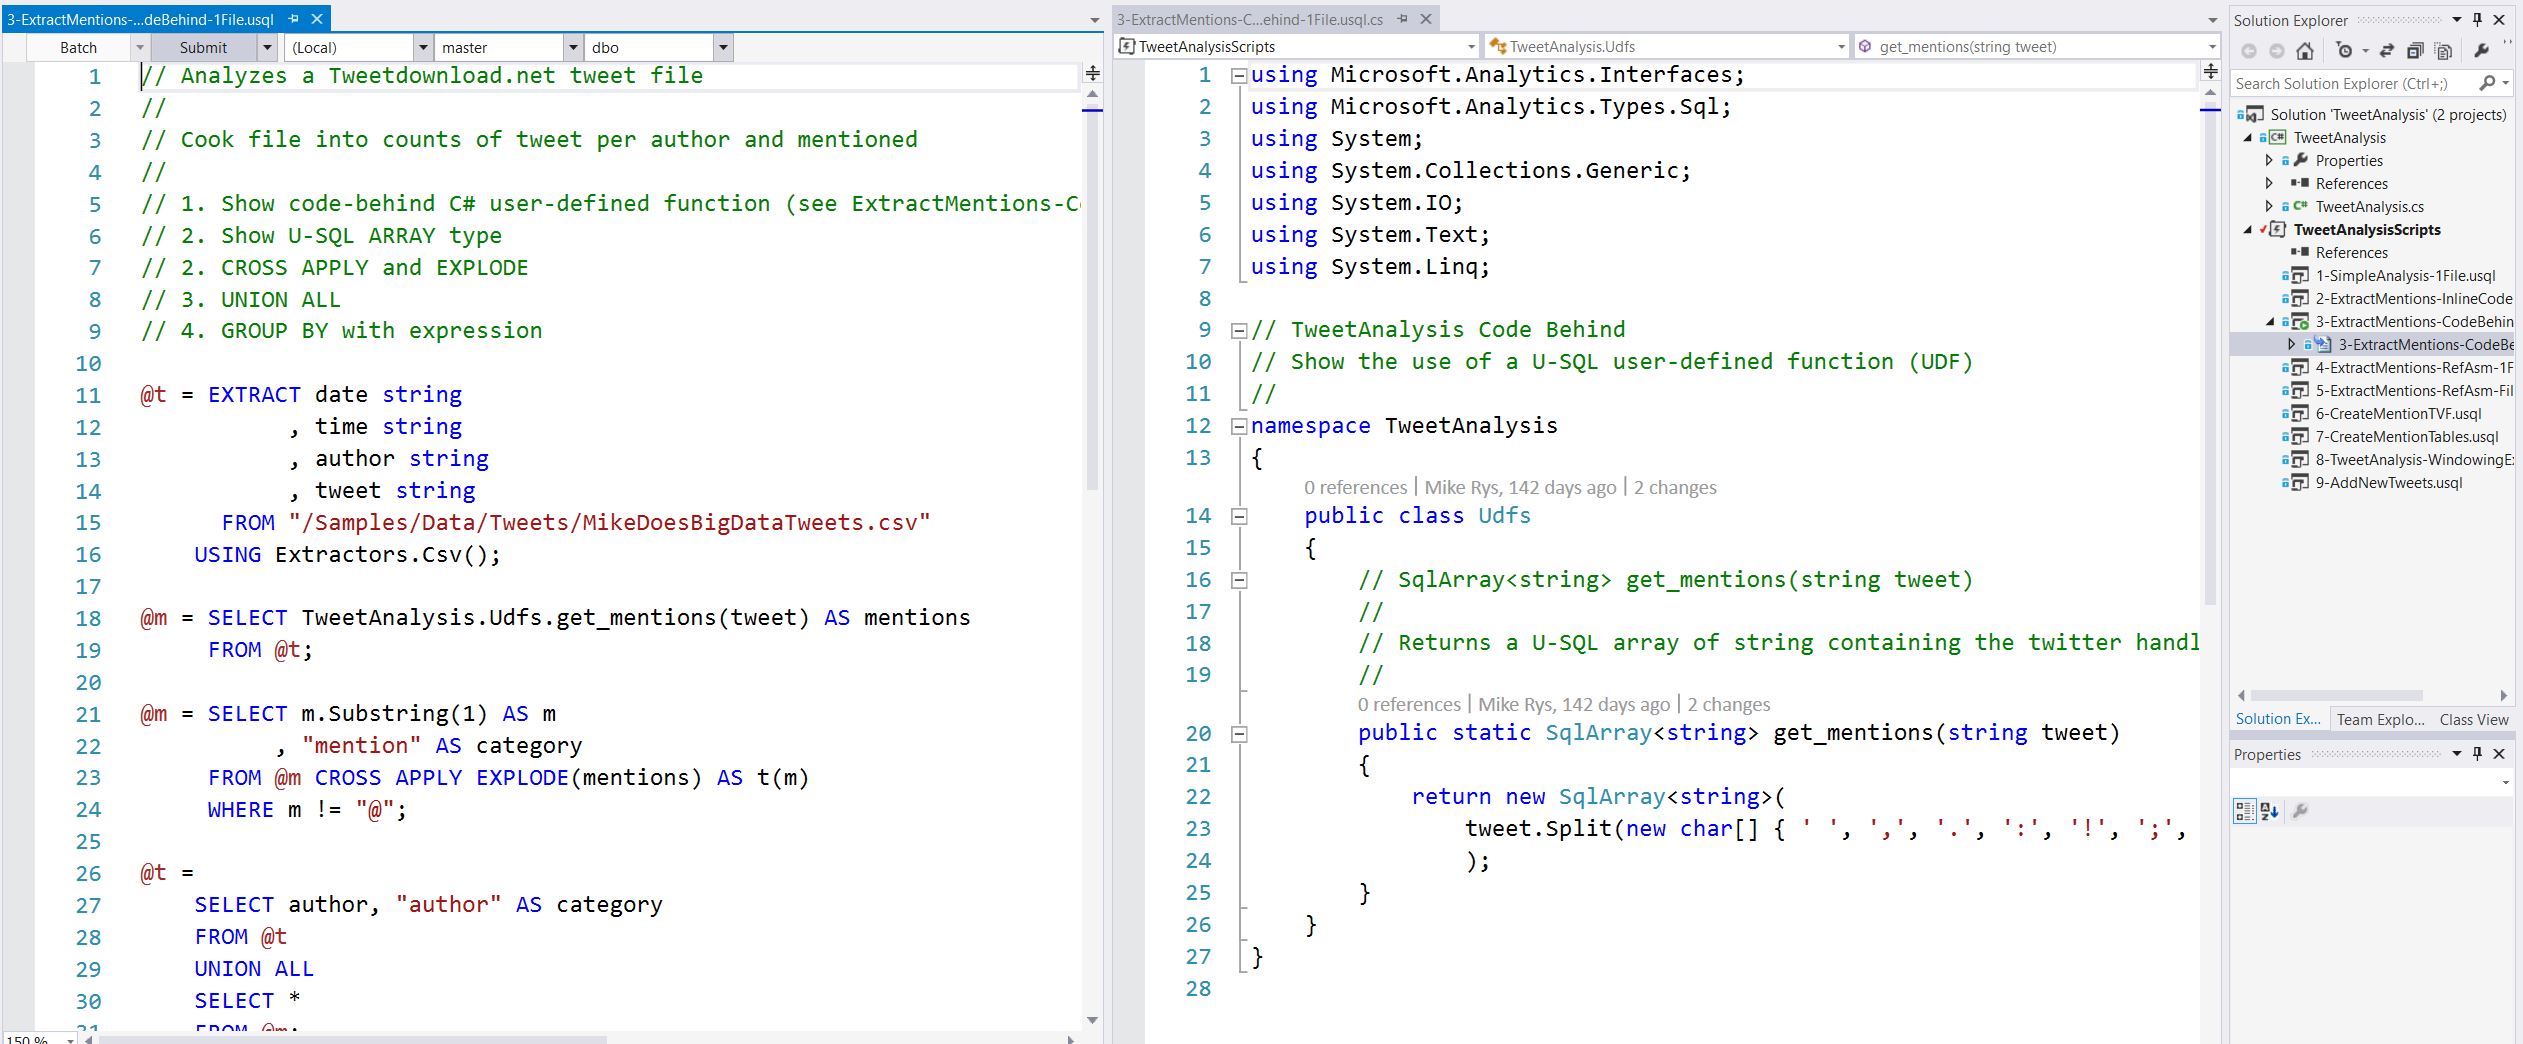
You fill in the custom code for the script (e.g., Script.usql) into its code-behind file (e.g., Script.usql.cs). See Figure 1.
Figure 1: Code-behind example in ADL Tools in VS (click on image to enlarge, sample code is available here)
The advantage of code-behind is, that the tooling is taking care of the following steps for you when you submit your script:
- It builds the assembly for the code-behind file
- It adds a prologue to the script that uses the
CREATE ASSEMBLYstatement to register the assembly file and usesREFERENCE ASSEMBLYto load the assembly into the script's context. - It adds an epilogue to the script that uses
DROP ASSEMBLYto remove the temporarily registered assembly again.
You can see the generated prologue and epilogue when you open the script:
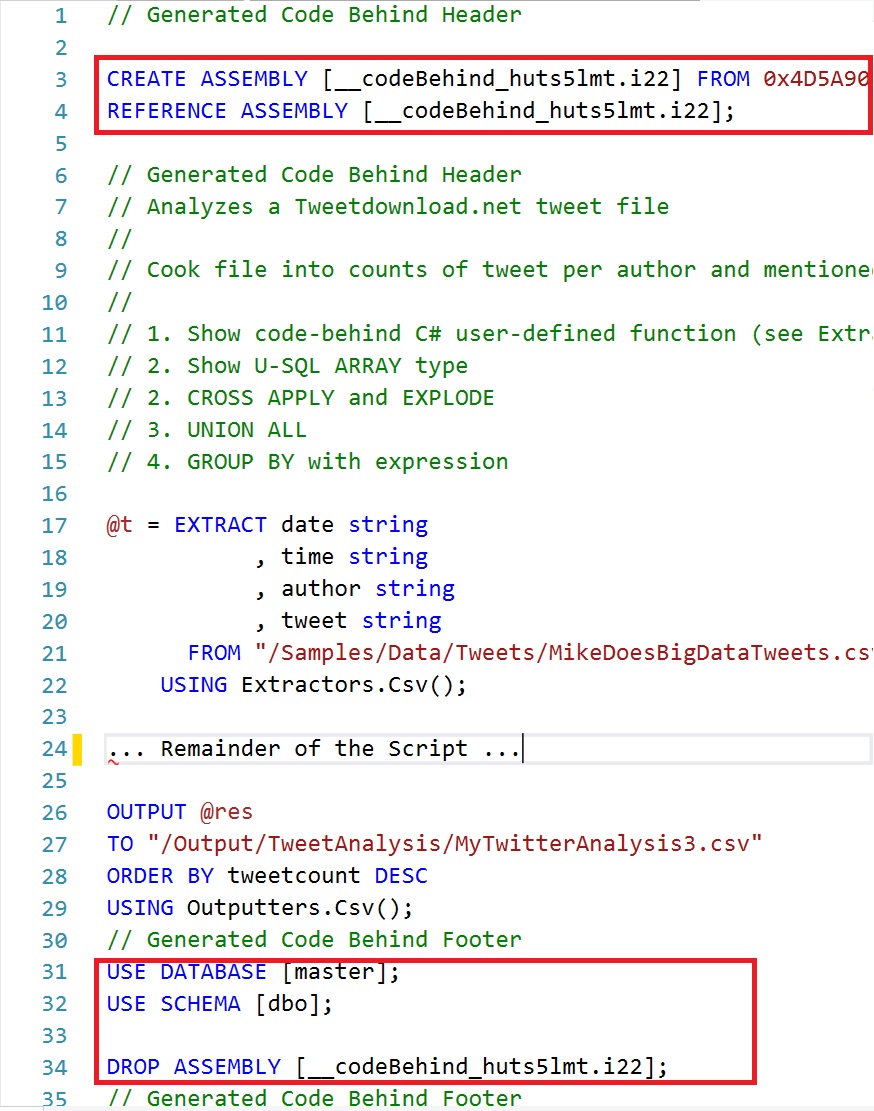
Figure 2: Auto-generated prologue and epilogue for code-behind
Some of the drawbacks of code-behind are
- that the code gets uploaded for every script submission<
- that the functionality cannot be shared with others.
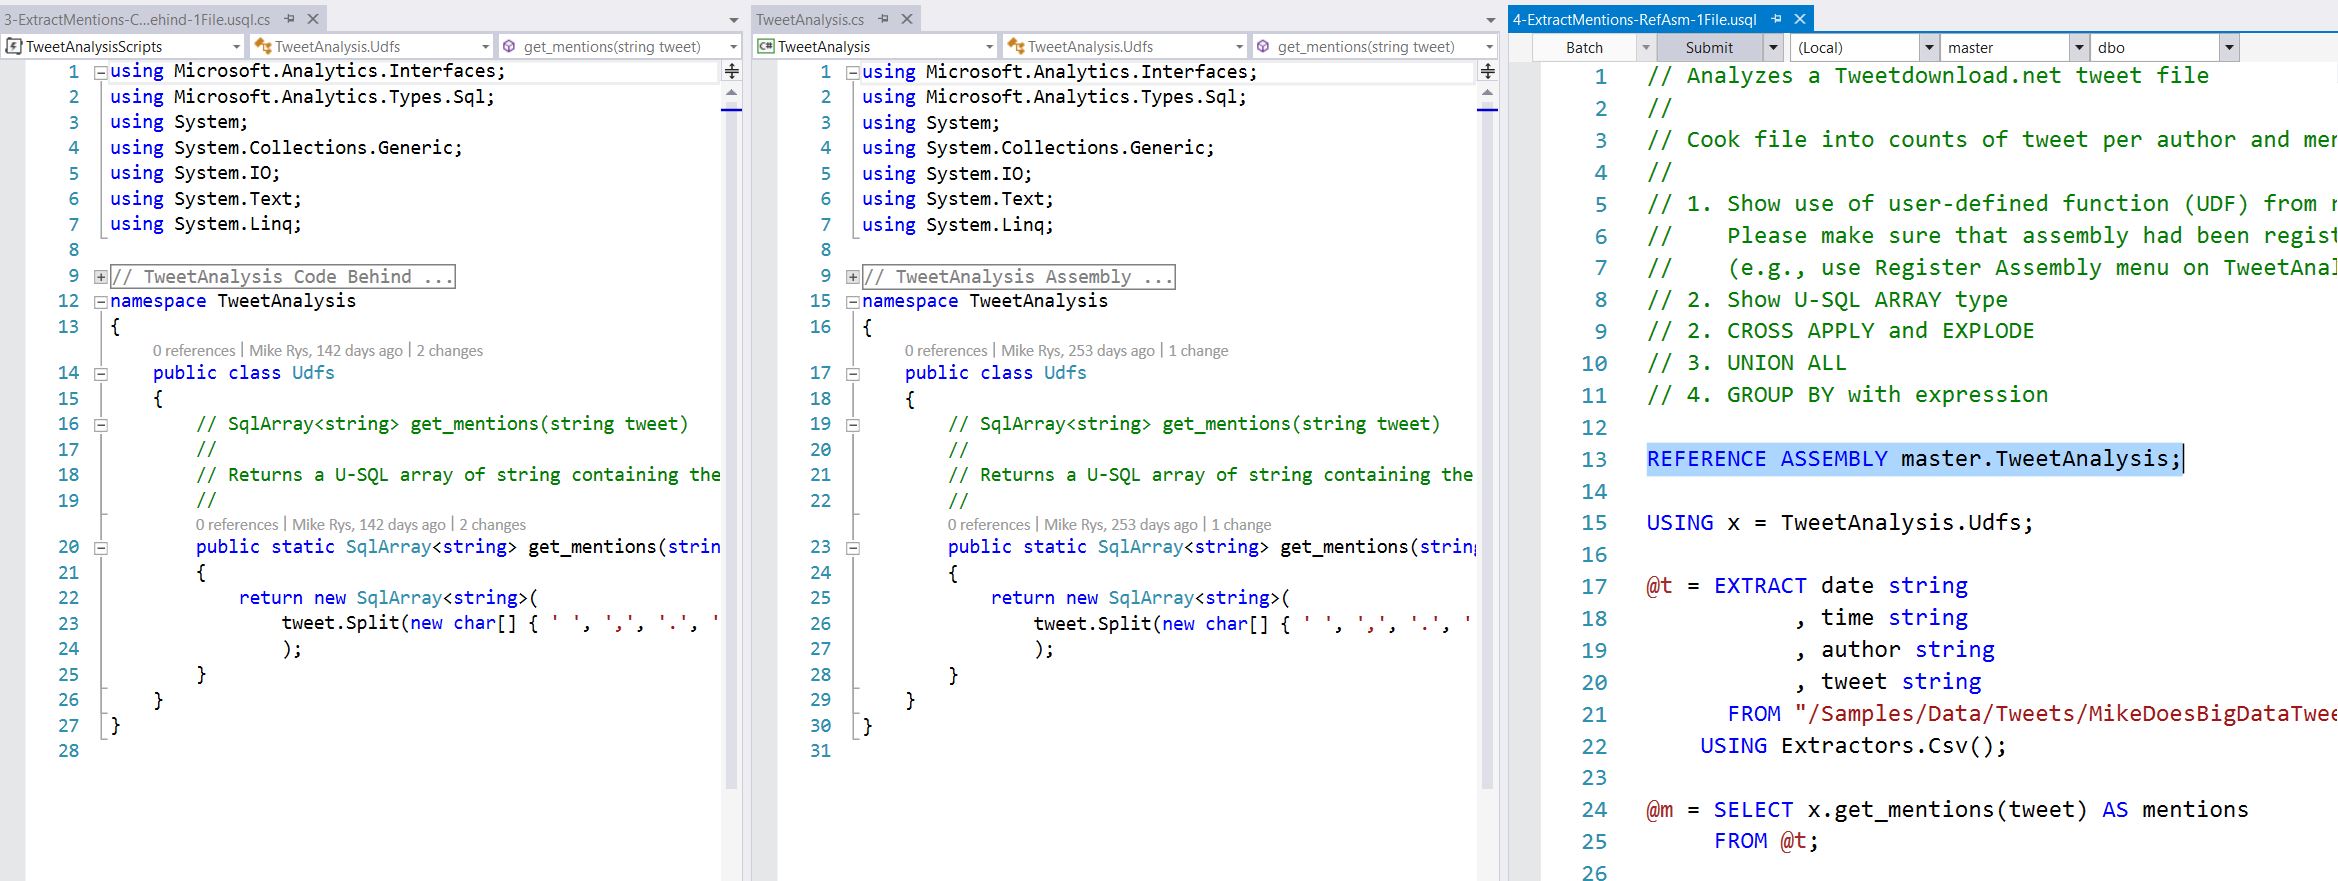
Thus, you can add a separate C# Class Library (for U-SQL) to your solution (see Figure 3), develop the code or copy existing code-behind code over (no changes in the C# code required, see Figure 4), and then use the Register Assembly menu option on the project to register the assembly (see Step 1 in Figure 5).
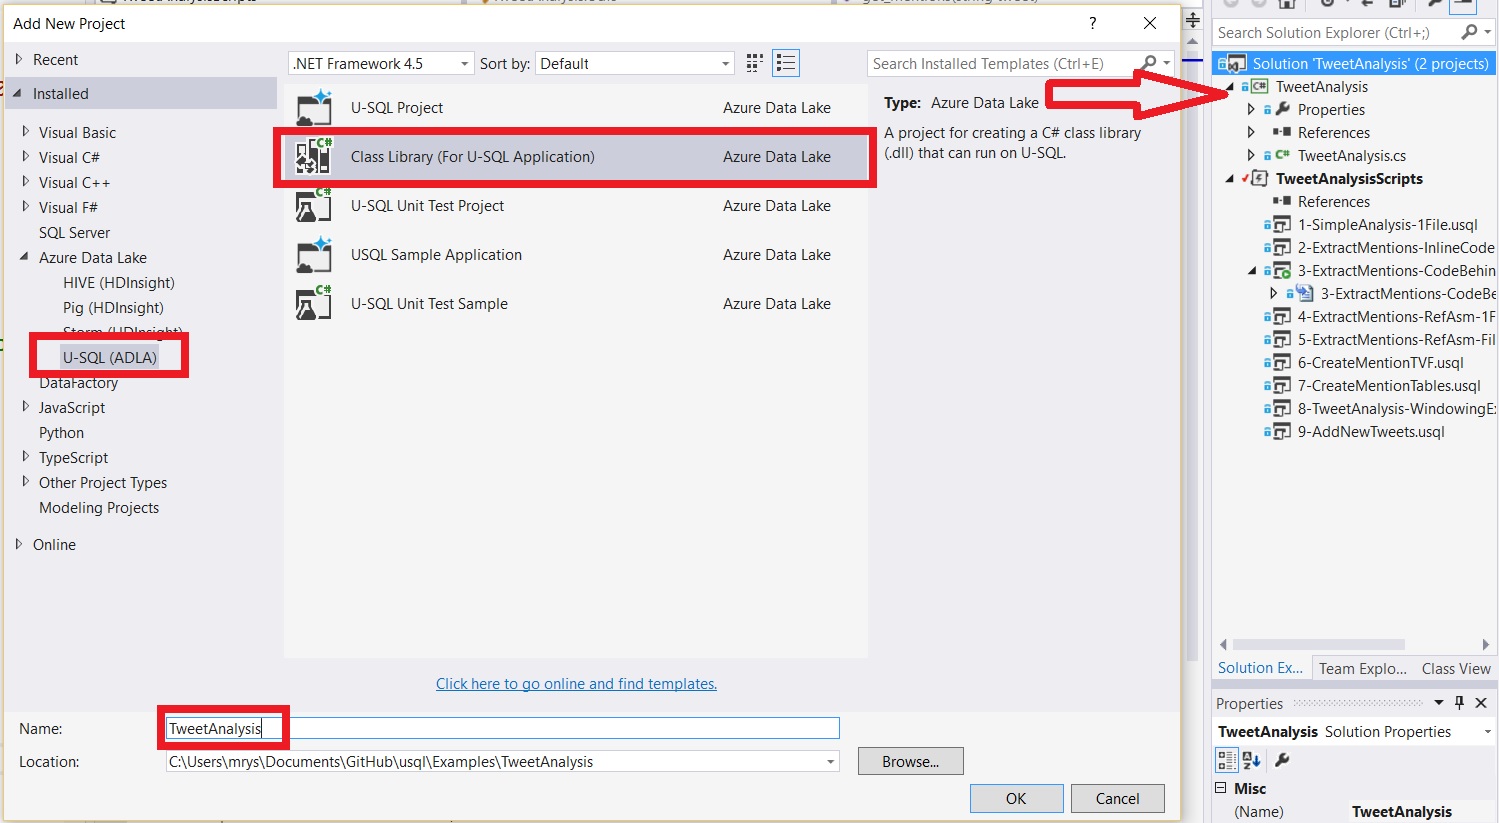
Figure 3: Creating a U-SQL C# code project.
Figure 4: The U-SQL C# class library next to the code-behind file.
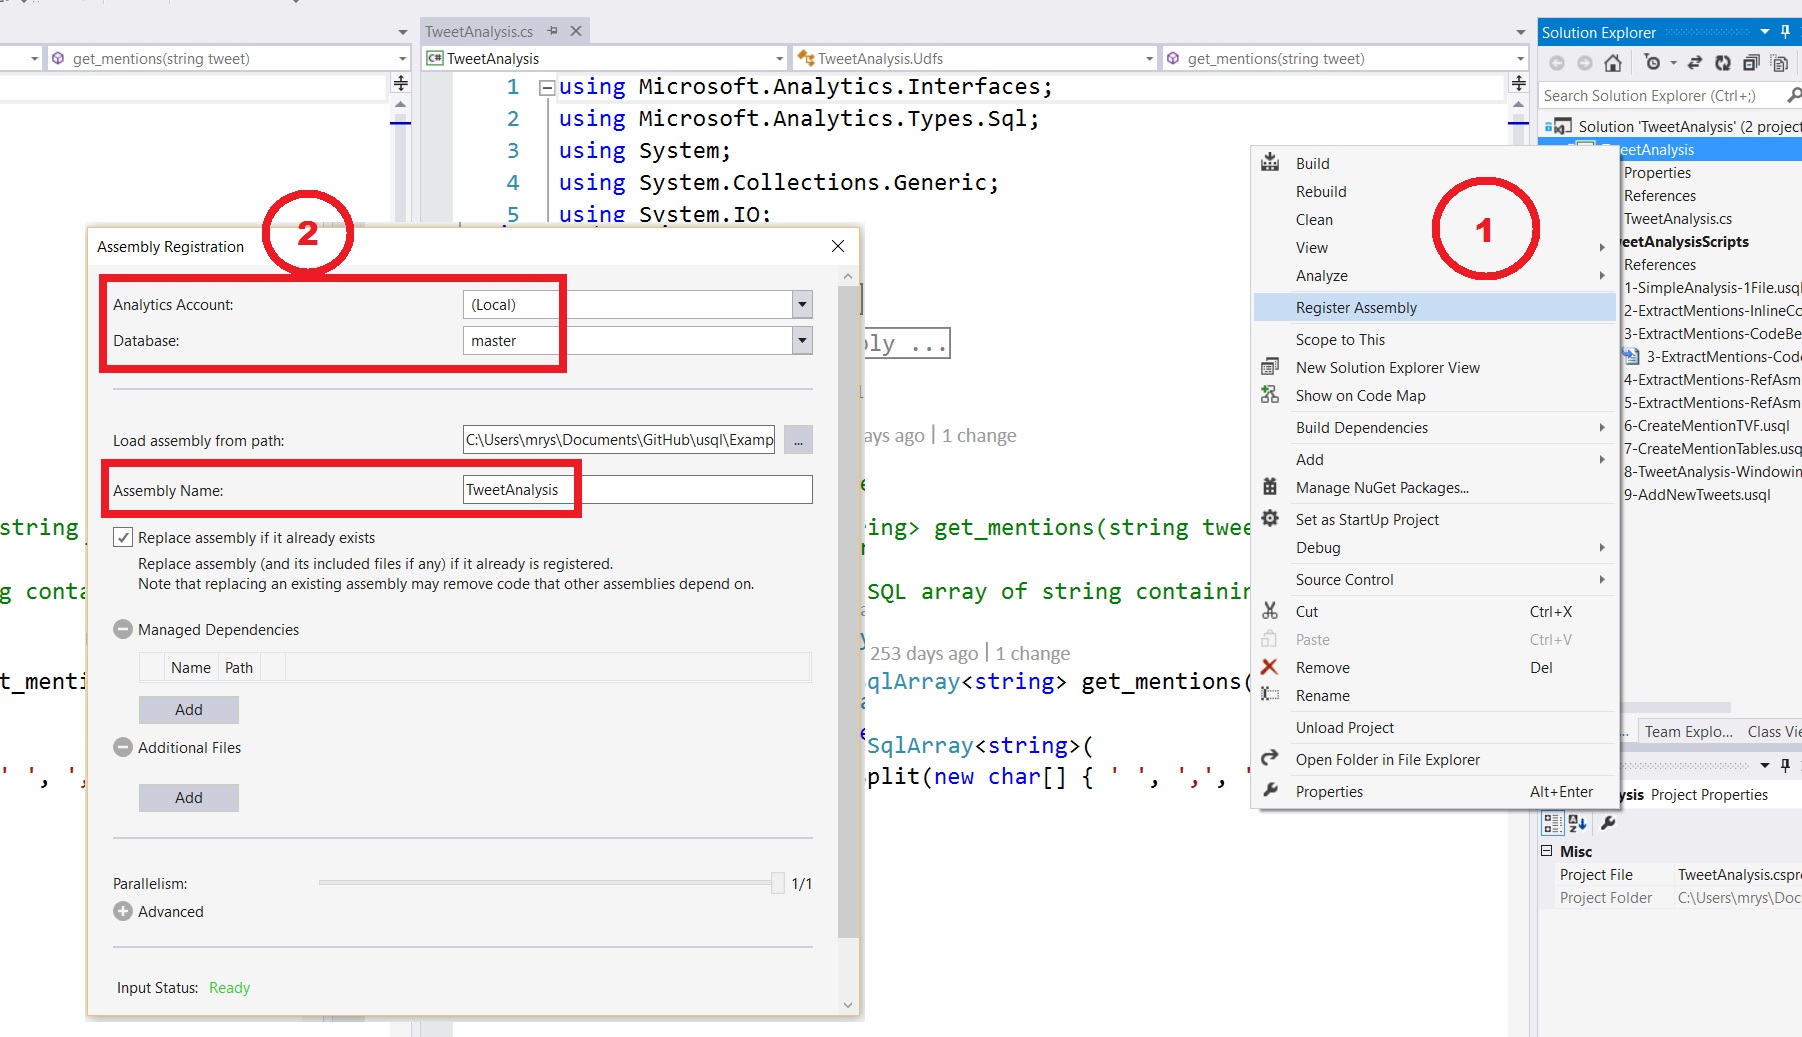
Figure 5: How to register the U-SQL C# code project
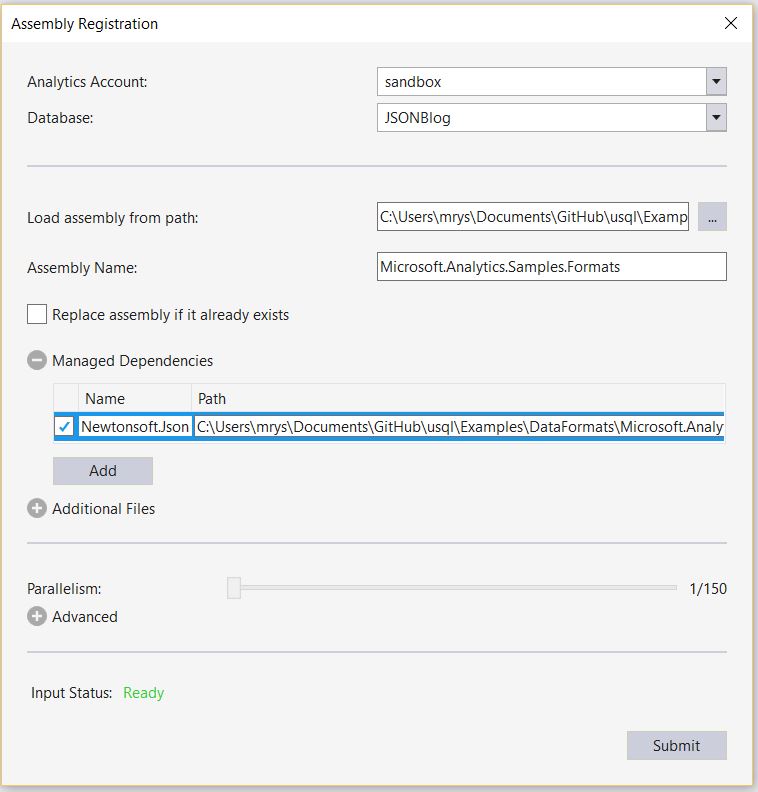
The registration dialog box (see Step 2 in Figure 5) gives you the option on where to register the assembly (which Data Lake Analytics account, which database) and how to name it (the local assembly path gets filled in by the tool). It also provides an option to re-register an already registered assembly, and it provides two options to add additional dependencies:
- Managed Dependencies: Shows the additionally needed managed assemblies. Each selected assembly will be registered individually and will become referenceable in scripts. You use this for other .Net assemblies
- Additional Files: Allows you to add additional resource files that are needed by the assembly. They will be registered together with the assembly and automatically loaded when the assembly gets referenced. You use this for config files, native assemblies, other language runtimes and their resources etc.
We will make use of both of these options in the examples below. The recent blog post on image processing is another example showing the use of a predefined assembly that can use these options for registration.
Now you can refer to the registered assemblies from any U-SQL script that has permissions to the registered assemblies' database (see the code in the U-SQL script in Figure 4). You will have to add a reference for every separately registered assembly. The additional resource files will automatically be deployed. Note that that script should not have a code-behind file for the code in referenced assemblies anymore, but can still provide other code.
How do I register assemblies via ADL Tools in Visual Studio and in U-SQL scripts?
While the ADL Tools in VisualStudio make it easy to register an assembly, you can also do it with a script (in the same way that the tools do it for you) if you are for example developing on a different platform, have already compiled assemblies that you just want to upload and register. You basically follow the following steps:
- You upload your assembly dll and all additionally required non-system dlls and resource files into a location of your choosing in your Azure Data Lake Storage account or even a Windows Azure Blob Store account that is linked to your Azure Data Lake account. You can use any of the many upload tools available to you (e.g., Powershell commands, VisualStudio's ADL Tool Data Lake Explorer upload, your favorite SDK's upload command or through the Azure Portal).
- Once you have uploaded the dlls, you use the
CREATE ASSEMBLYstatements to register them.
We will use this approach in the spatial example below.
How do I register assemblies that use other .Net assemblies (based on the JSON and XML sample library)?
Our U-SQL Github site offers a set of shared example assemblies for you to use. One of the assembly, called Microsoft.Analytics.Samples.Formats provides extractors, functions and outputters to handle both JSON and XML documents. The Microsoft.Analytics.Samples.Formats assembly depends on two existing domain-specific assemblies to do the processing of JSON and XML respectively. It uses the Newtonsoft Json.Net library for processing the JSON documents, and it uses the System.Xml assembly for processing XML. Let us use it to show how to register them and use the assemblies in our scripts.
First we download the VisualStudio project to our local development environment (e.g., with making a local copy with the GitHub tool for Windows). Then we open the solution in VisualStudio, right click on the project as explained above to register the assembly. While this assembly has two dependencies, we only have to include the Newtonsoft dependency since System.Xml is available in the Azure Data Lake already (it will have to be explicitly referenced though). Figure 6 shows how we name the assembly (note that you can chose a different name without dots as well), and add the Newtonsoft dll as well. Each of the two assemblies will now be individually registered in the specified database (e.g., JSONBlog).
Figure 6: How to register the Microsoft.Analytics.Samples.Formats assembly from VisualStudio
If you or others, who you shared the registered assemblies with by giving them read access to the database, now want to use the JSON capability in your own scripts, you just add the following two references to your script:
REFERENCE ASSEMBLY JSONBlog.[NewtonSoft.Json];
REFERENCE ASSEMBLY JSONBlog.[Microsoft.Analytics.Samples.Formats];
And if you want to use the XML functionality, you add a system assembly reference and an assembly to the registered assembly:
REFERENCE SYSTEM ASSEMBLY [System.Xml];
REFERENCE ASSEMBLY JSONBlog.[Microsoft.Analytics.Samples.Formats];
For more details on how to use the JSON functionality, see this blog post.
How do I register assemblies that use native C++ assemblies (using the SQL Server 2016 Spatial Type assembly from the feature pack)?
Now let's look at a slightly different scenario: Let's assume my assembly that I want to use has a dependency on code that is not .Net based, in particular, the assembly has a dependency on a native C++ assembly. An example of such an assembly is the SQL Server type assembly Microsoft.SqlServer.Types.dll that provides .Net based implementations of the SQL Server hierarchyID, geometry, and geography types to be used by SQL Server client-side applications for handling the SQL Server types (it was also originally the assembly providing the implementation for the SQL Server spatial types before the SQL Server 2016 release).
Let's take a look at how to register this assembly in U-SQL!
First, we download and install the assembly from the SQL Server 2016 feature pack. Please select the 64-bit version of the installer (ENU\x64\SQLSysClrTypes.msi), since we want to make sure that we have the 64-bit version of the libraries.
The installer installs the managed assembly Microsoft.SqlServer.Types.dll into C:\Program Files (x86)\Microsoft SQL Server\130\SDK\Assemblies and the native assembly SqlServerSpatial130.dll into \Windows\System32\. Now we upload the assemblies into our Azure Data Lake Store (e.g., into a folder called /upload/asm/spatial). Since the installer has installed the native library into the system folder c:\Windows\System32, we have to make sure that we either copy SqlServerSpatial130.dll out from that folder before uploading it, or make sure that the tool we use does not perform the File System Redirection of system folders. For example, if you want to upload it with the current VisualStudio ADL File Explorer, you will have to copy the file into another directory first, otherwise - as of the time of the writing of this blog - you will get the 32-bit version uploaded (since VisualStudio is a 32-bit application which does File System Redirection in its ADL upload file selection window) and when you run a U-SQL script that calls into the native assembly, you will get the following (inner) error at runtime:
Inner exception from user expression: An attempt was made to load a program with an incorrect format. (Exception from HRESULT: 0x8007000B)
After uploading the two assembly files, we now register them in a database SQLSpatial with the following script:
DECLARE @ASSEMBLY_PATH string = "/upload/asm/spatial/";
DECLARE @SPATIAL_ASM string = @ASSEMBLY_PATH+"Microsoft.SqlServer.Types.dll";
DECLARE @SPATIAL_NATIVEDLL string = @ASSEMBLY_PATH+"SqlServerSpatial130.dll";

CREATE DATABASE IF NOT EXISTS SQLSpatial;
USE DATABASE SQLSpatial;

DROP ASSEMBLY IF EXISTS SqlSpatial;
CREATE ASSEMBLY SqlSpatial
FROM @SPATIAL_ASM
WITH ADDITIONAL_FILES =
     (
         @SPATIAL_NATIVEDLL
     );
Note that in this case, we only register one U-SQL assembly and include the native assembly as a string dependency to the U-SQL assembly. In order to use the spatial assemblies we only need to reference the U-SQL assembly, and the additional file will automatically be made available for the assembly. Here is a simple sample script using the spatial assembly:
REFERENCE SYSTEM ASSEMBLY [System.Xml];
REFERENCE ASSEMBLY SQLSpatial.SqlSpatial;

USING Geometry = Microsoft.SqlServer.Types.SqlGeometry;
USING Geography = Microsoft.SqlServer.Types.SqlGeography;
USING SqlChars = System.Data.SqlTypes.SqlChars;

@spatial =
    SELECT * FROM (VALUES
                   // The following expression is not using the native DDL
                   ( Geometry.Point(1.0,1.0,0).ToString()),
                   // The following expression is using the native DDL
                   ( Geometry.STGeomFromText(new SqlChars("LINESTRING (100 100, 20 180, 180 180)"), 0).ToString())
                  ) AS T(geom);

OUTPUT @spatial
TO "/output/spatial.csv"
USING Outputters.Csv();
The SQL Types library has a dependency on the System.XML assembly, so we need to reference it. Also, some of the methods are using the System.Data.SqlTypes types instead of the built-in C# types. Since System.Data is already included by default, I just can reference to the needed SQL type. The code above is available on our Github site.
Some comments on Assembly versioning and other interesting tidbits
Let me add some additional interesting information about U-SQL assemblies.
Currently, U-SQL uses the .Net Framework version 4.5. So please make sure that your own assemblies are compatible with that version of the runtime!
As mentioned above, U-SQL runs code in a 64-bit (x64) format. So please make sure that your code is compiled to run on x64. Otherwise you will get the incorrect format error shown above!
Each uploaded assembly dll, resource file such as a different runtime, a native assembly, or config files etc can be at most 400MB and the total size of deployed resources either via the DEPLOY RESOURCE or via references assemblies and their additional files cannot exceed 3GB.
Finally, please note that each U-SQL database can only contain one version of any given assembly. For example, if you need both the version 7 and version 8 of the NewtonSoft Json.Net library, you will need to register them into two different databases. Furthermore, each script can only refer to one version of a given assembly dll. In this respect, U-SQL follows the C# assembly management and versioning semantics!
Comments
- Anonymous
November 23, 2016
I'm trying to register an assembly (U-SQL Class Library), but in the Assembly Registration dialog when I change the ADLA Account from Local to my ADLA account, the Input Status changes from "Ready" to "Not ready to submit registration". Why?- Anonymous
November 23, 2016
Dear MagnusThanks for the question!It looks like the tooling has an issue at the moment. Does closing the dialog and then opening it again resolve the problem? I forwarded the issue to the team to take a look and fix it.- Anonymous
November 24, 2016
Hi Michael,No, I've opened and closed it several times and also tried with different ADLA accounts, but with the same result.I solved it by implementing a U-SQL script and registering it "manually", i.e. using CREATE ASSEMBLY AssemblyName FROM "/assemblies/AssemblyName.dll";/Magnus
- Anonymous
- Anonymous
