Ruby on Rails in Windows Azure - Part 2 - Creating Windows Azure SDK 1.4 based Application to Host Ruby on Rails Application in Cloud
In the part 1 we have finished a Rails application name "RubyonAzure" as described in the link below:
Now to create Windows Azure Application, I took the Simon Davies written base sample from
the link below:
https://archive.msdn.microsoft.com/railsonazure
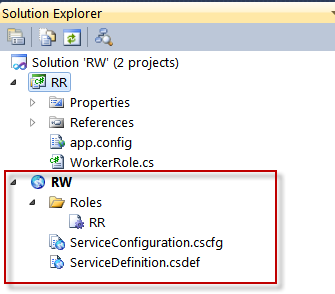
I am using the Simon Davies sample base application and then making changed to get it working on Ruby 1.9.2 and Rails 3.0.7. The solution in VS2010 looks as
below:

If you open the RR application you
will see two folders:
1.
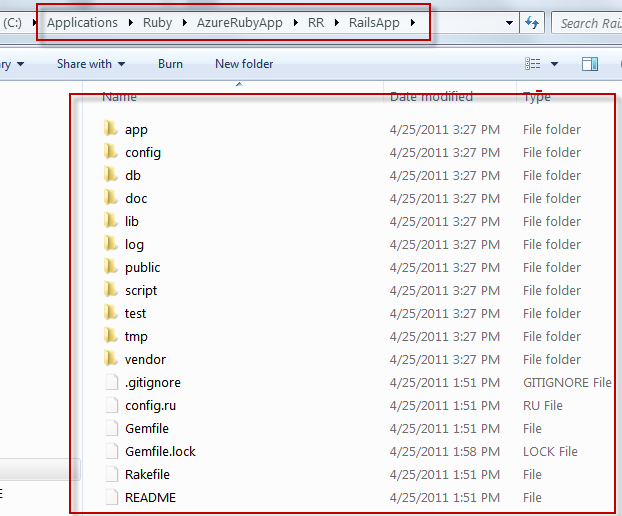
RailsApp folder: It will include your Rails Application
2.
Ruby Folder: This will include
Ruby\Bin and Ruby\Lib folder

Now include the Ruby\Bin and
Ruby\Lib files in above Ruby Folder:
Note: Please remove the following
folder as this is not needed and your package will be very smaller
comparatively.
ruby\gems\1.9.1\doc

Now copy RubyonAzure project in
“RailsApp” folder:

Now let’s include “Ruby” Folder
in the VS2010 Solution as below:
Note: Ruby\lib folder is about 90MB so
it will take good amount of time to include this folder in the VS2010 solution.
If you remove \Ruby\lib\ruby\gems\1.9.1\doc from the original Ruby\Lib
folder it will take about 1 hours to add all the files from the Ruby\Lib
folder.

Now let’s Include RailsApp folder
in the Solution as below:

Now Open the Service
Configuration (ServiceConfiguration.cscfg) and add the following:
 <?xml version="1.0"?>

<ServiceConfiguration serviceName="RW" xmlns="https://schemas.microsoft.com/ServiceHosting/2008/10/ServiceConfiguration">

  <Role name="RR">

    <Instances count="1" />

    <ConfigurationSettings>

      <Setting name="DiagnosticsConnectionString" value="DefaultEndpointsProtocol=https;AccountName=<Storage_Account_Name>;AccountKey=Storage_Account_Key” />

      <Setting name="StorageAccount" value="DefaultEndpointsProtocol=https;AccountName=<Storage_Account_Name>;AccountKey= Storage_Account_Key" />

      <Setting name="RubyFolder" value="Ruby" />

      <Setting name="AppFolder" value="RailsApp" />

      <Setting name="OutputContainer" value="testoutput" />

      <Setting name="Microsoft.WindowsAzure.Plugins.Diagnostics.ConnectionString" value="DefaultEndpointsProtocol=https;AccountName=<Storage_Account_Name>;AccountKey=Storage_Account_Key" />

      <Setting name="Microsoft.WindowsAzure.Plugins.RemoteAccess.Enabled" value="true" />

      <Setting name="Microsoft.WindowsAzure.Plugins.RemoteAccess.AccountUsername" value="avkash" />

      <Setting name="Microsoft.WindowsAzure.Plugins.RemoteAccess.AccountEncryptedPassword" value="***********************ENCRYPTED_PASSWORD**************************" />

      <Setting name="Microsoft.WindowsAzure.Plugins.RemoteAccess.AccountExpiration" value="2011-05-08T23:59:59.0000000-07:00" />

      <Setting name="Microsoft.WindowsAzure.Plugins.RemoteForwarder.Enabled" value="true" />

    </ConfigurationSettings>

    <Certificates>

      <Certificate name="Microsoft.WindowsAzure.Plugins.RemoteAccess.PasswordEncryption" thumbprint="*****************************************" thumbprintAlgorithm="sha1" />

    </Certificates>

  </Role>

</ServiceConfiguration>
Now Open Service Definition (ServiceDefinition.csdef)
and include the following:
 <?xml version="1.0" encoding="utf-8"?>

<ServiceDefinition name="RW" xmlns="https://schemas.microsoft.com/ServiceHosting/2008/10/ServiceDefinition">

  <WorkerRole name="RR" enableNativeCodeExecution="true">

    <ConfigurationSettings>

      <Setting name="DiagnosticsConnectionString" />

      <Setting name="RubyFolder" />

      <Setting name="AppFolder" />

      <Setting name="StorageAccount" />

      <Setting name="OutputContainer" />

    </ConfigurationSettings>

    <Endpoints>

      <InputEndpoint name="Server" port="80" protocol="tcp" />

    </Endpoints>

    <LocalResources>

      <LocalStorage cleanOnRoleRecycle="false" name="App" sizeInMB="200" />

    </LocalResources>

    <Certificates>

    </Certificates>

    <Imports>

      <Import moduleName="Diagnostics" />

      <Import moduleName="RemoteAccess" />

      <Import moduleName="RemoteForwarder" />

    </Imports>

  </WorkerRole>

</ServiceDefinition>
In the VS2010 based Solution, I
have already included the Ruby 1.9.2 and Rails 3.0.0 which is located in Ruby folder. Your RubyonRails application is
located in RailsApp folder inside
the application.
Worker Role Source Study:
Step 1: When the Worker Role
Starts, we copy Ruby + Rails files and our Ruby app application in two sub
steps:
1.
In step 1, we copy Ruby (Bin and
Lib) folder to Worker Role Local storage folder name \Ruby
2.
In step 2, we copy our
RubyonRails application to Worker Role local Storage folder name \RailsApp
The code responsible for it is as
below:
 string rubyFolderName = RoleEnvironment.GetConfigurationSettingValue("RubyFolder");

if (localStorageRoot.FullName.EndsWith("\\") == false)

      this.rubyLocation=string.Format("{0}\\{1}",localStorageRoot.FullName,rubyFolderName);

else

      this.rubyLocation = string.Format("{0}{1}", localStorageRoot.FullName, rubyFolderName);

CopyFolder(string.Format("{0}\\{1}", this.roleRoot, rubyFolderName), this.rubyLocation);


string appFolderName = RoleEnvironment.GetConfigurationSettingValue("AppFolder");

if (localStorageRoot.FullName.EndsWith("\\") == false)

      this.appLocation = string.Format("{0}\\{1}", localStorageRoot.FullName, appFolderName);

else

      this.appLocation = string.Format("{0}{1}", localStorageRoot.FullName, appFolderName);

CopyFolder(string.Format("{0}\\{1}", this.roleRoot, appFolderName), this.appLocation);


this.endPoint  = RoleEnvironment.CurrentRoleInstance.InstanceEndpoints["Server"].IPEndpoint;


// Start the server

StartProcess();
Step 2: Once above Ruby + Rails
& our Ruby application copy process is completed we launch the Ruby
application as below:
ProcessStartInfo spawnedProcessInfo = new ProcessStartInfo();
spawnedProcessInfo.UseShellExecute = false;
spawnedProcessInfo.WorkingDirectory = this.appLocation;
spawnedProcessInfo.CreateNoWindow = true;
//string args = String.Format(@"script\server --port {0} --binding {1}", this.endPoint.Port, this.endPoint.Address); // This is old code
// changed by Avkash to get it working
string args = String.Format(@"script\rails server --port {0} --binding {1}", this.endPoint.Port, this.endPoint.Address);
LogInfo(@"Arguments: {0}", args);
spawnedProcessInfo.Arguments = args;
spawnedProcessInfo.FileName = Path.Combine(this.rubyLocation, @"bin\Ruby ");
spawnedProcessInfo.RedirectStandardError = true;
spawnedProcessInfo.RedirectStandardOutput = true;
//Run It
Process spawnedProcess = new Process();
spawnedProcess.ErrorDataReceived += new DataReceivedEventHandler(spawnedProcess_ErrorDataReceived);
spawnedProcess.OutputDataReceived += new DataReceivedEventHandler(spawnedProcess_OutputDataReceived);
spawnedProcess.StartInfo = spawnedProcessInfo;
if (spawnedProcess.Start()) // This line Execute the process as >Ruby script\rails server –-port <Role_Port> --binding <Role_IP_Address>
{
this.id = spawnedProcess.Id;
spawnedProcess.BeginErrorReadLine();
spawnedProcess.BeginOutputReadLine();
LogInfo("Process Id {0} Started",this.id);
}
Note: When you are running this
application in Development Fabric please set the following
<Setting name="DiagnosticsConnectionString" value="UseDevelopmentStorage=true”
/>
<Setting name="StorageAccount" value="UseDevelopmentStorage=true" />
Now run the application in the
development fabric and you will see the following results in Compute Emulator
UI:

Using the IP address and Port available
in Computer Emulator we can launch the browser to check our application:

Now you can package this
application and deploy on Cloud to test as below:
Note: Before packaging the
application, please be sure to set your data connection string to your correct
Windows Azure Storage
<Setting name="DiagnosticsConnectionString" value="DefaultEndpointsProtocol=https;AccountName=<Storage_Account_Name>;AccountKey=Storage_Account_Key” />
<Setting name="StorageAccount" value="DefaultEndpointsProtocol=https;AccountName=<Storage_Account_Name>;AccountKey=
Storage_Account_Key" />
<Setting name="Microsoft.WindowsAzure.Plugins.Diagnostics.ConnectionString" value="DefaultEndpointsProtocol=https;AccountName=<Storage_Account_Name>;AccountKey=Storage_Account_Key" />
After publishing the Windows Azure Application in cloud you can verify it running as below:

You can download the Windows Azure SDK 1.4 based VS2010 Solution from the link below (This sample includes Ruby 1.9.2 and Rails 3.0.7 package as well):
https://rubyonrailsinazure.codeplex.com/
Comments
Anonymous
December 14, 2011
It is nice that you could do this...but seriously why would you? Here are my recommended steps: heroku create git push heroku master go have a beer -ScottAnonymous
December 14, 2011
@scottw, You forgot "Step 3: Profit!" :)Anonymous
December 14, 2011
The comment has been removedAnonymous
December 14, 2011
The comment has been removedAnonymous
December 15, 2011
Step 1: Create a potentially clumsy workflow that supports something you really want (RoR on Azure) Step 2: Elicit feedback. Step 3: Smooth over the most painful pain-points. Step 4: Go back to Step 2 until sufficiently painless. Step 5: Profit! What MSFT is doing here is just pushing out v0.1, like you would expect a start-up to do. Deploying is a feature, after all. A lot of this looks automate-able. Hopefully, someone will actually work on convention-izing a bunch of the repetitive elements.Anonymous
December 15, 2011
Thank you so much for all your comments!! Your passion for RoR made you write these amazing comments and similar to my passion for RoR made me try running RoR in Azure. With the release of SDK 1.6, few steps above can be simplified as well. Yes, I do believe there are places where RoR deployment could be comparative much easier and less painful, however this blog is written to guide, someone who would want to use RoR in Windows Azure and my objective to help anyone who is interested in RoR and Azure. Once again, I love your passion for RoR and thank you so much for your comments!! AvkashAnonymous
July 10, 2012
um... windows azure is a fraction of the cost of even a 1 dyno heroku deployment with a database. (the free heroku setup only includes a 5 MEGAbyte database, so you HAVE to get the $15/mo shared database option) So that's a pretty strong "why would you"...