How to configure the Windows Server 2008 CA Web Enrollment Proxy
Hi all, Rob here again. I had a case recently where the customer wanted to have the Windows Server 2008 Certificate Authority website loaded on another machine.
For those of you that do not know, you can install the Windows Server 2008 CA web site pages on an alternate server from the CA. One reason why you might deploy this configuration is if you currently have a Windows 2000 / Window Server 2003 Certification Authority and need to be able to deploy certificates to Windows Vista and Windows Server 2008 machines via the CA web site pages. Another reason might be because you want to offer certificate enrollment to Internet-based users but do not want to expose your Certification Authority to the Internet.
While I was working with the customer I found quite a few different configurations that are possible with IIS7, but each configuration requires a different setup within Active Directory and IIS7.
Getting started
The first thing to be decided is which account will be used for the web application pool account.
- Network Service.
- A domain user account (also known as custom identity).
The easier configuration is to leverage Network Service as the application pool account for the CertSrv web site. However, if you plan on bringing up more than one web server and use a network load balancer in front of the web servers your only option is to use a domain user account for the application pool identity.
The second thing that needs to be decided is what type of delegation you require in the environment.
- Open Delegation (Need to have Domain Functional Level at least Windows 2000)
- Constrained Delegation (Need Domain Functional Level at least Windows Server 2003)
- Constrained delegation with Protocol Transition (Need to configure the website to use Basic Authentication)
I am not going to dig deeply into the differences between open and constrained delegation; you can view the Kerberos section of the AskDS blog. Basically, constrained delegation is more secure because you are limiting to what back end service the application is allowed to impersonate the user account to.
Installing the Certification Authority website pages
Alright, so you have made your decision on what type of delegation you want and what account you will be using for the Web Application Pool Identity. Let’s install the IIS components:
1. Launch Server Manager (servermanager.msc).
2. Click on the Add Roles link in the right hand pane.
Installation Figure 1 - Add Roles
3. Check Active Directory Certificate Services and click the Next button.
4. Uncheck Certification Authority and check Certification Authority Web Enrollment. You will see the pictured dialog box stating that IIS roles will need to be added, so click on the Add Required Role Services button, and then click the Next button.
Installation Figure 2 - Select Role Services
5. You will then be asked to select the Enterprise Certification Authority that the web enrollment pages should use.
6. Click the Browse button, and the Select Certification Authority dialog box will be shown listing all the Certification Authorities in the forest.
7. Select the Certification Authority and click on the OK button, and click the Next button.
Installation Figure 3 - Select Certification Authority
8. Next you will be taken to the list of Role Services for the Web Server (IIS).
9. Add any other role services that you might need to support for the CA Web Enrollment web site like maybe enabling Basic Authentication keep in mind that Windows Integrated Authentication is selected by default.
10. Then click the Next button.
11. Lastly it will show you a confirmation screen before actually installing the web pages and IIS as shown below.
Installation Figure 4 - Confirm Installation Options
The next sections are broken down first by what the IIS Application Pool Identity runs as and then what type of Kerberos delegation you require. You can skip to the section that is relevant to your environment.
Setting up with Application Pool Identity set to Network Service
This section will cover how to configure IIS and the Active Directory accounts to support Kerberos open delegation as well as constrained delegation when the application pool identity is setup for Network Service.
Configuring for open delegation when using Network Service for AppPool Identity
1. Open up Active Directory Users and Computers (DSA.MSC) and double click on the IIS Computer account.
2. Click on the Delegation tab, and select Trust this computer for delegation to any service (Kerberos only) .
Network Service Delegation 1 - Configure Computer for open delegation
3. Then click OK.
4. Next we need to open Internet Information Services (IIS) Manager snapin.
5. Navigate to the CertSrv web application in the tree view, and double click on Authentication.
6. You should see all the supported authentication types listed.
7. Right click on Windows Authentication and select Enable if not already done.
8. Right click on Windows Authentication and selected Advanced Settings…
Network Service Delegation 2 - Windows Authentication Advanced settings
9. Check Enable Kernel-mode authentication, and click the OK button.
Network Service Delegation 3 - Enable Kernel-mode Authentication
10. Reboot the IIS computer and you are ready to go.
Configuring for constrained delegation when using Network Service for AppPool Identity
If you need to support Basic Authentication on the website you will need to make sure that you configure constrained delegation with protocol transition. However, you will need to scroll down to section Configuring the web site to support Basic Authentication below for more steps required to support basic authentication.
1. Open up Active Directory Users and Computers and find the IIS computer account.
2. Double click on the IIS Computer account.
3. Click on the Delegation tab and select Trust this computer for delegation to specified services only
4. Once the above option selected, you need to make another choice of one of the following:
a. Use Kerberos only (Kerberos constrained delegation).
b. Use any authentication protocol (Kerberos constrained delegation with protocol transition).
5. Click on the Add... button.
6. You now have the Add Services dialog box, click on the Users or Computers… button.
7. In the Select Users or Computers dialog, type in the Certification Authority computer account and click OK.
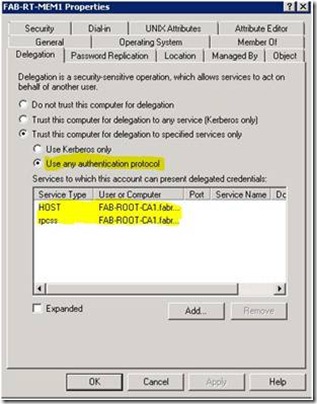
8. Select the following services HOST and rpcss. Once they have been selected click the OK button.
9. Once this is done it should look similar to the figure Network Service Delegation 4.
Network Service Delegation 4 - Configure Computer for constrained delegation
10. Next we need to open Internet Information Services (IIS) Manager snapin
11. Navigate to the CertSrv web application in the tree view, and double click on Authentication.
12. You should see all the supported authentication types listed.
13. Right click on Windows Authentication and select Enable if not already done.
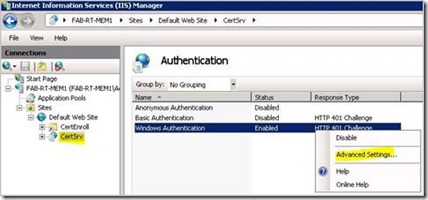
14. Right click on Windows Authentication and selected Advanced Settings…
Network Service Delegation 5 - Windows Authentication Advanced Settings
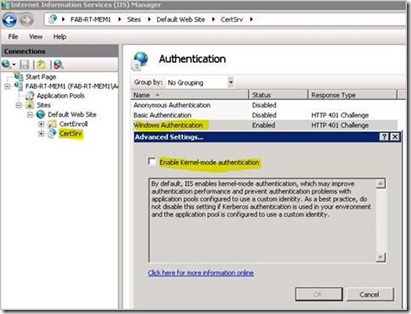
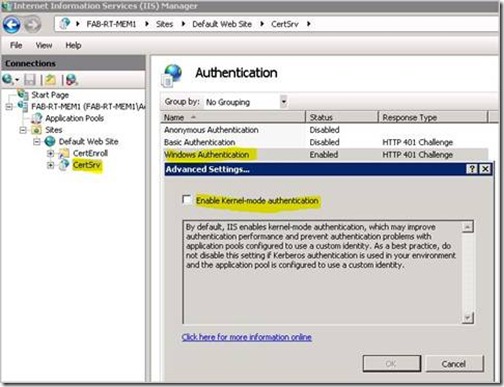
15. Uncheck Enable Kernel-mode authentication, and click the OK button.
Network Service Delegation 6 - Disable Kernel-mode authentication
16. Reboot the IIS computer and you are ready to go.
Setting up with Application Pool Identity set to custom account
This section will cover how to configure IIS and the Active Directory accounts to support Kerberos open delegation as well as constrained delegation when the application pool identity is setup for a custom account.
Configuring the Application Pool identity custom account
This section must be done whether you are using open or constrained delegation.
1. Next we need to open Internet Information Services (IIS) Manager snapin
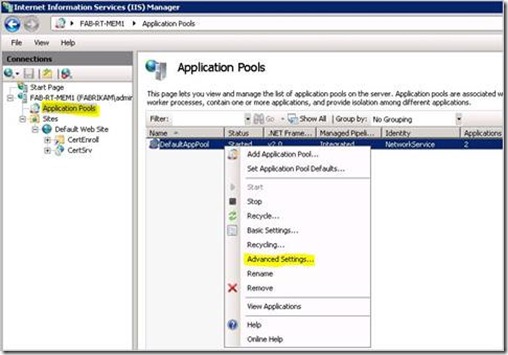
2. Navigate to the Application Pools node in the tree view.
3. Select DefaultAppPool right click and select Advanced Settings…
Custom Account Delegation 1 - Application Pool Advanced Settings
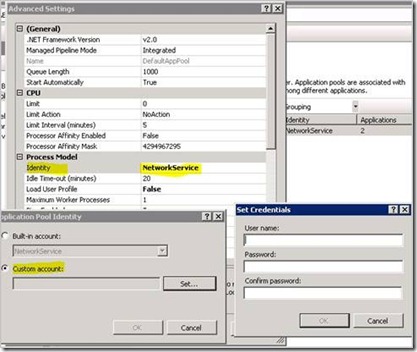
4. Change the Identity on the Advanced Settings dialog box, which then brings up the Application Pool Identity dialog box. Click on the Set… button.
5. In the Set Credentials dialog box, type in the domain user account to be used and password twice. Do not forget to type in the domain name. For example: FABRIKAM\IISKerbSvc
6. Click OK
7. Click OK
8. Click OK
Custom Account Delegation 2 - Configure Custom account
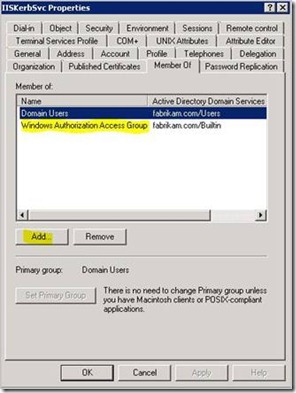
9. Open Active Directory Users and Computers snapin (dsa.msc) and find the domain account that the application pool was set to from step 5.
10. Add this account the Windows Authorization Access Group.
11. Click OK
12. Exit Active Directory Users and Computers.
Custom Account Delegation 3 - Add Custom account to domain group
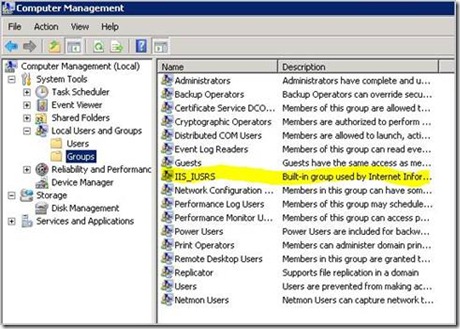
13. Open Computer Management snapin (compmgmt.msc) and go to the local groups in the tree view.
14. Add the account specified for the application pool identity to the IIS_IUSRS group
Custom Account Delegation 4 - Add Custom account to IIS_IUSRS
15. Next we need to open Internet Information Services (IIS) Manager snapin
16. Navigate to the CertSrv web application in the tree view, and double click on Authentication.
17. You should see all the supported authentication types listed.
18. Right click on Windows Authentication and select Enable if not already done.
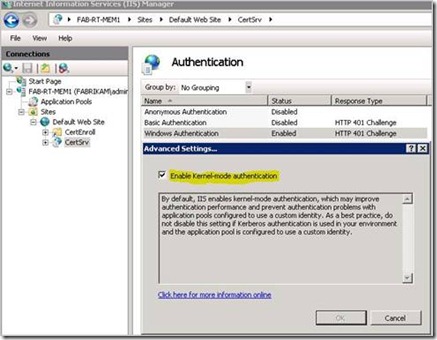
19. Right click on Windows Authentication and selected Advanced Settings…
Custom Account Delegation 5 - Windows Authentication Advanced Settings
20. Check Enable Kernel-mode authentication, and click the OK button.
Custom Account Delegation 6 - Enable Kernel-mode authentication
Configuring for open delegation when using custom account for AppPool Identity
1. Open up Active Directory Users and Computers and double click on the IIS Computer account.
2. Click on the Delegation tab, and select Trust this computer for delegation to any service (Kerberos only) .
Custom Account Delegation 7 - Configure Computer for open delegation
3. Then click OK.
4. Reboot the IIS computer and you are ready to go.
Configuring for constrained delegation when using custom account for AppPool Identity
If you need to support Basic Authentication on the website you will need to make sure that you configure constrained delegation with protocol transition. However, you will need to scroll down to the bottom of this blog for more steps required to support basic authentication.
1. Open up Active Directory Users and Computers and find the IIS computer account.
2. Double click on the IIS Computer account.
3. Click on the Delegation tab and select Trust this computer for delegation to specified services only, and then select Use any authentication protocol.
4. Click on the Add... button.
5. You now have the Add Services dialog box, click on the Users or Computers… button.
6. In the Select Users or Computers dialog, type in the Certification Authority computer account and click OK.
7. Select the following services HOST and rpcss. Once they have been selected click the OK button.
8. Once this is done it should look similar to the figure Custom Account Delegation 8.
Custom Account Delegation 8 - Configure Computer for constrained delegation
9. Next we need to add a Service Principal Name to the Application Pool account. This is done by using the SetSPN.exe utility. If my web site name is the IIS computer name (FAB-RT-MEM1) and I am using the account of FABRIKAM\IISKerbSvc the following commands would be ran:
SetSPN –A http/fab-rt-mem1 FABRIKAM\IISKerbSvc
SetSPN –A http/fab-rt-mem1.fabrikam.com FABRIKAM\IISKerbSvc
10. Find the Application Pool Identity account within Active Directory Users and Computers.
11. Double click on the domain user account.
12. Click on the Delegation tab and select Trust this computer for delegation to specified services only and then select Use any authentication protocol.
13. Click on the Add... button.
14. You now have the Add Services dialog box, click on the Users or Computers… button.
15. In the Select Users or Computers dialog, type in the Certification Authority computer account and click OK.
16. Select the following services HOST and rpcss. Once they have been selected click the OK button.
17. Click on the Add... button.
18. You now have the Add Services dialog box, click on the Users or Computers… button.
19. In the Select Users or Computers dialog, type in the IIS Server computer account and click OK.
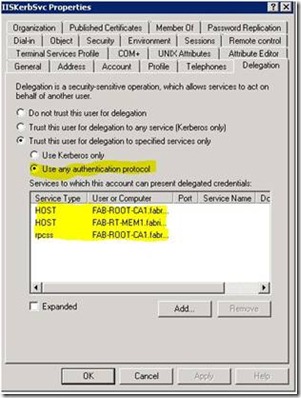
20. Select the following services HOST. Once they have been selected click the OK button.
21. Once this is done it should look similar to the figure Custom Account Delegation 9.
Custom Account Delegation 9 - Configure custom account for constrained delegation
22. Next we need to open Internet Information Services (IIS) Manager snapin
23. Navigate to the CertSrv web application in the tree view, and double click on Authentication.
24. You should see all the supported authentication types listed.
25. Right click on Windows Authentication and select Enable if not already done.
26. Right click on Windows Authentication and selected Advanced Settings…
Custom Account Delegation 10 - Windows Authentication Advanced Settings
27. Uncheck Enable Kernel-mode authentication, and click the OK button.
Custom Account Delegation 11 - Disable Kernel-mode authentication
28. Reboot the IIS computer and you are ready to go.
Configuring the web site to support Basic Authentication
Alright, so you need to support basic authentication huh…. Well, before you do the below steps you will first want to make sure that you have followed one of the set of steps for configuring constrained delegation and selected the Use any authentication protocol when you setup delegation.
1. Next we need to open Internet Information Services (IIS) Manager snapin
2. Navigate to the CertSrv web application in the tree view, and double click on Authentication.
3. You should see all the supported authentication types listed.
4. Right click on Basic Authentication and select Enable if not already done.
5. The next part we will need to edit one of the following config files on the file system.
- %systemroot%\system32\certsrv\en-US\Web.config
You are looking for the part that is in bold below.
… <authentication> <basicAuthentication enabled="true" realm="contoso.com" defaultLogonDomain="CONTOSO" logonMethod="Network" /> <windowsAuthentication enabled="false" useKernelMode="false" /> </authentication> …
Change it from logonMethod=”Network” to logonMethod=”ClearText”
NOTE: You might not have the web.config file located here.
- %systemroot%\system32\inetsrv\config\applicationHost.config
You are looking for the part in bold below, and then looking for basicAuthentication.
… <location path="Default Web Site/CertSrv"> <system.webServer> <handlers accessPolicy="Read, Script"> <clear /> <add name="ISAPI-dll" path="*.dll" verb="*" modules="IsapiModule" resourceType="File" requireAccess="Execute" allowPathInfo="true" /> … <add name="StaticFile" path="*" verb="*" modules="StaticFileModule,DefaultDocumentModule,DirectoryListingModule" resourceType="Either" requireAccess="Read" /> </handlers> <security> <authentication> <windowsAuthentication enabled="false"> <providers> <clear /> <add value="Negotiate" /> <add value="NTLM" /> </providers> </windowsAuthentication> <anonymousAuthentication enabled="false" logonMethod="Network"/> <basicAuthentication enabled="true" logonMethod="Network" /> </authentication> …
Change it from logonMethod=”Network” to logonMethod=”ClearText” for basicAuthentication section.
6. Reboot the IIS computer and you are ready to go.
The steps outlined in this blog are specifically for the CA website being loaded on Windows Server 2008 and will not translate properly to the configuration required for the website on Windows Server 2003.
The changes made to IIS7 have been drastic, from the GUI to the underlying code, so I hope that you have found this blog interesting and helpful.
- Rob Greene
Comments
Anonymous
April 23, 2009
A co-worker posted an interesting blog about configuring the Windows Server 2008 CA Web Enrollment proxyAnonymous
April 24, 2009
In folgendem Artikel wird beschrieben, wie eine Windows Server 2008 CA so konfiguriert wird, dass dieAnonymous
April 27, 2009
Spotted: a handy guide, to get your shiny new ADCS Web Enrollment* front end installed and pointed at



![clip_image010[1] clip_image010[1]](https://msdntnarchive.z22.web.core.windows.net/media/TNBlogsFS/BlogFileStorage/blogs_technet/askds/WindowsLiveWriter/HowtoconfiguretheWindowsServer2008CAWebE_973F/clip_image010%5B1%5D_thumb.jpg)
