How to develop and deploy ActiveX control in C#
How to develop and deploy ActiveX control in C#
There are lots of documents regarding how to develop and deploy an ActiveX control in native code(VB, C++, Delphi, …), however there’s few documents describe the manual in .NET. With this manual, you will learn how to develop, sign and deploy an ActiveX control with C#.NET. The practice can also be applied to C++.NET or VB.NET.
Create the ActiveX control DLL
In managed world, there’s no OCX control. So, we need to build a DLL control.
1. In “Visual Studio 2010”, create a new Library project with “Visual C#”
2. Rename the classname, and include “System.Runtime.InteropServices” namespace
3. Sign your assembly with a strong name
Select Project-><Project Name> properties… , on Signing tab, check “Sign the assembly” and New a name key file.

4. Select “Tools->Create GUID” to create a new GUID
5. Add “ProgId”, “Guid”, “ComVisible” to your class, and implement your logic
using System;
using System.Runtime.InteropServices;
namespace DemoCSharpActiveX
{
/// <summary>
/// Demo HelloWorld class
/// </summary>
[ProgId("DemoCSharpActiveX.HelloWorld")]
[ClassInterface(ClassInterfaceType.AutoDual)]
[Guid("415D09B9-3C9F-43F4-BB5C-C056263EF270")]
[ComVisible(true)]
public class HelloWord
{
[ComVisible(true)]
public String SayHello()
{
return "Hello World!";
}
}
}
6. Set ComVisible to true in AssemblyInfo.cs file.
[assembly: ComVisible(true)]
7. Write a sample HTML page to test this ActiveX control
<!DOCTYPE>
<html>
<head>
<title>DemoCSharpActiveX webpage</title>
</head>
<body>
<OBJECT id="DemoActiveX" classid="clsid:415D09B9-3C9F-43F4-BB5C-C056263EF270" codebase="DemoCSharpActiveX.cab"></OBJECT>
<script type="text/javascript">
try {
var obj = document.DemoActiveX;
if (obj) {
alert(obj.SayHello());
} else {
alert("Object is not created!");
}
} catch (ex) {
alert("Some error happens, error message is: " + ex.Description);
}
</script>
</body>
</html>
8. Build your dll and register it
C:\Windows\Microsoft.NET\Framework\v2.0.50727>regasm /codebase <full path of dll file>
To unregister your dll, just run regasm /u <full path of dll file>
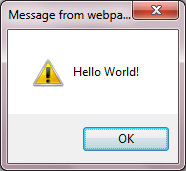
9. Now you can open your HTML file and test it. If it succeeds, IE will pop up the below message box.
If you cannot see this message box, you’d better check whether your IE is secured as https://support.real-time.com/browsers/security/ie/activex.html, please just try to change the settings to “Enable” or “Prompt”.
Create the installation package
For ActiveX controls written with native code, IE will register the control automatically when the webpage is visited the first time. However, IE WONT’T register a managed ActiveX control automatically so that we have to build an installation package for the registration.
1. Add a new “Setup” project
In the current solution, select File->Add->New Project… , select Other Project Types->Setup and Deployment->Visual Studio Installer, Click Setup Project and specify a project name.

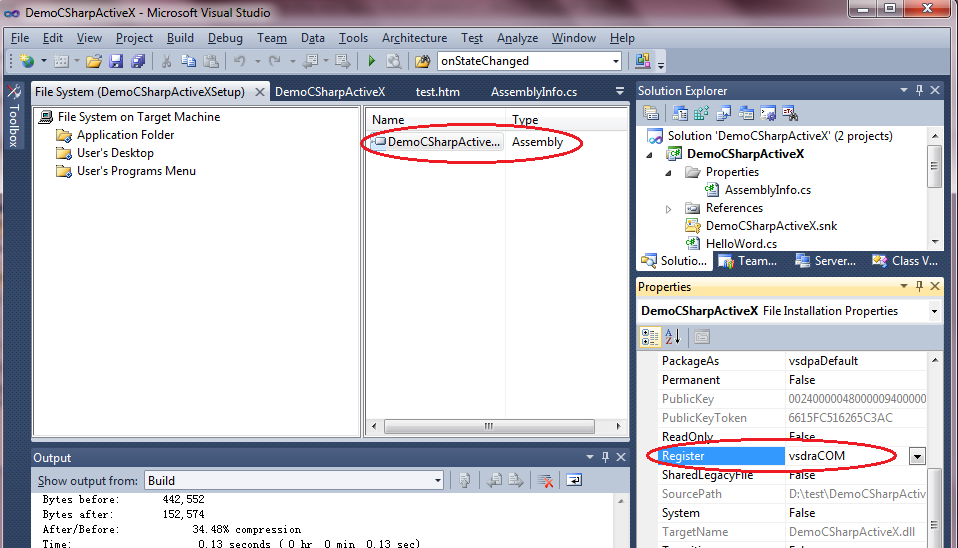
2. Add your ActiveX control dll into this setup project.
Right click Application Folder, select Add->File…

Then browse your dll file and add into the project
3. Select your ActiveX assembly and change Register to vsdraCOM.
4. Now if you build this project, it will create the MSI installation package.
Package to cab
The last step is to package the MSI installation to a *.cab file, together with a *.INF file. There are several tools to make the cab package, here I would like to choose makecab.exe which is shipped in OS.
1. Open the setup project which we create in the previous step
2. Create the INF file of your ActiveX control, and put it to the root directory of the setup project. The file name should be as same as the control dll’s name, and here’s the content of the file.
[version]
signature="$CHICAGO$"
AdvancedINF=2.0
[Setup Hooks]
install=install
[install]
run=msiexec.exe /package """%EXTRACT_DIR%\DemoCSharpActiveXSetup.msi""" /qn
3. Create the Directive File for makecab.exe, and put it to the root directory of the setup project. I name the file as build.ddf, here’s the content
.Set DiskDirectoryTemplate=cab
.Set CabinetNameTemplate=DemoCSharpActiveX.cab
release\DemoCSharpActiveXSetup.msi
DemoCSharpActiveX.inf
The directive file format is documented here.
4. Define the Post-Build event of the setup project.
Select the setup project, on the Properties panel, open the PostBuildEvent editor, and input the commands.
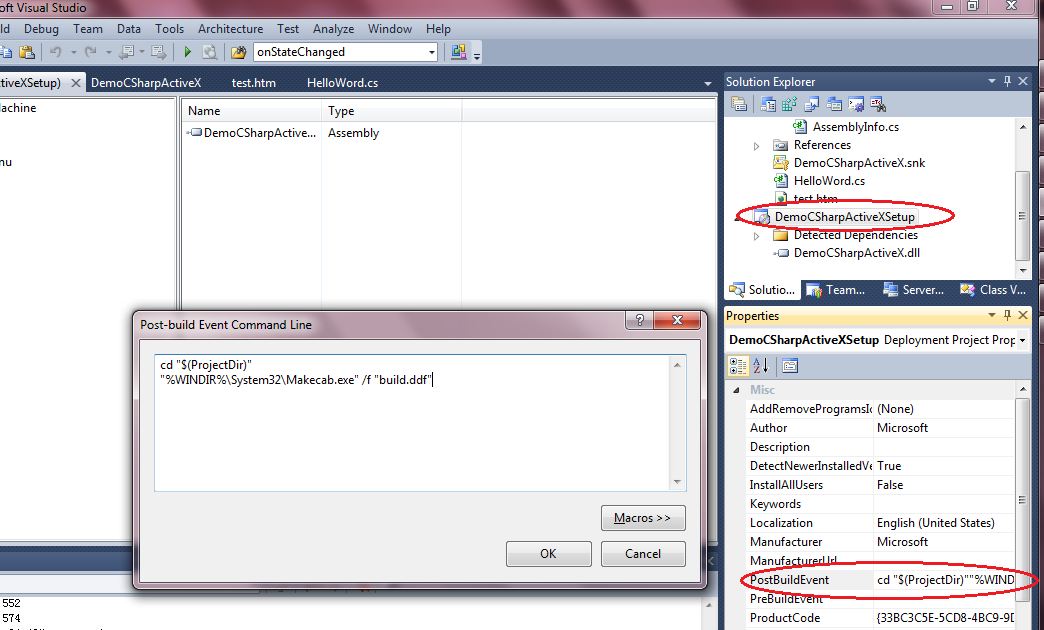
Here’re the commands.
cd "$(ProjectDir)"
"%WINDIR%\System32\Makecab.exe" /f "build.ddf"
5. Rebuild the setup project, and the cab file will be created in cab folder.
Sign your ActiveX control
Now we also need to sign the ActiveX control as most of the IT professionals block the installation of unsigned ActiveX control in IE. The required tools are contained in Windows SDK, so please download at first.
https://www.microsoft.com/download/en/details.aspx?id=3138
1. Make a certificate with the subject key file
makecert -sv myNew.pvk -ss myNewStore myNew.cer
2. Run signtool.exe wizard to sign the *.cab file
1) Run command “signtool signwizard”, then click “Next” on the Wizard

2) Select your *.cab file and click “Next”
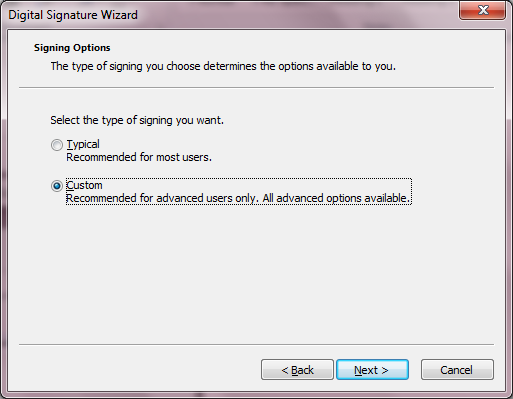
3) Select “Custom” as the signing type, then click “Next”
4) Click “Select from file…” and select the “*.cer” file as certificate, then click “Next”

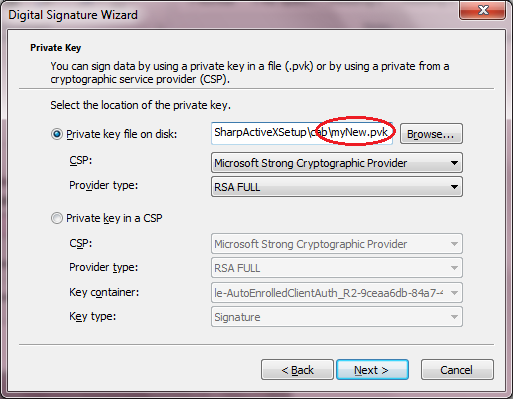
5) Select the private key file(*.pvk) and click “Next”
6) Click “Next” several time to finish the wizard, don’t change any settings.
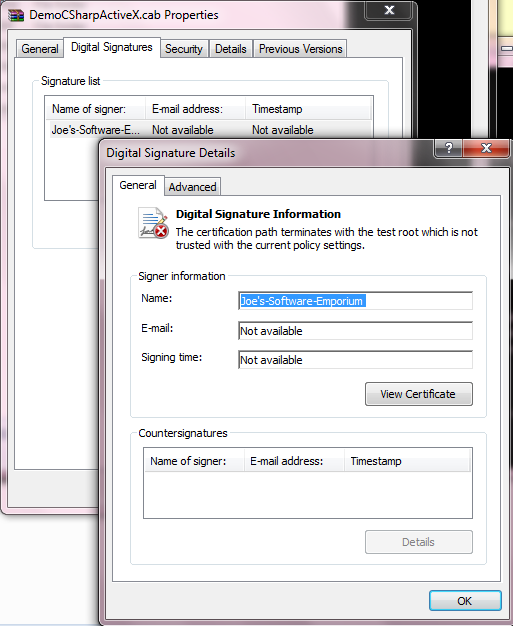
7) After the *.cab file is signed, right click it and check “Properties”->”Digital Signatures”, you will find it is signed with our certificate. But it is not trusted, I will make it trusted in the next steps.
Deploy your ActiveX control
Now everything is ready, please just put the cab and html files to the same web folder.
Test the ActiveX control
Since we only signed the ActiveX control with a test certificate, we need to make the root certificate trusted on the client machine at first. Here’re the steps.
1. Double click the *.cer file, go to “Certification Path”, select the root certificate and click “View Certificate”. As you see in the picture, currently it is not trusted.

2. On the “Details” tab of the root certificate, click “Copy to File…” to export the root certificate as a *.cer file.

3. Double click the exported *.cer file to open it, click “Install Certificate…” -> “Place all certificates in the following store” -> “Trusted Root Certification Authorities”. Then finish the wizard to install the certificate to trusted root authorities.

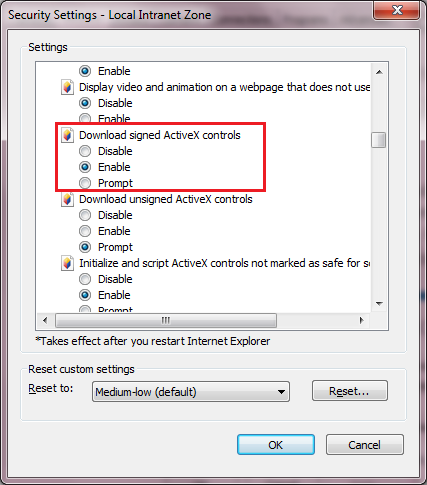
4. Now open IE and browse the web page, the control will be downloaded silently if “Download signed ActiveX controls” is enabled.
References
Create ActiveX in .NET Step by Step
https://www.codeproject.com/KB/cs/CreateActiveXDotNet.aspx
HowTo: Deploy .NET ActiveX Control
https://nikolkos.blogspot.com/2009/08/howto-deploy-net-activex-control.html
Introduction to Code Signing
https://msdn.microsoft.com/en-us/library/ms537361(v=vs.85).aspx
Signing and Checking Code with Authenticode
https://msdn.microsoft.com/en-us/library/ms537364(v=VS.85).aspx
Sign Tool (SignTool.exe)
https://msdn.microsoft.com/en-us/library/8s9b9yaz(v=vs.80).aspx
Regards,
Zhixing Lv from APGC DSI Team
Comments
- Anonymous
September 13, 2012
แล้วถ้าเกิด event ขึ้นใน activex แล้วอยากให้ส่งเรียก function javascript ในหน้าเว็บต้องทำไงครับเช่น เกิด event text_changed แล้วอยากให้หน้าเว็บที่เป็น html text เปลี่ยนตาม textbox ที่อยู่ใน activex ต้องใช้ code อย่างไรครับ - Anonymous
February 04, 2013
when I deploy the web application on IIS.Where should leave the .cab file, in the virtual root directory or in a folder? How is able to get to run the msi? - Anonymous
June 01, 2013
Convert VB to C# with VBConversions,the most accurate code translation tool available.more information then visit: www.vbconversions.com<a href="www.vbconversions.com/">convert vb.net to c#</a> - Anonymous
June 15, 2013
The most difficult features other programs don't even attempt are converted, such as LINQ, embedded XML, parameterized properties, local shared variables, On Error Goto statements, event handling, complex Case statements, API calls, and more.Don't take our word for it. Download a Free Trial Copy Today at www.vbconversions.com and check it out for yourself. - Anonymous
January 02, 2014
My dll version is change from 1.0.0.0 to version 1.0.0.1.How to auto update my registered dll or installed dll?My registered dll will only update if I uninstall my dll from the client machine.Thanks. - Anonymous
February 19, 2014
PostBuild Event failed with error code 1, please check this error and reply ASAP - Anonymous
April 03, 2014
Port Build Event error '1' NameSetUpProject.vdproj - Anonymous
April 07, 2014
Hello farooq nadeem & AO,Put that *.INF and *.ddf files into your setup project (file system directory)virtual directory.- Anonymous
October 28, 2016
That problem are the " " in:cd “$(ProjectDir)”“%WINDIR%\System32\Makecab.exe” /f “build.ddf”replace “” with ""
- Anonymous
- Anonymous
October 29, 2014
Awesome tutorial. I have tried everything except signing control and your tutorial rocks man. Best tutorial anywhere on web. - Anonymous
February 25, 2015
Hello!How to add UserControl to load automatically (main UI) when de activex start? - Anonymous
March 26, 2015
Absolutely the best reference for this I have found so far. - Anonymous
June 09, 2016
Thanks for the turtorial.Is Example solution available for this tutorial?