Using a Windows Runtime Component from a Win32 application
As we have seen in this blog multiple times, the Desktop Bridge isn't just a technology to package existing Win32 apps using the Windows 10 deployment model. It's also a way to give you access to Universal Windows Platform APIs, to allow a UWP application to launch a Win32 process, etc.
One of the many uses of this technology is also to allow leveraging a Windows Runtime Component from a Win32 application. A Windows Runtime Component is a sort of class library for the Universal Windows Platform, which however can be consumed regardless of the target language used to build the application. This is made possible by the fact that a Windows Runtime Component outputs a metadata file (.winmd), which contains the description of all the objects and methods exposed by the various classes.
Thanks to this approach you are able, for example, to use a Windows Runtime Component written in C++ in a UWP application built with XAML / C# or HTML and JavaScript.
However, being the Universal Windows Platform a different development ecosystem than the .NET Framework, you aren't able to mix the two technologies in an easy way. A Windows Runtime Component isn't a simple Class Library, so you can't add a reference to it, let's say, in a WPF or Windows Forms app.
This limitation can create some troubles when you want to reuse the code you have already written in a Windows Runtime Component; another scenario is when a Win32 application wants to leverage one of the new components of the Universal Windows Platform, like background tasks (which are implemented using a Windows Runtime Component).
Thanks to the Desktop Bridge and the Windows Application Packaging Project we can do it!
This post takes inspiration from two samples published by Microsoft:
- https://github.com/Microsoft/DesktopBridgeToUWP-Samples/tree/master/Samples/WinformsManagedWinRTComponent, which shows exactly our scenario. However, the sample is a bit old and it uses the deprecated JavaScript's project approach to package the application instead of the new Windows Application Packaging Project.
- https://github.com/Microsoft/Windows-Packaging-Samples, which shows how to add a background task to a Win32 application in the right way using the Windows Application Packaging Project. However, in this sample, it's a "passive" reference. Windows automatically invokes the background task based on the configured trigger, but the Win32 app doesn't actually try to use any of the classes or methods exposed by the WinRT component.
In this sample scenario, we're going to build a Windows Runtime Component which contains the logic to display a toast notification. The component will be leveraged by a WPF application. To show the cross-language nature of the solution, we're going to build the Windows Runtime Component in C++, while the WPF app will be built in C#.
Let's start!
The Windows Runtime Component
Let's start by creating a new Visual Studio solution with a Windows Runtime Component in it. You can find it under Visual C++ -> Windows Universal -> Windows Runtime Component (Universal Windows) . Name the project Notifications.

The project will already contain an empty class, called Class1.cpp. Feel free to rename it with something meaningful, like NotificationHelper.cpp. Do the same also for the header file, which describes all the methods exposed by the class. Rename Class1.h to NotificationHelper.h
This is how the header file looks like:
 #pragma once

namespace Notifications
{
    public ref class NotificationHelper sealed
    {
    public:
        NotificationHelper();
        void ShowNotification(Platform::String^ title, Platform::String^ content);
    };
}
Make sure that namespace Notifications is set with the same name you have assigned to the project, otherwise you will get a compilation error. This header simply describes two public methods: one is the default constructor, the other one is a method called ShowNotification() which accepts two string parameters as input.
Let's see now the implementation, which must be included in the NotificationHelper.cpp file:
 #include "pch.h"
#include "NotificationHelper.h"

using namespace Notifications;
using namespace Platform;
using namespace Windows::Data::Xml::Dom;
using namespace Windows::UI::Notifications;

NotificationHelper::NotificationHelper()
{
}

void NotificationHelper::ShowNotification(Platform::String^ title, Platform::String^ content)
{
    Platform::String^ xml = "<toast><visual><binding template='ToastGeneric'><text>" + title +" </text><text>" + content +"</text></binding></visual></toast>";
    XmlDocument^ doc = ref new XmlDocument();
    doc->LoadXml(xml);


    ToastNotification^ toast = ref new ToastNotification(doc);
    ToastNotificationManager::CreateToastNotifier()->Show(toast);
}
If you have some experience with toast notifications, the code shouldn't hard to decode. It's the standard UWP code we have already used in the past to create a basic notification, just written in C++. We define a XmlDocument object with the payload of the notification and we use it to create a new ToastNotification object. In the end, we display the notification to the user by using the ToastNotificationManager class and the Show() method.
The WPF application
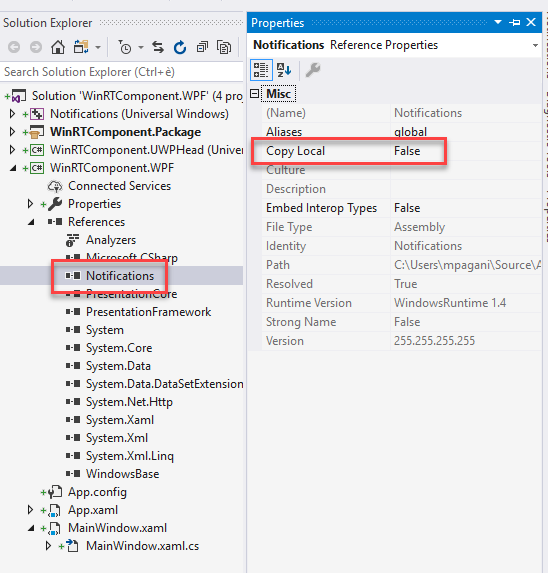
Now let's add to our solution a new WPF application, which template sits under Visual C# -> Windows Desktop -> WPF App (.NET Framework) . Give it a meaningful name (I've called it WinRTComponent.WPF). Then, as first things, let's add a reference to the Windows Runtime component. Right click on the WPF project, choose Add reference and select the C++ project we have previously created. Then expand the References section, expand it, look for the Windows Runtime component, right click on it and choose Properties. Make sure that Copy local is set to False.

Now let's write some code to use the Windows Runtime component. In the user interface let's just add a Button to trigger the notification. Open the MainWindow.xaml page and change the existing Grid with the following code:
 <StackPanel>
    <Button Content="Show notification" Click="OnShowNotification" />
</StackPanel>
Now move to the code behind class (the MainWindow.xaml.cs file) and add the definition of the OnShowNotification event handler:
 private void OnShowNotification(object sender, RoutedEventArgs e)
{
    Notifications.NotificationHelper helper = new Notifications.NotificationHelper();
    helper.ShowNotification("This is a notification", "This is a notification generated by a Win32 app");
}
We're just using the NotificationHelper class we have previously created in the C++ project to invoke the ShowNotification() method, passing a title and a content.
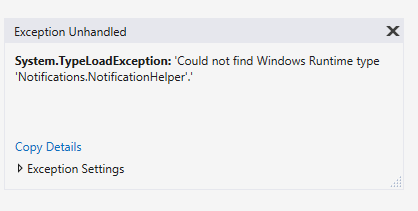
Let's try to run the WPF application and click on the button. As expected, the operation will fail:

The application isn't running in the context of the Universal Windows Platform and, as such, despite Visual Studio is able to see the Windows Runtime Component and provide IntelliSense, Windows isn't able to reference it in the proper way.
The Windows Application Packaging Project
The way to package an existing Win32 application and to leverage the Desktop Bridge is to add a new Windows Application Packaging Project in our solution. We can find it under Visual C# -> Windows Universal.
We need to include inside the package both the Windows Runtime Component and the WPF application, so right click on the Packaging Project, choose Add reference and select both projects:

Ops! We aren't allowed to add a direct reference to the Windows Runtime Component, because its ouput is a library, not an application. With the approach based on the JavaScript project of the first sample on GitHub we didn't have this problem. The JavaScript project outputs a UWP application, so you can reference a WinRT component without issues.
In order to workaround this problem, we need a real application to link to the Packaging Project. We're going to use an empty UWP project. It will be just an empty shell and its purpose it will be only to hold a reference to the WinRT component, so that it can be deployed inside the package in the right way.
Right click on your solution and add a new UWP project. You'll find the template under Visual C# -> Universal Windows -> Blank App (Universal Windows) . Call it as you prefer (I named it WinRTComponent.UWPHead, by following the guidance of the GitHub's sample, then right click on it, choose Add reference and select the Windows Runtime component we have created as first task.
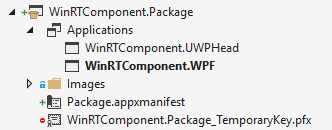
Now return to the Windows Application Packaging Project, right click on it, choose Add reference and, this time, make sure to include the WPF app and the empty UWP app you have just created. Then expand the Applications section and make sure that the WPF app is set as entry point.

Now deploy and run the Windows Application Packaging Project. Click on the button of the WPF app and... surprise!

Since now the application is running in the context of the Universal Windows Platform, we are able to use the ShowNotification() method exposed by our Windows Runtime component.
What if I want to use a C# Windows Runtime Component?
In case you want to use a Windows Runtime Component built with C#, there are a couple to extra steps to take.
Let's say that, to our solution, we have added a new Windows Runtime Component, this time using the template under Visual C# -> Universal Windows -> Windows Runtime Component (Universal Windows) .
This is the code we add to the main class included in the project:
 public sealed class NotificationHelper
{
    public void ShowNotification(string title, string content)
    {
        string xml = $"<toast><visual><binding template='ToastGeneric'><text>{title}</text><text>{content}</text></binding></visual></toast>";
        XmlDocument doc = new XmlDocument();
        doc.LoadXml(xml);

        ToastNotification toast = new ToastNotification(doc);
        ToastNotificationManager.CreateToastNotifier().Show(toast);
    }
}
It's the same code you've seen before to display a toast notification, but this time it's written in C#.
The first difference is that, unlike for a C++ WinRT component, you can't direclty reference it from a .NET project in Visual Studio. If you try to reference it from your WPF project, you'll get an error like the one below:

The trick is to manually add the reference, by editing the XML behing the project's file. Right click on the WPF project, choose Unload project, then right click on the project again and choose Edit.
Look for an ItemGroup section with a sequence of Reference items and add, as last item, a reference to the .winmd file generated by the Windows Runtime Component:
 <ItemGroup>
  <Reference Include="System" />
  <Reference Include="System.Data" />
  <Reference Include="System.Xml" />
  <Reference Include="Microsoft.CSharp" />
  <Reference Include="System.Core" />
  <Reference Include="System.Xml.Linq" />
  <Reference Include="System.Data.DataSetExtensions" />
  <Reference Include="System.Net.Http" />
  <Reference Include="System.Xaml">
    <RequiredTargetFramework>4.0</RequiredTargetFramework>
  </Reference>
  <Reference Include="WindowsBase" />
  <Reference Include="PresentationCore" />
  <Reference Include="PresentationFramework" />
  <Reference Include="RuntimeComponent1">
    <HintPath>..\RuntimeComponent1\bin\x86\Release\RuntimeComponent1.winmd</HintPath>
  </Reference>
</ItemGroup>
Notice how I'm pointing to the Release build of the Windows Runtime component. This is important, otherwise the solution won't work. As such, remember also to compile the Windows Runtime component you have created in Release mode.
Another important change to do is to define a specific compilation architecture. .NET apps, in fact, can be compiled for the Any CPU architecture, while Universal Windows Platform apps and components no. The reason is that the Universal Windows Platform uses .NET Native to directly create native code from the source and, as such, it can't be cross compiled for multiple architectures.
Right click on the WPF project, choose Properties and move to the Build section. Make sure that, in the Configuration dropdown the All configurations option is selected and change Platform target to x86 or x64, based on your preference.

The last step is to make sure that your WPF application is being compiled with .NET Framework 4.7, which contains specific fixes and improvements for this scenario. You may hit errors and warnings regarding a mismatch with the System.Runtime library if you try to compile the WPF project using a lower .NET version.
That's all! Now make sure to add to the UWP Head project a reference to the new C# Windows Runtime component, then deploy the Windows Application Packaging Project.
If you did everything properly, you will see again the notification popping out when you press the button. This time, however, it has been generated by a Windows Runtime Component written in C# and not C++.
Wait, why do I have two applications in my Start menu?
If you open the Start menu after you have deployed the packaging project, you will notice two applications in the list:
- The Windows Application Packaging Project
- The empty UWP project

This is happening for the same reason we have seen in the post about packaging a UWP app + Win32 app. By default, every project which outputs an application is deployed by Visual Studio. If you want to change this behavior and deploy only the relevant one (in our our case, the Windows Application Packaging Project), choose Build -> Configuration Manager from the Visual Studio menu and uncheck the Deploy column for the UWP project:

As stated in the other post, this affects only the debugging phase. When you create the package, automatically Windows will deploy only the project you have set as entry point in the manifest file.
Wrapping up
In this post we have learned which is the right way to leverage a Windows Runtime component from a .NET application, thanks to the Desktop Bridge and the Windows Application Packaging Project. We have explored both the steps to add a C++ component and a C# component.
You can find the sample project used in this post on GitHub at https://github.com/Microsoft/Windows-AppConsult-Samples-DesktopBridge/tree/master/Blog-WinRTComponent/WinRTComponent.
Happy coding!