How to Create a Document Set using a Workflow (SharePoint 2010)
I've been working with several colleagues on an internal SharePoint Server 2010 project for a while and we "went live" the first part of February 2012. The site is a place to help our (Microsoft) Premier Field Engineers (PFE’s) build teams for projects and Intellectual Property (IP) creation. Since launch, we have members from North America, Europe, and Middle East! The majority of this site consists of lists where information is entered into the list, either through typing the information, or selecting information from look-up columns in other lists.
We have several lists: Resources, Projects, Regions, Skills, Feedback, Issues, etc.
One of the suggestions that came through was the ability to create a document set for their project. "A document set is a group of related documents that can be created in one step and then managed as a single entity."
A previous post of mine, “How to Create an InfoPath Form to Auto Populate Data in SharePoint 2010”, demonstrated creating the form for our PFE’s to create new projects using InfoPath 2010. By modifying that form, I created a Yes/No value to see if a user wanted to create a document set or not. Next, using SharePoint Designer 2010, I created a workflow based on the projects list to see if the Yes/No column contained a “yes”, and if so, create a document set and set the name of the document set the same as the title of the project. Let’s see how to do this.
Steps we need to do:
- Create a document set
- Create a document library
- Add a column to the list and update the InfoPath form
- Create the workflow
- Verify the workflow association & test
- Troubleshooting
Create a Document Set
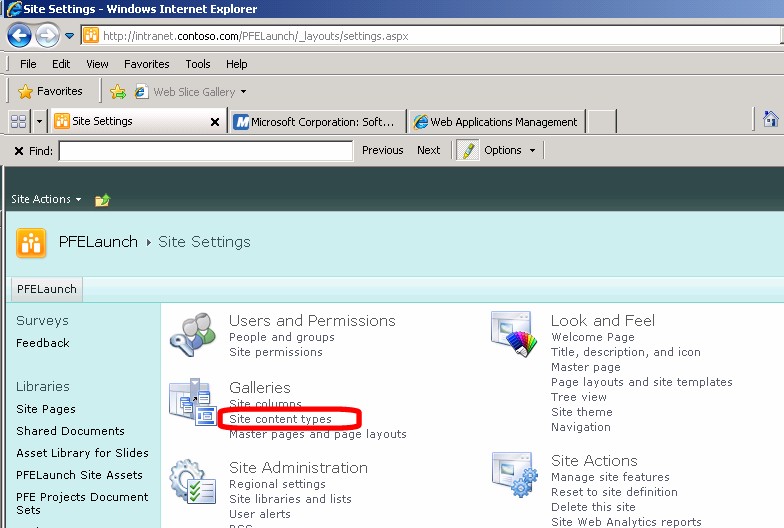
1) Launch the site and go to Site Actions, Site Settings, and choose Site Content Types under Galleries
2) On the Site Content types page, choose Create at the top
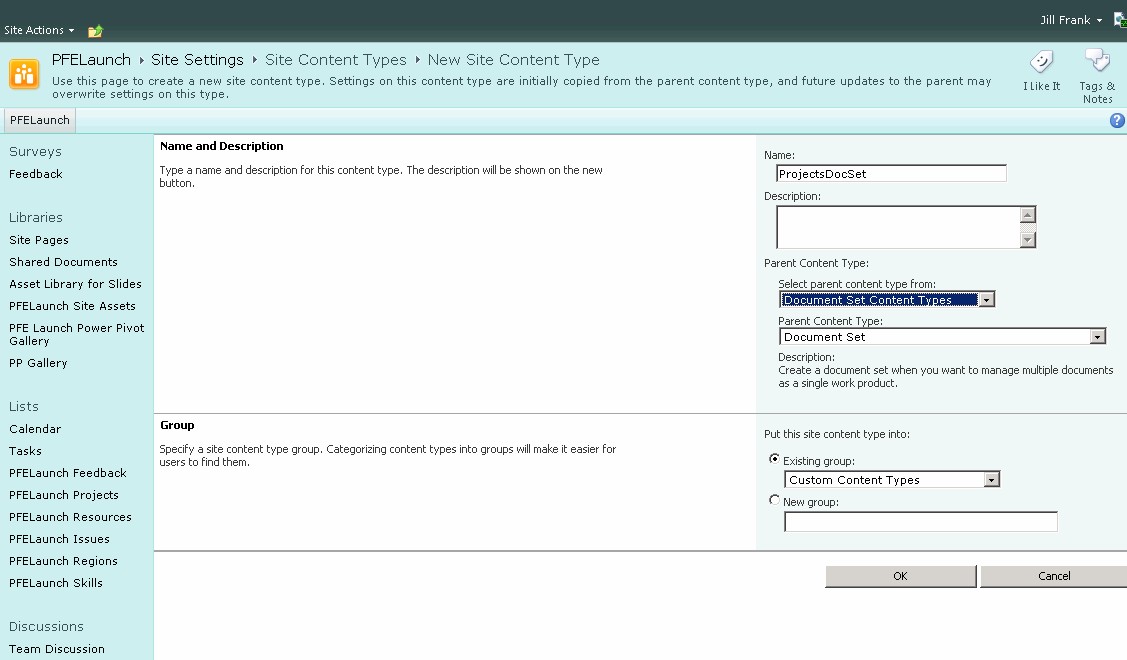
3) On the New Site Content Type page, type a name for the Content Type (i.e. ProjectsDocSet), select the parent content type from the “Document Set Content Types” with the parent content type of “Document Set”. You can either leave it in the existing Custom Content Type group or create a new one.
Figure 3: New site content
Create a Document Library
4) Launch the site and go to Site Actions, More Options. We need to create a new Document Library that will contain our Document Sets. From the Create dialog box, choose Document Library and name the Document Library.
Figure 4: Create document library
5) Within the document library, choose Library Settings, Advanced Settings. Since document sets are based on content types, we need to allow management of content types. For my purpose, I don’t want to allow new folders to be available so I choose “no” in that section and “no” to the datasheet settings.
Figure 5: Advanced Settings
6) In the Document Library Settings page, under Content Types, click “Add from existing site content types”.
Figure 6: Add from existing content types
7) In the Add Content Types page, select ProjectsDocSet from the Available Site Content Types and click Add, then OK
Figure 7: Add content types
8) Back at the Document Library Settings page, under Content Types, choose “Change New Button Order and Default Content Type”. For my purpose, I didn’t want anyone to be able to upload a document and only wanted the document set available.
Figure 8: Change new button order and default content type
Figure 9: Content type order
9) We should now have the Document Set as visible and the default content type.
Figure 10: Content Type
Figure 11: New Document
Add Column & Update the InfoPath 2010 Form
10) Go to the list properties of the Projects list and create a column called DocSet. Set the type as a Yes/No check box with a default value of “No”.
Figure 12: Create Column
11) On the Projects list, choose List under List Tools then select Customize Form.
Figure 13: Customize Form
12) The form will open in InfoPath 2010
Figure 14: Open form
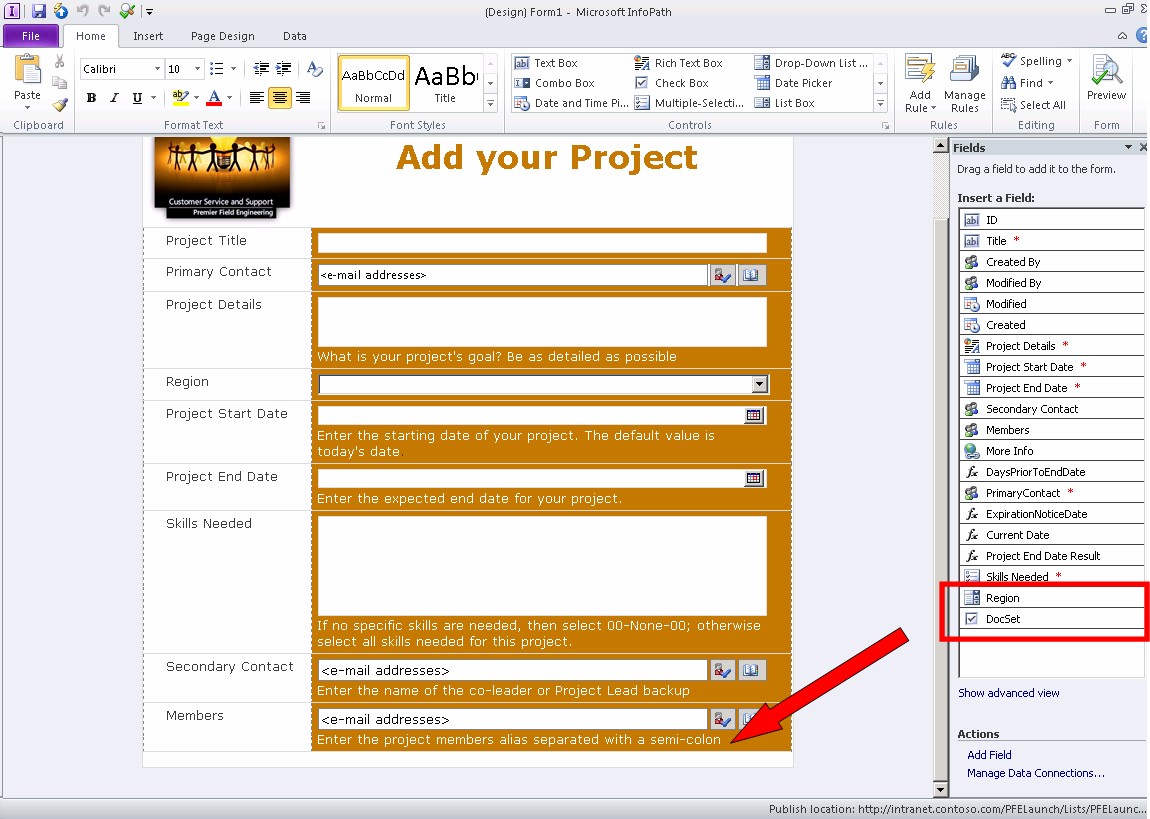
Notice the new DocSet field on the right. We have to add the DocSet field to the form so users can select the form.
13) Place the cursor at the end of the last line after “semi-colon” (shown by the arrow) and press the tab key. This will create a new row in the form.
Figure 15: New row
14) Click DocSet on the right and drag the field to the colored column on the new row.
Figure 16: Drag DocSet
15) Next we need to add some text to the form so it makes sense to the user. Click in the colored area to un-highlight the field name.
Figure 17: Un-highlight
16) Erase the word “DocSet” and add your own text similar to the following in both columns of the new row.
Figure 18: Add row text
17) Now we need to publish the form. From the menu bar, click File, Publish, and click the SharePoint List button.
Figure 19: Publish Form
You should get a dialog box (shown above) with your InfoPath form in the background showing the form was successfully published. Click OK on the dialog box and close out of InfoPath. You will be taken back to the list in SharePoint.
18) Let’s verify the form is correct when opening. From the list, click Items under List Tools and click New Item.
Figure 20: New item
Figure 21: New Item 2
Super! Now, we’re ready to create the workflow that will actually create the Document Set.
Create Workflow to Automatically Create a Document Set
19) Launch Microsoft SharePoint Designer 2010 (SPD) and open the site.
Figure 22: Open site
20) Once the site opens in SPD, click Workflows under Navigation, Site Objects.
Figure 23: Select Workflows
21) Once Workflows is selected, the Ribbon shows the Workflow options. Click List Workflow and select the list that will be used for this workflow – in our case it is the PFELaunch Projects list.
Figure 24: Select projects workflow
22) Next, the Create List Workflow dialog box opens. Type a Name for the workflow and (optional) description, and then click OK.
Figure 25: Create list workflow
23) In the Workflow editor, we need to put in the logic on when to create the document set.
Figure 26: Create workflow 01
Thinking out loud, here’s what we want to do:
IF DocSet from the Projects list is Yes, THEN create the document set using the same name as the title of the project; otherwise do not create a DocSet for the project.
NOTE: You cannot use the following characters in the Project Title or else the workflow will fail.
: / \ : * ? " < > | # { } % & ~ or tab characters and multiple periods.
a) In the section where it says “Start typing . . .”, type the letter “I” and press <enter>. Listings of all the possible options are shown. Select “If current item field equals value”.
Figure 27: Create workflow 02
Figure 28: Create workflow 03
24) Click the “field” hyperlink and scroll down and select DocSet.
Figure 29: Create Workflow 04
Figure 30: Create Workflow 05
25) Next, select the “value” hyperlink and choose “Yes”
Figure 31: Create workflow 06
26) Remembering our logic from before: IF DocSet from the Projects list is Yes, THEN create the document set using the same name as the title of the project, we have set the first condition – next we need to create the document set.
27) Below our “If” statement, type create and press enter to see our list of choices – choose “Create List Item”
Figure 32: Create Workflow 07
28) After you choose “Create List Item”, you screen should look like this:
Figure 33: Create Workflow 08
29) Click on “this list” hyperlink, select the down arrow next to List and choose ProjectDocuments.
Figure 34: ProjectsDocSet
The “Create New List Item” dialog box will now show the list as ProjectDocuments with the following fields:
Field |
Value |
Content Type ID |
Document |
Path and Name (*) |
|
30) Highlight “Content Type ID” and select “Modify”. Change the value of “Content Type ID” to ProjectsDocSet.
Figure 35: Content Type ID
31) Select Path and Name (Red arrow) and click Modify (Blue arrow). When the “Value Assignment” dialog pops up, select the function button (fx),(Purple arrow) then choose Title from the Field from source selection (Green arrow).
Figure 36: Create New List Item
32) Once you have selected “Title” from the “Field from source” selection, click OK to close the “Lookup for String” dialog box, and then click OK at the “Value Assignment” dialog box. Your “Create New List Item” dialog box should now look like this:
Figure 37: New List item
33) Click OK at the Create New List Item dialog box – the completed workflow is now set.
34) From the breadcrumb at the top of SPD, click ProjectsCreateDocSet to go to the information and settings page of the workflow.
Figure 38: Create Workflow 10
35) Select the Start Option of “Start workflow automatically when an item is created” and “Start workflow automatically when an item is changed.”
Figure 39: Create Workflow 11
36) Click “Publish” on the ribbon to publish the workflow to the projects list.
Figure 40: Create Workflow 09
37) Close SharePoint Designer 2010
Verify the Workflow Association & Test
38) Launch the site and go to the projects list
39) Check to make sure the workflow is associated with the list by going into the List Settings and selecting Workflow Settings.
Figure 41: Verify workflow association
40) Looks like the workflow is associated with the list correctly – now it’s time to try it out and make sure it works as planned.
41) Go back to the list and select Items from the List Tools, then New Item. Complete the form and click Save making sure to check the box to create a document set.
Figure 42: New Project 01
Figure 43: New Project 02
42) We have successfully created a new project with the DocSet set to yes. Let’s check our ProjectDocSets library to make sure the document set was created.
Figure 44: Document Sets Completed
Troubleshooting
If you are a site and/or site collection administrator, you will need to work with your SharePoint administrators to troubleshoot why the workflow is not working. However, I want to give you some things to look at as this happened to me when I first created this workflow.
If you’re confident your workflow is set up properly along with your document set and lists, then the SharePoint administrator needs to look at the ULS logs. Ask them to check for a category called “Workflow Infrastructure” to see if they can find any unexpected or critical errors.
For example, in my initial situation, I couldn’t get the workflow to create a document set. In looking at the ULS logs, I came across this unexpected error.
Time: |
04/27/2012 14:23:22.52 |
Process: |
w3wp.exe (0x392C) |
Thread: |
0x3AA4 |
Product: |
SharePoint Foundation |
Category: |
Workflow Infrastructure |
EventID: |
b9vu |
Level: |
Unexpected |
Message: |
Declarative workflows cannot automatically start if the triggering action was performed by System Account. Canceling workflow auto-start. List Id: %s, Item Id: %d, Workflow Association Id: %s |
Workflows will not work if the account creating the project is the SharePoint System Administrator.
I hope this post helps others out there who are trying to accomplish this task.
Comments
Anonymous
January 01, 2003
Very Nice How to! PAUL MCE , you should find the list of library you have created, check if you how you have named your libraryAnonymous
January 01, 2003
Hi Anne - I followed your detailed explanation (Thank you) and i stumbled at step 30. Within your list dropdown you display 'ProjectDocuments' which I do not have as a selection. Instead, I have 'Library'....can you tell if I did something wrong or missed a setting somewhere? Also, I went along with using 'Library' and the workflow ran successfully, but in all content types under the 'Library' (From Doc Libraries) it lists 2 items, but when i navigate to that page I do not see any listings..your help is greatly appreciated! Thanks PaulAnonymous
January 01, 2003
Good work done :)!Anonymous
January 01, 2003
Very web explained!!Anonymous
January 01, 2003
Excellent...Well explained..Anonymous
August 19, 2012
Noticed it looks like this is part of a larger project mgmt solution. Do you have that whole solution blogged elsewhere?Anonymous
November 21, 2012
Hello, Excellent, but a question. How can I create the Document Set in thet current library instead of having to chose a library (by clicking on the "this list"-link and choose). I want to create a reusable workflow to create a DocSet in any library where the workflow is started. Is this possible?Anonymous
December 06, 2012
Great article thank you! I have a workflow that creates the document set! However, none of the default documents that are set to the document set are being created. What did I miss? =/Anonymous
January 17, 2013
I have the workflow create the document set, but it does not create any of the Documents. Did i do something Wrong?Anonymous
April 04, 2013
I am also failing so see any files within the newly created folder. Help?!? Did anyone find a solution?Anonymous
May 20, 2013
Great Pist .. helped me alot thankuAnonymous
May 29, 2013
This is a great article and it worked perfectly. Is there a way to use the same type of approach to copy "Attachments" from the source list into the document set that you just created?Anonymous
June 13, 2013
This wast great! It was simple and easy to follow! Thanks for posting!Anonymous
July 08, 2013
Awesome nice post ...working fine...:PAnonymous
October 09, 2013
Hi, Thank you for the post really helps, I wanted to find out if there was a way to store the URL of the created document set in a column in the list itself. Thanks againAnonymous
November 21, 2013
Great job it was very helpful. Question; do you have experience in a workflow action "Collect data from User"Anonymous
July 06, 2014
Thanks, nice post with detailed screen shotAnonymous
August 07, 2014
I am having the same problem. The document set is not showing any of the pre existing documents in the new document set? Any solution to this?Anonymous
September 08, 2014
Thanks. Nice Post.Anonymous
December 29, 2014
The content did not create with the document set. Did anyone find a solution to this issue?Anonymous
August 11, 2017
Anne, Thank you very much. This is very helpful, and I especially like that you cover each step with a screen shot. You should write a book because it is very difficult to find a good reference. The best I found is Sharepoint Cookbook by Won-A-Ton. Hoping this stuff will move OK to Sharepoint 2016 when we get that deployed.


