Packaging and Deploying Windows Mobile applications
In my last couple of projects, one of the issues I consistently ran into was packaging and deployment. Although there are several resources distributed all over MSDN on this topic, none of them covered the task as a whole. So, here is my take and consolidation of the packaging and deployment tasks in real life scenarios.
The story of packaging begins of course only once you have compiled all your code and the output is available in the form of executable (.exe) or dynamically linked library (.dll) files or both. It is possible to deploy the output files directly to the device into a folder on the device and run the executable. This is exactly how Visual Studio does it while development. But this is neither efficient nor elegant and in most production packaging cases does not provide for extra functionality required like setting up registry, creating shortcuts, etc.
Applications must be packaged into a manageable form - which in the case of .Net CF applications is a Cabinet (.cab) file.
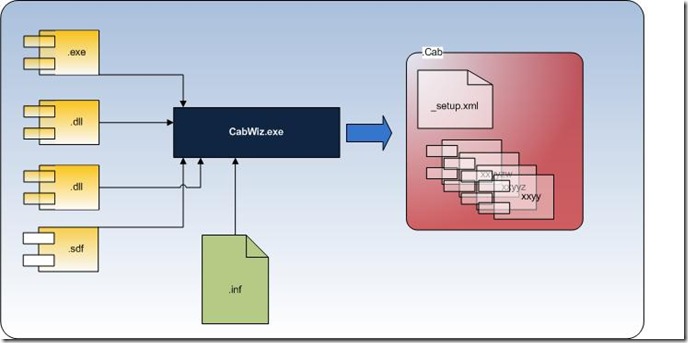
To create a cabinet file, the command line CabWiz utility is run over the deployment components and a .inf file that contains instructions for the CabWiz tool. The resultant output is a single cabinet file which is basically constituted of the deployment components and metadata about how to go about deploying them onto the device as shown in the figure above.
The information file is a text file divided into sections for different types of instructions that allow us to do a number of useful things during deployment in addition to specifying the deployment components.
-
- Add registry entries
- specify the destination directories
- create shortcuts on the device
- specify the version and creator of the file
- much more ..
For more detailed information on the sections in the information file see here - Information File reference
command line? ... I'm too lazy for that - Well, since most of us have evolved (please spare me the flame -you know its true) into more efficient developers by the use of IDEs, lets take a look at how to achieve this from within the cosy confines of our favourite IDE - Visual Studio. Assuming that you already have the application code ready, its a metter of three simple steps
Step 1: Add a new CAB Project to the solution.
File > Add > New Project > Other Project Types > Smart Device CAB Project
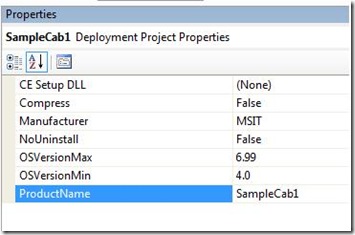
At this point all that is done in the background is a file of type ".vddproj" is created in the appropriate directory which contains very basic information that can be modified through the project properties pane
All these properties correspond to a section of the .inf file used as the input to cabwiz.exe. However, at this point we don't yet have a .inf file created.
Step 2: Add files to the project
Right click on the Cab Project and click on Add > Project Output and select the project you want deployed on the device.Now the project is populated with the output and it lists dependencies for the project output as well.
For large projects, you would want to cut down on the CAB size by
a) Excluding extraneous files from the project output
b) Examining the dependency dlls added by VS automatically: In some cases - especially when referencing dlls that are expected to be in GAC, VS 2005 may not pick up the correct dependencies.To reduce the size of the CAB being created, always watch out for what is being included in the project as dependency. I have been able to cut down on many megs by being careful with what VS deploys automatically. In one case VS insisted upon deploying the mscorlib.dll due to version conflicts.
Step 3: Build
This step leads to the creation of the .inf file described earlier and is feed by VS to CabWiz to generate the cab files. A simple project cab file creation command might look something like
"C:\Program Files\Microsoft Visual Studio 8\smartdevices\sdk\sdktools\cabwiz.exe" "D:\Visual Studio 2005\Projects\SampleCab1\Debug\SampleCab.inf" /dest "D:\Visual Studio 2005\Projects\SampleCab1\Debug\" /err CabWiz.log"
And voila - The Cab file is created under the \Debug or \Release folder depending upon build configuration of the project.I have been deliberately brief about this procedure as there are enough resources out there to guide you around this. Instead lets dig into some of the more complex scenarios that crop up during production packaging
Advanced Deployment Tasks
Creating Registry entries
Registry entries can be created programmatically using the Microsoft.Win32.Registry namespace - AVOID this for creating new registry entries. Registry entries created programmatically like this will not be cleaned up automatically during un-install. Instead use the CAB packaging feature for this. Using visual studio its an absolute snap to create new registry entries. Simply create the expected folder structure, and add your keys and values as required. If the folder structure you have specified already exists, it will be re-used without any conflicts. Best of all, when your app is un-installed, the entries created through this step will magically also disappear.
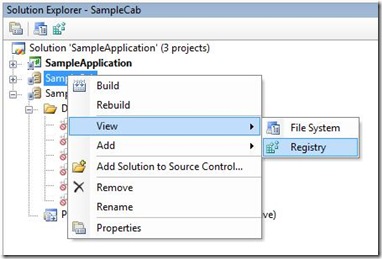
Right-click on the CAB project > View > Registry; Create hierarchical structure under the appropriate hive; add entries
Starting programs on Soft-Reset
There are two ways of automatically starting up your application on device soft-reset - Startup folder and Registry configuration.
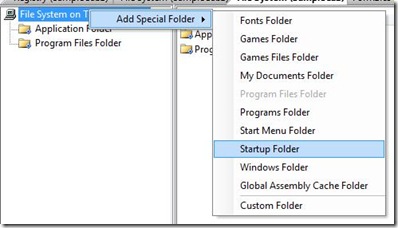
Startup Folder: Create a shortcut to your application and place it in the special "startup" folder as shown below. This is the simplest approach for starting up your application, but the startup sequence is not predictable and typically all the programs in this folder will be started up at once. This will usually suffice in most situations but will not work if you have hard dependency upon other elements of the OS to load up.
Registry Setting: You can also register your application to start with the registry under HKLM \ init folder. The advantage of this approach is that it allows you to build up a dependency tree.
Each Launchxx entry conatins the location of the application to be started up and its corresponding Dependsxx contains (in hex) the reference number of the program it depends upon. Thus a dependency tree is maintained for the startup application. Note also that you can create more than one dependency for each application. For example in the figure to the left, Depends85 has a value of 3d 00, which is 61 in decimal. This means that Lunch85 (appman.exe) is dependant upon Launch61 which is ciphase2.exe. Similarly, Launch61 is dependant upon 280 0 and 3c 00 which are 40 and 60 respectively in decimal.
For your application you need to create 1) String value for Launchxx, where xx is an arbitrarily selected value and 2) a corresponding binary value for Dependsxx.
Pesky Pesky Typeloadexception on Startup: Even after creating dependencies in the appropriate dependencies in the registry you find that your application is throwing up a Typeloadexception. This could be due to the fact that registry settings in theory allow for sequencing between CE system processes, they does not hold good if you are dependent upon other assemblies in the GAC to load into memory. You may have to provide a delay timer in your startup code of application to ensure that all your dependant assemblies are present in memory. Not nice, but I have not been able to find a reliable way to workaround this problem... yet !
Custom deployment programming
If the options provided by the CAB project options is not enough for you needs, you have the option of configuring a setup dll with the cab which can be programmed to provide any custom actions required. The setup dll, however has to be an unmanaged COM style library. I won't go into much more detail, because this is explained in sufficient detail here
Deploying Multiple Cabs
In many cases it is necessary to deploy dependant CAB files along with your custom application - usually when you need to deploy a newer version of CF or SQL server or some other infrastructure component to the device. This can be done via a process called cab chaining and a very good example is provided along with the Window Mobile 5/6 SDK usually found at C:\Program Files\Windows Mobile 6 SDK\Samples\Common\CPP\Win32\multicabinstall. It works like a charm - follow the instruction provided and re-use away to full affect.
whew.. that's it folks..
Comments
- Anonymous
August 24, 2008
Here is a noteworthy blog which explains on Packaging and deploying applications for Windows Mobile. - Anonymous
August 25, 2008
http://blogs.msdn.com/agujjar/archive/2007/11/19/packaging-and-deploying-windows-mobile-applications


