Build Plug-ins with AD FS 2019 Risk Assessment Model
You can now build your own plug-ins to block or assign a risk score to authentication requests during various stages – request received, pre-authentication and post-authentication. This can be accomplished using the new Risk Assessment Model introduced with AD FS 2019.
What is the Risk Assessment Model?
The Risk Assessment Model is a set of interfaces and classes which enable developers to read authentication request headers and implement their own risk assessment logic. The implemented code (plug-in) then runs in line with AD FS authentication process. For example, using the interfaces and classes included with the model, you can implement code to either block or allow authentication request based on the client IP address included in the request header. AD FS will execute the code for each authentication request and take appropriate action as per the implemented logic.
The model allows to plug-in code at any of three stages of AD FS authentication pipeline as shown below:
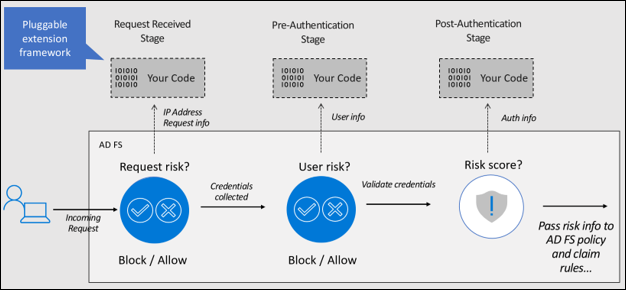
Request Received Stage – Enables building plug-ins to allow or block request when AD FS receives the authentication request i.e. before user enters credentials. You can use the request context (for example: client IP, Http method, proxy server DNS, etc.) available at this stage to perform the risk assessment. For example, you can build a plug-in to read the IP from the request context and block the authentication request if the IP is in the pre-defined list of risky IPs.
Pre-Authentication Stage – Enables building plug-ins to allow or block request at the point where user provides the credentials but before AD FS evaluates them. At this stage, in addition to the request context you also have information on the security context (for example: user token, user identifier, etc) and the protocol context (for example: authentication protocol, clientID, resourceID, etc) to use in your risk assessment logic. For example, you can build a plug-in to prevent password spray attacks by reading the user password from the user token and blocking the authentication request if the password is in the pre-defined list of risky passwords.
Post-Authentication – Enables building plug-in to assess risk after user has provided credentials and AD FS has performed authentication. At this stage, in addition to the request context, security context, and protocol context, you also have information on the authentication result (Success or Failure). The plug-in can evaluate the risk score based on the available information and pass the risk score to claim and policy rules for further evaluation.
To better understand how to build a risk assessment plug-in and run it in line with AD FS process, let's build a sample plug-in that blocks the requests coming from certain extranet IPs identified as risky, register the plug-in with AD FS and finally test the functionality.
Note
Alternatively, you can build Risky User Plug-in, a sample plug-in that leverages user risk level determined by Microsoft Entra ID Protection to block authentication or enforce multi-factor authentication (MFA). Steps to build Risky User Plug-in are available here.
Building a sample plug-in
Note
This walkthrough is only to show you how you can create a sample plug-in. The solution we're creating is by no means an Enterprise-ready solution.
Pre-requisites
Following is the list of pre-requisites required to build this sample plug-in:
- AD FS 2019 installed and configured
- .NET Framework 4.7 and above
- Visual Studio
Build plug-in dll
The following procedure will walk you through building a sample plug-in dll:
- Download the sample plug-in, use Git Bash and type the following:
git clone https://github.com/Microsoft/adfs-sample-RiskAssessmentModel-RiskyIPBlock
- Create a .csv file at any location on your AD FS server (in my case, I created the authconfigdb.csv file at C:\extensions) and add the IPs you want to block to this file.
The sample plug-in will block any authentication requests coming from the Extranet IPs listed in this file.
Note
If you have an AD FS Farm, you can create the file on any or all the AD FS servers. Any of the files can be used to import the risky IPs into AD FS. We'll discuss the import process in detail in the Register the plug-in dll with AD FS section below.
Open the project
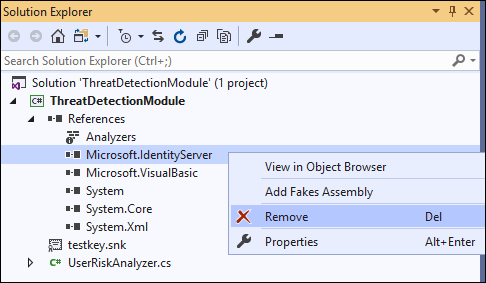
ThreatDetectionModule.slnusing Visual Studio.Remove the
Microsoft.IdentityServer.dllfrom the Solutions Explorer as shown below:
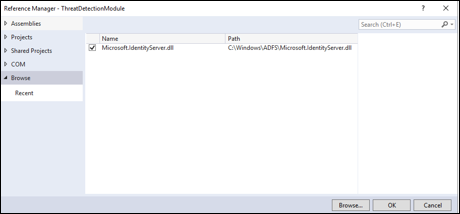
Add reference to the
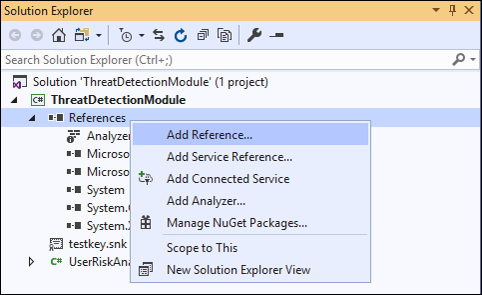
Microsoft.IdentityServer.dllof your AD FS as shown below:
a. Right click on References in Solutions Explorer and select Add Reference….
b. On the Reference Manager window, select Browse. In the Select the files to reference… dialogue, select Microsoft.IdentityServer.dll from your AD FS installation folder (in my case C:\Windows\ADFS) and click Add.
Note
In my case, I'm building the plug-in on the AD FS server itself. If your development environment is on a different server, copy the Microsoft.IdentityServer.dll from your AD FS installation folder on AD FS server on to your development box.
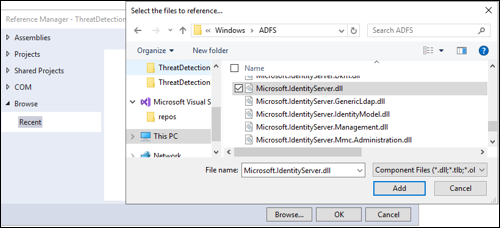
c. Click OK on the Reference Manager window after making sure the Microsoft.IdentityServer.dll check box is selected.
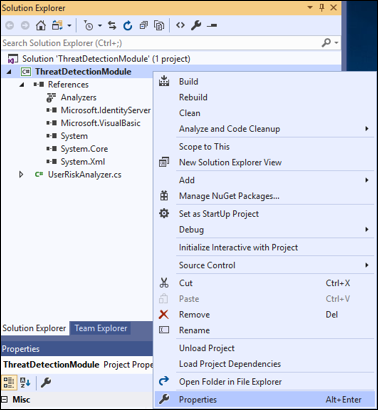
- All the classes and references are now in place to do a build. However, since the output of this project is a dll, it will have to be installed into the Global Assembly Cache, or GAC, of the AD FS server and the dll needs to be signed first. This can be done as follows:
a. Right-click on the name of the project, ThreatDetectionModule. From the menu, click Properties.
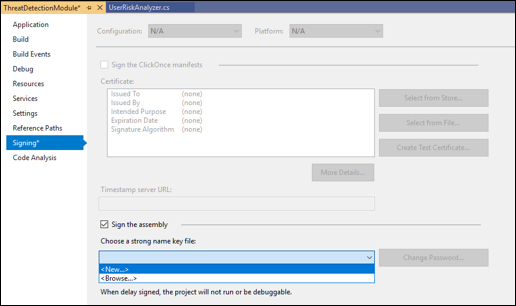
b. From the Properties page, click Signing, on the left, and then check the check box marked Sign the assembly. From the Choose a strong name key file: pull down menu, select <New...>.
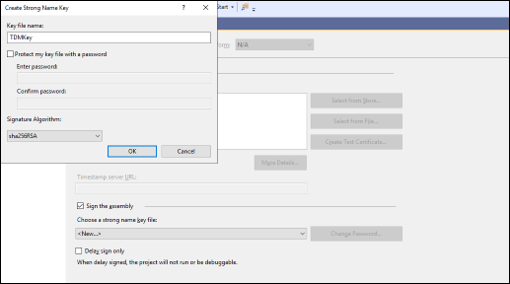
c. In the Create Strong Name Key dialogue, type a name (you can choose any name) for the key, uncheck the check box Protect my key file with password. Then, click OK.
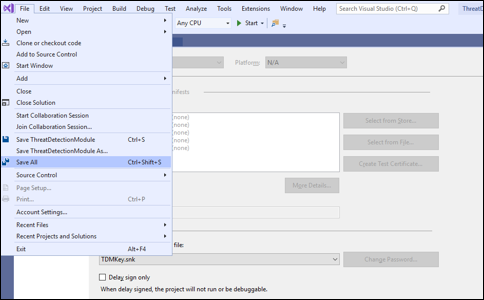
d. Save the project as shown below:
- Build the project by clicking Build and then Rebuild Solution as shown below:
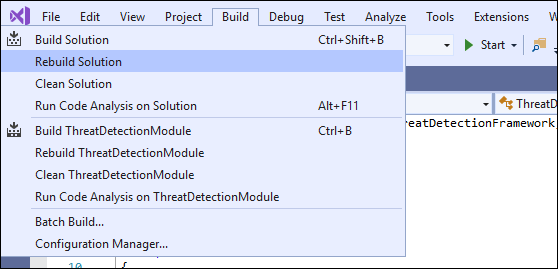
Check the Output window at the bottom of the screen, to see if any errors occurred.

The plug-in (dll) is now ready for use and is in the \bin\Debug folder of the project folder (in my case, that's C:\extensions\ThreatDetectionModule\bin\Debug\ThreatDetectionModule.dll).
The next step is to register this dll with AD FS, so it runs in line with the AD FS authentication process.
Register the plug-in dll with AD FS
We need to register the dll in AD FS by using the Register-AdfsThreatDetectionModule PowerShell command on the AD FS server. However, before we register, we need to get the Public Key Token. This public key token was created when we created the key and signed the dll using that key. To learn what the Public Key Token for the dll is, you can use the SN.exe as follows:
Copy the dll file from the \bin\Debug folder to another location (in my case, copying it to C:\extensions).
Start the Developer Command Prompt for Visual Studio and go to the directory containing the sn.exe (in my case, the directory is C:\Program Files (x86)\Microsoft SDKs\Windows\v10.0A\bin\NETFX 4.7.2 Tools).

- Run the SN command with the -T parameter and the location of the file (in my case
SN -T "C:\extensions\ThreatDetectionModule.dll").
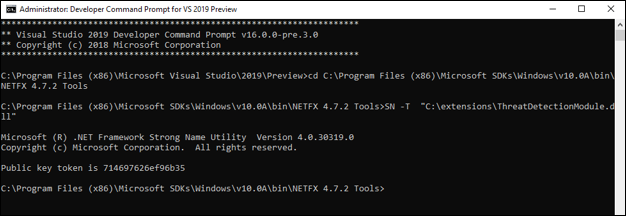
The command will provide you the public key token (For me, the Public Key Token is 714697626ef96b35)
- Add the dll to the Global Assembly Cache of the AD FS server Our best practice would be that you create a proper installer for your project and use the installer to add the file to the GAC. Another solution is to use Gacutil.exe (more information on Gacutil.exe available here) on your development machine. Since I have my visual studio on the same server as AD FS, I'll be using Gacutil.exe as follows:
a. On Developer Command Prompt for Visual Studio and go to the directory containing the Gacutil.exe (in my case, the directory is C:\Program Files (x86)\Microsoft SDKs\Windows\v10.0A\bin\NETFX 4.7.2 Tools).
b. Run the Gacutil command (in my case Gacutil /IF C:\extensions\ThreatDetectionModule.dll):

Note
If you have an AD FS farm, the above needs to be executed on each AD FS server in the farm.
- Open Windows PowerShell and run the following command to register the dll:
Register-AdfsThreatDetectionModule -Name "<Add a name>" -TypeName "<class name that implements interface>, <dll name>, Version=10.0.0.0, Culture=neutral, PublicKeyToken=< Add the Public Key Token from Step 2. above>" -ConfigurationFilePath "<path of the .csv file>"
In my case, the command is:
Register-AdfsThreatDetectionModule -Name "IPBlockPlugin" -TypeName "ThreatDetectionModule.UserRiskAnalyzer, ThreatDetectionModule, Version=10.0.0.0, Culture=neutral, PublicKeyToken=714697626ef96b35" -ConfigurationFilePath "C:\extensions\authconfigdb.csv"
Note
You need to register the dll only once, even if you have an AD FS farm.
- Restart the AD FS service after registering the dll.
That's it, the dll is now registered with AD FS and ready for use!
Note
If any changes are made to the plugin and the project is rebuilt, then the updated dll needs to be registered again. Before registering, you'll need to unregister the current dll using the following command:
UnRegister-AdfsThreatDetectionModule -Name "<name used while registering the dll in 5. above>"
In my case, the command is:
UnRegister-AdfsThreatDetectionModule -Name "IPBlockPlugin"
Testing the plug-in
- Open the authconfig.csv file we created earlier (in my case at location C:\extensions) and add the Extranet IPs you want to block. Every IP should be on a separate line and there should be no spaces at the end.

Save and close the file.
Import the updated file in AD FS by running the following PowerShell command:
Import-AdfsThreatDetectionModuleConfiguration -name "<name given while registering the dll>" -ConfigurationFilePath "<path of the .csv file>"
In my case, the command is:
Import-AdfsThreatDetectionModuleConfiguration -name "IPBlockPlugin" -ConfigurationFilePath "C:\extensions\authconfigdb.csv")
- Initiate authentication request from the server with the same IP you added in authconfig.csv.
Enter federation server instance and hit Test Authentication button.
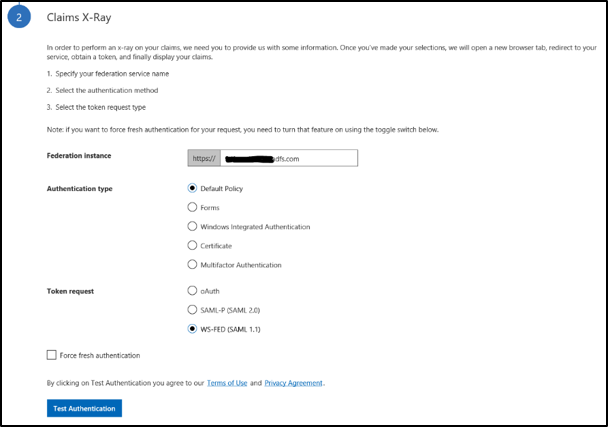
- Authentication is blocked as shown below.
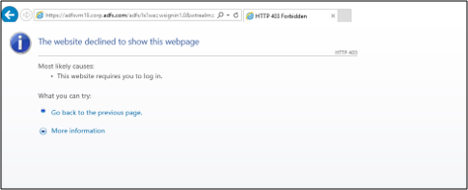
Now that we know how to build and register the plug-in, let's walkthrough the plug-in code to understand the implementation using the new interfaces and classes introduced with the model.
Plug-in code walkthrough
Open the project ThreatDetectionModule.sln using Visual Studio and then open the main file UserRiskAnalyzer.cs from the Solutions Explorer on the right of the screen

The file contains the main class UserRiskAnalyzer which implements the abstract class ThreatDetectionModule and interface IRequestReceivedThreatDetectionModule to read the IP from the request context, compare the obtained IP with the IPs loaded from AD FS DB, and block request if there's an IP match. Let's go over these types in more detail
ThreatDetectionModule abstract class
This abstract class loads the plug-in into AD FS pipeline making it possible to run the plug-in code in line with AD FS process.
public abstract class ThreatDetectionModule
{
  protected ThreatDetectionModule();

  public abstract string VendorName { get; }
  public abstract string ModuleIdentifier { get; }

  public abstract void OnAuthenticationPipelineLoad(ThreatDetectionLogger logger, ThreatDetectionModuleConfiguration configData);
  public abstract void OnAuthenticationPipelineUnload(ThreatDetectionLogger logger);
  public abstract void OnConfigurationUpdate(ThreatDetectionLogger logger, ThreatDetectionModuleConfiguration configData);
}
The class includes the following methods and properties:
| Method | Type | Definition |
|---|---|---|
| OnAuthenticationPipelineLoad | Void | Called by AD FS when the plugin is loaded into its pipeline |
| OnAuthenticationPipelineUnload | Void | Called by AD FS when the plugin is unloaded from its pipeline |
| OnConfigurationUpdate | Void | Called by AD FS on config update |
| Property | Type | Definition |
| VendorName | String | Gets the name of the vendor owning the plugin |
| ModuleIdentifier | String | Gets the identifier of the plugin |
In our sample plugin, we're using OnAuthenticationPipelineLoad and OnConfigurationUpdate methods to read the pre-defined IPs from AD FS DB. OnAuthenticationPipelineLoad is called when plug-in is registered with AD FS while OnConfigurationUpdate is called when the .csv is imported using the Import-AdfsThreatDetectionModuleConfiguration cmdlet.
IRequestReceivedThreatDetectionModule Interface
This interface enables you to implement risk assessment at the point where AD FS receives the authentication request, but before user enters credentials i.e. at Received Request stage of the authentication process.
public interface IRequestReceivedThreatDetectionModule
{
  Task<ThrottleStatus> EvaluateRequest (
  ThreatDetectionLogger logger,
  RequestContext requestContext );
}
The interface includes EvaluateRequest method which allows you to use the context of the authentication request passed in the requestContext input parameter to write your risk assessment logic. The requestContext parameter is of type RequestContext.
The other input parameter passed is logger which is type ThreatDetectionLogger. The parameter can be used to write the error, audit and/or debug messages to AD FS logs.
The method returns ThrottleStatus (0 if NotEvaluated, 1 to Block, and 2 to Allow) to AD FS which then either blocks or allows the request.
In our sample plug-in, EvaluateRequest method implementation parses the clientIpAddress from the requestContext parameter and compares it with all the IPs loaded from the AD FS DB. If a match is found, method returns 2 for Block, else it returns 1 for Allow. Based on the returned value, AD FS either blocks or allows the request.
Note
The sample plug-in discussed above implements only IRequestReceivedThreatDetectionModule interface. However, the risk assessment model provides two additional interfaces –IPreAuthenticationThreatDetectionModule (to implement risk assessment logic during pre-authentication stage) and IPostAuthenticationThreatDetectionModule (to implement risk assessment logic during post-authentication stage). The details on the two interfaces are provided below.
IPreAuthenticationThreatDetectionModule Interface
This interface enables you to implement risk assessment logic at the point where user provides the credentials but before AD FS evaluates them i.e. pre-authentication stage.
public interface IPreAuthenticationThreatDetectionModule
{
  Task<ThrottleStatus> EvaluatePreAuthentication (
  ThreatDetectionLogger logger,
  RequestContext requestContext,
  SecurityContext securityContext,
  ProtocolContext protocolContext,
  IList<Claim> additionalClams
  );
}
The interface includes EvaluatePreAuthentication method which allows you to use the information passed in the RequestContext requestContext, SecurityContext securityContext, ProtocolContext protocolContext, and IList<Claim> additionalClams input parameters to write your pre-authentication risk assessment logic.
Note
For list of properties passed with each context type, visit RequestContext, SecurityContext, and ProtocolContext class definitions.
The other input parameter passed is logger which is type ThreatDetectionLogger. The parameter can be used to write the error, audit and/or debug messages to AD FS logs.
The method returns ThrottleStatus (0 if NotEvaluated, 1 to Block, and 2 to Allow) to AD FS which then either blocks or allows the request.
IPostAuthenticationThreatDetectionModule Interface
This interface enables you to implement risk assessment logic after user has provided credentials and AD FS has performed authentication i.e. post-authentication stage.
public interface IPostAuthenticationThreatDetectionModule
{
  Task<RiskScore> EvaluatePostAuthentication (
  ThreatDetectionLogger logger,
  RequestContext requestContext,
  SecurityContext securityContext,
  ProtocolContext protocolContext,
  AuthenticationResult authenticationResult,
  IList<Claim> additionalClams
  );
}
The interface includes EvaluatePostAuthentication method which allows you to use the information passed in the RequestContext requestContext, SecurityContext securityContext, ProtocolContext protocolContext, and IList<Claim> additionalClams input parameters to write your post-authentication risk assessment logic.
Note
For complete list of properties passed with each context type, refer RequestContext, SecurityContext, and ProtocolContext class definitions.
The other input parameter passed is logger which is type ThreatDetectionLogger. The parameter can be used to write the error, audit and/or debug messages to AD FS logs.
The method returns the Risk Score which can be used in AD FS policy and claim rules.
Note
For plug-in to work, the main class (in this case UserRiskAnalyzer) needs to derive ThreatDetectionModule abstract class and should implement at least one of the three interfaces described above. Once the dll is registered, AD FS checks which of the interfaces are implemented and calls them at appropriate stage in the pipeline.
FAQs
Why should I build these plug-ins?
A: These plug-ins not only provide you additional capability to secure your environment from attacks such as password spray attacks, but also give you the flexibility to build your own risk assessment logic based on your requirements.
Where are the logs captured?
A: You can write error logs to "AD FS/Admin" event log using WriteAdminLogErrorMessage method, audit logs to "AD FS Auditing" security log using WriteAuditMessage method and debug logs to "AD FS Tracing" debug log using WriteDebugMessage method.
Can adding these plug-ins increase AD FS authentication process latency?
A: Latency impact will be determined by the time taken to execute the risk assessment logic you implement. We recommend evaluating the latency impact before deploying the plug-in in production environment.
Why can't AD FS suggest the list of risky IPs, users, etc.?
A: Though not currently available, we're working on building the intelligence to suggest risky IPs, users, etc. in the Pluggable Risk Assessment Model. We'll share the launch dates soon.
What other sample plug-ins are available?
A: The following sample plug-in(s) are available:
| Name | Description |
|---|---|
| Risky User Plug-in | Sample plug-in that blocks authentication or enforces MFA based on user risk level determined by Microsoft Entra ID Protection. |