Filter data when importing PST files
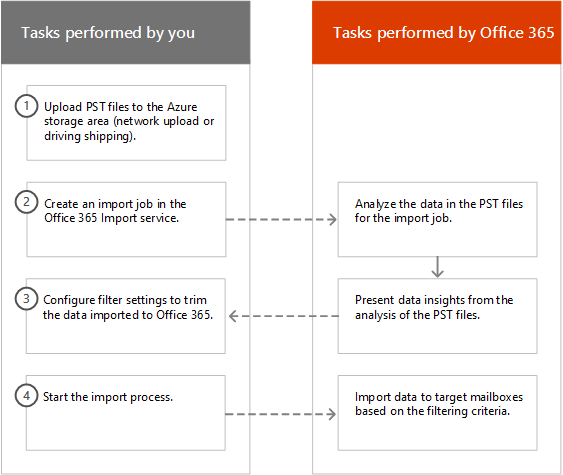
Use the new Intelligent Import feature in the Microsoft 365 Import service to filter the items in PST files that actually get imported to the target mailboxes. Here's how it works:
After you create and submit a PST import job, PST files are uploaded to an Azure storage area in the Microsoft cloud.
Microsoft 365 analyzes the data in the PST files, in a safe and secure manner, by identifying the age of the mailbox items and the different message types included in the PST files.
When the analysis is complete and the data is ready to import, you have the option to import all data in the PST files as is or trim the data that's imported by setting filters that control what data gets imported. For example, you can choose to:
Import only items of a certain age.
Import selected message types.
Exclude messages sent or received by specific people.
After you configure the filter settings, Microsoft 365 imports only the data that meets the filtering criteria to the target mailboxes specified in the import job.
The following graphic shows the Intelligent Import process, and highlights the tasks you perform and the tasks performed by Office 365.
Tip
If you're not an E5 customer, use the 90-day Microsoft Purview solutions trial to explore how additional Purview capabilities can help your organization manage data security and compliance needs. Start now at the Microsoft Purview trials hub. Learn details about signing up and trial terms.
Create a PST import job
The steps in this article assume that you've created a PST import job in the Office 365 Import service by using network upload or drive shipping. For step-by-step instructions, see one of the following articles:
After you create an import job by using network upload, the status for the import job on the Import page in the Microsoft Purview compliance portal is set to Analysis in progress, which means that Microsoft 365 is analyzing the data in the PST files that you uploaded. Select Refresh
 to update the status for the import job.
For drive shipping import jobs, the data will be analyzed by Microsoft 365 after Microsoft datacenter personnel receive your hard drive and upload the PST files to the Azure storage area for your organization.
Filter data that gets imported to mailboxes
After you've created a PST import job, follow these steps to filter the data before you import it to Office 365.
Go to Microsoft Purview compliance portal and sign in using the credentials for an administrator account in your organization.
In the left pane of the compliance portal, select Data lifecycle management > Microsoft 365 > Import.
The import jobs for your organization are listed on the Import tab. The Analysis completed value in the Status column indicates the import jobs that have been analyzed by Microsoft 365 and are ready for you to import.

Select the import job that you want to complete and select Import to Office 365.
A fly out page is displayed with information about the PST files and other information about the import job.
Select Import to Office 365.
The Filter your data page is displayed. It contains data insights about the data in the PST files for the import job, including information about the age of the data.
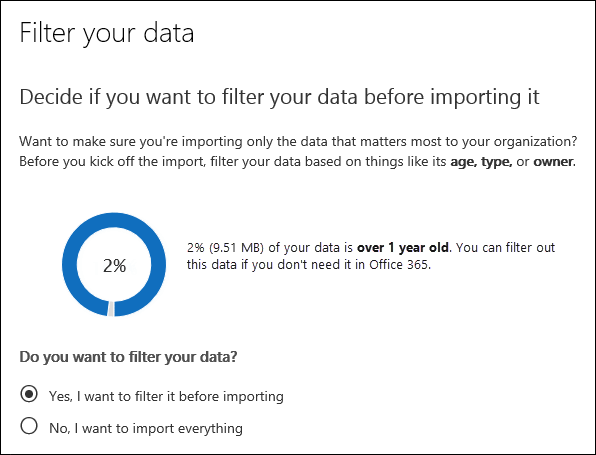
Based on whether or not you want to trim the data that's imported to Microsoft 365, under Do you want to filter your data?, do one of the following:
a. Select Yes, I want to filter it before importing to trim the data that you import, and then select Next.
The Import data to Office 365 page page is displayed with detailed data insights from the analysis that Microsoft 365 performed.
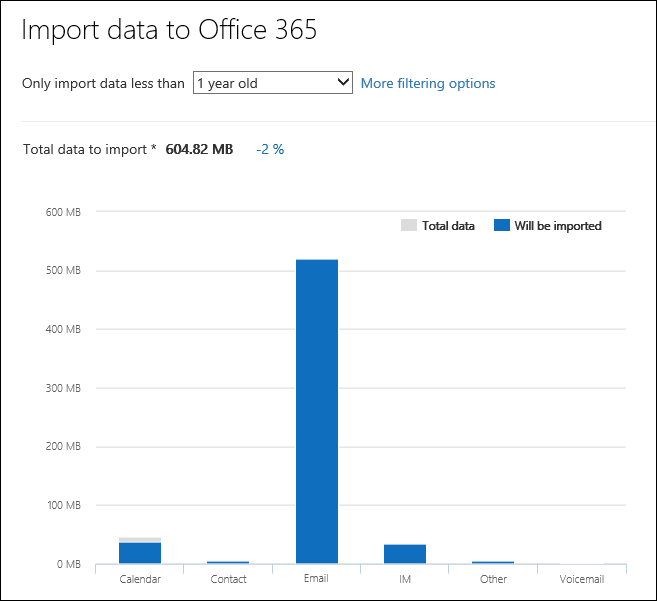
The graph on this page shows the amount of data that will be imported. Information about each message type found in the PST files is displayed in the graph. You can hover the cursor over each bar to display specific information about that message type. There's also a drop-down list with different age values based on the analysis of the PST files. When you select an age in the drop-down list, the graph is updated to show how much data will be imported for the selected age.
b. To configure addition filters to reduce the amount of data that's imported, select More filtering options.
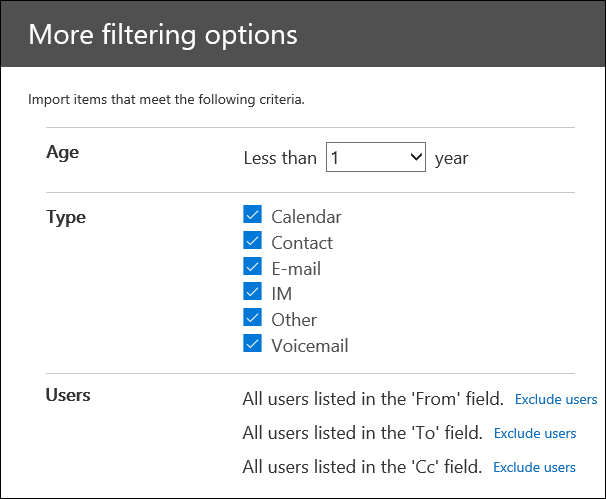
You can configure these filters:
Age - Select an age so only items that are newer than the specified age will be imported. See the More information section for a description about how Microsoft 365 determines the age buckets for the Age filter.
Type - This section shows all the message types that were found in the PST files for the import job. You can uncheck a box next to a message type that you want to exclude. You can't exclude the Other message type. See the More information section for a list of mailbox items that are included in the Other category.
Users - You can exclude messages that are sent or received by specific people. To exclude people who appear in the From: field, To: field, or the Cc: field of messages, select Exclude users next to that recipient type. Type the email address (SMTP address) of the person, select Add
 to add them to the list of excluded users for that recipient type, and then select Save to save the list of excluded users.
Note
Microsoft 365 doesn't show data insights that result from setting the People filter. However, if you set this filter to exclude messages sent or received by specific people, those messages will be excluded during the actual import process.
c. Select Apply in the More filtering options fly out page to save your filter settings.
The data insights on the Import data to Office 365 page are updated based on your filter settings, including the total amount of data that will be imported based on the filter settings. A summary of the filter settings is also shown. You can select Edit next to a filter to change the setting if necessary.
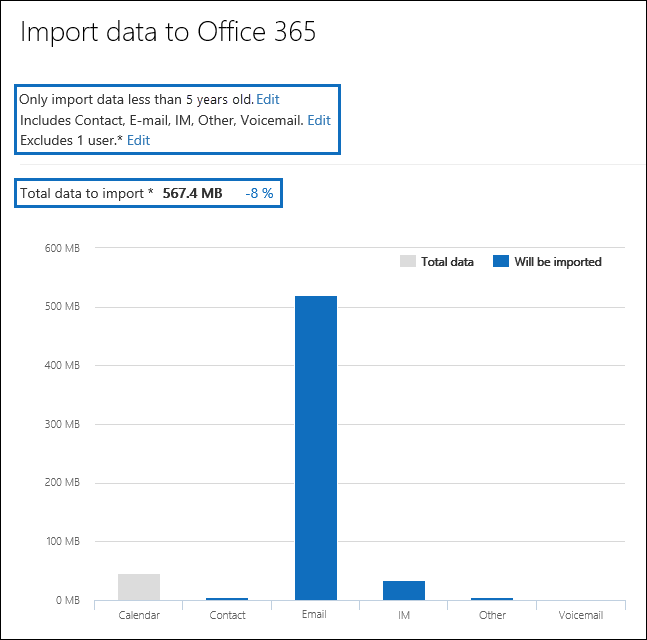
d. Select Next.
A status page is displayed showing your filter settings. Again, you can edit any of the filter settings.
e. Select Import data to start the import. The total amount of data that will be imported is displayed.
Or
a. Select No, I want to import everything to import all data in the PST files to Office 365, and then select Next.
b. On the Import data to Office 365 page, select Import data to start the import. The total amount of data that will be imported is displayed.
On the Import tab, select Refresh
 . The status for the import job is displayed in the Status column.
Select the import the job to display more detailed information, such as the status for each PST file and the filter settings that you configured.
More information
How does Microsoft 365 determine the increments for the age filter? When Microsoft 365 analyzes a PST file, it looks at the sent or received time stamp of each item (if an item has both a sent and received timestamp, the oldest date is selected). Then Microsoft 365 looks at the year value for that timestamp and compares it to the current date to determine the age of the item. These ages are then used as the values in the drop-down list for the Age filter. For example, if a PST file has messages from 2016, 2015, and 2014, then values in the Age filter would be 1 year, 2 years, and 3 years.
The following table lists the message types that are included in the Other category in the Type filter on the More options fly out page (see Step 5b in the previous procedure). Currently, you can't exclude items in the "Other" category when you import PSTs to Office 365.
Message class ID Mailbox items that use this message class IPM.Activity Journal entries IPM.Document Documents and files (not attached to an email message) IPM.File (same as IPM.Document) IPM.Note.IMC.Notification Reports sent by Internet Mail Connect, which is the Exchange Server gateway to the Internet IPM.Note.Microsoft.Fax Fax messages IPM.Note.Rules.Oof.Template.Microsoft Out-of-office autoreply messages IPM.Note.Rules.ReplyTemplate.Microsoft Replies sent by an inbox rule IPM.OLE.Class Exceptions for a recurring series IPM.Recall.Report Message recall reports IPM.Remote Remote mail messages IPM.Report Item status reports