Configure an Azure cloud service project with Visual Studio
Applies to: ![]() Visual Studio
Visual Studio ![]() Visual Studio for Mac
Visual Studio for Mac
Note
This article applies to Visual Studio 2017. If you're looking for the latest Visual Studio documentation, see Visual Studio documentation. We recommend upgrading to the latest version of Visual Studio. Download it here
You can configure an Azure cloud service project, depending on your requirements for that project. You can set properties for the project for the following categories:
- Publish a cloud service to Azure - You can set a property to make sure that an existing cloud service deployed to Azure is not accidentally deleted.
- Run or debug a cloud service on the local computer - You can select a service configuration to use and indicate whether you want to start the Azure Storage Emulator.
- Validate a cloud service package when it is created - You can decide to treat any warnings as errors so that you can ensure that the cloud service package deploys without any issues.
Steps to configure an Azure cloud service project
Open or create a cloud service project in Visual Studio
In Solution Explorer, right-click the project, and, from the context menu, select Properties.
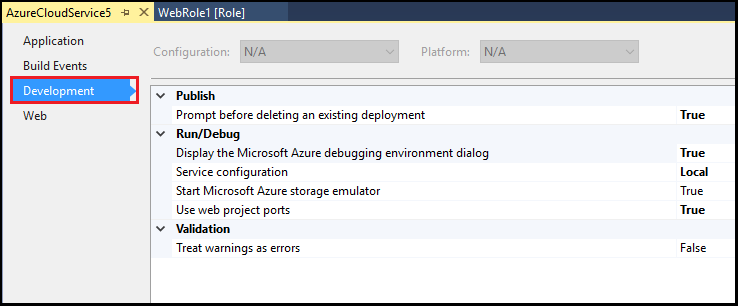
In the project's properties page, select the Development tab.

Set Prompt before deleting an existing deployment to True. This setting helps to ensure you don't accidentally delete an existing deployment in Azure
Select the desired Service configuration to indicate which service configuration you want to use when you run or debug your cloud service locally. For more information on how to modify a service configuration for a role, see How to configure the roles for an Azure cloud service with Visual Studio.
Set Start Azure Storage Emulator to True to start the Azure Storage Emulator when you run or debug your cloud service locally.
Set Treat warnings as errors to True to make sure you cannot publish if there are package validation errors.
Set Use web project ports to True to make sure that your web role uses the same port each time it starts locally in IIS Express.
From the Visual Studio toolbar, select Save.