Customize Microsoft Dynamics 365 Power BI content packs
Applies To: Dynamics 365 (online), Dynamics CRM Online
Microsoft Power BI is a comprehensive collection of services and tools that you use to visualize your business data. Content packs are available that make it easy to visualize and analyze the Dynamics 365 data with Power BI based on a standard data model. The content packs are built with a set of Dynamics 365 entities and fields that are useful for most sales, service, or marketing reporting scenarios.
Instances of Dynamics 365 are often extended with custom fields. These custom fields don’t automatically show up in the Power BI model. This topic describes the different ways that you can edit or extend the reports included in a content pack to include custom fields in the Power BI model.
In this topic
Do this before you customize a Dynamics 365 content pack for Power BI reports
Customize a Dynamics 365 content pack
Publish your report to the Power BI service
Do this before you customize a Dynamics 365 content pack for Power BI reports
Before you customize a content pack, read the information here and perform each task as necessary.
Requirements
Power BI Desktop application for editing Power BI reports.
PBIX file for the content pack that you want to customize.
Dynamics 365 (online) content packs are currently only supported in the U.S. English language.
Prepare a content pack for customization
Important
To connect the OData feed to your Dynamics 365 (online) instance you must follow the steps described here before you customize the content pack.
Start Power BI Desktop.
Click File > Open, open a content pack, such as Sales Manager.bpix, and then click Open.
Several pages of reports within the content pack are loaded and displayed in Power BI Desktop.
On the Power BI Desktop ribbon, click Edit Queries.
In the left navigation pane of the Edit Queries window, under Queries, click the CRMServiceUrl query, and then on the ribbon, click Advanced Editor. In the source definition, replace base.crm.dynamics.com with your Dynamics 365 (online) instance URL. For example, if the organization name is Contoso, the URL looks like this:
Source = "https://contoso.crm.dynamics.com/api/data/v8.0/"
Click Done, and then click Close & Apply in the Query Editor.
When the Access an OData feed dialog appears, click Organizational account, and then click Sign-in.
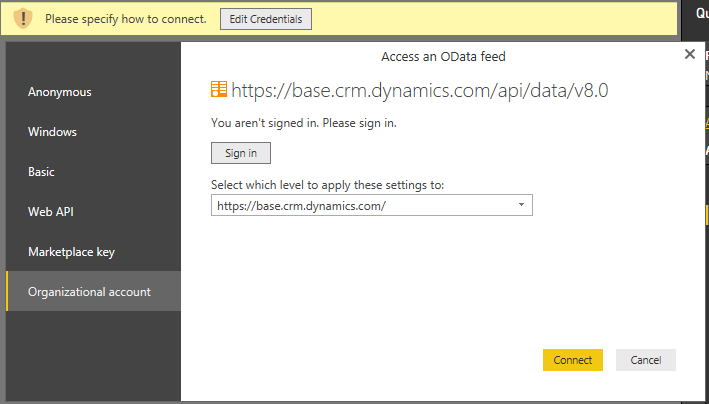
When the sign-in page appears, enter your credentials to authenticate to your Dynamics 365 (online) instance.
In the Access an Odata feed dialog, click Connect.
The content pack queries are updated. This may take several minutes.
Customize a Dynamics 365 content pack
Convert a DateTime field to a Date field for reporting
Add a custom field to a report
Add a custom field to a report for the Account entity
Add a custom option set field to a report
Increase the number of rows queried
Convert a DateTime field to a Date field for reporting
In Microsoft Dynamics 365, some dates are saved in a Date/Time/Timezone format, which may not be the preferred format for aggregating data in a report. You can convert the date displayed in reports for an entity field. For example, the Opportunity Created On field can be converted to a date to report the Opportunities created by day.
In Power BI Desktop, click Edit Queries.
In the left navigation pane of the Query Editor, under Queries, click the query that has the date field that you want to change, such the Estimated Close Date in the Opportunity entity query.
Right-click the column heading, such as Estimated Close Date, point to Change Type, and then select another date type, such as Date.
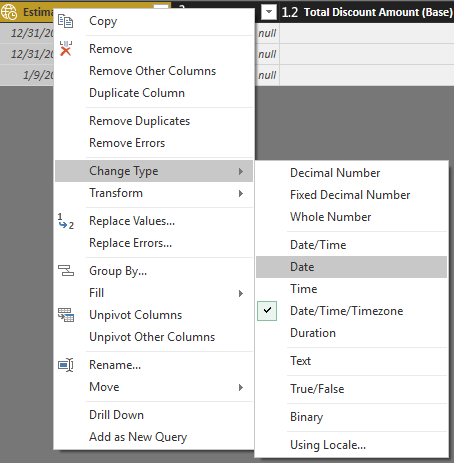
Click Close & Apply to close the Query Editor.
On the main Power BI page, click Apply Changes to update the associated reports.
Add a custom field to a report
The following procedure describes how to add a custom field that is a date, string, or number to a report for all available entities except the Account entity.
Note
To add a field to the Account entity, see Add a custom field to a report for the Account entity. To add a field that is an option set type, see Add a custom option set field to a report.
In Power BI Desktop, click Edit Queries.
In the left navigation pane of the Query Editor, under Queries, click the query that has the custom field that you want to make available for reports, such as the Opportunity entity query.
In the right pane, under APPLIED STEPS, click the settings button
 next to Removed Other Columns.
The Choose Columns list shows all fields for the entity, including custom fields. Select the custom field that you want, and then click OK.
The entity query is updated and a column is added in the entity table for the custom field that you selected.
In the right pane, under APPLIED STEPS, click Lang – Renamed Columns and then click Advanced Editor to add the mapping for the field to the entity query. For example, if the custom field name for the Opportunity entity is int_forecast and the display name is Forecast, the entry should appear like this.
{"int_forecast","Forecast"}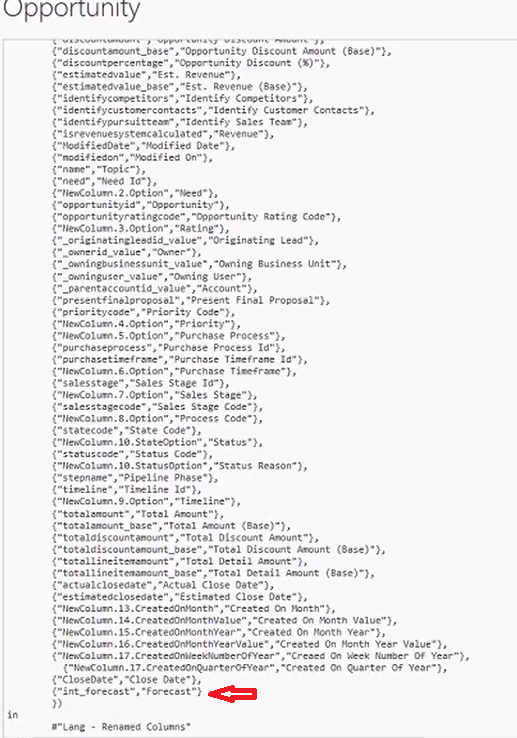
After you add your field mapping, make sure there are no syntax errors displayed at the bottom of the Advanced Editor. Also, make sure the field name appears exactly as it appears in the column heading, including the correct letter case. If no syntax or table errors are detected, click Done.
Click Close & Apply in the Query Editor.
The custom field is now available in the right pane under Fields for the entity, and can be added to new or existing reports.
Add a custom field to a report for the Account entity
Because the Account query uses Fetch XML to filter the query, the steps to add a field are different than for other entity queries that use OData. To add a custom field to the OData queried entities, see Add a custom field to a report.
Copy the encoded Fetch XML query for the Account entity. To do this, follow these steps:
In Power BI Desktop, click Edit Queries.
In the left navigation pane of the Query Editor, under Queries, click the Account entity query, and then on the ribbon, click Advanced Editor.
From the first line, beginning with %3Cfetch and ending with fetch%3E, copy the entire encoded Fetch XML.
The encoded Fetch XML that you copy should look similar to this:
%3Cfetch%20version%3D%221.0%22%20output-format%3D%22xml-platform%22%20mapping%3D%22logical%22%20distinct%3D%22true%22%3E%3Centity%20name%3D%22account%22%3E%3Cattribute%20name%3D%22territorycode%22%20%2F%3E%3Cattribute%20name%3D%22customersizecode%22%20%2F%3E%3Cattribute%20name%3D%22owningbusinessunit%22%20%2F%3E%3Cattribute%20name%3D%22ownerid%22%20%2F%3E%3Cattribute%20name%3D%22originatingleadid%22%20%2F%3E%3Cattribute%20name%3D%22revenue%22%20%2F%3E%3Cattribute%20name%3D%22sic%22%20%2F%3E%3Cattribute%20name%3D%22marketcap%22%20%2F%3E%20%3Cattribute%20name%3D%22parentaccountid%22%20%2F%3E%3Cattribute%20name%3D%22owninguser%22%20%2F%3E%3Cattribute%20name%3D%22accountcategorycode%22%20%2F%3E%3Cattribute%20name%3D%22marketcap\_base%22%20%2F%3E%3Cattribute%20name%3D%22customertypecode%22%20%2F%3E%3Cattribute%20name%3D%22address1\_postalcode%22%20%2F%3E%3Cattribute%20name%3D%22numberofemployees%22%20%2F%3E%3Cattribute%20name%3D%22accountratingcode%22%20%2F%3E%3Cattribute%20name%3D%22address1\_longitude%22%20%2F%3E%3Cattribute%20name%3D%22revenue\_base%22%20%2F%3E%3Cattribute%20name%3D%22createdon%22%20%2F%3E%3Cattribute%20name%3D%22name%22%20%2F%3E%3Cattribute%20name%3D%22address1\_stateorprovince%22%20%2F%3E%3Cattribute%20name%3D%22territoryid%22%20%2F%3E%3Cattribute%20name%3D%22accountclassificationcode%22%20%2F%3E%3Cattribute%20name%3D%22businesstypecode%22%20%2F%3E%3Cattribute%20name%3D%22address1\_country%22%20%2F%3E%3Cattribute%20name%3D%22accountid%22%20%2F%3E%3Cattribute%20name%3D%22address1\_latitude%22%20%2F%3E%3Cattribute%20name%3D%22modifiedon%22%20%2F%3E%3Cattribute%20name%3D%22industrycode%22%20%2F%3E%3Clink-entity%20name%3D%22opportunity%22%20from%3D%22parentaccountid%22%20to%3D%22accountid%22%20alias%3D%22ab%22%3E%3Cfilter%20type%3D%22and%22%3E%3Ccondition%20attribute%3D%22opportunityid%22%20operator%3D%22not-null%22%20%2F%3E%3Ccondition%20attribute%3D%22modifiedon%22%20operator%3D%22last-x-days%22%20value%3D%22365%22%20%2F%3E%3C%2Ffilter%3E%3C%2Flink-entity%3E%3C%2Fentity%3E%3C%2Ffetch%3E
Decode the encoded Fetch XML. It must be valid encoded Fetch XML and, once encoded, should look similar to this:
\<fetch version="1.0" output-format="xml-platform" mapping="logical" distinct="true"\> \<entity name="account"\> \<attribute name="territorycode" /\> \<attribute name="customersizecode" /\> \<attribute name="owningbusinessunit" /\> \<attribute name="ownerid" /\> \<attribute name="originatingleadid" /\> \<attribute name="revenue" /\> \<attribute name="sic" /\> \<attribute name="marketcap" /\> \<attribute name="parentaccountid" /\> \<attribute name="owninguser" /\> \<attribute name="accountcategorycode" /\> \<attribute name="marketcap\_base" /\> \<attribute name="customertypecode" /\> \<attribute name="address1\_postalcode" /\> \<attribute name="numberofemployees" /\> \<attribute name="accountratingcode" /\> \<attribute name="address1\_longitude" /\> \<attribute name="revenue\_base" /\> \<attribute name="createdon" /\> \<attribute name="name" /\> \<attribute name="address1\_stateorprovince" /\> \<attribute name="territoryid" /\> \<attribute name="accountclassificationcode" /\> \<attribute name="businesstypecode" /\> \<attribute name="address1\_country" /\> \<attribute name="accountid" /\> \<attribute name="address1\_latitude" /\> \<attribute name="modifiedon" /\> \<attribute name="industrycode" /\> \<link-entity name="opportunity" from="parentaccountid" to="accountid" alias="ab"\> \<filter type="and"\> \<condition attribute="opportunityid" operator="not-null" /\> \<condition attribute="modifiedon" operator="last-x-days" value="365" /\> \</filter\> \</link-entity\> \</entity\> \</fetch\>Tip
Many URL encoder and decoder tools are freely available on the web.
In the Fetch XML, add your custom entity as an attribute node between the <entity> nodes. For example, to add a custom field named customclassificationcode, add the node after another attribute node, such as industrycode.
<attribute name="industrycode" />
<attribute name=" customclassificationcode "/>
<link-entity name="opportunity" from="parentaccountid" to="accountid" alias="ab">
URL encode the updated Fetch XML. The Fetch XML that includes the new custom attribute must be encoded and then used to replace the existing OData feed query that comes with the content pack. To do this, copy the updated FetchXML to the clipboard and paste it into a URL encoder.
Paste the encoded Fetch XML URL into the OData feed. To do this, paste the encoded URL between the quotation marks after the Query=[fetchXml= text, replacing the existing encoded FetchXML, and then click Done.
The screen shot below indicates where the left-most quotation is located.

In the right pane, under APPLIED STEPS, click the settings button
 next to Removed Other Columns.
The Choose Columns list shows all fields for the entity, including custom fields. Select the custom field, such as customclassificationcode, that you added to the Fetch XML query earlier, and then click OK.
Note
The field name that you select in the Column Chooser and the field name that you add to the FetchXML query must match.
The entity query is updated and a column is added in the entity table for the custom field that you selected.
Click Close & Apply in the Query Editor.
The custom field is now available in the right pane under Fields for the entity and can be added to new or existing reports.
Add a custom option set field to a report
Option set fields allow you to choose from multiple values. Examples of out-of-box option set fields are the Rating and Sales Stage fields for an opportunity. Imagine you have a custom option set field on the main Opportunity form that has the following values and labels.
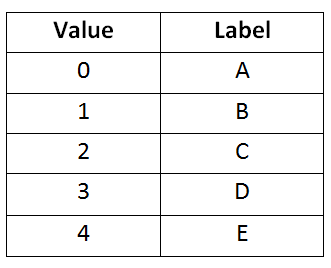
To add the custom option set field to a report, follow these steps.
Add the custom field column.
In the left navigation pane of the Query Editor, under Queries, click the entity that has the associated custom option set, such as the Opportunity entity.
In the right pane, under APPLIED STEPS, click the settings button
 next to Removed Other Columns.
The Choose Columns list shows all fields for the entity, including custom fields. Select the custom field, such as new_customoptionset, and then click OK.
Click Save, and then when prompted, click Apply.
The column for the custom field appears in the entity table.
Create the option set query.
In Power BI Desktop, click Edit Queries.
In the left navigation pane of the Query Editor. under Queries, click the query under the Make Tables group that has the option set field that is the most similar to the option set you want to add to a report. For this example, the SalesStageOptionSet query has four options so is a good choice.
Click Advanced Editor.
The option set query is displayed.
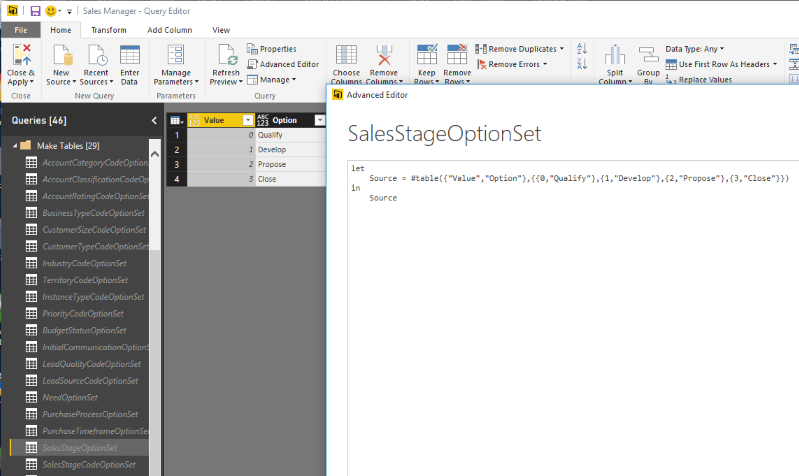
Copy the entire query to the clipboard. You can paste it in to a text editor, such as Notepad, for later reference.
In the Query Editor, right-click the Make Tables group, click New Query, and then click Blank Query.
In the right pane, under Name enter a name, such as CustomOptionSet, and then press Enter.
Click Advanced Editor.
In the Advanced Editor, paste in the query you copied earlier.
Replace the existing values and options with your custom values and options. In this example, you change this.
let
    Source = #table({"Value","Option"},{{0,"Qualify"},{1,"Develop"},{2,"Propose"},{3,"Close"}})
in
    Source
To this.
let
    Source = #table({"Value","Option"},{{0,"A"},{1,"B"},{2,"C"},{3,"D"},{4,"E"}})
in
    Source
Make sure there are no syntax errors, and then click Done to close the Advanced Editor. The table of values and options appears in the Query Editor.
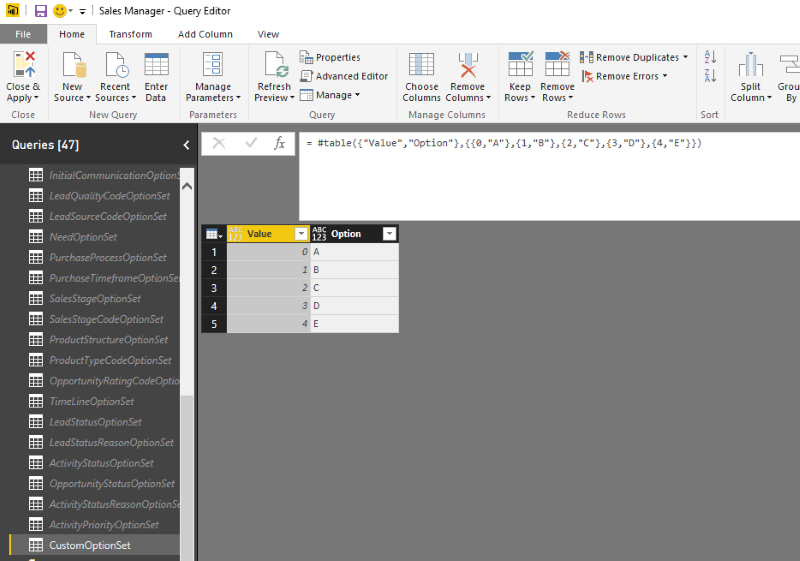
Click Save, and then when prompted, click Apply.
Insert a merge query for the entity and custom option set tables.
In the left pane of the Query Editor, under Entities, click the entity that includes the custom option set. For this example, the Opportunity entity query is selected.
On the Ribbon click Merge Queries and, when you are prompted to insert a step, click Insert.
In the Merge dialog, click the column heading for the custom option set, such as new_optionset. In the drop-down list, select the corresponding option set query that you created earlier. When the option set table appears, click the Value column heading to select it.
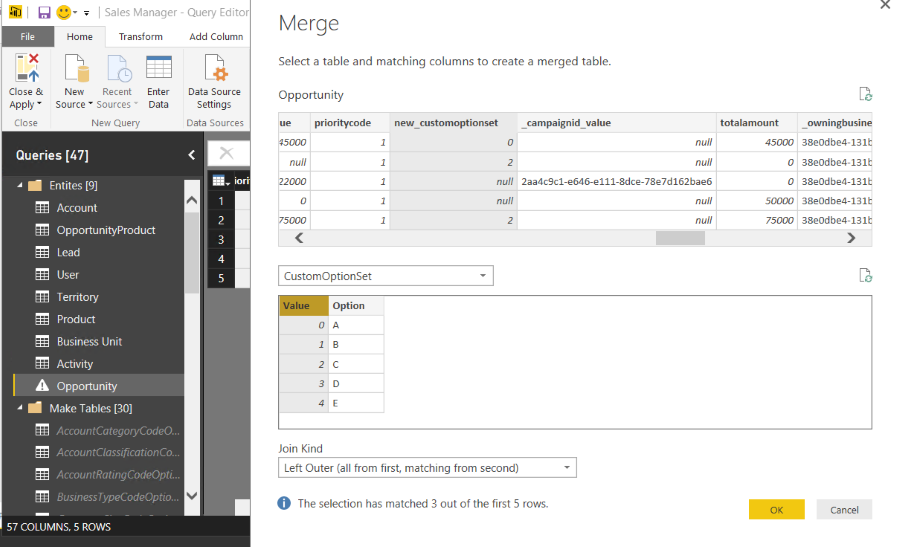
Leave the join kind as Left Outer (all from first, matching from second), and then click OK.
Tip
Rename the merge query. Under APPLIED STEPS, right-click the merge query that you created, click Rename, and enter a descriptive name, such as Merge CustomOptionSet.
Define the column so that only the labels display.
In the left pane of the Query Editor, under Entities, click the entity that includes the custom option set. For this example, the Opportunity entity query is selected.
In the right pane, under APPLIED STEPS, click one of the expanded queries to reveal the merged columns, such as Expanded SalesStage.
Locate and click the column heading for the new column that was created as part of the earlier merge query step.
On the Transform tab, click Expand.
In the Expand new column dialog, clear the column that corresponds to the values (because only the labels should appear in the column). Click Done.
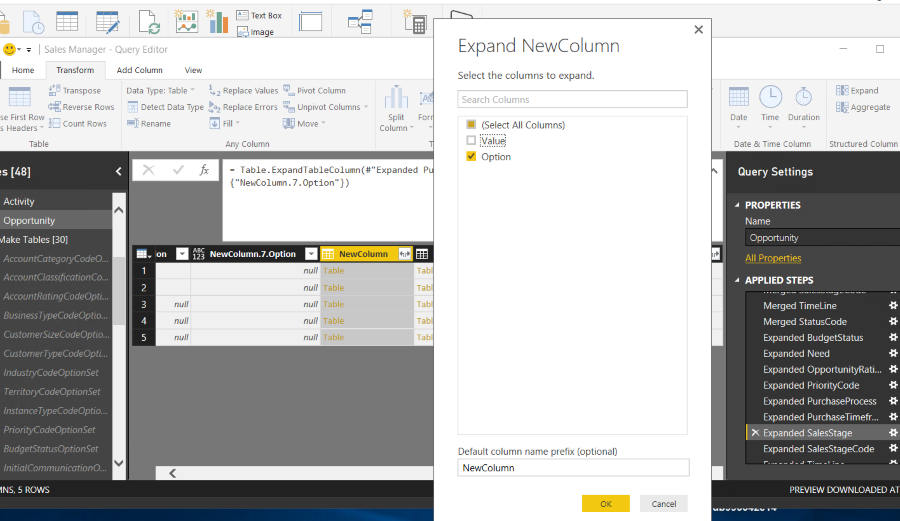
Click Save, and then when prompted, click Apply.
Change the column name for report building.
In the left pane of the Query Editor, under Entities, click the entity that includes the custom option set. For this example, the Opportunity entity query is selected.
Click Advanced Editor.
Add a renamed column line item, make sure there are no syntax errors, and then click Done. In this example, the custom option set column name that you created earlier is NewColumn that is being renamed to Custom Option Set.

Click Save, and then when prompted, click Apply.
Click Close & Apply to close the Query Editor.
The custom option set can now be used to build Power BI reports.
Increase the number of rows queried
By default, all Power BI entity queries in the Microsoft Dynamics 365 content packs cannot exceed 100,000 rows. To increase the number of rows that can be queried, follow these steps.
Important
Increasing the row count limit can significantly impact the time it takes for a report to refresh. Additionally, the Power BI service has a 30-minute limit for running queries. Use caution when increasing the row count limit.
In Power BI Desktop, click Edit Queries.
In the left navigation pane of the Query Editor, under Queries, click the entity query that you want to increase the row count limit, such as the Lead entity.
In the right pane, under APPLIED STEPS, click Kept First Rows.
Increase the filtered row number. For example to increase to 150,000, change Table.FirstN(#"Filtered Rows",100001) to Table.FirstN(#"Filtered Rows",150000)
In the right pane, under APPLIED STEPS, click Check Row Count.
Locate the >100,000 part of the step.

Increase the value to a larger number, such as 150,000.
Click Close & Apply in the Query Editor.
Publish your report to the Power BI service
Publish your report for organizational sharing and access from anywhere on most any device.
On the Power BI Desktop main page Home tab ribbon, click Publish.
If you are prompted to sign in to the Power BI service, click Sign in.
If multiple destinations are available, select the one you want, and then click Publish.
See Also
Use Power BI with Microsoft Dynamics 365
© 2017 Microsoft. All rights reserved. Copyright