Room analytics
Room reservations, combined with occupancy sensor data, offer key insights for real estate and facility managers to better understand, analyze, and optimize room utilization. By analyzing reservation data that reflects intended room use alongside sensor data showing actual occupancy, managers can understand occupancy and booking behavior, and identify high no-show rates. This data helps managers make better decisions about room availability.
Room utilization based on intent to use
Room analytics uses room-reservation data to track the intended use of rooms, providing insight into planned room occupancy.
The reservation data is collected from all room mailboxes on Exchange associated with a tenant through a service that runs daily.
Room utilization based on actual occupancy
Room analytics uses occupancy signals to detect the actual presence of people, allowing measurement of actual room use.
Currently, Microsoft supports the following occupancy signals:
- CRS (Call Record Summaries from Teams meetings)
- Other occupancy or people count sensors
Onboarding CRS data
Call record summarized signal contains the Teams meeting start and end time, which can be used to infer the room occupancy. CRS data is published by the Substrate Intelligence Platform (SIP) team to the SIGS dataset.
The CallRecordSummarized signal is available in the SIGS dataset 4 days after the event time. And it remains available for 28 days.
Process to enable CRS
CRS is currently supported in these major regions: NAM, EUR, JPN, and APAC. If your organization is located within one of these supported regions, the CRS data onboarding process is fully automated.
No manual action is required for data integration. Once the system detects that you're within a supported region, the data flow starts automatically.
Dataset schema
| Column | Type | Description |
|---|---|---|
| AadTenantId | String | Tenant ID of the record. It's used to partition the data to the tenant container and dropped after partition. |
| ActorId | String | Microsoft Entra ID of the actor, which can be a user or a room. It's later used to join with Room ID from Room Inventory to obtain signals from rooms. |
| StartTime | String | Meeting start time, which indicates the room is occupied. |
| EndTime | String | Meeting end time, which indicates the room is no longer occupied. |
| PrimarySmtp | String | SMTP of the person or room. |
| ActorIdType | String | Actor ID type, which should be Microsoft Entra ID. This string is used for debugging. |
| ActorType | String | Actor type, which is always "user" regardless of person or room. |
| CreationTime | String | Creation time of this record. |
| DatasetCategory | String | Dataset category, which can be Commercial or MSIT. |
| SignalType | String | CallRecordSummarized, which is the signal type in the SIGS dataset. |
Connecting occupancy sensor data
Connecting occupancy and people-count sensors is done in four steps.
- Device onboarding.
- Uploading telemetry.
- Real-time telemetry ingestion.
- Verify that data is available in Places.
Device onboarding
The first step involves uploading a CSV file with the device metadata, including how devices are mapped to a PlaceId in Microsoft Places. This step helps to contextualize the telemetry when it reaches Places.
The following diagram shows how you can onboard devices and sensors onto Places.
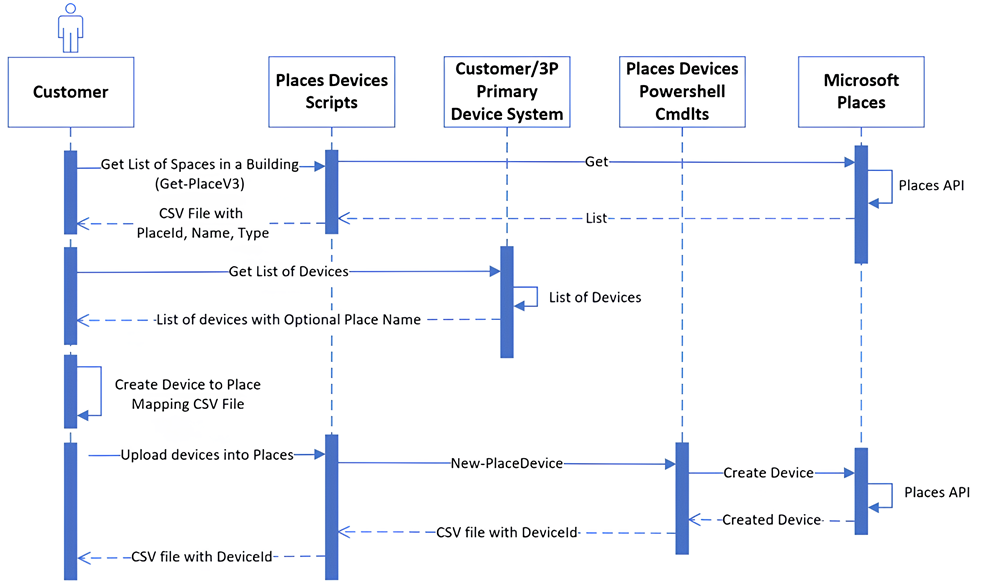
First, the device data needs to be prepared.
Download place information from Microsoft Places. First, install PowerShell 7 by running the following PowerShell cmdlet. To learn more about PowerShell on Windows, see Installing PowerShell on Windows.
Install-Module -Name ExchangeOnlineManagement

Import-Module -Name ExchangeOnlineManagement

Connect-ExchangeOnline
Open PowerShell as an administrator and run the following ExchangeOnline PowerShell command to check if your account has the required TenantPlacesManagement role, and to make sure your username is listed.
Get-ManagementRoleAssignment -Role TenantPlacesManagement -GetEffectiveUsersYou should see the following name and assigned role if you have the right permissions.
- Name: PlacesAdmin
- Assigned Role: TenantPlacesManagement
To get the PlaceId of buildings, open a new PowerShell window and run the following Windows PowerShell cmdlet.
Install-Module -Name MicrosoftPlaces -AllowPrerelease -Force

Connect-MicrosoftPlaces
Execute the following commands to download the list of floors and rooms.
$buildingName = “”
$allPlaces = Get-PlaceV3 | Select-Object PlaceId, DisplayName, Type, ParentId
$building = $allPlaces | Where-Object { $_.DisplayName -eq $buildingName -and $_.Type -eq "Building" }
$floors = $allPlaces | Where-Object { $_.ParentId -eq $building.PlaceId }
$spacesAndRooms = $floors | ForEach-Object {
$floor = $_;
$allPlaces | Where-Object { $_.ParentId -eq $floor.PlaceId }
}
$places = @()
$floors | ForEach-Object { $places += $_ }
$spacesAndRooms | ForEach-Object { $places += $_ }
$outputPath = 'C:\places.csv'
$places | Select-Object PlaceId, DisplayName, Type | Export-Csv -Path $outputPath -NoTypeInformation
The output file in your CSV file path should contain the following information:
PlaceId DisplayName Type 5d275bba-5d7d-487f-855e-75cd2943204f Floor 1 Floor 0fa1b1eb-6066-45ea-8f7c-09b4e8cc4e74 Conf Room 1202/3455 (9) Room Download the device metadata from a partner solution or from your system, including all the devices.
Use a script or manually map your devices to PlaceId using the following data-format for PlacesDevice.
| Column | Description | Notes | Example |
|---|---|---|---|
| DeviceId (required) | The unique identifier of the device (recommended: Manufacturer_DeviceUniqueId). | Must match the ID of the telemetry sent. | Manuf1_3455 |
| DisplayName | The display name of the device. | You can use a friendly name if applicable. | Manuf1_3455 |
| Description | The description of the device. | ||
| MacAddress | The Mac address of the device. | Supplier provided (if available). | |
| Manufacturer (required) | The manufacturer of the device. | Provided by the IT admin. | Manuf1 |
| IPV4Address | The IPV4Address of the device. | Supplier provided (if available). | |
| IPV6Address | The IPV6Address of the device. | Supplier provided if available. | |
| PlaceId (required) | The PlaceId to which your device is mapped in Places. | The IT admin maps DeviceID to the DisplayName field from a list of rooms. | 76fe540f-01a9-425e-acd5-5d7d1da44fbf |
| Tags | A list of custom tags associated with the device to help with search. | [ "IsVirtual_False", "Building_121"] | |
| Sensor.SensorId (required) | The unique identifier of a sensor within the device. | Must come in the standard telemetry payload. | PeopleCount, Occupancy |
| Sensor.DisplayName | The display Name of the sensor. | You can use a friendly name (if applicable). | Occupancy, PeopleCount |
| Sensor.SensorType (required) | The type of sensor. | A validated list (see examples). | Paperclip |
| Sensor.PlaceId | The unique identifier of the place served by the sensor (you only need to provide this information if the sensor is in a different place than the device's location). | 76fe540f-01a9-425e-acd5-5d7d1da44fbf |
General guidelines for devices and sensors
We recommend you provide the DeviceId as Manufacturer_DeviceUniqueId. However, in cases where your partners can't send telemetry at a device level (for example, they combine telemetry from multiple devices), a virtual DeviceId can be created as Manufacturer_Building_VirtualDeviceId. In this case, VirtualDeviceId can be some natural key of a space. If your customer is providing the VirtualDeviceId, you should include information about the physical devices from which the telemetry is being calculated. Physical-device information can be in tags.
If Sensor.SensorType is unique for a device, you only need to provide SensorType. In cases where there are multiple data streams for a particular sensor type for a device, a unique SensorId is needed. SensorType and SensorId, in most cases, are PeopleCount, Occupancy, etc., unless SensorType isn't unique for a device. In this case, SensorId is SensorType_SomeUnique identifier.
Once the device metadata is prepared, device information can be uploaded to Microsoft Places in following ways.
- Using PowerShell cmdlets
- Using Microsoft Graph APIs
Using PowerShell cmdlets
To individually manage devices, the Microsoft Places PowerShell cmdlets can be used directly. See the Microsoft Places cmdlets module for PowerShell to learn more about Places cmdlets.
Note
To run cmdlets, you must have the TenantPlacesManagement role assigned.
| Cmdlet name | Description | Parameters |
|---|---|---|
| New-PlaceDevice | Creates a new device | DeviceId (required), DisplayName, Description, MACAddress, Manufacturer (required), IPV4Address, IPV6Address, PlaceId (required), Tags, Sensors (required) |
| Remove-PlaceDevice | Deletes a device | ID (required) |
| Set-PlaceDevice | Updates a device | ID (required), DeviceId (required), DisplayName, Description, MACAddress, Manufacturer (required), IPV4Address, IPV6Address, PlaceId, Tags, Sensors (required) |
| Get-PlaceDevice | Gets a device | Id, Filter, Top |
Open PowerShell 7 (not as an administrator).
Install Microsoft Places by running the following Windows PowerShell cmdlet. For more information on Microsoft Places installation, see the Microsoft Places PowerShell Gallery.
Install-Module -Name MicrosoftPlaces -AllowPrerelease -ForceImport the Microsoft Places module by running the following Windows PowerShell cmdlet.
Import-Module -Name MicrosoftPlacesAfter installing and importing the module, connect to the Microsoft Places module by running the following Places PowerShell cmdlet.
Connect-MicrosoftPlacesUse New-PlaceDevice cmdlet example shown below to add a device. The Sensors parameter is an object of type MicrosoftPlaces.PlacesDevices.Sensor having the fields mentioned above.
New-PlaceDevice -DeviceId "contoso_9D6816" -DisplayName "Contoso 9D6816 Device" -Description "Contoso 9D6816 Device" -MACAddress "00:0A:95:9D:68:16" -Manufacturer "Contoso" -IPV4Address "192.168.1.100" -IPV6Address "2001:db8::ff00:42:8329" -PlaceId "acfa3bc0- 2b83-425b-8910-84a0250e9671" -Tags "BuildingA" -Sensors (New-Object MicrosoftPlaces.PlacesDevices.Sensor -Property @{SensorType="occupancy"})Use Get-PlaceDevice to view list of devices. By default, it returns 10 devices. To return more devices, add the -top parameter as shown below.
Get-PlaceDevice -top 100Use Set-PlaceDevice to update a device with the existing ID.
Set-PlaceDevice -Id "e5a216ff-1d32-4647-8dab-a2523ee5796e" -DeviceId "contoso_7D6816" -DisplayName "Contoso 7D6816 Device" -Description "Contoso 9D6816 Device" -MACAddress "00:0A:95:9D:68:16" -Manufacturer "Contoso" -IPV4Address "192.168.1.100" -IPV6Address "2001:db8::ff00:42:8329" -PlaceId "acfa3bc0- 2b83-425b-8910-84a0250e9671" -Tags "BuildingA" -Sensors (New-Object MicrosoftPlaces.PlacesDevices.Sensor -Property @{SensorType="peopleCount"})Use Remove-PlaceDevice to delete a device.
Remove-PlaceDevice -Id "e5a216ff-1d32-4647-8dab-a2523ee5796e"
Using Microsoft Graph APIs
To modify the process or automate and integrate with existing systems, Microsoft Graph APIs can be used.
To use APIs, follow these steps.
Create an app registration in Microsoft Entra.im. To learn more about the PlaceDeviceRead.All and PlaceDevice.ReadWrite.All permission, see the Microsoft Graph Permissions Reference.
Build and deploy an application to sync device information across Microsoft Places and your partners.
To learn more about sensor devices, see the following Microsoft Graph APIs and device documentation:
- List sensorDevices
- Create workplaceSensorDevice
- Get workplaceSensorDevice
- Update workplaceSensorDevice
- Delete workplaceSensorDevice
- To learn more about viewing devices, see List sensorDevices.
- To learn more about creating a new device, see Create workplaceSensorDevice.
Sample device:
POST https://graph.microsoft.com/beta/workplace/sensorDevices

{
            "deviceId": "contoso_9D6821_occ_new",
            "displayName": "Contoso 9D6816 Device",
            "description": "Contoso 9D6816 Device",
            "macAddress": "00:0A:95:9D:68:16",
            "manufacturer": "Contoso",
            "ipV4Address": "192.168.1.100",
            "ipV6Address": "2001:db8::ff00:42:8329",
            "placeId": "acfa3bc0-2b83-425b-8910-84a0250e9671",
            "tags": [
                "BuildingA",
                "Floor 3",
                "Room 300",
                "Conference Room"
            ],
            "sensors": [
                {
                    "sensorId": "Occupancy",
                    "displayName": null,
                    "sensorType": "occupancy",
                    "placeId": "acfa3bc0-2b83-425b-8910-84a0250e9671"
                }
            ]
        }
- To learn how to view a specific device, see Get workplaceSensorDevice.
Example:
GET
https://graph.microsoft.com/beta/workplace/sensorDevices/<workplacesensordevice-id>

GET
https://graph.microsoft.com/beta/workplace/sensorDevices/8e404458-e9b1-4153-b6b5-4858ccee1486
Sample response:
{
    "@odata.context": "https://graph.microsoft.com/beta/$metadata#workplace/sensorDevices/$entity",
    "@microsoft.graph.tips": "Use $select to choose only the properties your app needs, as this can lead to performance improvements. For example: GET workplace/sensorDevices('<guid>')?$select=description,deviceId",
    "id": "8e404458-e9b1-4153-b6b5-4858ccee1486",
    "deviceId": "contoso_9D6821_occ_new",
    "displayName": "Contoso 9D6816 Device",
    "description": "Contoso 9D6816 Device",
    "macAddress": "00:0A:95:9D:68:16",
    "manufacturer": "Contoso",
    "ipV4Address": "192.168.1.100",
    "ipV6Address": "2001:db8::ff00:42:8329",
    "placeId": "acfa3bc0-2b83-425b-8910-84a0250e9671",
    "tags": [
        "BuildingA",
        "Floor 3",
        "Room 300",
        "Conference Room"
    ],
    "sensors": [
        {
            "sensorId": "Occupancy",
            "displayName": null,
            "sensorType": "occupancy",
            "placeId": "acfa3bc0-2b83-425b-8910-84a0250e9671"
        }
    ]
}
- To learn more about updating existing device, see Update workplaceSensorDevice.
Example:
PATCH https://graph.microsoft.com/beta/workplace/sensorDevices/8e404458-e9b1-4153-b6b5-4858ccee1486

{
            "deviceId": "contoso_9D6821_occ_new",
            "displayName": "Contoso 9D6816 Device New",
            "description": "Contoso 9D6816 Device",
            "macAddress": "00:0A:95:9D:68:16",
            "manufacturer": "Contoso",
            "ipV4Address": "192.168.1.100",
            "ipV6Address": "2001:db8::ff00:42:8329",
            "placeId": "acfa3bc0-2b83-425b-8910-84a0250e9671",
            "tags": [
                "BuildingA",
                "Floor 3",
                "Room 300",
                "Conference Room"
            ],
            "sensors": [
                {
                    "sensorId": "Occupancy",
                    "displayName": null,
                    "sensorType": "occupancy",
                    "placeId": "acfa3bc0-2b83-425b-8910-84a0250e9671"
                }
            ]
        }
Sample response:
{
    "@odata.context": "https://graph.microsoft.com/beta/$metadata#workplace/sensorDevices/$entity",
    "id": "8e404458-e9b1-4153-b6b5-4858ccee1486",
    "deviceId": "contoso_9D6821_occ_new",
    "displayName": "Contoso 9D6816 Device New",
    "description": "Contoso 9D6816 Device",
    "macAddress": "00:0A:95:9D:68:16",
    "manufacturer": "Contoso",
    "ipV4Address": "192.168.1.100",
    "ipV6Address": "2001:db8::ff00:42:8329",
    "placeId": "acfa3bc0-2b83-425b-8910-84a0250e9671",
    "tags": [
        "BuildingA",
        "Floor 3",
        "Room 300",
        "Conference Room"
    ],
    "sensors": [
        {
            "sensorId": "Occupancy",
            "displayName": null,
            "sensorType": "occupancy",
            "placeId": "acfa3bc0-2b83-425b-8910-84a0250e9671"
        }
    ]
}
- To learn more about deleting a device, see Delete workplaceSensorDevice.
Example:
DELETE https://graph.microsoft.com/beta/workplace/sensorDevices/<workplaceSensorDevice-Id>
DELETE https://graph.microsoft.com/beta/workplace/sensorDevices/052062b9-38f6-48d4-a638-05a72c79419b
Uploading telemetry
Once you have your devices onboarded into Microsoft Places, you can perform a one-time backfill of historical data to populate Places with historical telemetry. Then you can configure Places to receive continuous telemetry from your devices to stay up to date. The following diagram outlines the backfill file upload flow (top half) and the continuous device telemetry flow (bottom half).
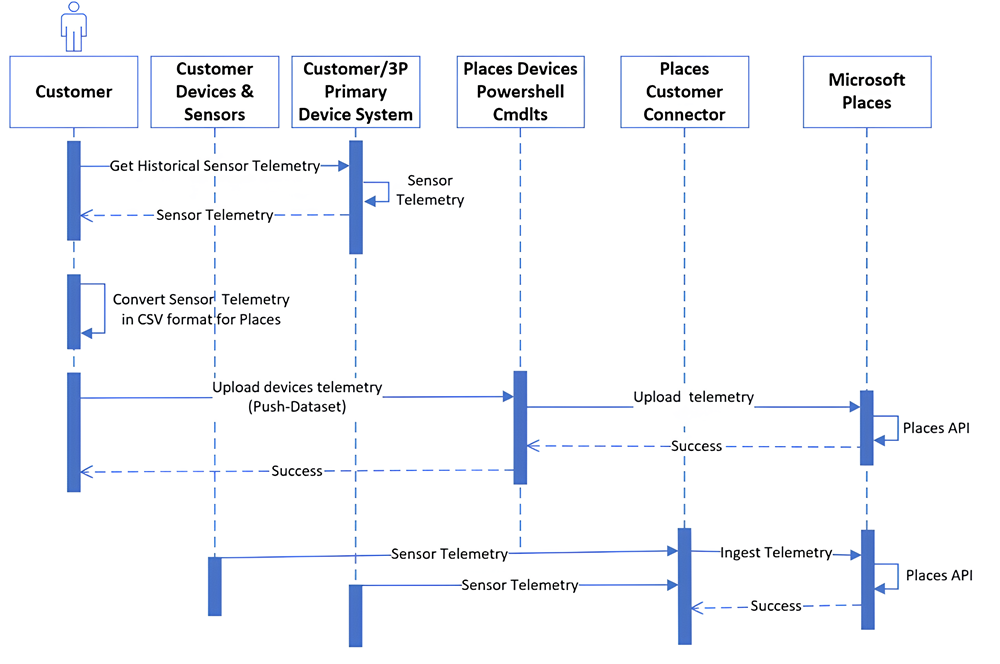
Option 1: Using the Push-Dataset cmdlet
Microsoft Places accepts historical data in a specific CSV file format and schema. You must export this data from an existing system and then use the following PowerShell cmdlet to upload the data.
| Cmdlet name | Description | Parameters | Example |
|---|---|---|---|
| Push-Dataset | Uploads dataset into ADLS. | Type, Path | Push-Dataset -Type RoomOccupancy -Path C:\sensordata\ |
Note
Type can be RoomOccupancy and PeopleCount. Role should be assigned to TenantPlacesManagement. To learn more about PowerShell cmdlets, see the Microsoft Places PowerShell Gallery.
Open PowerShell 7 (not as an administrator).
Install Microsoft Places by running the following Windows PowerShell cmdlet. For more information on Microsoft Places installation, see the Microsoft Places PowerShell Gallery.
Install-Module –Name MicrosoftPlaces –AllowPrerelease –ForceImport the Microsoft Places module by running the following Windows PowerShell cmdlet.
Import-Module -Name MicrosoftPlacesConnect to the Microsoft Places module by running the following Places PowerShell cmdlet.
Connect-MicrosoftPlacesUpload the dataset from the location on your device (using the folder and path) by running the following Places PowerShell cmdlet.
Push-Dataset -Type RoomOccupancy -Path <folder path>
The CSV file format for PeopleCount
| Column name | Column order | Comment | Example |
|---|---|---|---|
| DeviceId | 1 | Device ID. | Manuf1_1202_3455 |
| SensorId | 2 | Sensor ID. | PeopleCount |
| Value | 3 | An unsigned integer. | PeopleCount (any unsigned integer; for example, 5). |
| IngestionTime | 4 | Timestamp from the telemetry, in UTC format. | 2023-06-27T18:24:20.808Z |
| locationHint | String | Additional information to indicate the location of the device. | Building-1 |
Sample CSV:
19966d8e-4434-477a-a38a-2df5651cd90f,6afe1ea7-82aa-451c-b2e1-48e48ca39ec0,5, 2023-06-27T18:24:20.808Z,building1

19966d8e-4434-477a-a38a-2df5651cd90f,6afe1ea7-82aa-451c-b2e1-48e48ca39ec0,5, 2023-06-27T18:24:20.808Z,building1

457702f3-c58d-44fa-9d26-f153fcd27452,a7387ed0-b540-47b0-8170-bc9c80f6c5b9,5, 2023-06-27T18:24:20.808Z,building1

457702f3-c58d-44fa-9d26-f153fcd27452,a7387ed0-b540-47b0-8170-bc9c80f6c5b9,5, 2023-06-27T18:24:20.808Z,building1
The CSV file format for occupancy
| Column name | Column order | Comment | Example |
|---|---|---|---|
| DeviceId | 1 | Device ID. | Manuf1_1202_3455 |
| SensorId | 2 | Sensor ID. | RoomOccupancy |
| Value | 3 | An unsigned integer. | Occupancy: True or False. |
| IngestionTime | 4 | Timestamp from the telemetry, in UTC format. | 2023-06-27T18:24:20.808Z |
| locationHint | String | Additional information to indicate the location of the device. | Building-1 |
Sample CSV:
19966d8e-4434-477a-a38a-2df5651cd90f,6afe1ea7-82aa-451c-b2e1-48e48ca39ec0,true, 2023-06-27T18:24:20.808Z,building1

19966d8e-4434-477a-a38a-2df5651cd90f,6afe1ea7-82aa-451c-b2e1-48e48ca39ec0,true, 2023-06-27T18:30:20.808Z,building1

457702f3-c58d-44fa-9d26-f153fcd27452,a7387ed0-b540-47b0-8170-bc9c80f6c5b9,false, 2023-06-27T18:40:20.808Z,building1

457702f3-c58d-44fa-9d26-f153fcd27452,a7387ed0-b540-47b0-8170-bc9c80f6c5b9,true, 2023-06-27T18:45:20.808Z,building1
Option 2: automate using the Microsoft Graph API
To build an application to automate the upload of telemetry, and to build an application to automate registering and onboarding devices, APIs are available through Microsoft Graph. To use APIs, follow these steps.
Create an app registration in Microsoft Entra. To learn more about the PlaceDeviceRead.All and PlaceDevice.ReadWrite.All permission, see the Microsoft Graph Permissions Reference.
Build and deploy an application to sync telemetry across Microsoft Places and your partners.
Use the IngestTelemetry API to push occupancy and people count data to Microsoft Places.
For more information on ingest sensor telemetry for a workplace sensor, and to learn more about the IngestTelemetry API, see workplaceSensorDevice: ingestTelemetry.
To push occupancy and people count data to Microsoft Places using the Microsoft Graph API
- Download data from existing systems as described earlier.
- Prepare telemetry based on the following Occupancy data signal-data format.
Occupancy data signal-data format
| Parameter | Type | Description |
|---|---|---|
| telemetry (required) | workplaceSensorDeviceTelemetry | A collection of the telemetry data collected and reported by a sensor on a room device. |
| deviceId (required) | String | The user-defined unique identifier of the device provided at the time of creation. Don't use the system-generated identifier of the device. Use the device IDs onboarded using the new-device cmdlet only. |
| sensorId | String | The user-defined unique identifier of the sensor on the device. If the device has multiple sensors of the same type, the property must be provided to identify each sensor. If the device has only one sensor of a type, the property can be omitted. The default value is the sensor type. Optional. |
| boolValue (required) | Boolean | True or false based on whether the room is occupied or not. |
| timestamp (required) | DateTimeOffset | The date and time when the sensor measured and reported its value. The timestamp type represents date and time information using ISO 8601 format and is always in UTC. For example, midnight UTC on Jan 1, 2024, is 2024-01-01T00:00:00Z. |
| sensorType (required) | workplaceSensorType | occupancy |
| LocationHint (required) | String | Additional information used to indicate the location of the device. |
People count data signal-data format
| Parameter | Type | Description |
|---|---|---|
| telemetry (required) | workplaceSensorDeviceTelemetry | A collection of the telemetry data collected and reported by a sensor on a room device. |
| deviceId (required) | String | The user-defined unique identifier of the device provided at the time of creation. Don't use the system-generated identifier of the device. Use the device IDs onboarded using the new-device cmdlet only. |
| sensorId | String | The user-defined unique identifier of the sensor on the device. If the device has multiple sensors of the same type, the property must be provided to identify each sensor. If the device has only one sensor of a type, the property can be omitted. The default value is the sensor type. Optional. |
| intValue (required) | Int32 | Number of people occupying the room. |
| timestamp (required) | DateTimeOffset | The date and time when the sensor measured and reported its value. The timestamp type represents date and time information using ISO 8601 format and is always in UTC. For example, midnight UTC on Jan 1, 2024, is 2024-01-01T00:00:00Z. |
| sensorType (required) | workplaceSensorType | peopleCount |
| LocationHint (required) | String | The additional information to indicate the location of the device. |
- Run the API to push the data to Microsoft Places.
The following command is a sample API request for occupancy.
{
"telemetry": [
        {
            "deviceId": "19966d8e-4434-477a-a38a-2df5651cd90f",
            "sensorid":"6afe1ea7-82aa-451c-b2e1-48e48ca39ec0",
            "sensorType": "occupancy",
            "boolValue": false,
            "timestamp": "2021-03-31T09:36:05.144Z",
            "locationHint":"building1"
        }
    ]
}
The following command is a sample API request for people count:
{
"telemetry": [
        {
            "deviceId": "457702f3-c58d-44fa-9d26-f153fcd27452",
            "sensorid":"a7387ed0-b540-47b0-8170-bc9c80f6c5b9",
            "sensorType": "peopleCount",
            "intValue": 5,
            "timestamp": "2023-06-27T18:24:20.808Z",
            "locationHint":"building1"
        }
    ]
}
Real-time telemetry ingestion
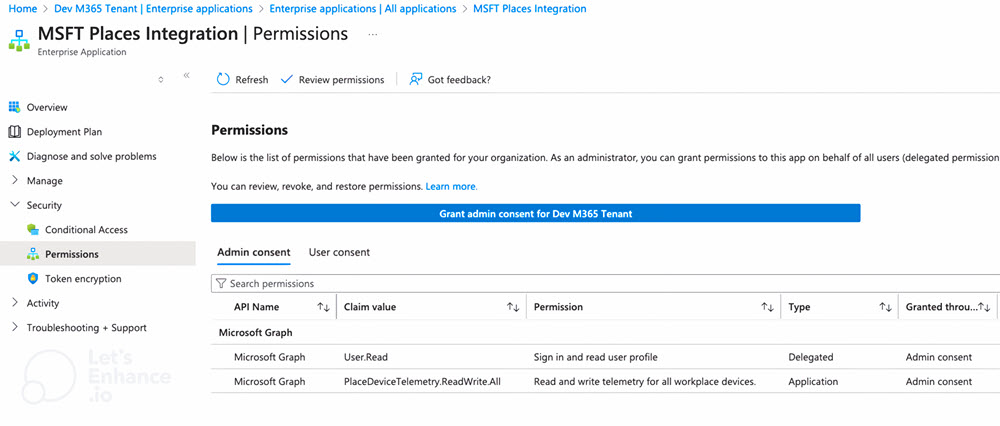
The connectors described in Scope need the following permission to request the real-time telemetry ingestion service.
- PlaceDeviceTelemetry.ReadWrite.All
You must complete the admin consent or create a Microsoft Entra application with the permission based on the selected architecture. To learn more about PlaceDeviceTelemetry.ReadWrite.All permission, see the Microsoft Graph Permissions Reference.
The following diagram outlines the architecture for telemetry ingestion.
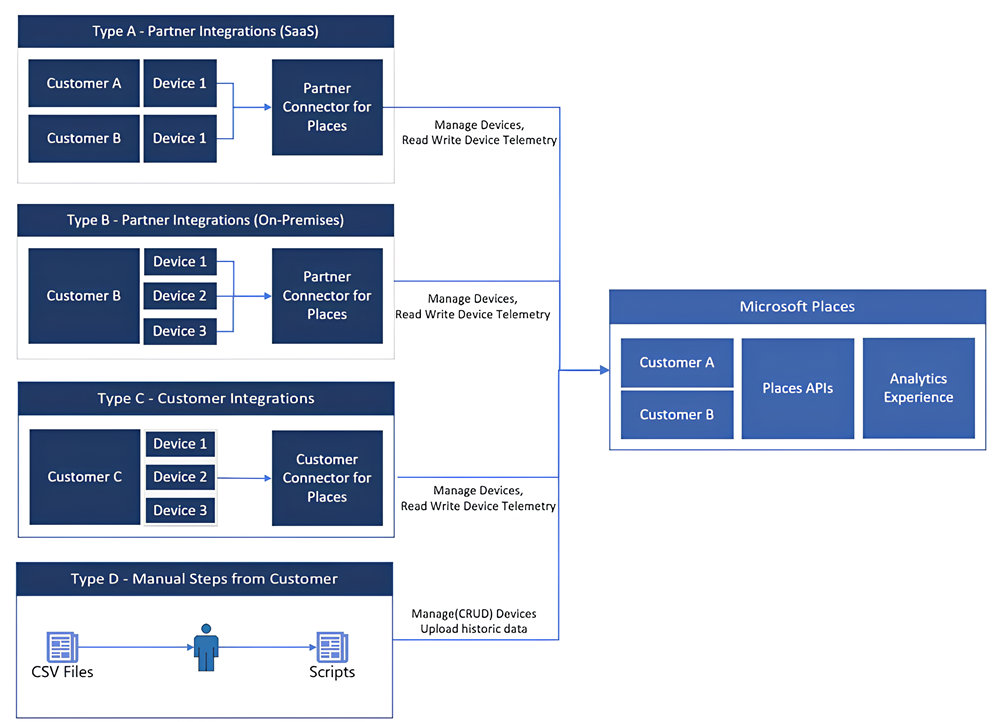
Admin Consent: type A architecture, hardware partner-owned connector (SaaS)
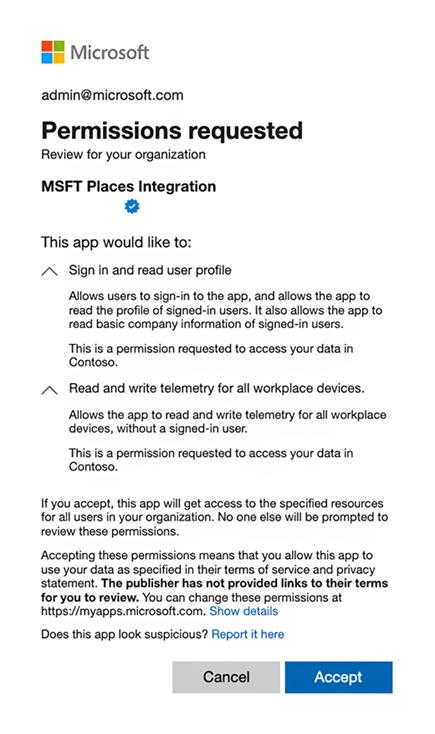
For customers choosing these integration types, you must complete the tenant-wide admin consent to grant the permissions to the partner services to ingest telemetries on their behalf.
This is applicable when hardware providers have created multitenant SaaS connectors (single versus multitenant apps). To learn more about multitenant connectors, see Tenancy in Microsoft Entra ID.
Get the app ID (GUID) from the partner that ingests telemetries on behalf of your service.
Create a Service principal with the app ID. There are several options to choose from. For more information, see Create an enterprise application from a multitenant application in Microsoft Entra ID.
If you're using the Microsoft Graph PowerShell, Graph, or Azure CLI, replace the ID or app ID (of the commands mentioned) in the pages to create a Service principal, then grant admin consent in the Service principal on Azure.
If you're using an admin consent URL, replace the app ID in the page with the partner app ID, then open it in a browser. It creates a Service principal and asks you to grant admin consent. To grant admin consent, select Accept.
Admin Consent: type B and C architecture, connector running in a customer on-site environment
Microsoft Places makes available an API that accepts telemetry in a standard format exposed over Microsoft Graph. The API accepts a batch of telemetry messages.
For type B architecture, customers rely on an integration provided by their hardware partners hosted on-site in the customer’s environment.
For type C architecture, customers can create a long-running process or an event-based process, using Azure functions, to call Microsoft Places APIs to send building telemetry.
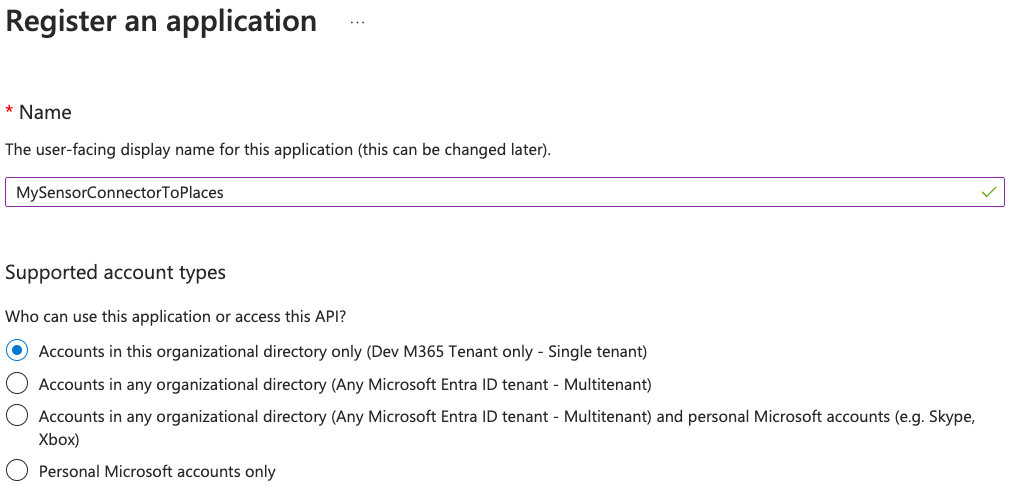
Both type B and C integration architectures require customers to create an app registration in Microsoft Entra, as shown in the following illustration, and to provide admin consent with PlaceDeviceTelemetry.ReadWrite.All. To learn more about permissions exposed by Microsoft Graph, see the Microsoft Graph Permissions Reference.
Verify data is available in Microsoft Places
Once your devices are onboarded and the API is ingesting live sensor data, the Microsoft Places analytics reports start to populate. To unlock insights that help optimize your workspace, verify that the data is flowing into your analytics dashboard within 72 hours.
