Step 2: Define the Business Process

Time to complete: 8 minutes
Objective: In this step, you use Orchestration Designer to define your business process.
Purpose: The workflow of the orchestration represents and automates your company's business process for approving inventory replenishment requests.
Prerequisites
Note the following requirements before you begin this step:
- Before you begin this step you must complete Step 1: Add EAIOrchestration Project to the Solution.
Procedures
The first step for developing an orchestration is to use action shapes to represent the business process.
To create the EAI business process workflow
From Visual Studio, in Solution Explorer, double-click EAIProcess.odx to open the orchestration.
In Orchestration Designer, from the orchestration Toolbox, drag the Receive shape, and drop it between the Begin (green circle) and End (red octagon) shapes.
Note
If the Toolbox is not open, in the View menu, click Toolbox. To anchor it on the screen, click the thumbtack icon.
From the toolbox, drag the Decide shape beneath the Receive shape.
From the toolbox, drag the Transform shape to the left branch of the Decide shape. The Transform shape is nested inside the Construct Message shape.
From the toolbox, drag the Send shape beneath the Transform shape.
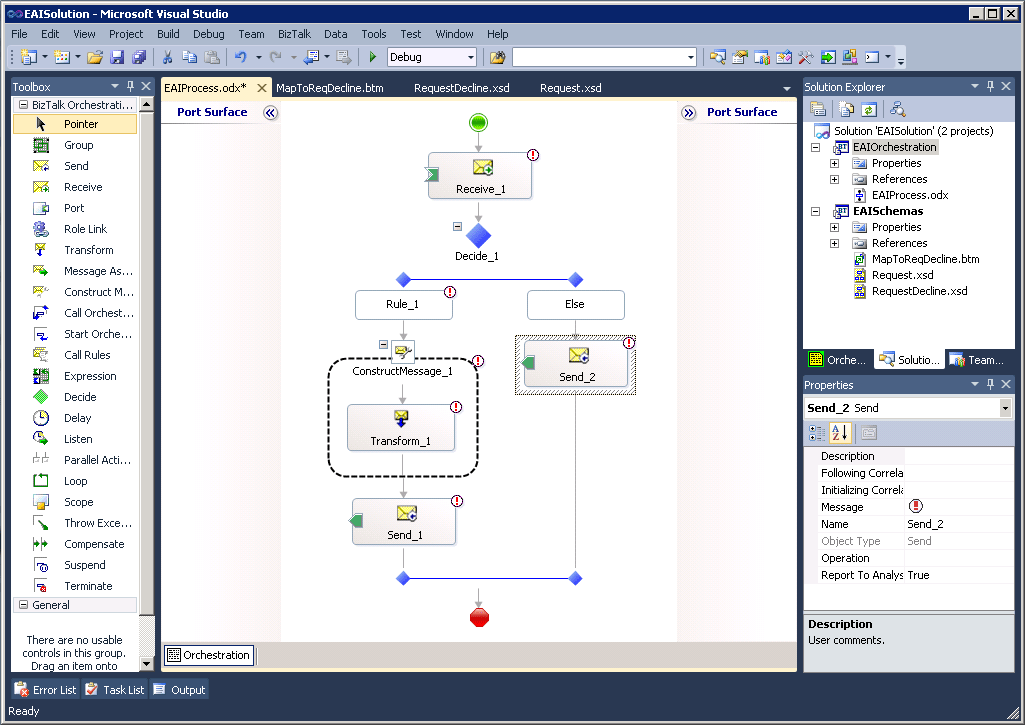
From the toolbox, drag the Send shape to the right branch of the Decide shape. The orchestration looks like the following after you added the action shapes:

The next step is to define message variables. Several action shapes have a message property that needs to be specified.
To define message variables
From Visual Studio, click the View menu, click Other Windows, and then click Orchestration View.
From Orchestration View, right-click Messages, and then click New Message.
In the Properties window, do the following:
Use this To do this Identifier Type RequestMessage. Message Type Click Schemas, and then click <Select from referenced assembly …>. From the Select Artifact Type window, click EAISchemas, and then click Request. Click OK From Orchestration View, right-click Messages, and then click New Message.
In the Properties window, do the following:
Use this To do this Identifier Type RequestDeclineMessage. Message Type Click Schemas, and then click <Select from referenced assembly …>. From the Select Artifact Type window, click EAISchemas, and then click RequestDecline. Click OK
To configure the properties of the shapes
On the design surface, click the Receive shape to select it.
In the Properties window, do the following:
Use this To do this Name Type ReceiveRequest. Message Select RequestMessage. Activate From the drop-down list, select True. Note
If the Property window is not open, in the View menu, click Properties Window.
On the design surface, click the Decide shape.
In the Properties window, do the following:
Use this To do this Name Type CheckGrandTotal. Note
If the Property window is not open, in the View menu, click Properties Window.
On the design surface, click the Rule_1 shape.
In the Properties window, do the following:
Use this To do this Name Type DeclineRule. Expression Click the ellipses (…), and then type RequestMessage(EAISchemas.PropertySchema.GrandTotal ) > 10000. Click OK.On the design surface, click the ConstructMessage_1 shape.
In the Properties window, do the following:
Use this To do this Name Type ConstructRequestDeclineMessage. Messages Constructed Select RequestDeclineMessage. On the design surface, click the Transform_1 shape.
In the Properties window, do the following:
Use this To do this Name Type TransformRequestToRequestDeclineMessage. Map Name Click …. From Transform Configuration, do the following:
Enter the configuration information:
- Click Existing Map.
Fully Qualified Map Name:
- Select <Select from referenced assembly>. From the left pane, select EAISchemas. From the right pane, select EAISchemas.MapToReqDecline. Click OK.
Source
- RequestMessage
Destination
- RequestDeclineMessageOn the design surface, click the Send_1 shape.
In the Properties window, do the following:
Use this To do this Name Type SendRequestDecline. Message Select RequestDeclineMessage. On the design surface, click the Send_2 shape.
In the Properties window, do the following:
Use this To do this Name Type SendRequestToERP. Message Select RequestMessage.
What did I just do?
In this step, you used Orchestration Designer to define your business process.
Next Steps
You add logical ports to the orchestration in Step 3: Add Ports to the Orchestration.
See Also
Step 1: Add EAIOrchestration Project to the Solution
Step 3: Add Ports to the Orchestration
Step 4: Build the EAIOrchestration Project