Step 1: Use the Adapter Service Development Wizard to Create the Web Project

Time to complete: 10 minutes
In this step, you create a project using Visual Studio and the Adapter Service Development Wizard. The Adapter Service Development Wizard collects information about the adapter, operations, and endpoint configurations, and generates a Web project that can then be deployed to IIS.
Prerequisites
You must build and deploy the Echo sample described in Tutorial 1: Develop the Echo Adapter before beginning this tutorial.
To start the Adapter Service Development Wizard
Start Visual Studio and then on the File menu, point to New, and then click Web Site.
In the New Web Site dialog box, perform the following actions:
Use this To do this Language Click Visual C#. Templates Click WCF Adapter Service. Location Select File System, and then type C:\Tutorials\EchoWeb as the path. Click OK.
On the Welcome page, click Next.
To select the adapter and URI
On the Choose the operations to generate a service contract page, select echoAdapterBindingV2 from the Select a binding drop-down list, and then click Configure.
On the Security tab of the Configure Adapter dialog box, set Client Credential type to Username, and then set the User name credentials as follows:
Property Value User name username Password password Note
The user name and password entered here are only used to connect to the adapter while performing the steps in the wizard, and are not preserved after the wizard completes.
Click the URI Properties tab, and then set the properties as follows:
Property Value Application LobApplication EnableAuthentication True Hostname lobhostname EchoInUpperCase False Note
The URI properties selected here will be used to create the <client><endpoint> elements in the web.config file.
Click the Binding Properties tab. Note the default values, and then click OK.
Note
The binding values will be used to generate the <bindings><echoAdapterBindingV2> elements in the web.config file.
To select the contract and operations
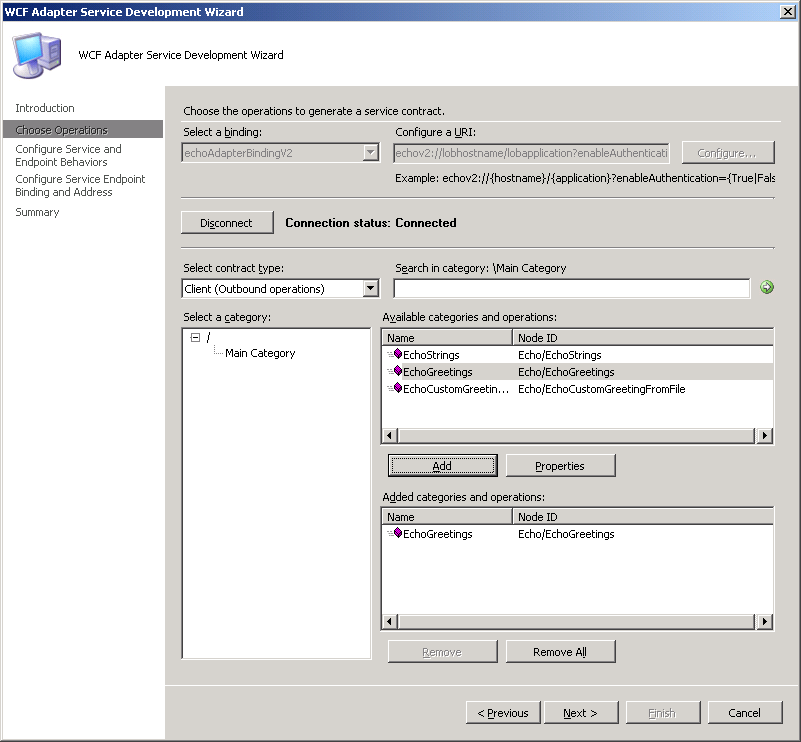
On the Choose the operations to generate a service contract page, click Connect.
In the Select a category tree, select Main Category. This populates the Available categories and operations list.
Note
You can also enter a search term in the Search in category field to find any operations that contain the search term.
In the Available categories and operations list, select EchoGreetings and click Add. This moves the EchoGreetings operation to the Added categories and operations list. The operations selected here will be exposed to client applications through the client proxy code generated by the wizard.

Click Next.
To configure service and endpoint behavior
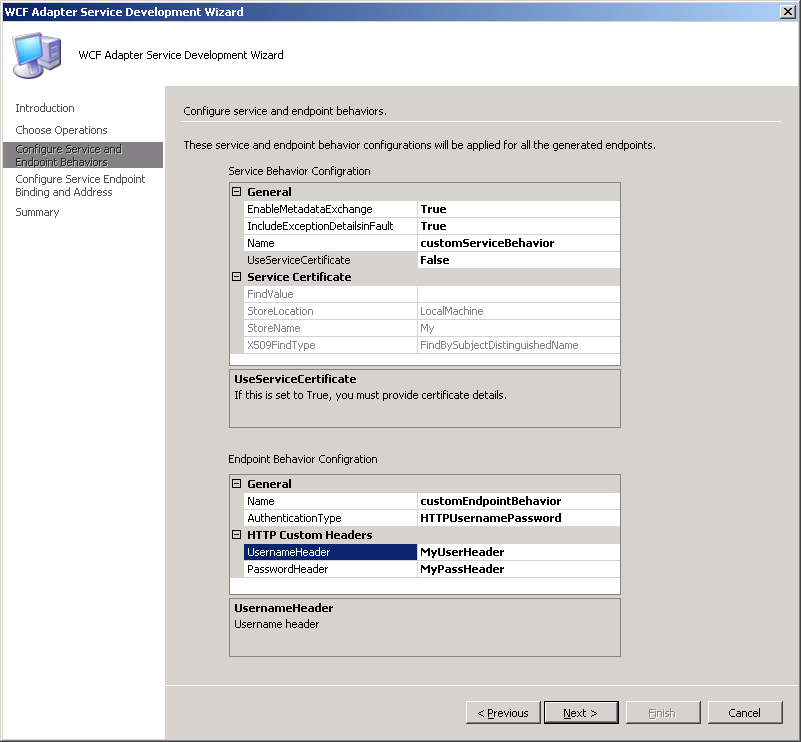
On the Configure service and endpoint behaviors page, enter the following values for Service Behavior Configuration:
Property Value EnableMetadataExchange True IncludeExceptionDetailsinFault True Name customServiceBehavior UseServiceCertificate False These values are used to populate the <serviceBehaviors>.
Enter the following values for Endpoint Behavior Configuration:
Property Value Name customEndpointBehavior AuthenticationType HTTPUsernamePassword UsernameHeader MyUserHeader PasswordHeader MyPassHeader These values will be used to specify the adapterSecurityBridgeType in the <endpointBehaviors element in web.confg.

Click Next
To configure the binding
On the Configure the service endpoint binding and address page, select the BindingConfiguration entry in Configure the address and binding for the contract, and then click the ellipsis (…) button.
In the Customize Binding dialog box, set Mode to TransportWithMessageCredential, and then click OK.
Click Apply, and then click Next.
On the Summary page, review the contracts and operations selected for this project, and then click Finish. You will be presented with the EchoWeb solution, which contains the project files created by the Adapter Service Development Wizard
What did I just do?
In this step, you used the Adapter Service Development Wizard to generate a Web project that, when published to IIS, will host the Echo Adapter developed in Tutorial 1: Develop the Echo Adapter in the IIS process. The resulting Web project allows Web Services and WCF clients to access the selected operations.
Next Steps
To build and deploy the Web project, proceed to Step 2: Deploy the Web Project