Windows Azure Connect Use Case: Enable File Sharing on Windows Azure VM
Once Windows Azure VMs are connected with your local machines using Connect (see this blog if you are new to Connect), there are many interesting use cases you can enable.
As we mentioned in an earlier blog, application connectivity in Connect is governed by Windows firewall policy, just as within a normal network. If your application requires specific firewall settings to work, you will need to set appropriate firewall rules manually. But sometimes these firewall settings are not so obvious, so we thought we would save you some time by showing you the steps required to enable some common use cases.
In this blog, we will show you how to enable file sharing on Windows Azure VMs. The steps below assume that you have enabled Remote Desktop for your Windows Azure role and have created an user account for it, and that you will be using this account to access file shares on your Windows Azure VMs. (Note, it is important to point out that any changes made during a Remote Desktop session don’t persist, so it should be for temporary use only. If you would like to create persistent file shares, you should use Windows Azure xdrive and skip step 4 through 7 below.)
0. First make sure the Windows Azure Connect connection is established. e.g. make sure you can ping your Azure VM from local machine and vice versa.
1. Remote Desktop to your Windows Azure VM instance using the user account you set up. (In this example we assume that you created an user account "my_account".)
2. Run "wf.msc" to open the "Windows Firewall and Advanced Security" UI.
3. Create a new inbound rule to allow file share:
- Right click "Inbound Rules", choose "New Rule ...".
- Select "Predefined", choose "File and Printer sharing" from the drop down list.
- In the “Predefined Rules” page, select “File and Printer Sharing (SMB-in) from the predefined rules list.
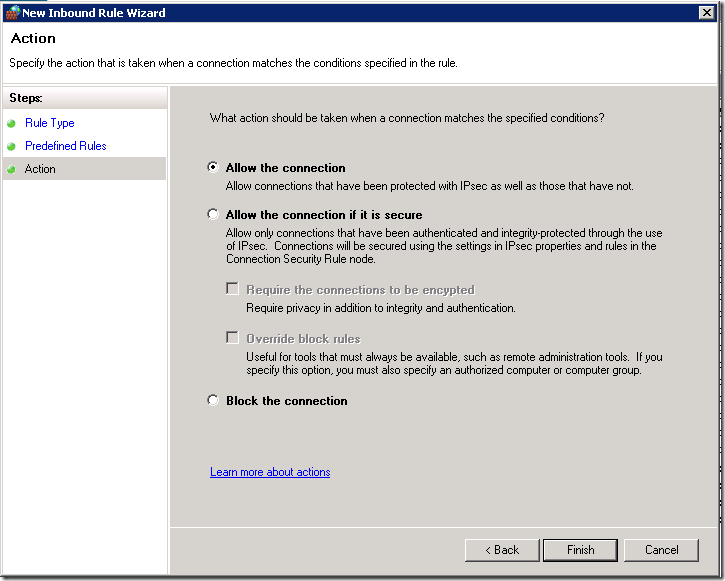
- In the next page, select “Allow the connection" and click “Finish”.
4. Create a folder on the VM machine, e.g. d:\share.
5. Create a network share
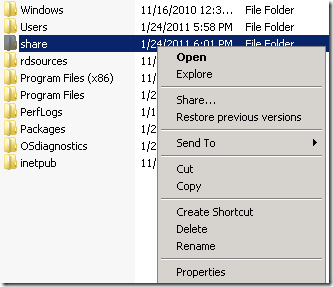
- Right click on the folder, select “Share…”.
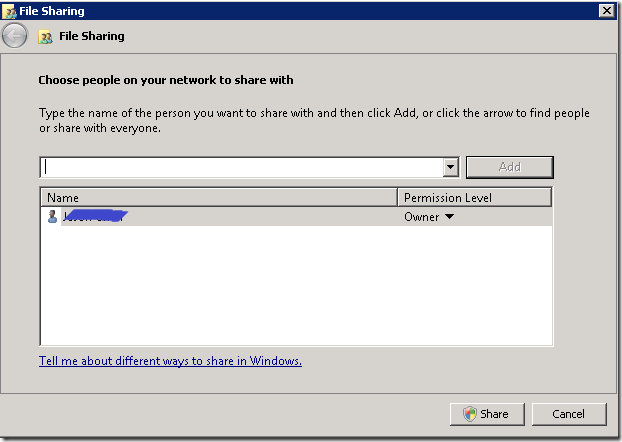
- In the “File Sharing” dialog, add users you would like to give access to this share.
When done, click on the “Share” button.
If you prefer command line, you can accomplish the task by running command:
net share MyShare=d:\share /grant:my_account,FULL
8. Now you should be able to connect to this share from your local machine. e.g. Run "net use * \\RD00155D328928\MyShare", where RD00155D328928 is the hostname of your Azure VM.
--Jason Chen
Comments
Anonymous
July 18, 2011
a outbound new rule should also be added. also before this, one command should be executed by prompt cmd as administrator netsh advfirewall firewall add rule name="ICMPv6 echo" dir=in action=allow enable=yes protocol=icmpv6:128,anyAnonymous
April 11, 2012
Thanks for this tutorial, I was able to make my shared folder available from my Local On-Premises machine to my Azure account... But the one thing I can't seem to make work is make a Virtual Directory from my Azure IIS to my shared folder. I can create it in IIS, but the contents are not visible to the browser. So I can create a VD called shared, and in there I have some images. My attempts to access those images results in 404. I'm guessing it's something to do with the IUSR, since I noticed IUSR is in the permissions of the other folders in IIS. I can't seem to figure out how to add IUSR to the permissions. When I try to add IUSR to the VD from my Azure RD session I get a permission denied... Is it trying to find an IUSR from my On-Premises machine too?


