Version Control Walkthrough (TFVC) Part 4 – Explore the diff and merge tools
Goal
Continued from Version Control Walkthrough (TFVC Gems) Part 3 – Use the local workspace in offline mode, we explore the diff and merge tools when working in both offline and online modes.
Context
We will perform a diff in offline mode, reconnect to Team Foundation Server, annotate the source code changes, make changes as a different user, and resolve conflicting changes.
Perform a diff in offline mode
- Switch back to Visual Studio and make various insert, edit and delete changes to the source code for the Guard class and then save the changes
- Open Pending Changes and right-click Guard.cs under Included Changes
- Click Compare with Workspace Version. The Diff window should appear in the provisional tab
- Locate the Compare Files toolbar, click the first icon in the list and click side-by-side mode
- Take a moment to explore the other options on the Compare Files toolbar and to explore the functionality of the Diff window. In particular, note the following about the Diff window:
Reconnect to Team Foundation Server
- Switch back to the administrative level Command Prompt and execute iisreset /start. The message Internet services successfully started should be displayed
- Open Source Control Explorer and click the Refresh icon to reconnect to Team Foundation Server
- Source Control Explorer should reconnect and refresh
Annotate the source code changes
You can annotate a file to learn who made changes and what changes they made in all earlier versions of the file.
- Open Pending Changes and right-click Guard.cs under Included Changes
- Click Annotate

- Review the annotations to the left of the source code
- Save all unsaved changes, close Visual Studio and then log off.
Make changes as a different user
- Repeat Part 1 - Log on as Adam Barr using the same password
- Repeat Part 1 - Use the path c:\hol\Adam Barr for the Local Folder
- Repeat Part 2 - to open the FabrikamFiber CallCenter solution
- Open Solution Explorer if it is not already open and expand the FabrikamFiber.Web project, expand the Helpers folder and finally double-click Guard.cs to view the C# source code
- Make one minor change to the source code for the Guard class. You should make this change to one of the lines of code that you modified when logged on as the first user. However, this change should be a different change. Since you will check in this modification, the change should not materially affect the operation of the code. Save your change
- Open Pending Changes if it is not already open and in the Comment section click on Enter a check-in comment. Enter a comment of your choice
- Click Check in and in the Check-in Confirmation message box click Yes
- You will see at the top of the Pending Changes windows a message confirming that the check was successful.
- Log off and then log back on as Administrator
Resolve conflicting changes
- Open Visual Studio and open Source Control Explorer
- Right-click on FabrikamFiber.CallCenter and click Get Latest Version
- The Resolve Conflicts should appear
- Click Merge Changes in Merge Tool
- The Merge tool will appear showing the Server version, the Local version and the Result

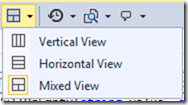
- You can change the merge view by click on the View icon

- Take a moment to explore the other options on the Merge toolbar and to explore the functionality of the Merge window. In particular, note the checkboxes on the left hand side of the Server and Local panes for each difference and conflict. These checkboxes provide an easy to use mechanism for indicating which of the changes should be included and which should be excluded

- Open Pending Changes and click Actions, Undo All
- In Undo Pending Changes dialog click Undo Changes
- In Confirm Undo Checkout, click Yes to All. All changes are undone and are removed from Included Changes
Please send candid feedback!
We need your candid feedback. Here are some ways to connect with us:
- Add a comment below.
- Contact us on our blog.
References
- Version Control (ex Branching and Merging) Guide
- Prerequisites & Part 1: Create a new local workspace
- Part 2: Use the local workspace in online mode
- Part 3: Use the local workspace in offline mode
A special thank you to everyone who laid the foundation this and ither version control guidance: Anil Chandr Lingam, Bijan Javidi, Bill Heys, Bob Jacobs, Brian Minisi, Clementino de Mendonca, Daniel Manson, Jahangeer Mohammed, James Pickell, Jansson Lennart, Jelle Druyts, Jens Suessmeyer, Krithika Sambamoorthy, Lennart Jansson, Mathias Olausson, Matt Velloso, Matthew Mitrik, Michael Fourie, Micheal Learned, Neno Loje, Oliver Hilgers, Sin Min Lee, Stefan Mieth, Taavi Koosaar, Tony Whitter, Willy-Peter Schaub, and the ALM Community.
![image[8] image[8]](https://msdntnarchive.z22.web.core.windows.net/media/MSDNBlogsFS/prod.evol.blogs.msdn.com/CommunityServer.Blogs.Components.WeblogFiles/00/00/01/70/47/metablogapi/5125.image8_thumb_7DFEA3ED.png)
