Automating Lab Environments with LabInaBox on Prem or in the Cloud.
Today building out repeatable demo/lab environments quickly has become a necessity. Previous this year I released LabInaBox which provided for a quick way to build out lab environments on a Windows 10 machine using Hyper-V. As more and more customers are looking at Azure I wanted to provide a similar experience for cloud lab deployment. Today I will walk through the new GUI interface which has been deployed with this release and discuss how you can leverage LabInaBox to build test environments in Hyper-V or in Azure.
Install LabInaBox
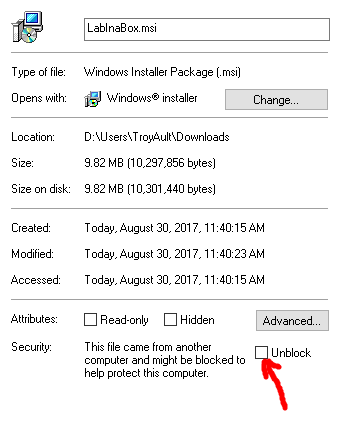
First things first we need to install LabInaBox. The installation msi can be found on GitHub here. Simply download the msi locally to your machine. After downloading you will need to unblock the file before you can execute the msi. You can do this by right clicking on the executable and selecting properties then clicking the unblock box.
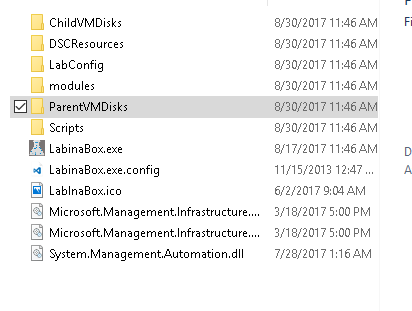
After executing you will be prompted for the installation Folder by default it will place in the C:\LabInaBox folder. The installation path can be modified, however I would recommend not placing it in the program files folder as files are created by the application in this directory which would require administrative privileges. After the setup completes you should have a folder structure with supporting files which resembles the below:
At this point we have all the files required to move forward Azure Deployment. If we want to also leverage the Hyper-V lab scenario we will need to provide a sysprepped Windows2016 image in the ParentVMDisks folder. Due to licensing and size of the file I was not able to package this into the installation. If you need further instructions on creating the sysprepped image further details can be found in the ReadMe under installation.
LabInaBox Layout
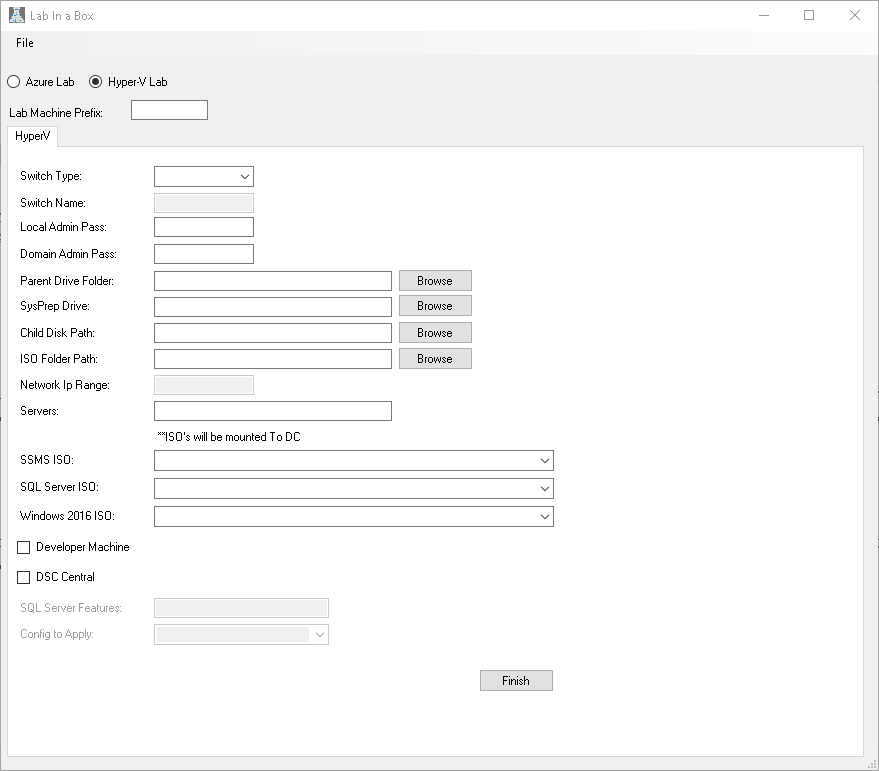
LabInaBox has a GUI configuration utility which will aid you in generating files you will leverage to build out your labs. To further understand the layout I will walk through the steps for creating these files then go into the detail of what the files are and how to leverage them. So lets get started by launching LabInaBox. Once you launch you will be presented with the screen below.
You have the option of starting from scratch selecting which type of Lab you want to build and filling out the appropriate fields, however for simplicity I have have provided templates which you can open and modify then generate your lab files. We will walk through the Azure one first. To utilize these click File..Open and select DefaultAzureConfig.json.
Azure LabInaBox
Generate Azure Lab Automation Scripts
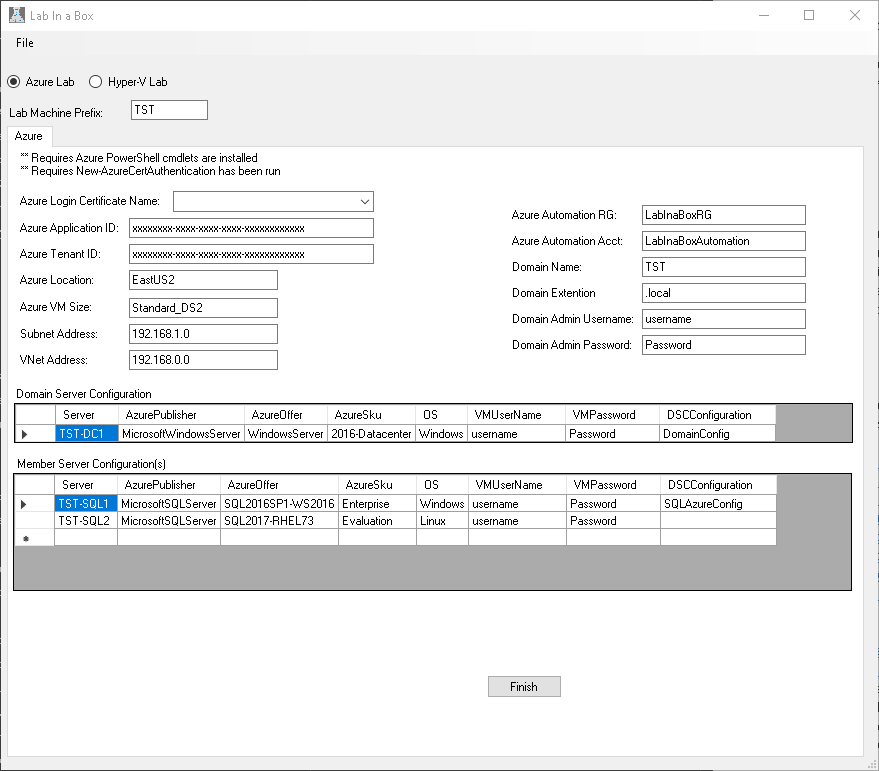
Below you see the values which have been pre-populated from the template. Notice there are three values which are either blank or have XXXX that you will need to provide the details for. These are Azure Login Certificate Name, Azure ApplicationID and Azure Tenant ID. The Azure Lab scripts require you to have created a service principal name with a certificate so that you can automatically log into azure from your machine without user input. If you have not read and completed this step please refer to my previous blog where I walk you through the steps.
Once you provide the three required values discussed above you could click Finish and the fields will be generated with the values provided. However, you may want to change a few things here though so lets walk through some of these items and explain. Lab Machine Prefix is utilized to create a folder structure on disk where the scripts are stored. You will also see this same prefix is what I chose to pass for my Domain Name and I prepended it to each machine name. I prefer this as I know when looking at the machine what lab it is tied to. Other items you will likely want to change are the Domain Admin Username and Password and the VMUserName and Password. Domain Admin is as it sounds the domain administrator for the domain and VMUsername is the local administrator on the machine. Azure Publisher, Azure Offer, AzureSku and OS are all values which determine which azure template is utilized to build the VM. Three additional items of interest which you may not immediately follow are Azure Automation Account, Azure Automation Resource Group, and DSC Configuration. Azure Automation Account is the name of the automation account which will be generated via the PowerShell scripts and it will be created in the Azure Automation Resource Group. All DSC Scripts, modules ect. will be uploaded to this location. A separate resource group is leveraged here so that in if we have a nightly destroy script to remove resource groups we can easily filter out our automation account. DSCConfiguration is the final item of interest here. When you install LabInaBox two configurations are provided DomainConfig and SQLAzureConfig. Additional ones can be added overtime as the community feels needed. Make your changes and click Finish. Upon clicking Finish the application will close and open windows explorer showing the files it has generated. You should see something similar to below. Notice its created in the LabConfig directory under TST which was our LabPrefix. Each file is prefaced with our prefix.
What are these files generated and how do I leverage them?
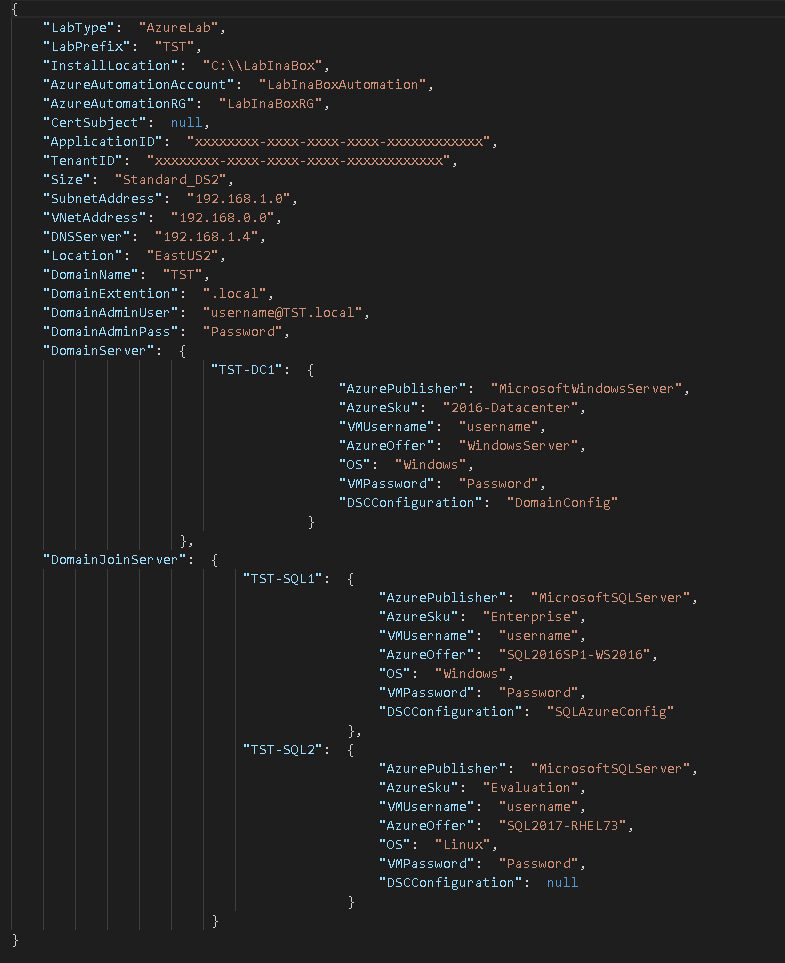
Notice we have three files here, one JSON file and two ps1 files. Lets take a look at the JSON file first. I am utilizing Visual Studio Code to analyse the file. Below we see the contents of the JSON file. Notice first I did not provide the Certificate Subject, ApplicationID, or TenantID but I was able to generate the scripts. If I ran the scripts currently they would error because these are required to connect to Azure. Throughout the JSON file we see all the information we input into the GUI tool and some additional ones which are automatically generated.
There is nothing we need to change here I just wanted to show this file is generated and the PowerShell scripts will consume these values. We could modify/create this file manually if we wanted however we could also open the file in the tool and modify it and click finish and the scripts will be updated.
The next file listed is TST_Create.ps1 contents of it are showed below:
First item in the script is to load a custom module LabinaBox.psm1. You will notice it has a WarningAction of Silently Continue. This suppresses the warning message which is generated because Login-AzureCert doesnt comply with naming standards. Next we see a series of cmdlet calls which will build out our AzureLab environment and configure it. Notice each cmdlet takes a parameter of configuration. Configuration is the JSON file we looked at previously. Within each module this json file will be converted into a PSCustom Object so that each property can be dot source referenced. A quick run down of each cmdlet and what it is used for is listed below for reference:
New-AzureLab
- Creates ResourceGroup for Lab
- Creates Azure Virtual Network
- Creates Each Azure VM requested
Publish-AzureDSModules
- Creates ResourceGroup for Automation Account
- Creates Automation Account
- Creates Storage Account
- Creates StorageContainer
- Uploads DSC Modules from Install Location\LabInaBox\DSCResources\AzureAutomation to container
- Creates AzureAutomationModule from uploaded file
New-AzureDSCConfigurations
- Creates Credentials in Automation account
- Imports DSC Configurations to AutomationAccount
Compile-AzureDSCConfiguration
- Compiles each configuration for each node requested
Set-AzureDSCNodeConfigurations
- Registers each Node with AzureAutomation DSC
- Applies configuration requested
The final final TST_Remove.ps1 is listed below.
Below describes what each of these cmdlets do:
RemoveAzureDSCNodeConfiguration
- Removes Configuration from server
- Unregisters server from Azure Automation DSC
Remove-AzureLab
- Removes Lab Resource Group and all items in ResouceGroup
Hyper-V LabInaBox
Similarly you can generate a Lab onprem on a Hyper-V server. In this case as mentioned before we will need Windows10 as well as a sysprepped image before we can move on. Once we have these we can again click File...Open and select Default_Private_Config.json. You should now be presented with a screen that looks like the following:
Similar to the Azure LabInaBox you may want to change a few properties here. To Start Lab Machine Prefix similar to the Azure will drive how the folder structure is created for the scripts. Unlike the Azure component this is prepended by default to all VMs which are created because we do not have a Resource Group to break them out we need to ensure we dont overlap Vms. Moving down the list in this example I name the switch based on the subnet I am utilizing for the lab, this is not required but something I found easier to identify later. As you move down the list there are Folder paths to set. This allows you move things around if you have more than one drive in your machine and you want to segregate the IO workload. Servers is just a comma separated list of server names you want created, keep in mind the lab prefix will be pre-pended to the name. ISO selection allows you to mount ISOs as drives on the domain controller so you can install additional software later. Once you select the ISO FOlder Path the values will populate in the drop down. If we stop here in this example we will get three machines. One Domain controller named PRV-DC and two windows servers named PRV-SQL1 and PRV-SQL2. Our domain controller will have DHCP,DNS, AD, and certificate services configured so we are ready to begin playing with DSC configurations. If we are looking for additional functionality we look at the last four boxes. Developer Machine will create another windows machine PRV-DEV which will be leveraged for any scripting or development. DSC Central will create an additional vm named PRV-DSC. PRV-DSC will have a DSC configuration applied to it which installs SQL Server and sets up the DSC Data Driven Deployment solution found on GitHub. Clicking Finish as before will present us with the scripts which are generated.
Notice with Hyper-V we have several additional scripts which are generated. With HyperV we have scripts to Start, Stop, Update, Create, Remove and Checkpoint a Lab. Hyper-V scripts are setups the same as the Azure LabInabox in that each cmdlet also takes configuration as a parameter where configuration is a JSON.
Wrap-Up
All of the cmdlet code can be found in the one module LabInaBox.psm1. In general my approach with here was to be able to easily and quickly generate a lab in Hyper-V or Azure. With that being said all the PowerShell cmdlets can be used as examples of how you could automate your workloads in your environment. Please feel free to comment or contribute to the solution on GitHub.
Happy Automating till Next Time!
