How to Deploy Windows DNS Server on Nano Server
Windows Server 2016 Technical Preview offers a new installation option: Nano Server. Nano Server is a remotely administered server operating system optimized for private clouds and datacenters. It is similar to Windows Server in Server Core mode, but significantly smaller, has no local logon capability, and only supports 64-bit applications, tools, and agents. It takes up far less disk space, sets up significantly faster, and requires far fewer updates and restarts than Windows Server. When it does restart, it restarts much faster.
Nano Server is ideal for a number of scenarios:
- As a “compute” host for Hyper-V virtual machines, either in clusters or not
- As a storage host for Scale-Out File Server, either in clusters or not
- As a DNS server
- As a web server running Internet Information Services (IIS)
- As a host for applications that are developed using cloud application patterns and run in a container or virtual machine guest operating system
Source : <https://technet.microsoft.com/en-us/library/mt126167.aspx>
Here we will see how to deploy a DNS server in a Nano Server virtual machine installation.
Prerequisites:
- Windows Server® 2016 Technical Preview ISO : You can download the ISO here
- A Windows 2012 R2 or Windows Server® 2016 Technical Preview Server running as Hyper-V host.
Create the Nano Server DNS VHD
- Mount the Windows Server® 2016 Technical Preview ISO (double click on the file). Note the drive in which it is mounted.
- Copy NanoServerImageGenerator.psm1 and Convert-WindowsImage.ps1 from the \NanoServer folder in the Windows Server Technical Preview ISO to a folder on your hard drive.
- Start Windows PowerShell as an administrator, change directory to the folder where you've placed these scripts and then import the NanoServerImageGenerator script with Import-Module NanoServerImageGenerator.psm1 -Verbose
- Create a VHD that sets a computer name and includes the Hyper-V guest drivers by running the following command which will prompt you for an administrator password for the new VHD:
New-NanoServerImage -MediaPath <path to root of media> -BasePath .\Base -TargetPath .\NanoServerVM\NanoServerVM.vhd -ComputerName <computer name> -GuestDrivers -packages Microsoft-NanoServer-DNS-Package
where
<path to root of media> is the path to the drive where where you have mounted the ISO.
-BasePath specifies a folder that will be created to copy the Nano Server WIM and packages to.
-TargetPath specifies the full path, including the filename and extension, where the resulting VHD or VHDX will be created.
-ComputerName is the computer name you provide for the Nano Server virtual machine you are creating.
-Packages takes the value 'Microsoft-NanoServer-DNS-Package' which configures the nanoserver vhd with DNS server package
Example:
New-NanoServerImage -MediaPath F:\ -BasePath .\Base -TargetPath .\NanoServerVMDNS.vhd -ComputerName DNSServerNano -GuestDrivers -Packages Microsoft-NanoServer-DNS-Package
This example creates a VHD from an ISO mounted as F:\.
When creating the VHD it will use a folder called Base in the same directory where you ran New-NanoServerImage;it will place the VHD (called NanoServerVMDNS.vhd) in a folder from where the command is run.
The computer name for the machine booted with this VHD will be DNSServerNano and will have virtual machine drivers installed for running Hyper-V. If you choose .
NanoServerVMDNS.vhd, the result uses the MBR layout. If you want the GPT layout, use NanoServerVMDNS.vhdx, which support Generation 2 virtual machines.
Note: New-NanoServerImage is supported on Windows 8.1, Windows 10, Windows Server 2012 R2, and Windows Server 2016 Threshold Preview.
- You can optionally provide IP Address to the VHD or rely on your DHCP server to provide you an IP which you can change later
An example of pre-configuring the DNS server nanoserver image with networking setting is
New-NanoServerImage -MediaPath F:\ -BasePath .\Base -TargetPath .\NanoServerVMDNS.vhd -ComputerName DNSServerNano -GuestDrivers -Packages Microsoft-NanoServer-DNS-Package -InterfaceNameOrIndex Ethernet -Ipv4Address 192.168.1.2 -Ipv4SubnetMask 255.255.255.0 -Ipv4Gateway 192.168.1.1
- In Hyper-V Manager, create a new virtual machine and use the VHD created in Step 3.
- Boot the virtual machine and in Hyper-V Manager connect to the virtual machine.
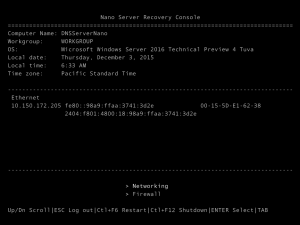
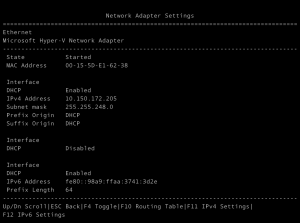
- Log on to the Recovery Console (see the "Nano Server Recovery Console" section in this guide ), using the administrator and password you supplied while running the script in Step 3. Here you can see the firewall and network settings.
By default with the DNS image the firewall exceptions for DNS are added. If you want the Ping to be working, you need to enable appropriate firewall exceptions.
You can also change the network configurations.
Obtain the IP address of the Nano Server virtual machine and use Windows PowerShell remoting or other remote management tool to connect to and remotely manage the virtual machine.
Installing the DNS Server Role
Nano Server is 100% managed remotely. There is no local logon capability at all, nor does it support Terminal Services. However, you have a wide variety of options for managing Nano Server remotely, including Windows PowerShell, Windows Management Instrumentation (WMI), Windows Remote Management, and Emergency Management Services (EMS).
To use any remote management tool, you will probably need to know the IP address of the Nano Server. Some ways to find out the IP address include:
- Using the computer name you assigned to the Nano Server while configuring it, you can get the IP address with ping. For example, ping NanoServer-PC /4. If you want the Ping to be working, you need to enable appropriate firewall exceptions.
- Or, you can find it on the Nano Server Recovery Console Networking section once you have logged on.
(Read more at : <https://technet.microsoft.com/en-us/library/mt126167.aspx> )
Using Windows PowerShell Remoting
To manage Nano Server with Windows PowerShell remoting, you need to add the IP address of the Nano Server to your management computer’s list of trusted hosts, add the account you are using to the Nano Server’s administrators, and enable CredSSP if you plan to use that feature.
To add the Nano Server to the list of trusted hosts, run this command at an elevated Windows PowerShell prompt:
Set-Item WSMan:\localhost\Client\TrustedHosts "<IP address of Nano Server>"
To start the remote Windows PowerShell session, start an elevated local Windows PowerShell session, and then run these commands:
$ip = “<IP address of Nano Server>”
$user = “$ip\Administrator”
Enter-PSSession -ComputerName $ip -Credential $user
You can now run Windows PowerShell commands on the Nano Server as normal.
Extract the DNS Role on the Nano Server
Once you have entered the PS session of the nano server, the first step is to unpack the DNS server full role there.
[10.150.172.205]: PS C:\Users\Administrator\>Enable-WindowsOptionalFeature -Online -FeatureName DNS-Server-Full-Role
This will extract the DNS server role and its cmdlets. Now you need to import the DNSserver module and get the DNS management cmdlets operational.
[10.150.172.205]: PS C:\Users\Administrator\>import-module DNSServer
[10.150.172.205]: PS C:\Users\Administrator\>get-command -Module DNSServer
At this point you have installed the DNS server role and the DNS management tools on the nano server. You can now perform DNS administrative operations on this DNS server.
Perform DNS operations
We can now perform some DNS operations to validate the sanity of the setup.
- Add a zone
[10.150.172.205]: PS C:\Users\Administrator\>Add-DnsServerPrimaryZone -ZoneName contoso.com -ZoneFile contoso.com.dns
- Add a Record in that Zone
[10.150.172.205]: PS C:\Users\Administrator\>Add-DnsServerResourceRecordA -Name www -ZoneName contoso.com -IPv4Address 10.0.0.2
- Query that record from some other PowerShell window on the management server
PS C:\Users\Administrator> resolve-dnsName www.contoso.com -Server 10.150.172.205
Name Type TTL Section IPAddress
---- ---- --- ------- ---------
www.contoso.com A 3600 Answer 10.0.0.2
Kudos! You have successfully deployed DNS Server on Nano Server in Windows Server 2016.
Note:
The Nano server does not support running a domain controller in Windows Server Technical Preview 4
The DNS server thus created cannot be a domain controller and can host only file backed zones.
(This article has been authored by Kumar Ashutosh and Vithalprasad Gaitonde with inputs from the Nano Server team. For feedback and support reach out to us at windns-users@lists.cloudapp.net)
Comments
- Anonymous
December 07, 2015
You can learn many other new features from the link below:
https://www.youtube.com/playlist?list=PLKWqPrqG4yyQ9mdlAviu_0Tr2wLgyQJj0 - Anonymous
December 07, 2015
In Targetpath, you use .NanoServerVMNanoServerVM.vhd , wouldn't it be better to use -TargetPath .NanoServerVMNanoServerVM.vhdx instead to create Generation2 VMs? - Anonymous
December 07, 2015
@Werner Yes you can do that. We have mentioned that option as well.

