Using BranchCache with System Center Essentials
Configure System Center Essentials to use BranchCache operating in Distributed Cache mode:
Document Owner: Anshu Agrawal
Why BranchCache Integration?
BranchCache is a new feature in both the Windows 7 client operating system and the Windows Server 2008 R2 operating system that significantly improves end user experience at branch locations or remote offices. BranchCache enables peer sharing of applicable content between Branch Cache-Cache enabled computers. System Center Essentials uses BranchCache to provide Essentials managed computers with limited connectivity to a Distribution Point (WAN) to obtain content locally rather than over a slower, less reliable, or more expensive link.
BranchCache seeks to reduce network strain by downloading and locally caching content on the first BranchCache client. Subsequent requests for the same content by its peers will result in the first client sharing its content over the LAN instead of requiring the peer computers to download the content over the WAN. This “peer-transferred” content is also cached for later sharing, and multiple peer computers can transfer content simultaneously, further improving performance.
Enabling BranchCache to your environment
BranchCache is not installed by default on Windows Server 2008 R2. To configure the Essentials management server when it is using the Background Intelligent Transfer Service (BITS) protocol, you must install the BranchCache feature using Server Manager. Use the Add Features Wizard of Server Manager in Windows Server 2008 R2 to enable BranchCache.
Following are the steps:
To install the BranchCache feature
- Click Start, point to Administrative Tools, and then click Server Manager.
- Right-click Features, and then click Add Features.
- In the Add Features Wizard, select BranchCache, and then click Next.
- In the Confirm Installation Selections dialog box, click Install.
- In the Installation Results dialog box, confirm that BranchCache installed successfully, and then click Close.
(Note: You can verify the installation from serverManager.log of windows directory or from features summary of Server Manager).
If you see any warning in the Installation Results dialog box, you can see the resolution and try to fix it. Examples of few warning messages:
1. Windows Automatic updating is not enabled. To ensure that your newly-installed role or features are automatically updated, turn on Windows Update in Control Panel.
You can resolve this manually, or Essentials installation will automatically turn on Windows Update.
2. Firewall setting exceptions
You can resolve this by opening firewall.cpl from a command prompt, and change the settings.
How to enable Distributed Cache mode and verify if server and client computers are using BranchCache:
1. To enable BranchCache in Distributed Cache mode (Figure1):
a. Click the Start button.
b. Type command in the Start Search box.
c. Right-click Command Prompt, and then click Run as administrator.
d. At the command prompt, run the following command: netsh branchcache set service mode=DISTRIBUTED
Figure1: Enable BranchCache in Distributed cache mode
2. To verify the Status (Figure2), at the command prompt,
3. type netsh branchcache show status all. The following figure demonstrates a correctly configured Distributed Cache:
Figure2: Verification
Configuring Essentials to use BranchCache:
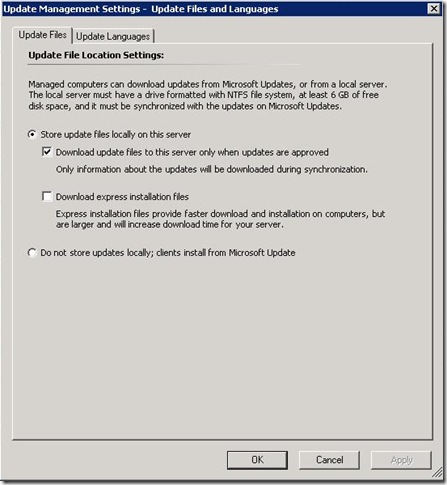
In addition to enabling BranchCache in your environment, Essentials must be configured to store update files locally, and also Essentials must be configured to use domain-level Group Policy objects (GPOs). On all BranchCache enabled computers, Essentials downloads the applicable contents to peers using cached content for non-Microsoft update packages, catalogs, and Microsoft updates.
The following steps verify that Essentials is correctly configured to use BranchCache:
1. Open Essentials console.
2. Click the Administration navigation button to Administration workspace.
3. In the Administration pane of the Essentials console. click Settings.
4. In the Tasks pane, click Update Files and Languages.
5. Click the Update Files tab.
6. Select the Store update files locally on this server option (Figure3)
7. Select the Download update files to this server only when updates are approved check box (Figure3).
Figure3: Update files and languages to enable BranchCache
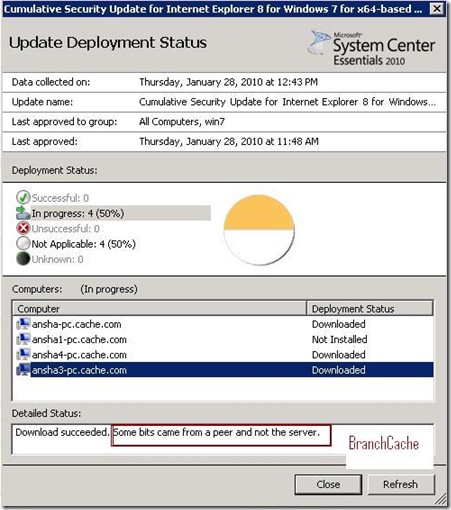
Verifying branchCache from Essentials (Figure4):
1. Open the Essentials console
2. Click the Updates navigation button to open the Updates workspace.
3. Right-click an update, and click Update Deployment Status Report.
4. Select the computer where you have enabled Branch Cache.
5. View the detailed status (Figure4).
Figure4: Deployment Status from BranchCache
Calculating BranchCache efficiency with performance counters
Please Refer: https://technet.microsoft.com/en-us/library/dd637782(WS.10).aspx
References:
Some of the information in this article has been taken directly or paraphrased from the following references.
https://technet.microsoft.com/en-us/library/cc708431(WS.10).aspxhttps://technet.microsoft.com/en-us/library/dd637785(WS.10).aspx


