Setting up Data Recovery Agent for Bitlocker
You might have already read on TechNet and one of the other AskCore Blogson how to setup Data Recovery Agent (DRA) for BitLocker. However, how do you request a certificate from internal Certificate Authority (AD CS) to enable Data Recovery Agent (DRA). Naziya Shaik and I have written detailed instructions here and hope it is helpful.
So what is a Data Recovery Agent?
Data recovery agents are individuals whose public key infrastructure (PKI) certificates have been used to create a BitLocker key protector, so those individuals can use their credentials to unlock BitLocker-protected drives. Data recovery agents can be used to recover BitLocker-protected operating system drives, fixed data drives, and removable data drives. However, when used to recover operating system drives, the operating system drive must be mounted on another computer as a data drive for the data recovery agent to be able to unlock the drive. Data recovery agents are added to the drive when it is encrypted and can be updated after encryption occurs.
Below are the steps needed. From creating the certificate on the Certification Authority, to using it on Client machine.
The machines in use are:
1. Windows Server 2012 R2 DC and CA
2. Windows 10 Enterprise
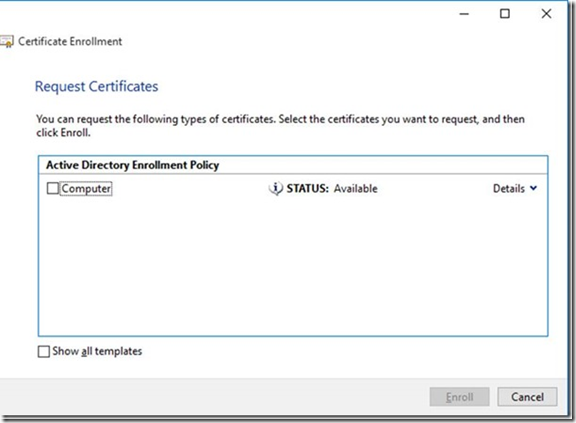
If I go to Windows 10 and try to request a DRA certificate, we cannot see it as illustrated below:
In order for the client to see a DRA certificate, we need to copy the Key Recovery Agent template, add BitLocker Drive Encryption, and BitLocker Drive Recovery Agent from the application policies.
Here is how you do it.
1. On a CA, we created a duplicate of the Key Recovery Agent and named it BitLocker DRA.
2. Add the BitLocker Drive Encryption and BitLocker Data Recovery Agent by going into Properties -- > Extensions and edit Application Policies.
3. In the CA Management Console, go into Certificate Templates and add BitLocker DRAas the template to issue.
On a Windows 10 client, adding Certificate Manager to Microsoft Management Console:
1. Click Start, click Run, type mmc.exe, and then click OK.
2. In the File menu, click Add/Remove Snap-in.
3. In the Add/Remove Snap-in box, click Add.
4. In the Available Standalone Snap-ins list, click Certificates, and click Add.
5. Click My user account, and click Finish.
6. Then click OK.
Then under Certificates -- > Personal -- > Right click on Certificate -- > All Tasks -- > Request New Certificate
These are the Certificate Enrollment steps
Click Next andin our case, we have Active Directory Enrollment Policy
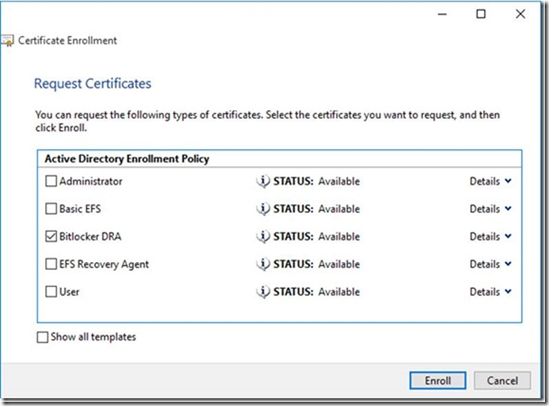
Click Nextand you will see the BitLocker DRA certificate which we created above.
Select BitLocker DRA and click Enroll.
This is what it looks like.
The next steps are pretty much the same as given in this Blog. We will need to export the certificate to be used across all the machines.
To accomplish this, right click on the certificate above and choose Export.
This will bring up the export wizard.
On the Export Private Key page, leave the default selection of No, do not export the private key.
On the Export File Format page, leave the default selection of DER encoded binary X.509 (.CER) .
The next window is specifying the location and file name of the certificate you are exporting. In my case below, I chose to save it to the desktop.
Click Finish to complete the wizard.
The next step will be to import that certificate into our BitLocker GPO to be able to use. In this, I have a GPO called BitLocker DRA.
Under Computer Configuration -- > Policies -- > Windows Settings -- > Security Settings -- > Public Key Policies -- > Right click BitLocker Drive Encryption –> Add Data Recovery Agent
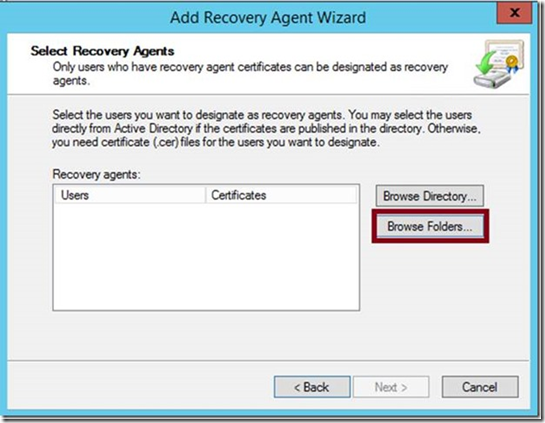
This will start the Add Data Recovery Agent wizard.
Click Browse Folders and point it to the location where you saved the certificate. My example above was from the desktop, so got from there.
Double click on the certificate to load it.
Click Next and Finish.
You will see the certificate imported successfully.
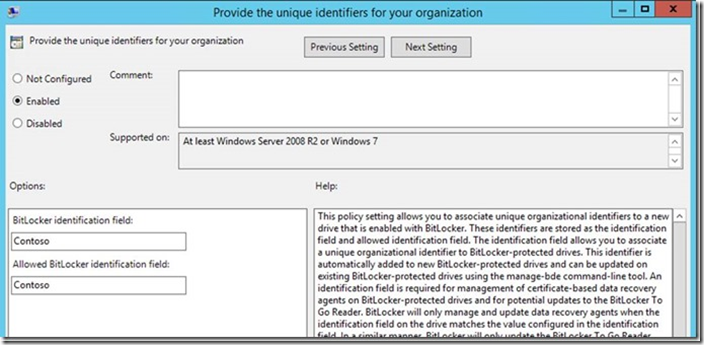
Additionally, make sure that you have the below GPO enabled. In Group Policy Editor, expand Computer Configuration -- > Administrative Templates -- > Windows Components -- > BitLocker Drive Encryption and ensure Enabled is selected .
Running Manage-bdeto get the status on the client you enabled Bitlocker on, you will see Data Recovery Agent (Certificate Based) to show it is currently set.
Thanks,
Saurabh Koshta
Naziya Shaikh
Comments
- Anonymous
October 16, 2015
You might have already read on TechNet and one of the other AskCore Blogs on how to setup Data Recovery


