How to deploy RRAS based VPN server that gives dedicated IP to remote users/machines and allow them to access Internet using a dedicated public IP address
Hello Customers,
In this blog, I will go through the steps to enable the following scenario:
Let us say you have a bunch of remote application servers that should be exposed to Internet only after routing them via a central server (which does accounting/firewall etc). And as they are application servers, you will like to reserve a public IP address for each of them – so that their external name to public IP address mapping is maintained.
How to enable this scenario?
You can deploy Windows based RRAS server role as a VPN server plus a NAT router and configure it in such a way that a dedicated public IP address is allocated to each VPN clients (i.e. your application servers in this case). The way we will do this is: Enable NAT router functionality on the VPN server to redirect public IP addresses to private IP addresses using 1o1 mapping. Then enable VPN server to assign each VPN username a dedicated private IP address. And then create VPN client on the application server with different username.
Let me walk you through the quick steps to do this:
Install Windows server on one of your edge machine at the central site. And connect it to Internet.
Obtain a range of public IP addresses from the ISP – let us say IP1, IP2, IP3 .... IP10 - first one (i.e. IP1) by VPN server and rest nine (IP2 to IP9) for remote application servers that are exposed by this VPN server.
On this Windows server machine:
- Configure all the IP addresses given by ISP to Ethernet interface facing Internet (i.e. IP1 to IP10 in this example) – let us call this interface as “Internet Interface”.
- Open “Server Manager” and install Routing and Remote Access server role.
- Click on “Routing and Remote Access” MMC snap-in, configure RRAS as VPN server by following the steps 2.1 to 2.3 given in this blog – using “Internet Interface” as the public interface. Note: Please ensure you have not selected “Enable security on the selected interface by setting up static packet filters” on the wizard. Because RRAS static filters and NAT doesn’t work together.
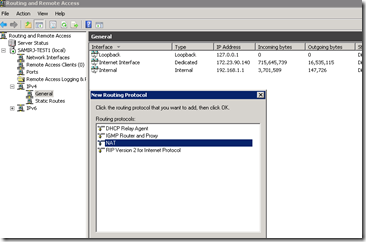
- Now install the NAT component. On the MMC snap-in, select “IPv4” and “General”. Right click and select “New Routing Protocol” and select “NAT”. You will then see “NAT” node under IPv4.
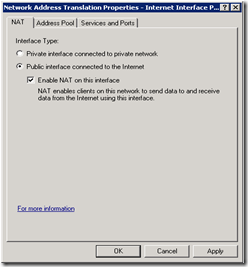
- Now configure the NAT component with a pool of public IP addresses. Right-click on NAT node and select the “Internet Interface”. Click OK. Select Interface Type as “Public Interface connected to the Internet” and select “Enable NAT on this interface”.
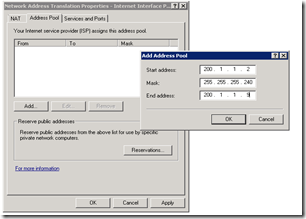
- Click on “Address Pool” tab at the top, click on “Add” and enter the range of IP addresses that you have allocated for your remote application servers (i.e. IP2 to IP10 in this example). Ensure you have entered the network mask correctly. Once done click OK.
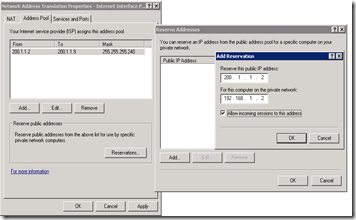
- Now do a 1-to-1 mapping of each public IP address to a private IP address – that you will assign to your remote application servers when they establish VPN connection to this machine. Let us say the private IP addresses are – IPA, IPB, ... IPI. Click on “Reservations” button on “Address Pool” tab and add the reservation – e.g. public IP2 mapped to private IPA; public IP3 mapped to private IPB and so on.... Once done click OK.
- The above step gets your NAT router mapping ready for one public IP address to one private IP address and vice-versa.
- Now configure the NAT component with VPN interface as the private interface. Right-click on NAT node and select the interface named “Internal” (this is the pseudo interface created by VPN server which is representing the interface on which all clients connect). Select Interface Type as “Private Interface connected to private network”.
- Now you need to configure the VPN server to ensure each remote application server when connects to this machine over VPN – gets a dedicated private IP address (one of IP address in IPA to IPI pool in this example) . This way after VPN connection, when these remote machine send packets to any machine beyond VPN server (say on Internet), their IP packets gets rightly translated – e.g. for appserverA – it is translated from IPA to IP2 when going out to Internet and vice versa when coming in from Internet.
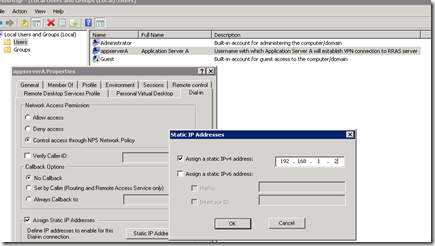
To enable this, click on “Users and Groups” snap-in (i.e. lusrmgr.msc) on the machine where the usernames are created with which each application server will establish a VPN connection. This can be a local machine OR the active directory machine (if RRAS server or its Radius server is joined to the domain). Open the snap-in, click on the username (e.g. appserverA), click on “Dial-in” tab, select “Network Access Permission” as “Allow access”, select “Assign Static IP Addresses” and then enter the static IPv4 address – i.e. private IP address assigned to this machine i.e. IPA.
Repeat the same step for all the other username for other application servers (e.g. appserverB to appserverI) – with different private IP addresses (i.e. IPB to IPI).
- Create VPN client connection on each of your application server machine – giving destination IP address of VPN server (i.e. IP1) and corresponding username (e.g. application server A using appserverA as the username).
- Once the above steps are done – you are all set.
How does it work?
- Remote application servers working as VPN client connect to VPN server at the edge of your network.
- The VPN client machine gets a private IP address assigned to them – e.g. application server A connecting with VPN username as appserverA gets IP address IPA.
- When the machine sends an IP packet on Internet, the IP packet goes with inner IP header having source IP address as private IPA till the VPN server. When it reaches VPN server, it removes the outer IP header, looks at inner IP header and does NAT translation to change the source IP address from private IPA to public IP2. And then send it on public Interface onto Internet.
- The packet reaches the peer machine on internet. When the return IP packet traverses the Internet, the ISP forwards the packet to the VPN server machine.
- VPN server receives the packet on Internet interface, looks at the NAT mapping and then changes destination IP address in IP header from public IP2 to private IPA. And then sees the private IPA is assigned to a VPN client. And it sends the packet on “Internal” interface which sends over VPN tunnel, adds outer IP header and the packet finally reaches the VPN client with destination IP address as IPA.
Thanks to Aria Fahimipour from Aria servers for providing me the required details about this common usage scenario which has worked for them.
Let me know if that works for you too.
With Regards,
Samir Jain
Senior Program Manager
Windows Networking
[This posting is provided “AS IS” with no warranties, and confers no rights.]
