Building a Cloud Business App: Kudos
Office 365 is an ideal business app platform providing a core set of services expected in today’s business apps and a central location for installing, discovering, and managing apps. Office 365 makes these business apps available where users already spend their time - in SharePoint and Office.
Visual Studio 2013 streamlines modern business app development for Office 365 and SharePoint 2013 with the Cloud Business App project. This walkthrough will show how you can build social, touch-centric, cross-platform Office 365 business applications that run well on modern devices.
What we’re going to build
In our scenario, let’s say my organization is on Office 365. The company encourages cross-team collaboration and would like to build an app that allows employees to send kudos to fellow employees.
An employee can find the app on SharePoint. He or she can launch the app on desktop browsers or different mobile devices. The app allows a user to send kudos to a coworker and shows a list of kudos users sent and received.

Figure 1. The kudos app we will be building in this walkthrough
Let’s build this app with Cloud Business App!
Create a Cloud Business App project
Let’s create a Cloud Business App project. We are creating an app for Office 365, so you can find the Cloud Business App template under Office/SharePoint for both VB and C# . This categorization is based on the language used in the middle tier; the client is HTML and JavaScript.
Let’s name the project KudosApp and choose OK.

Figure 2. Create a new Cloud Business App project in Visual Studio
You first need an Office 365 developer site to start building apps for Office/SharePoint. If you don’t have an account for development, you can sign up for free 30-day trial at dev.office.com. If you are a MSDN subscriber, you will receive the subscription as a benefit.
Enter your SharePoint development site here and choose OK.

Figure 3. Enter your Office 365 developer site
Once created, you will find a Cloud Business App is comprised of four projects in the solution:
- Server project, which is a basic ASP.NET project used to add tables and connect to data sources
- Standard SharePoint project, which provides a connection to Office 365
- HTML client project, a JavaScript project in which you define the UI for your app
- A Cloud Business App project, which ties all the other projects together

Figure 4. Solution Explorer
Define data
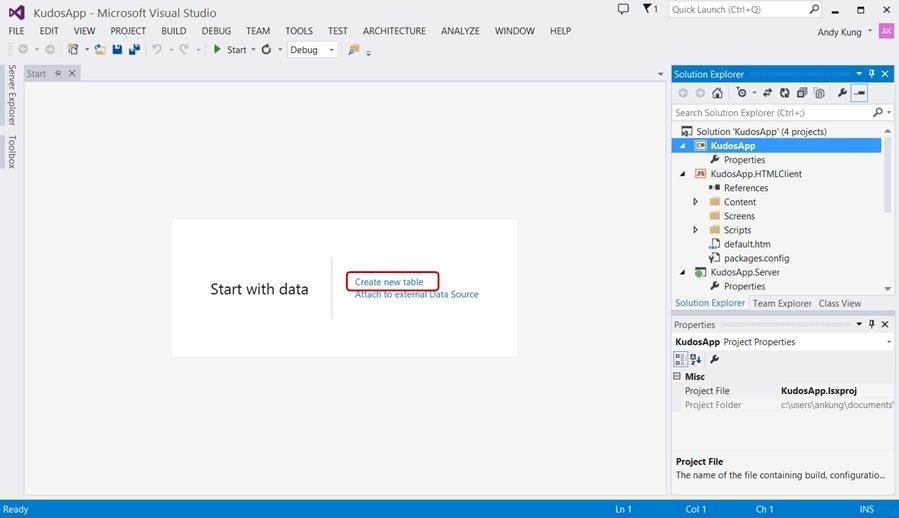
Let’s start by defining the data model for our app. In Cloud Business App, you can create new tables or attach to external data sources such as SQL, Odata, and SharePoint assets. In our scenario, we send and receive kudos, so let’s create a table for kudos. Choose Create new table.

Figure 5. Add a new table in the Table Designer
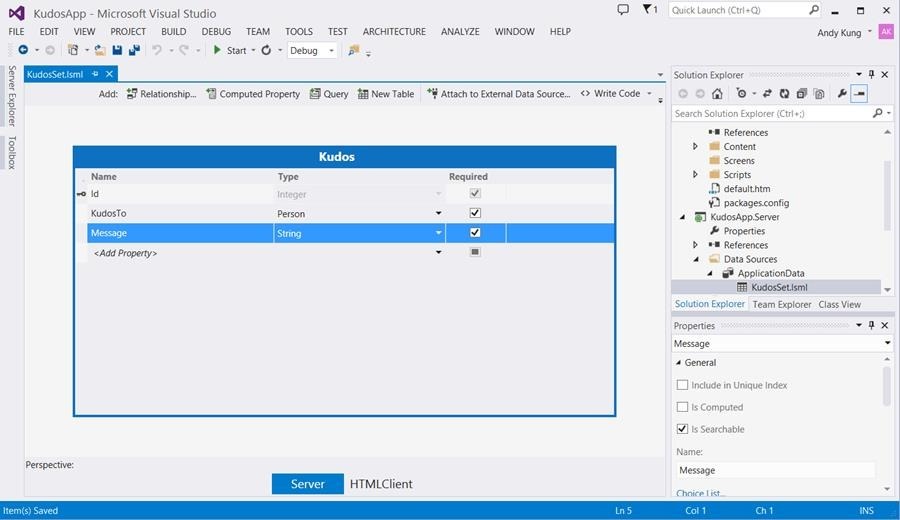
Name the table Kudos and add two fields:
- KudosTo (Person)
- Message (String)
The Table Designer provides a set of business types, such as PhoneNumber, Email, and Person. They include specific validation logic and visualizations both in the tooling and runtime.

Figure 6. Add some fields in the Table Designer
There is a growing trend in integrating social features into modern business applications. Cloud Business App makes it easy by integrating with the SharePoint Newsfeed feature.
With the title of the Kudos table selected, you can enable social under the Social category in Properties window. Select Post when Created.When a kudos is created, the app will post the activity to Newsfeed.

Figure 7. Enable Social feature in your app
Create queries
In our app, we want to show kudos sent by me, as well as the kudos I received. We can create two queries for these. Choose Add Query button in the tool bar of the Table Designer.

Figure 8. Choose "Query" button to add a custom query for this table
In Query Designer, name the query KudosSent. We want the query to return all kudos created by me, so let’s filter it by setting CreatedBy equals to Current User. Let’s also sort it by the Created field.

Figure 9. Customize the query with the Query Designer
We will create another query via the context menu of the Kudos table in Solution Explorer.

Figure 10. Add another query via the context menu
This time, we will name the query KudosReceived and filter by setting KudosTo equals Current User.

Figure 11. Customize another query
Create a browse screen
Now that we’ve defined the data model, let’s design the UI for the app. Create a screen via the context menu on Screens node in Solution Explorer.

Figure 12. Add a screen via the context menu
The Add New Screen dialog box will appear. Cloud Business App provides three screen templates that represent common UI patterns for browsing, viewing, adding, and editing data. Let’s start with a browse screen that shows all kudos sent by me.
Select Browse Data Screen, name the screen WelcomeToKudos and select KudosSent query as the screen data. Choose OK.

Figure 13. Create a screen by choosing a screen template
A screen is created for you. In the Screen Designer, you see a Screen Content Tree in the middle that represents the visual elements in the UI. Visual elements are bound to a data on the Data Members List on the left.
For example, in this screen, we have list visual showing values from the KudosSent data set.

Figure 14. Your UI elements are laid out in the Screen Designer
We can also choose to render the data set as a Table or a Tile List visual. Let’s use Tile List.

Figure 15. Change the visual control
The node under the Tile List indicates what fields will show up in a tile.

Figure 16. We will display kudos as a tile list
Since this is a list of kudos sent by me, let’s delete the Created By field. We will also delete the ModifiedBy and Modified fields.

Figure 17. Customize the tile list
You may have noticed that Cloud Business App automatically created audit fields for you (Created, CreatedBy, Modified, and ModifiedBy). It is a common requirement in business apps, so the tool handles it for you (you can turn it off in the Table Designer).
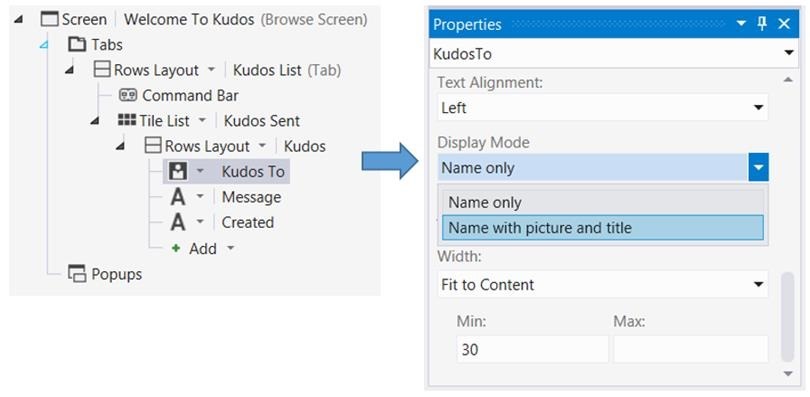
In the tile, the Kudos To field is rendered with a Person Viewer control. We can customize what will show up in the Person Viewer via the Properties window. Change the Display Mode to Name with picture and title.

Figure 18. Customize the look-and-feel of a visual control
Let’s also change the font and alignment of the Created field. Select Created. In Properties window, change Font Style to Small and Text Alignment to Right.

Figure 19. Customize the font and alignment of a visual control
Create an add screen
We have a list of kudos sent by me. Let’s create some UI to add kudos. In WelcomeToKudos screen, add a button in the Command Bar.

Figure 20. Add a button to the screen
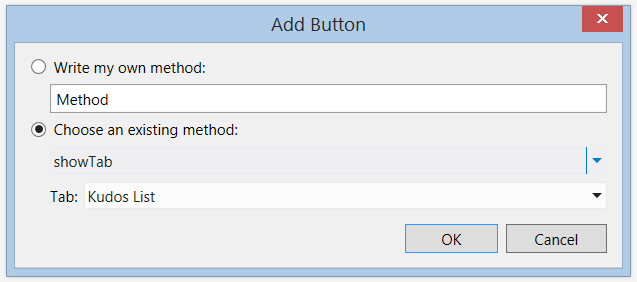
The Add Button dialog box will appear.

Figure 21. Add Button dialog box
You can write your own method for this button using JavaScript code or, in our case, we can select from a set of commonly used features. In the Choose an existing method dropdown menu, select KudosSent.addAndEditNew.
We are saying that, when the button is chosen, we will add a new record to the KudosSent data set via a new screen we are about to create. Choose OK.

Figure 22. Choose an existing method
The tool will guide us to create a new screen for adding a kudos. Name the screen SendKudos and choose OK.

Figure 23. Create a screen to add a kudo
A new screen (SendKudos) is now created.

Figure 24. New screen created in the Screen Designer
Let’s check what we’ve got so far! Press F5 to run the app.

Figure 25. Run the application
We have an empty list and an add button on the screen. Let’s add a kudos. Choose Add Kudos. The Send Kudos screen (rendered as a dialog box) will appear.

Figure 26. UI to add a kudo
Note that all layouts adapt well to different form factors. Resizing the browser window gives you an idea of how the app looks on a phone or tablet. Everything is optimized for touch, but works equally well on a desktop browser using keyboard and mouse.

Figure 27. App in a small form factor
Customize the UI while running in the browser
In the Send Kudos dialog box, Message is rendered as a text box. We want to change it to a text area. Also, since we only have two fields in the screen, we don’t need to show two columns in bigger form factors. For these types of UI tweaks on the screen, I can quickly make these changes without closing the browser and press F5 again.
Go back to the designer (without closing the browser) and change the Message fields to use Text Area control.

Figure 28. Customize the UI in Visual Studio while the app is running
Let’s also change the KudosTo display mode to show picture and title.

Figure 29. Customize the visual control
Now, let’s remove the columns. Drag Kudos To and Message out of the columns layout, then delete columns layout.

Figure 30. Customize the UI layout
Choose Save All in the designer and refresh the browser. Choose Add Kudos again. All the UI changes are now reflected in the app. This provides an efficient iterative design experience.
Let’s add a Kudos. The Kudos To value can be selected using an auto-complete text box based on Active Directory.

Figure 31. Choose a person from the auto complete text box
Choose Save and the newly added kudos will appear in the list.

Figure 32. A kudo is created in the app
Notice, you can see additional Office 365 integration here. When you hover your mouse over the person, it shows presence information. You can send an IM, e-mail, or schedule a meeting right here.

Figure 33. Presence information inside of the tile
Create a screen tab
Now we have a list of kudos sent by me. Let’s also add a list of kudos I received. We can show the two lists on the same screen using two different screen tabs.
Close the browser and return to Visual Studio. Open the WelcomeToKudos screen. Notice our tile list is currently under a screen tab called Kudos List. By default, every screen has one screen tab. The tab UI will not show in the app unless you have more than one screen tab.

Figure 34. By default, there is one screen tab in the screen
Let’s add another screen tab. Choose the Tabs node and select Add Tab.

Figure 35. Add a new screen tab
A new screen tab is now added.

Figure 36. New screen tab is created
In Properties window, change the Display Name of first screen tab to Kudos Sent and the second screen tab to Kudos Received.

Figure 37. Change the display name of the screen tabs
Add new data to the screen
Now, we need to add the list of kudos I received under the newly created screen tab. Recall we created a KudosReceived query earlier. Let’s include that query on the screen. Choose Add Data Item button in the toolbar.

Figure 38. Add a data member to the screen
In the Add Data Item dialog box, select KudosReceived and choose OK.

Figure 39. Select a data member to add to the screen
The query now appears in the Data Members List.

Figure 40. A new data member is added to the screen
Drag the query under the second screen tab on the Screen Content Tree.

Figure 41. Create UI for the newly added data member
Like we did with the first list, let’s change the Kudos Received list to a Tile List. Customize the tile to show only Created By, Message, and Created.

Figure 42. Customize the tile list
Press F5 again to see the changes. Now, there are two screen tabs on the screen.

Figure 43. App displays 2 screen tabs
If you send a kudos to yourself, you will see it in the second screen tab.

Figure 44. Kudos Received tab shows all kudos created by the current user
Remember when we created the Kudos table, we enabled the social feature. Now, if we open the Newsfeed page, we will see some posts by the app.
Write business logic
So far, we have a completely functional app now without writing a single line of code!
Cloud Business App lets you focus your energy on the unique value of the app: the business logic. Let’s say we don’t want you to be able to send kudos to yourself and we want to write some validation logic for that.
Open the Kudos table. Business logic is written on the middle tier, which is represented by the server project in your solution. The Table Designer provides you with entry points into the data pipeline of your app.
Open the Write Code dropdown menu in the tool bar, you will find a list of code entry points for business logic. Choose KudosSet_Validate.

Figure 45. Entry points for writing business logic
It will take you to the code entry point in the Code Editor.

Figure 46. Write validation logic
Write the following code.
 if (entity.KudosTo == Application.Current.User.Email)
{
  results.AddPropertyError("You cannot send kudos to yourself",
  entity.Details.Properties.KudosTo);
}
Now, run the app and try to send a kudos to yourself. You will get the validation error.

Figure 47. Validation logic is invoked in the running app
Publish the app
Finally, when I’m ready to publish this app to my organization, I can choose the Cloud Business App project and select Publish. I can follow the Publish Wizard to step through different deployment options.

Figure 48. Publish your app
The app is in the app catalog and can be installed on one or more sites for people to use.

Figure 49. The app is published to the app catalog
Conclusion
To summarize, you saw a highly productive experience for defining data and screens that enable you to quickly get an app up and running. The app has a professional looking UI that blends with SharePoint and is integrated with a set of Office 365 services. This allows you to focus on your business logic and get more done.
To learn more about Cloud Business Apps, visit Apps for Office and SharePoint Dev Center and Cloud Business Apps on MSDN.
Thanks!
Andy Kung
Program Manager, Visual Studio
Comments
Anonymous
October 31, 2013
Excellent article..is this feature available on on-premises Sharepoint server?Anonymous
October 31, 2013
Hi Karthik, Yes this is available for on-premises SharePoint 2013 as well. Cheers, -BethAnonymous
November 06, 2013
Excellent starter article, thank you! Publishing is somewhat glossed over, and the MSDN links aren't particularly helpful on this. SharePoint folks, a walkthough of the two database options (provisioned and external connection) and the two publishing options (Auto and Provider) would be extremely useful, especially in terms of understanding database instances, app instances, and where the database lives on beyond an app being deleted. Please consider this!Anonymous
November 06, 2013
Great Article thanks Chaks for turning me on to this, gave me an Idea for the company I work for and a program they have that does something similar, this is fantastic. This can even be a Topic for a SPS or Conference :-) Cheers see u at the next SharePoint Gathering mate.Anonymous
November 14, 2013
When we publish this app to the app catalogue and try to use it, I can only see my entries and my colleague can only see his. We cannot see each others stuff. Where is the data being stored? How can you adapt this to add items to a list?Anonymous
November 19, 2013
The comment has been removedAnonymous
November 19, 2013
The comment has been removedAnonymous
December 26, 2013
I am running into an error while trying debug this app locally. I created an Azure Visual Studio 2013 VM (With VS 2013 Professional) and an Office 365 dev account. When I try to debug this app, I get the following error: This page can't be displayed •Make sure the web address https://localhost:44300 is correct. •Look for the page with your search engine. •Refresh the page in a few minutes. •Make sure TLS and SSL protocols are enabled. Go to Tools > Internet Options > Advanced > Settings > Security The URL is https://localhost:44300/SharePointLaunch.aspx?... I checked the TLS and SSL protocols and they are enabled. I am sure it is something simple that I am not able to figure out. Any help would be appreciated.Anonymous
December 27, 2013
I am trying to follow this sample, but I am running into an error while debugging the app. I setup a Windows Azure Visual Studio 2013 VM and an Office 365 dev account. When I start to debug (pressing F5), I get the following error: This page can’t be displayed •Make sure the web address https://localhost:44300 is correct. •Look for the page with your search engine. •Refresh the page in a few minutes. The URL is: https://localhost:44300/SharePointLaunch.aspx?SPHostUrl=https%3A%2F%2Ftestsls%2Esharepoint%2Ecom%2Fsites%2Fo365dev&SPLanguage=en%2DUS&SPClientTag=0&SPProductNumber=16%2E0%2E2308%2E1221&SPAppWebUrl=https%3A%2F%2Ftestsls%2Df748121ad436bf%2Esharepoint%2Ecom%2Fsites%2Fo365dev%2FKudosApp I would appreciate any help in trying to resolve this issue.Anonymous
January 13, 2014
@Vikram - have you tried debugging the app by putting some breakpoints? That might help you to find where it is failing.Anonymous
January 13, 2014
The comment has been removedAnonymous
January 13, 2014
@Fabian - great to see you here! - Do keep us updated on your app journey :)Anonymous
April 01, 2014
Is there any possibility that these cloud business apps will "someday" be able to be added as an app part to SharePoint Online sites? I know they are currently not able to be added as app parts in a SharePoint site.Anonymous
May 19, 2015
How to get "Cloud Business App" project in Visual Studio 2013? I don't see it. We have SharePoint Online 2013. I created Äpp for SharePoint 2013". Not sure how to deploy apps in it via Visual Studio 2013 Ultimate. We don't have Azure or Office365.