Create a custom user control using Xaml and C# for Windows 8

Edit : Here is an update : How to Migrate this control to Windows 8.1 and Windows Phone 8.1 (WinRT)
As you may know, you can easily develop native applications for Windows 8 using XAML and C# (Or VB.NET by the way ![]() ).
).
Among a lot of other things, XAML allows you to create custom control to factorize your UI.
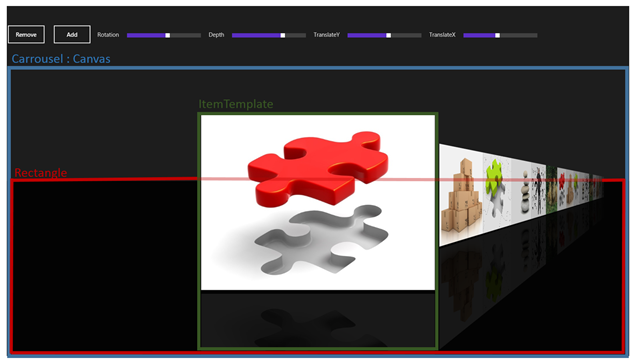
Today, I would like to show you how to create this kind of control and to do so, please let me introduce you with the final version of the XAML Carousel Control:
As you can see, this is a 3D carousel that can be used to display a long list of items (with a great (if you like it ![]() ) mirror).
) mirror).
(If you want to know how to achieve the same goal but with WinJS and HTML, you can read this article written by my colleague David Catuhe: https://blogs.msdn.com/b/eternalcoding/archive/2013/03/19/create-a-custom-user-control-using-javascript-and-winjs-for-windows-8.aspx)
So you may now wonder how you can develop such a beautiful (!!) control. The response will be decomposed on 6 parts:
Setting up the layout
The control itself is built using on top of a Canvas, called Carousel. The Carrousel contains a DataTemplate property called ItemTemplate, which describes the visual structure of each item in the carousel.
In the sample you will see that I made a mirror defined by the original image on which I made a CompositeTransform (ScaleY) and a PlaneProjection (RotationX)
Finally, the Carrousel has a black rectangle to delimit the perspective :

Thanks to DataTemplate and Dependency Properties you can style every part of the control just by setting properties and declaring an item template.
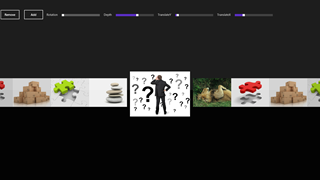
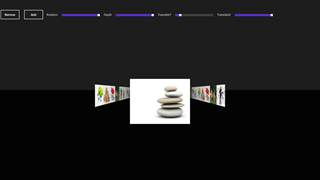
For example here are two different styles : without mirror, and no Rotation. And an other with a 90° Rotation max Depth and max TranslateX (Click on each image to view original picture)
 |
 |
Declaring and instancing the control
A simple as :
<ctrl:LightStone />
By the way, you can configure severals properties:
ItemsSource
On the same model than a ListBox or a ListView, you need to configure an ItemSource. Prefer an ObservableCollection<T> as you can add and remove items during running of your application (see Data Binding later in this article)
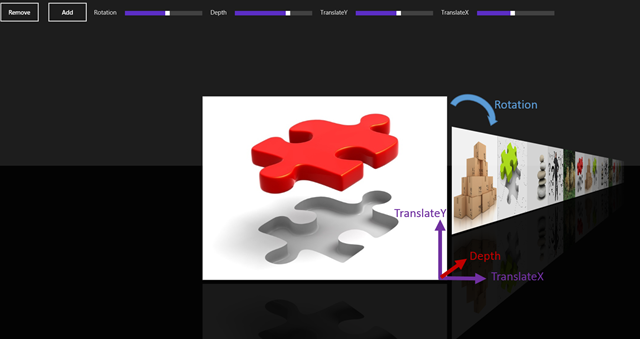
Dependency Properties
- TransitionDuration : animation duration (ms)
- Depth : Depth on the non selected items
- Rotation : rotation of non selected items
- TranslateX : translation on the X axis of non selected items
- TranslateY : translateion on the Y axis of all items
EasingFunction
You can configure an easing function for all items. Here is the MSDN Documentation to see all easing function you can use.
I decided to use a CubicEase with an easing mode set to “EaseOut”

Templates
Xaml infrastructure provides a simple way to implement an ItemTemplate. To go further on the subject, you will see in the code the method to render an item binded with a DataTemplate.
You need to implement a data Template property which will be declared in your xaml control. In the sample provided, you will see that I declare an image, and a mirrored image with an opacity.
 <ctrl:LightStone.ItemTemplate>
     <DataTemplate>
         <Grid>
             <Grid.RowDefinitions>
                 <RowDefinition Height="Auto"/>
                 <RowDefinition Height="Auto"/>
             </Grid.RowDefinitions>
             <Image Source="{Binding BitmapImage}" Width="600" VerticalAlignment="Bottom"
                Stretch="Uniform"></Image>

             <Rectangle Grid.Row="1" Fill="Black" Margin="0,10" ></Rectangle>

             <Image Grid.Row="1" VerticalAlignment="Top" Width="600"  Margin="0,10"
                Source="{Binding BitmapImage}" Stretch="Uniform"
                Opacity="0.1" >
                 <Image.RenderTransform>
                     <CompositeTransform ScaleY="1" />
                 </Image.RenderTransform>
                 <Image.Projection>
                     <PlaneProjection RotationX="180"></PlaneProjection>
                 </Image.Projection>
             </Image>

         </Grid>
     </DataTemplate>
 </ctrl:LightStone.ItemTemplate>
Implementation
The Itemtemplate property is a DataTemplate. Here is the code. No need to declare a dependency property because we don’t want to change it during running.
 /// <summary>
 /// Item Template
 /// </summary>
 public DataTemplate ItemTemplate
 {
     get
     {
         return itemTemplate;
     }
     set
     {
         itemTemplate = value;

     }
 }
During binding, a method is responsible of binding and rendering, thanks to the method LoadContent, which will create all the UIElements :
 /// <summary>
/// Bind all Items
/// </summary>
private void Bind()
{
    if (ItemsSource == null)
        return;

    this.Children.Clear();
    this.internalList.Clear();

    foreach (object item in ItemsSource)
        this.CreateItem(item);

    this.Children.Add(rectangle);
}

 /// <summary>
 /// Create an item (Load data template and bind)
 /// </summary>
 private FrameworkElement CreateItem(object item, Double opacity = 1)
 {
     FrameworkElement element = ItemTemplate.LoadContent() as FrameworkElement;
     if (element == null)
         return null;

     element.DataContext = item;
     element.Opacity = opacity;
     element.RenderTransformOrigin = new Point(0.5, 0.5);

     PlaneProjection planeProjection = new PlaneProjection();
     planeProjection.CenterOfRotationX = 0.5;
     planeProjection.CenterOfRotationY = 0.5;
     element.Projection = planeProjection;

     this.internalList.Add(element);
     this.Children.Add(element);

     return element;
 }
Data Binding
The mechanism of data binding is provided by a dependency properties called ItemsSource.
By the way, you need to provide your own collection. You ll find in the sample an ObservableCollection of Data
Here is the Data class (defined by a BitmapImage and a Title)
 public class Data
    {
        public BitmapImage BitmapImage { get; set; }
        public String Title { get; set; }
    }
Here is the ObservableCollection<Data> used :
 public ObservableCollection<Data> Datas { get; set; }

public MainPageViewModel()
{
     this.Datas = new ObservableCollection<Data>();
     this.Datas.Add(new Data { BitmapImage = new BitmapImage(new Uri("ms-appx:///Assets/pic01.jpg", UriKind.Absolute)), Title = "Wall 05" });
     this.Datas.Add(new Data { BitmapImage = new BitmapImage(new Uri("ms-appx:///Assets/pic02.jpg", UriKind.Absolute)), Title = "Wall 06" });
     this.Datas.Add(new Data { BitmapImage = new BitmapImage(new Uri("ms-appx:///Assets/pic03.jpg", UriKind.Absolute)), Title = "Wall 07" });
}
Implementation
I used a dependency property to get a callback method when my ItemsSource change, to allow a “re bind”
Note the Handler on the ItemsSourceChangedCallback method:
 /// <summary>
/// Items source : Better if ObservableCollection :)
/// </summary>
public IEnumerable<Object> ItemsSource
{
    get { return (IEnumerable<Object>)GetValue(ItemsSourceProperty); }
    set { SetValue(ItemsSourceProperty, value); }
}

// Using a DependencyProperty as the backing store for ItemsSource.
//This enables animation, styling, binding, etc...
public static readonly DependencyProperty ItemsSourceProperty =
    DependencyProperty.Register("ItemsSource",
                typeof(IEnumerable<Object>),
                typeof(LightStone),
                new PropertyMetadata(0, ItemsSourceChangedCallback));
The ItemsSourceChangedCallback allows me to implement my own mechanism when adding or deleting one or multiple items:
 private static void ItemsSourceChangedCallback(DependencyObject dependencyObject, DependencyPropertyChangedEventArgs args)
 {
     if (args.NewValue == null)
         return;

     if (args.NewValue == args.OldValue)
         return;

     LightStone lightStone = dependencyObject as LightStone;

     if (lightStone == null)
         return;

     var obsList = args.NewValue as INotifyCollectionChanged;

     if (obsList != null)
     {
         obsList.CollectionChanged += (sender, eventArgs) =>
             {
                 switch (eventArgs.Action)
                 {
                     case NotifyCollectionChangedAction.Remove:
                         foreach (var oldItem in eventArgs.OldItems)
                         {
                             for (int i = 0; i < lightStone.internalList.Count; i++)
                             {
                                 var fxElement = lightStone.internalList[i] as FrameworkElement;
                                 if (fxElement == null || fxElement.DataContext != oldItem) continue;
                                 lightStone.RemoveAt(i);
                             }
                         }

                         break;
                     case NotifyCollectionChangedAction.Add:
                         foreach (var newItem in eventArgs.NewItems)
                             lightStone.CreateItem(newItem, 0);
                         break;
                 }
             };
     }

     lightStone.Bind();
 }
User Input and Animations
Inputs
To respond to user inputs, you just have to handle pointer events.
Note: To go further, you can use the GestureRecognizer, but in this sample we just want to handle simple gestures.
The principle is simple: if the user moves his finger/mouse/pen over more than 40 pixels, we can change the current item according to the direction of the movement.
Here is the code :
 /// <summary>
/// Initial pressed position
/// </summary>
private void OnPointerPressed(object sender, PointerRoutedEventArgs args)
{
    initialOffset = args.GetCurrentPoint(this).Position.X;
}

/// <summary>
/// Calculate Behavior
/// </summary>
private void OnPointerReleased(object sender, PointerRoutedEventArgs pointerRoutedEventArgs)
{
    // Minimum amount to declare as a manipulation
    const int moveThreshold = 40;

    // last position
    var clientX = pointerRoutedEventArgs.GetCurrentPoint(this).Position.X;

    // Here is a "Tap on Item"
    if (!(Math.Abs(clientX - initialOffset) > moveThreshold))
        return;

    isIncrementing = (clientX < initialOffset);

    // Here is a manipulation
    if (clientX < initialOffset)
    {
        this.SelectedIndex = (this.SelectedIndex < (this.internalList.Count - 1))
                                 ? this.SelectedIndex + 1
                                 : this.SelectedIndex;

    }
    else if (this.SelectedIndex > 0)
    {
        this.SelectedIndex--;
    }

    initialOffset = clientX;
}
I used an other method to respond on the touch event (not a gesture, just a tap action)
To get the correct tapped item, I used the UIElement.TranformToVisual method which returns a transform object that can be used to transform coordinates from the UIElement:
var rect = child.TransformToVisual(this).TransformBounds(new Rect(0, 0, child.DesiredSize.Width, child.DesiredSize.Height));
Here is the complete method:
 /// <summary>
/// Tap an element
/// </summary>
private void OnTapped(object sender, TappedRoutedEventArgs args)
{
    var positionX = args.GetPosition(this).X;
    for (int i = 0; i < this.internalList.Count; i++)
    {
        var child = internalList[i];
        var rect = child.TransformToVisual(this).TransformBounds(new Rect(0, 0, child.DesiredSize.Width, child.DesiredSize.Height));

        if (!(positionX >= rect.Left) || !(positionX <= (rect.Left + rect.Width))) continue;

        isIncrementing = (i > this.SelectedIndex);

        this.SelectedIndex = i;
        return;
    }
}
Animations
The transition on each item is provided by a wonderful feature available on each UIElement : the UIElement.Projection.
Projection gets or sets the perspective (3-D effect) to apply when rendering this element. When you set a projection, you can choose beetween a Matrix3DProjection or a PlaneProjection. I used the plane projection on this sample.
Each item will animate properties of its PlaneProjection. According to the dependency properties you provided in the xaml control, of course ![]()

Thanks to the Animation mechanism of XAML, we will animate all items with a single Storyboard :
 /// <summary>
/// Update all positions. Launch every animations on all items with a unique StoryBoard
/// </summary>
private void UpdatePosition()
{
    if (storyboard.GetCurrentState() != ClockState.Stopped)
    {
        storyboard.SkipToFill();
        storyboard.Stop();
        storyboard = new Storyboard();
    }


    isUpdatingPosition = true;

    for (int i = 0; i < this.internalList.Count; i++)
    {
        var item = internalList[i];

        PlaneProjection planeProjection = item.Projection as PlaneProjection;

        if (planeProjection == null)
            continue;

        // Get properties
        var depth = (i == this.SelectedIndex) ? 0 : -(this.Depth);
        var rotation = (i == this.SelectedIndex) ? 0 : ((i < this.SelectedIndex) ? Rotation : -Rotation);
        var offsetX = (i == this.SelectedIndex) ? 0 : (i - this.SelectedIndex) * desiredWidth;
        var translateY = TranslateY;
        var translateX = (i == this.SelectedIndex) ? 0 : ((i < this.SelectedIndex) ? -TranslateX : TranslateX);

        // CenterOfRotationX
        // to Get good center of rotation for SelectedIndex, must know the animation behavior
        int centerOfRotationSelectedIndex = isIncrementing ? 1 : 0;
        var centerOfRotationX = (i == this.SelectedIndex) ? centerOfRotationSelectedIndex : ((i > this.SelectedIndex) ? 1 : 0);
        planeProjection.CenterOfRotationX = centerOfRotationX;

        // Dont animate all items
        var inf = this.SelectedIndex - (MaxVisibleItems * 2);
        var sup = this.SelectedIndex + (MaxVisibleItems * 2);

        if (i < inf || i > sup)
            continue;

        // Zindex and Opacity
        var deltaFromSelectedIndex = Math.Abs(this.SelectedIndex - i);
        int zindex = (this.internalList.Count * 100) - deltaFromSelectedIndex;
        Canvas.SetZIndex(item, zindex);
        Double opacity = 1d - (Math.Abs((Double)(i - this.SelectedIndex) / (MaxVisibleItems + 1)));

        var newVisibility = deltaFromSelectedIndex > MaxVisibleItems
                       ? Visibility.Collapsed
                       : Visibility.Visible;

        // Item already present
        if (item.Visibility == newVisibility)
        {
            storyboard.AddAnimation(item, TransitionDuration, rotation, "(UIElement.Projection).(PlaneProjection.RotationY)", this.EasingFunction);
            storyboard.AddAnimation(item, TransitionDuration, depth, "(UIElement.Projection).(PlaneProjection.GlobalOffsetZ)", this.EasingFunction);
            storyboard.AddAnimation(item, TransitionDuration, translateX, "(UIElement.Projection).(PlaneProjection.GlobalOffsetX)", this.EasingFunction);
            storyboard.AddAnimation(item, TransitionDuration, offsetX, "(UIElement.Projection).(PlaneProjection.LocalOffsetX)", this.EasingFunction);
            storyboard.AddAnimation(item, TransitionDuration, translateY, "(UIElement.Projection).(PlaneProjection.GlobalOffsetY)", this.EasingFunction);
            storyboard.AddAnimation(item, TransitionDuration, opacity, "Opacity", this.EasingFunction);
        }
        else if (newVisibility == Visibility.Visible)
        {
            // This animation will occur in the ArrangeOverride() method
            item.Visibility = newVisibility;
            item.Opacity = 0d;
        }
        else if (newVisibility == Visibility.Collapsed)
        {
            storyboard.AddAnimation(item, TransitionDuration, rotation, "(UIElement.Projection).(PlaneProjection.RotationY)", this.EasingFunction);
            storyboard.AddAnimation(item, TransitionDuration, depth, "(UIElement.Projection).(PlaneProjection.GlobalOffsetZ)", this.EasingFunction);
            storyboard.AddAnimation(item, TransitionDuration, translateX, "(UIElement.Projection).(PlaneProjection.GlobalOffsetX)", this.EasingFunction);
            storyboard.AddAnimation(item, TransitionDuration, offsetX, "(UIElement.Projection).(PlaneProjection.LocalOffsetX)", this.EasingFunction);
            storyboard.AddAnimation(item, TransitionDuration, translateY, "(UIElement.Projection).(PlaneProjection.GlobalOffsetY)", this.EasingFunction);
            storyboard.AddAnimation(item, TransitionDuration, 0d, "Opacity", this.EasingFunction);
            storyboard.Completed += (sender, o) =>
                item.Visibility = Visibility.Collapsed;
        }
    }

    // When storyboard completed, Invalidate
    storyboard.Completed += (sender, o) =>
        {
            this.isUpdatingPosition = false;
            this.InvalidateArrange();
        };

    storyboard.Begin();
}
To make it easier and simple to use, you will find an extension method to set a DoubleAnimation directly on a Storyboard:
 public static void AddAnimation(this Storyboard storyboard, DependencyObject element,
                                 int duration,double fromValue, double toValue, String propertyPath,
                                 EasingFunctionBase easingFunction = null)
{
    DoubleAnimation timeline = new DoubleAnimation();
    timeline.From = fromValue;
    timeline.To = toValue;
    timeline.Duration = TimeSpan.FromMilliseconds(duration);
    if (easingFunction != null)
        timeline.EasingFunction = easingFunction;

    storyboard.Children.Add(timeline);

    Storyboard.SetTarget(timeline, element);
    Storyboard.SetTargetProperty(timeline, propertyPath);
}
Optimizations
Finally, just to be sure our control works well on very low end hardware, we must ensure that only visible items are effectively handled by the control, and by the way animate only items which are visible.
In order to achieve this goal, we just have to remove items from the control when their opacity is inferior or equal to 0. Obviously you must have to re-inject them when they become visible again:
 // Dont animate all items
var inf = this.SelectedIndex - (MaxVisibleItems * 2);
var sup = this.SelectedIndex + (MaxVisibleItems * 2);

if (i < inf || i > sup)
    continue;

// Get if item is visible or not
var newVisibility = deltaFromSelectedIndex > MaxVisibleItems
               ? Visibility.Collapsed
               : Visibility.Visible;
By the way in the ArrangeOverride method, we can check if an item appear or not :
 // Items appears
if (container.Visibility == Visibility.Visible && container.Opacity == 0d)
{
    localStoryboard.AddAnimation(container, TransitionDuration, rotation, "(UIElement.Projection).(PlaneProjection.RotationY)", this.EasingFunction);
    localStoryboard.AddAnimation(container, TransitionDuration, depth, "(UIElement.Projection).(PlaneProjection.GlobalOffsetZ)", this.EasingFunction);
    localStoryboard.AddAnimation(container, TransitionDuration, translateX, "(UIElement.Projection).(PlaneProjection.GlobalOffsetX)", this.EasingFunction);
    localStoryboard.AddAnimation(container, TransitionDuration, offsetX, "(UIElement.Projection).(PlaneProjection.LocalOffsetX)", this.EasingFunction);
    localStoryboard.AddAnimation(container, TransitionDuration, translateY, "(UIElement.Projection).(PlaneProjection.GlobalOffsetY)", this.EasingFunction);
    localStoryboard.AddAnimation(container, TransitionDuration, 0, opacity, "Opacity", this.EasingFunction);
}
else
{

    container.Opacity = opacity;
}
You’ll find the complete code provided with this post.
Happy coding.
Comments
Anonymous
March 19, 2013
Great Work - Thanks :-)Anonymous
March 19, 2013
Thank you Oliver :)Anonymous
March 28, 2013
Hi Sebastien, is this possible to be remade in Windows 7? Or you have any resources for me to refer to? I would prefer it in C# as I'm looking for ways to incorporate this into Kinect.Anonymous
March 28, 2013
Hi Anne, it's not easy to remade it for WPF, because we don't have PlaneProjection in WPF world... I think you have to check this codeplex project, which can help you, maybe : http://slflow.codeplex.com/ I don't know if it works with Kinect, by the way.Anonymous
April 08, 2013
Hi Sebastien, is it possible i retrieve local Pictures library files as the content of the images? How should i do it ? Because I try to do it this way --> this.Datas.Add(new Data { BitmapImage = new BitmapImage(new Uri(@"C:UsersanneteohDesktoppuppypuppy1.png", UriKind.RelativeOrAbsolute)), Title = "Wall 00" }); and it is not working .Anonymous
April 17, 2013
Great!Anonymous
April 17, 2013
Hi Sebastien, Great work learn :). Hey i am new to xaml designing so plz help understand that can we provide scrolls to the items in list instead of one by one selection. thanks.Anonymous
April 17, 2013
Hi Anna, You can't do this kind of pictures insert. In Windows Store Apps, you have to include your pictures in your applications (or download it with HttpClient) You can check the source code. You will see that I used pictures included in the application with specific URI (ms-appx:///....)Anonymous
April 17, 2013
Hi Aviral; You just have to "tap" an item and the scroll will directly go to the tapped item. I don't have include a scrollviewer to interact with the control. If you want a scrollviewer, you have to modify the source code to include it. In my point of view, it may be a lot of work to make it work correctly. SébastienAnonymous
April 17, 2013
Sebastien Thanx a lot for your responce. But can u plz tell me that how we can include a gridview like motion of items in your control.It would be great to have a scroll event in the control. Thanx in advance.Anonymous
April 18, 2013
With a GridView, you need to develop a custom ItemsTemplate. It won't be easy but it's possible. SébastienAnonymous
June 12, 2013
This isn't really a carousel -- it doesn't loop around in a circle. A carousel would look like this: www.oxylusflash.com/.../oxylus-advanced-3d-carousel-v2-xml.jpgAnonymous
September 17, 2013
I would like to have rotating Carousel. Is it possible?Anonymous
November 19, 2013
Really good work! Thanks a ton!! :)Anonymous
April 03, 2014
I'm working on a project and I have to provide a functionality where user can customize greeting cards. Actually I'm a beginner, I tried some javascript, canvas but I couldn't make it. I think there should be some server-side code too. Unfortunately I couldn't find any clue or idea about - what exactly should I do? (need to make the functionality from the scratch). Can I use any plugin? I'm using ASP.NET 4.0, C# 4.0. I wonder if somebody can help me. Really in need of help. Thanks in advance.Anonymous
April 13, 2014
Hi..I really liked your Carousel control. I must say you are too professional with XAML. I want to learn the XAML inside out like you did. Please suggest any good learning source. I am a Windows phone developer but seriously I didnt get much of the code you did to make this work. Its amazing. Great work.Anonymous
March 31, 2015
Hello can I do like this application using windows desktop application