Setting Up a Mail Template for Document Approval Notifications
The email notifications that are sent between users according to the document approvals setup are based on email templates defining which fields and text to show in the notification.
The email template is an HTML file that you can export from Microsoft Dynamics NAV, edit in Word, for example, and then import back to the program where it then defines the content of approval notifications sent between users in the database.
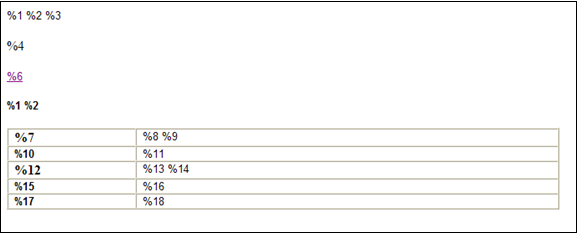
The following default notification email template is shipped with the standard product:
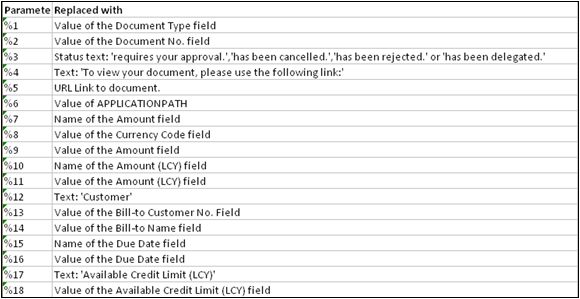
The parameters represent the following variables when used for sales approval notifications:
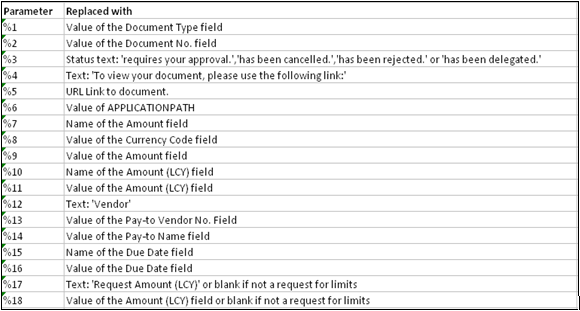
The parameters represent the following variables when used for purchase approval notifications:
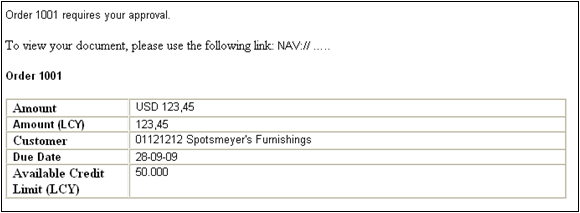
A sales approval notification based on the default template looks approximately as follows:
Note: The program automatically inserts variables in the notification according to the approval action and document type that it notifies about.
If the default mail template for approval notifications does not fit your needs, you can export, edit, and import it as described in the following procedure.
To Set Up a Mail Template for Document Approval Notifications
Begin by exporting the default mail template to a folder on your computer.
1. From the navigation pane, click Administration, and then click Application Setup
2. Click Document Approval, and then click Approval Setup.
3. In the Approval Setup window, click Mail Templates, point to Approval Mail Template, and then click Export.
4. Give the HTML file a name, such as “notification mail.htm”, and save it in any folder.
Proceed to edit the template to define which fields to include in approval notifications in your company.
1. Locate the exported template file.
2. Right-click on the file, point to Open with, and then click Word (or Note Pad).
3. Edit the template by adding, changing, or removing variables to define the notification content you want.
4. Save and close the HTML file.
Finish by importing the changed template.
1. From the navigation pane, click Administration, and then click Application Setup
2. Click Document Approval, and then click Approval Setup.
3. In the Approval Setup window, click Mail Templates, point to Approval Mail Template, and then click Import.
4. Select the HTML file you edited in the previous steps, and then click OK.
5. Click Yes to overwrite the existing mail template in the database.
Overdue Mail Template
To define the content of reminder emails to users concerning overdue approval actions, follow the same procedure as for notification mails, but begin by clicking Mail Templates, and then point to Overdue Mail Template in the Approvals Setup window.


