Construct 2 Tip #1: Implementing Snapped View State
This is the first of a short set of blog posts (following up on my article on Construct 2 Starter Kits) in which I want to touch on a few techniques and lessons I learned while building games and applications for the Windows Store using Scirra’s Construct 2. This post specifically covers how I’ve been implementing the snapped view state, which per item 3.6 of the Windows 8 application certification requirements is a must for an application to be accepted into the store.
Snapped view state refers to the docking of one Windows Store application to the right (or left) side of the screen while a second Windows Store application runs along side. Per the requirements: Your app must remain functional when the customer snaps and unsnaps the app.
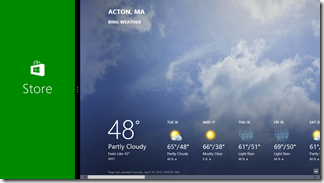
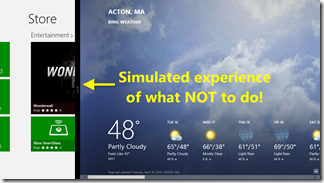
There is however a bit of leeway with “functional”: take a look at the default experience for the Windows Store app itself below left. Yup, it’s perfectly ok to just put up a logo or some static screen if your app really can’t do anything useful in the amount of real estate provided in snapped mode. What’s not ok, is to have the user experience suffer, such as by truncating the display (below right).
In your Construct 2 game, you’re probably using (or should be) the Letterbox scale mode so that your game or application adapts well to the various device sizes and configurations your users may employ. When using that mode with Construct 2 though, the entire screen is scaled, so the dimensions in snapped mode are something along the lines of 320x180, and for most games and applications you’ll build, it’s unlikely the default full-screen experience will translate well.
In the applications I’ve published, I’ve taken a route similar to the Windows Store application and simply provide a logo and some narrative text to let the users know they need to get out of snapped mode to fully experience the application. Below for instance, is what I’m doing for my Twelve Labors of Heracles application:

Each of the starter kits I described in my last post provides an experience similar to this, but if you’re building a new Construct 2 app from some of the additional File>New Templates in the tool, you’ll need to build your own mechanism for snapped view. Doing so isn’t too hard, and you can use the same pattern employed in the starter kits.
 If you open up one of the starter kit files, you’ll note it has an event sheet named Windows8Events, and that event sheet is ‘included’ in each of the other event sheets that drive a particular layout in the game. Remember, the user could snap your game while on any screen (layout) you provide, so you need a decent experience for each.
Within the Windows8Events sheet, I take advantage of the built-in Windows 8 plug-in provided with Construct 2 by simply dragging and dropping it onto one of the layouts (you’ll find it under the Platform Specific category in Construct 2’s Insert New Object dialog). Like the Touch plug-in, once you add it, it’s available across the project.
The Windows8 plug-in has a number of events you can use to detect and leverage platform-specific options for Windows 8, like view state, sharing, and in-app purchases. For snapped view, the primary condition to detect is a view state change:

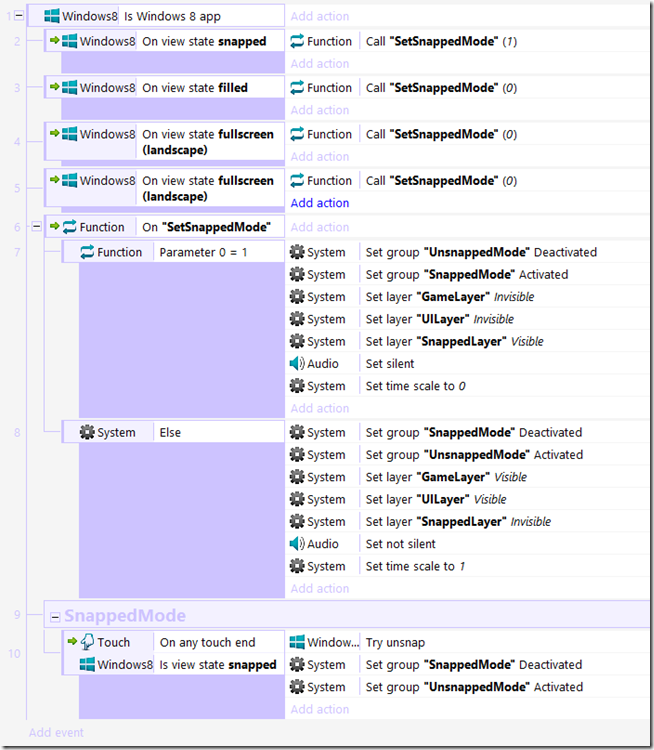
Here’s the code for the Windows8Events sheet of one of my apps, with a line-by-line narrative following:

| Line 1 | This is a simple check for whether the application (remember it’s HTML5/JavaScript at its core) is running on a Windows 8 device. Strictly speaking it’s not required, since the events that follow will silently fail if the application is not running on Windows 8. |
| Lines 2 - 5 | There are four discrete view states for Windows 8, so when any of those are triggered, an call is made to a function, SetSnappedMode, to make the necessary UI adjustments. The parameter to that function indicates whether you’re transitioning to (1) or away from (0) the snapped view state. |
| Line 6 | Function declaration |
| Line 7 | This branch is called when an argument value of 1 (snapped view) is passed in. In response, there are a few actions that occur:
|
| Line 8 | As you might expect, the processing for coming out of snapped view state is essentially the inverse of what was described above. |
| Line 9 -10 | Set up the SnappedMode event group; in Construct 2, a group is a subset of events and actions that can be enabled or disabled via a single operation (the Set group <name> activated/deactivated action you see in Lines 7 and 8). This is necessary because even though the layers within your game may be hidden, the elements are still there and can respond to user input events like taps, clicks, and keyboard entry. The SnappedModeGroup you see in the Windows8Events sheet contains the only input events that should be recognized while the app is in the snapped view state, and that’s to try to unsnap whenever the user taps anywhere on the screen in that view. In response, the TryUnsnap action is executed, and all events within each of the UnsnappedMode groups, which should be present in each of your game layout screens (like below), are now back in play.  |
That’s the gist of it. Unfortunately, you can’t test these events within Construct 2 itself, so you will have to export the project and run from within Visual Studio to make sure you’ve covered all the bases.
Comments
- Anonymous
June 12, 2013
The comment has been removed

