Azure@home Part 1: Application architecture
This post is part of a series diving into the implementation of the @home With Windows Azure project, which formed the basis of a webcast series by Developer Evangelists Brian Hitney and Jim O’Neil. Be sure to read the introductory post for the context of this and subsequent articles in the series.
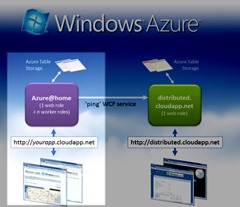
 As a quick review, the @home with Windows Azure project involves two applications hosted in Windows Azure:
- Azure@home, a cloud application that can be individually deployed to contribute to the Folding@home effort, and
- distributed.cloudapp.net, the project host and reporting site to which each of the Azure@home deployments ‘phone home.’
The relationship of the two applications is depicted in the architecture slide to the right, and for the purposes of this and the subsequent posts in my blog series I’ll be concentrating on the highlighted Azure@home piece (for additional context see the introductory blog post of this series).
Solution structure
The source code for Azure@home is available as both Visual Studio 2008 and Visual Studio 2010 solutions and comprises five distinct projects, as you can see when opening the solution file in Visual Studio or Visual Web Developer Express; I’ll be using Visual Studio 2010 from here on out.

- AzureAtHome, the cloud services project that ‘wraps’ the Azure@home application, which consists of two roles along with configuration data.
- AzureAtHomeEntities, classes implementing the Azure StorageClient API for the Windows Azure storage used by this application.
- FoldingClientMock, a console application that implements the same ‘interface’ as the full FAH console client, and which is used for testing Azure@home in the development fabric.
- WebRole, the public-facing ASP.NET website with two simple pages: one that accepts some input to start the folding process, and the second that reports on progress of the Folding@home work units.
- WorkerRole, a wrapper for the FAH console client which runs infinitely to process work units and record progress.
Application flow
Using the image below, let’s walk through the overall flow of the application and identify where the various Azure concepts – worker roles, web roles, and Azure storage – are employed, and then in the next post, we’ll start pulling apart the code.

Note there are two distinct paths through the application, one denoted by blue, numbered circles and the other by the two green, lettered circles; I’ll start with the blue ones.
The application kicks off with the launch of a web site hosted within a single instance of a web role. In this case, the site is built using Web Forms, but it could just has easily been an MVC site or Dynamic Data. In fact, you can deploy PHP sites, or pretty much any other web technology as well (although that’s done a bit differently and something I won’t tackle in this particular blog series).
The default.aspx page of the site is a simple interface consisting of a a few standard ASP.NET controls (a couple of TextBoxes, a Hyperlink, and a button) along with the Bing Maps Ajax control. On this page, the user enters his or her name (which will ultimately be recorded at the Folding@home site) and selects a location on the map to provide some input for the Silverlight visualization on the main @home With Windows Azure site.
The information collected from the default.aspx page (user name and lat/long combination) and a few other items are posted to the ASP.NET web site hosted by the Azure web role and then written to a table in Azure storage named client. The page then redirects to the status.aspx page (labeled with the green ‘a’ and which I’ll discuss toward the end of the article).
Although it appears the application is idle until the user submits the default.aspx page, in actuality each of the deployed worker roles has been continuously polling the client table. Each worker role is a wrapper for a single instance of a Folding@home (FAH) console client process, and it’s the worker’s job to start a FAH process passing in the requisite parameters (one of which is the user name stored within the client table). Until there is a record in the client table, there is nothing for the worker role to do, so it will just sleep for 10 seconds and then check again.
Once a record appears in the client table (and there will always be at most one record there), the worker role can initiate the FAH console client process (or the FoldingClientMock, when testing) via Process.Start and let it do whatever magic is held within. What happens inside the FAH console client is a black-box in terms of the Azure@home application; at the high level it’s doing some number crunching and reporting information periodically back to one of the servers at Stanford.
The other thing the FAH process does is update a local text file named unitinfo.txt (in the same directory that the FAH process is running in) to include information on the progress of the individual work unit – specifically the percentage complete.
Each worker role polls its associated unitinfo.txt file to parse out the percentage complete of the given work unit that it hosts. The polling interval is configurable, but since many of the work units take a day or even longer to complete, the default configuration has it set to 15 minutes.
After the worker role has parsed the unitinfo.txt file and extracted the percentage of completion, it adds a entry to another Windows Azure Table, this one called workunit, which stores information about the progress of both running and completed work units.
In conjunction with Step 7, the worker role also makes an HTTP call to a service hosted at distributed.cloudapp.net, passing in the information on the progress of the work unit. distributed.cloudapp.net maintains a record of all work units in every Azure@home deployment (in Azure Table storage, of course!) to report progress and support the Silverlight map.
Steps 5 through 8 continue until the FAH client has completed a work unit, at which point the FAH process (started in step 4) ends, and the worker role reinitiates step 3, the polling process. The client table’s record will be in place then, so the poll will be immediately successful, another FAH process is started, and the cycle continues ad infinitum.
The second path through the application is a simple one.
 On load of the default page for the ASP.NET web site, say https://yourapp.cloudapp.net, a check is made as to whether a record exists in the client table. If so, this Azure@home application instance has already been initialized – that is, the user provided their name and location – and so is actively processing work units via however many worker roles were deployed. default.aspx then automatically redirects to the status.aspx page.
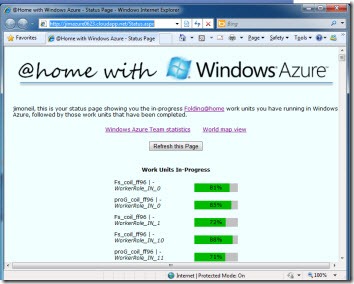
- status.aspx simply queries the workunit table in Azure storage to get the status of all on-going and completed work units to display them in the web page, as shown to the right.
Next time we’ll crack open the WebRole code and dive into steps 1 and 2 above.