Excel for Security Analysts - Episode 2
In today's episode on Excel for Security Analysts, we will import SSH logs to Excel. To read more episodes of Excel for Security Analysts, go here.
The idea for this post came from a TechNet forum thread that started by a Data Analyst here (Thank you Rajender for sharing the challenge and the logs).
You start with a log file like this:
And you should end up with a table in Excel:
Looks challenging, isn't it? Well, with Power Query you can transform this type of data with simple mouse clicks and few easy Power Query (M) formulas.
Note: As usual, we will use the integrated Power Query experience in Excel 2016, which is available in the Data ribbon inside the Get & Transform group. If you are still on Excel 2010 or 2013, you can download Power Query Add-in here to perform the same data transformations, that are described in this post. You can also use Power BI Desktop to accomplish all the steps below. Download Power BI Desktop here.
Let's start:
Connect Phase
In Excel 2016 Preview, go to the Data ribbon. In Get & Transform group, click New Query, go to From Other Sources, and click From Web.
In From Web dialog, paste the following URL to the URL box, and click OK:
https://gallery.technet.microsoft.com/SSH-Log-Sample-to-import-b4088fd4/file/140762/1/ssh.txt
In Access Web Content dialog, ensure you are in the Anonymous tab, select the second URL, and click Connect.
The Query Editor will open with a preview from the original log file. You can see that at this stage we have a single column whose cells consist of the original lines. It's difficult to work with this kind of data structure.
Cleanup Phase
Let's filter out all the lines that are not relevant for us.
Click the filter button on the header of Column1, click Text Filters, and click Contains...
In the Filter Rows dialog (as shown in the screenshot below), enter $ssh , and abc in the first and second text boxes. Select Or in the relevant radio button, and select begins with in the second drop down menu.
We will now tune our filter to accept a combination of OR statements, and ensure that all the relevant lines are filtered in.
In Home tab, click Advanced Editor.
We will now modify the Power Query expression (M):
Change the expression
let
Source = Table.FromColumns({Lines.FromBinary(Web.Contents("https://gallery.technet.microsoft.com/SSH-Log-Sample-to-import-b4088fd4/file/140762/1/ssh.txt"),null,null,1252)}),
#"Filtered Rows" = Table.SelectRows(Source, each Text.Contains([Column1], "$ssh") or Text.StartsWith([Column1], "abc"))
in
#"Filtered Rows"
To the following expression:
let
Source = Table.FromColumns({Lines.FromBinary(Web.Contents("https://gallery.technet.microsoft.com/SSH-Log-Sample-to-import-b4088fd4/file/140762/1/ssh.txt"),null,null,1252)}),
#"Filtered Rows" = Table.SelectRows(Source, each
Text.Contains([Column1], "$ssh") or
Text.StartsWith([Column1], "MAC Address") or
Text.StartsWith([Column1], "Port") or
Text.StartsWith([Column1], "PEVLAN") or
Text.StartsWith([Column1], "TrustFlag") or
Text.StartsWith([Column1], "Peer IP") or
Text.StartsWith([Column1], "Aging time") or
Text.StartsWith([Column1], "TimeStamp"))
in
#"Filtered Rows"
You can see that we added OR statements to filter the data by lines that starts with MAC Address, Port , PEVLAN , etc. These lines contain the multiline records that we want to transform into a tabular format.
Click Done in the Advanced Editor dialog.
Extracting SSH Server IP Addresses
In Add Column tab, click Add Custom Column.
Paste the following formula to the Custom column formula box, and click OK.
if Text.Contains([Column1], "$ssh") then [Column1] else null
This formula will copy the cells from Column1 to a new column, if the cell contains the text $ssh.
Select column Custom(by clicking on its header). In Home tab, click Split Column, then click By Delimiter.
In the Split by Delimiter dialog, select the Custom delimiter, enter "$ssh " as a delimiter, and click OK.
The previous step will split Custom into two columns: Custom.1 and Custom.2 .
Select Custom.1 and delete it (By pressing the Delete key).
Rename Custom.2to IP (By double clicking the header and editing the header name).
Right click on column IP, click Fill, and click Down.
Following the last step, we handled the IP Addresses, from occasional log line, such as the line below, to a column that associates the IP address to its relevant log data.
[u0039853@sam ~]$ssh 10.35.9.15
We can now filter out the rows that contains $ssh in Column1.
Click the filter button on the header of Column1, select Text Filters, and click Does Not Contain..
In the Filter Rows dialog, enter $ssh, and click OK.
Obtain unique IDs for Multiline Records
The next phase of our transformation will help us to associate multiple rows into a single record. We will use the technique that I shared with you here.
Assuming that each record of data is in a multiline structure as shown below, we would like to associate a unique ID to each record. We will assume that every multiline record starts with the prefix MAC Address.
MAC Address: 0000-5e00-01a8 VLAN/VSI/SI : MOB-RAN-1158
Port : Eth-Trunk11.1198 Type : dynamic
PEVLAN : 1 CEVLAN : 1198
TrustFlag : 0 TrustPort : -
Peer IP : - VC-ID : -
Aging time : 300 LSP/MAC_Tunnel: 1/16407
TimeStamp : 7918170
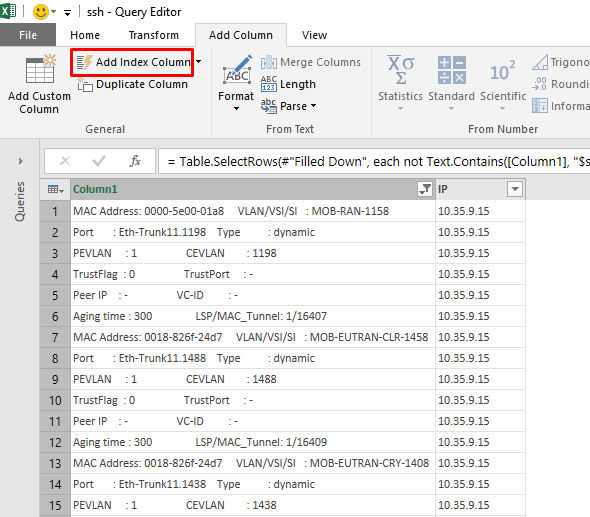
In Add Column tab, click Add Index Column.
Now let's create a new column with the index values from the rows that start with MAC Address.
In the Add Custom Column, enter the following formula, and click OK.
if Text.StartsWith([Column1], "MAC Address") then [Index] else null
Select column Custom, and in Transform tab, click Fill, and click Down.
We now have a unique ID for each record. We can delete column Index, and proceed to the next phase.
Split, Trim & Merge
In this phase we will perform a series of split and trim transformations to change the clattered data in Column1 into four well-structured columns of field, value, field value.
Right click on the header of column Column1, select Split Column and click By Delimiter...
In the Split by Delimiter dialog, select Colon as the delimiter, then select to split At each occurrence of the delimiter, as shown in the following screenshot, and click OK.
After the previous step, we have three columns: Column1.1 , Column1.2 and Column1.3.
Right click on Column1.2, select Transform, and click Trim.
Right click on Column1.2, select Split Column, and click By Delimiter...
In Split by Delimiter dialog, select Space as delimiter, split At the left-most delimiter, and click OK.
The column Column1.2 is now transformed into Column1.2.1 and Column1.2.2.
We will now trim the first four columns.
Select Column1.1, Column1.2.1, Column 1.2.2 and Column 1.3 (You can use the Shift key to select a range of columns). Right click on any of the column headers, select Transform, and click Trim.
We got to the point of having four columns in a structure of field, value, field, value.
The next phase will include two merge operations, that will help us to stage the next transformation.
Select Column1.1 and then Column 1.2.1. Right click on one of the selected columns and click Merge Columns.
In Merge Columns dialog, select Colon as a separator and click OK.
Select Column1.2.2 and then Column 1.3. Right click on one of the selected columns and click Merge Columns.
In Merge Columns dialog, select Colon as a separator and click OK.
As a result of this stage, we have two columns in the format of field:value.
The Magic Starts...
The next phase is where the really cool things start.
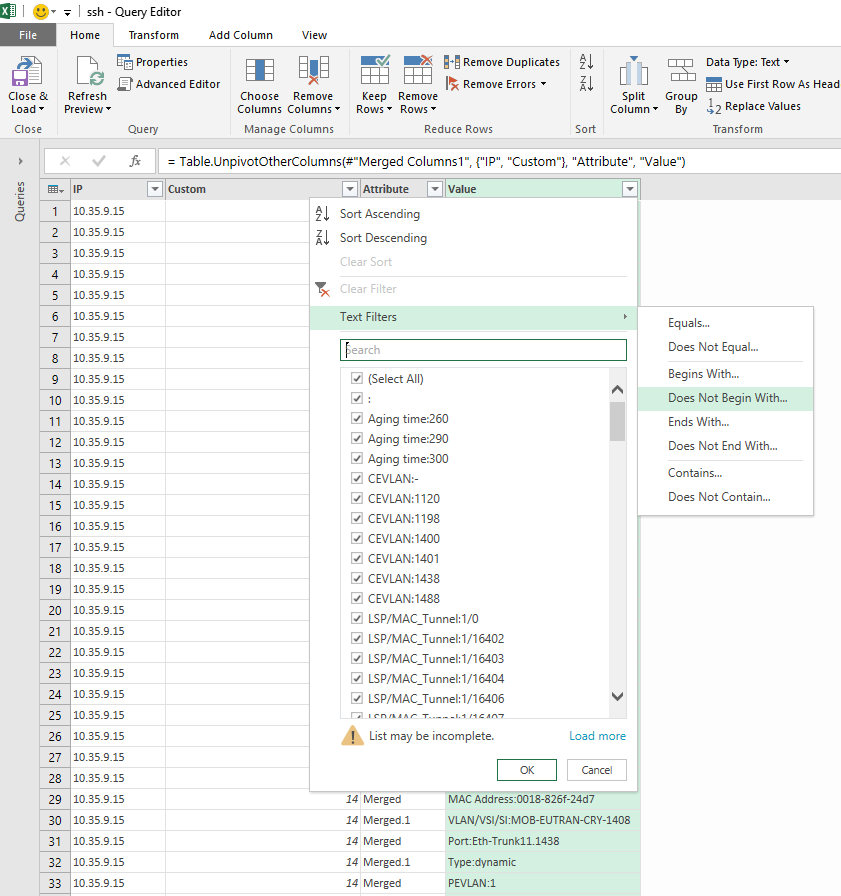
Select the first two columns (Merged and Merged.1), right click on one of the column headers, and click Unpivot Columns.
Click the filter button of Value header, select Text Filters, and click Does Not Begin With...
In Filter Rows dialog, enter the colon character in the text box which is adjacent to the drop down menu does not begin with, and click OK.
Delete column Attribute (by selecting the column and pressing Delete key).
Right click on column Value, select Split Column, and click By Delimiter...
In the Split by Delimiter dialog, select Colon as the delimiter and click OK,
Rename the last two columns to Field and Value.
Select the column Field, and in the Transform tab click Pivot Column.
In the Pivot Column dialog, select Value in the Values Column, expand the Advanced options, then select Don't Aggregate in Aggregate Value Function, and click OK.
Delete Column Custom, and we are done.
In Home tab, click Close & Load, or Close & Load To... and select your load options (If you have more than 1M rows, don't load the data to a table. Use the Data Model option and build PivotTable to analyze the data).
Conclusions
All the data is now loaded in the desired structure, and is quite different than the data we've started with. Don't you think?
You can now start using the power of Excel to analyze and visualize this data.
To download the workbook that was used for this episode, click here.
To skip all the steps above, and build the same query in your favorite Query Editor (Excel 2016 Preview, Excel 2013, Excel 2010 or Power BI Desktop), open the Advanced Editor and paste the following Power Query (M) expression:
let
Source = Table.FromColumns({Lines.FromBinary(Web.Contents("https://gallery.technet.microsoft.com/SSH-Log-Sample-to-import-b4088fd4/file/140762/1/ssh.txt"),null,null,1252)}),
#"Filtered Rows" = Table.SelectRows(Source, each
Text.Contains([Column1], "$ssh") or
Text.StartsWith([Column1], "MAC Address") or
Text.StartsWith([Column1], "Port") or
Text.StartsWith([Column1], "PEVLAN") or
Text.StartsWith([Column1], "TrustFlag") or
Text.StartsWith([Column1], "Peer IP") or
Text.StartsWith([Column1], "Aging time") or
Text.StartsWith([Column1], "TimeStamp")),
#"Added Custom" = Table.AddColumn(#"Filtered Rows", "Custom", each if Text.Contains([Column1], "$ssh") then [Column1] else null),
#"Split Column by Delimiter" = Table.SplitColumn(#"Added Custom","Custom",Splitter.SplitTextByEachDelimiter({"$ssh "}, null, false),{"Custom.1", "Custom.2"}),
#"Changed Type" = Table.TransformColumnTypes(#"Split Column by Delimiter",{{"Custom.1", type text}, {"Custom.2", type text}}),
#"Removed Columns" = Table.RemoveColumns(#"Changed Type",{"Custom.1"}),
#"Renamed Columns" = Table.RenameColumns(#"Removed Columns",{{"Custom.2", "IP"}}),
#"Filled Down" = Table.FillDown(#"Renamed Columns",{"IP"}),
#"Filtered Rows1" = Table.SelectRows(#"Filled Down", each not Text.Contains([Column1], "$ssh")),
#"Added Index" = Table.AddIndexColumn(#"Filtered Rows1", "Index", 0, 1),
#"Added Custom1" = Table.AddColumn(#"Added Index", "Custom", each if Text.StartsWith([Column1], "MAC Address") then [Index] else null),
#"Filled Down1" = Table.FillDown(#"Added Custom1",{"Custom"}),
#"Removed Columns1" = Table.RemoveColumns(#"Filled Down1",{"Index"}),
#"Split Column by Delimiter1" = Table.SplitColumn(#"Removed Columns1","Column1",Splitter.SplitTextByDelimiter(":"),{"Column1.1", "Column1.2", "Column1.3"}),
#"Changed Type1" = Table.TransformColumnTypes(#"Split Column by Delimiter1",{{"Column1.1", type text}, {"Column1.2", type text}, {"Column1.3", type text}}),
#"Trimmed Text" = Table.TransformColumns(#"Changed Type1",{{"Column1.2", Text.Trim}}),
#"Split Column by Delimiter2" = Table.SplitColumn(#"Trimmed Text","Column1.2",Splitter.SplitTextByEachDelimiter({" "}, null, false),{"Column1.2.1", "Column1.2.2"}),
#"Changed Type2" = Table.TransformColumnTypes(#"Split Column by Delimiter2",{{"Column1.2.1", type text}, {"Column1.2.2", type text}}),
#"Trimmed Text1" = Table.TransformColumns(#"Changed Type2",{{"Column1.1", Text.Trim}, {"Column1.2.1", Text.Trim}, {"Column1.2.2", Text.Trim}, {"Column1.3", Text.Trim}}),
#"Merged Columns" = Table.CombineColumns(#"Trimmed Text1",{"Column1.1", "Column1.2.1"},Combiner.CombineTextByDelimiter(":", QuoteStyle.None),"Merged"),
#"Merged Columns1" = Table.CombineColumns(#"Merged Columns",{"Column1.2.2", "Column1.3"},Combiner.CombineTextByDelimiter(":", QuoteStyle.None),"Merged.1"),
#"Unpivoted Columns" = Table.UnpivotOtherColumns(#"Merged Columns1", {"IP", "Custom"}, "Attribute", "Value"),
#"Filtered Rows2" = Table.SelectRows(#"Unpivoted Columns", each not Text.StartsWith([Value], ":")),
#"Removed Columns2" = Table.RemoveColumns(#"Filtered Rows2",{"Attribute"}),
#"Split Column by Delimiter3" = Table.SplitColumn(#"Removed Columns2","Value",Splitter.SplitTextByEachDelimiter({":"}, null, false),{"Value.1", "Value.2"}),
#"Changed Type3" = Table.TransformColumnTypes(#"Split Column by Delimiter3",{{"Value.1", type text}, {"Value.2", type text}}),
#"Renamed Columns1" = Table.RenameColumns(#"Changed Type3",{{"Value.1", "Field"}, {"Value.2", "Value"}}),
#"Pivoted Column" = Table.Pivot(#"Renamed Columns1", List.Distinct(#"Renamed Columns1"[Field]), "Field", "Value"),
#"Removed Columns3" = Table.RemoveColumns(#"Pivoted Column",{"Custom"})
in
#"Removed Columns3"
If you find this post useful, please share your comments with us.
To read more episodes of Excel for Security Analysts, go here.
Which other log files do you think we should try next?
Comments
- Anonymous
August 04, 2015
Excel for Security Analysts is a series of blog posts for Security, Data and BI analysts. In this series - Anonymous
August 06, 2015
Thanks a lot once again Gil. these step by step guide helps me more to understand this. - Anonymous
August 07, 2015
I think the [Index] should be replaced with [Column1] in: "if Text.Contains([Column1], "$ssh") then [Index] else null" - Anonymous
August 07, 2015
Also, should replace 1.2.1 with 1.2.2 in "Select Column1.2.1 and then Column 1.3. Right click on one of the selected columns and click Merge Columns."
This is a great post! I could code this if I had to, but really don't want to! - Anonymous
August 07, 2015
Hi Donald,
Thank you for the feedback. I edited the post with the correct instructions. - Anonymous
August 14, 2015
Solid explanations and a great solution. Thanks for sharing. - Anonymous
September 02, 2016
Thanks a lot Gil. It is really helpful.


