Workflows in Dynamics CRM
This article has the purpose of being an in depth discussion of what is a workflow in CRM, what are possibilities and how you can develop a simple workflow for CRM.
For the purpose of this article, the author decided to go with the CRM 2016 version of the SDK (available here). It is strongly recommended that you keep up to speed with the changes in the SDK, as new information is always released.
The term workflow implies that in order to get to it, there is something that defines it - a business process. A business process can be thought of as set of specific steps that have to be undertaken by a business worker in order to attain a specific objective.
How can we express a business process in CRM? For that we have 4 distinct ways of doing it:
Type of business process |
When to use it |
Workflow |
When you want to automate processes that were accomplished before by one or more people within a business. |
Action |
When you want to combine a set of steps that are not otherwise made available by standard CRM components |
Business Process Flow |
When you want to give the users a visual representation of a business processes. Users are guided through the various stages of the process, whether it is a sales or customer service related process |
Dialog |
When you want the user to interact with the system, and collecting data from users along the steps of the dialog. |
Creating a workflow is in Settings -> Processes (It is under Process Center). Once the page loads, you’re greeted with the “My Processes” view, which is the default view for Processes.
Note: The content below can also be found on Technet. Click here to get more information.
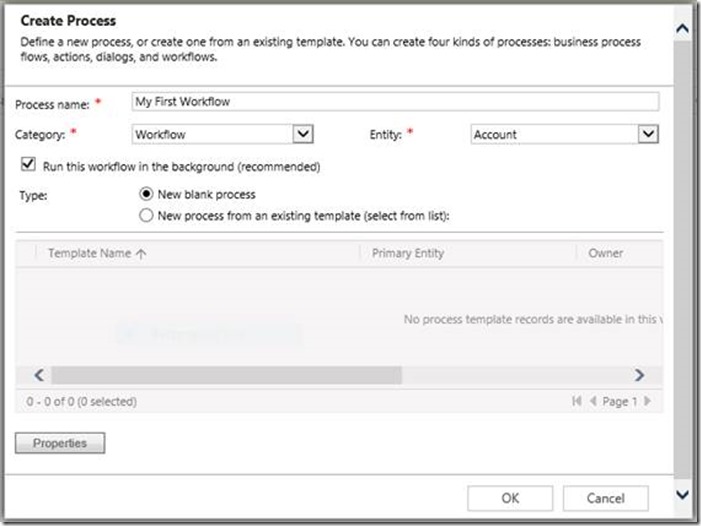
Click on the “New” button to create a new workflow. The following dialog appears:
Process Name: You should always put a descriptive enough name for the process, so that once people see the workflow name, have an idea of what it is supposed to do, rather than having to open it to understand what it does.
Category: Since the process we’re trying to create is a workflow, we’ll set this to “Workflow”
Entity: This field defines the primary entity record (in this case, the Account entity), upon which the workflow will perform some action. You can’t change the entity once the workflow has been set.
The “Run this workflow in the background (Recommended)” checkbox is there to let us decide if we want to run the workflow in an asynchronous (i.e. in the background) or in a synchronous fashion. Let’s leave it checked for now.
The last option that we are given is whether we want to create a new process or based on an already existing template. Let’s go with the blank process option.
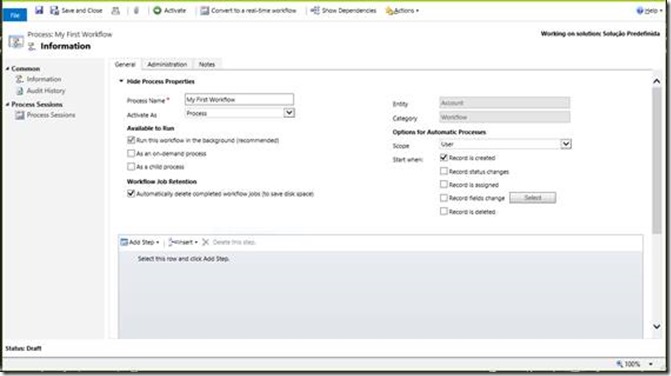
Once we click OK, the below dialog appears:
We’ll begin with the “Activate As” dropdown. The following values are available:
Option |
What happens if I select it? |
Process |
An actual instance of a workflow will be created every time the workflow is run |
Process Template |
It will make the workflow available in the template list. This is useful to create a set of workflows that can share a common set of logic. |
Under Available to Run you are given three checkboxes:
Option |
What does it mean |
Run this workflow in the background (recommended) |
The workflow will be invoked in an asynchronous fashion once the trigger conditions are met. |
As an on-demand process |
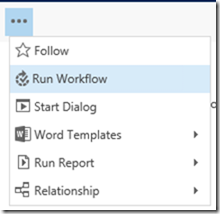
The user will have the possibility of running the workflow by accessing it in the Run Workflow command under “More Commands” (see screenshot below) |
As a child process |
This will allow for a workflow to be called from another workflow[HFLVD1] . |
The option “Automatically delete completed workflow jobs” will allow for some housekeeping regarding the records left in the AsyncOperationBase table. Do use some caution when deciding not to have completed jobs be deleted (this leads to excessive growth of the AsyncOperationTable – clean-up procedures for this table can be found here)
As you can see, for automatic processes, you have a number of options. Let’s go over each one of them:
The scope restricts the records upon which the workflow will run.
Scope |
What records will be affected |
User |
Records owned by the user that created the workflow |
Business Unit |
All records within the user’s business unit |
Parent: Child Business Unit |
All records belonging to the user’s business unit and children business units |
Organization |
All records[HFLVD2] in the organization. |
For the purpose of the exercise, set the scope to organization.
Finally, you get to select when the workflow is started:
Record is created |
Upon record creation |
Record status changes |
When the status of the record changes |
Record is assigned |
When the record is assigned to a user or team |
Record fields change |
When a field (from a list of fields selected by the user) changes |
Record is deleted |
When the record is deleted from the system |
Once all these settings are done, we can get to the actual steps of the workflow itself.
From this point onwards, all you need to add to the workflow are its steps. If you click on the Add Step button, you’ll have an array of options, most of which are self-explanatory. It is at this time that we strongly recommend that you have the flowchart of the workflow handy so that you don’t make any mistakes creating the workflow.
Imagine that the existing options you have for a workflow just don’t cut it and you want something that it is just not available within the UI. Here is the point where you need to start looking into code.
And that part happens to be Custom Workflow Activities and Custom XAML Workflows (see doc links here and here).
Be mindful of the following when developing Custom Workflow Activities and Custom XAML Workflows:
For CRM OnPremises
Custom Workflow Activities can run under full trust and partial trust code execution
Custom XAML Workflows can be run.
For CRM Online
Custom Workflow Activities only run under partial trust code execution
Custom XAML workflows are not allowed.
Let us focus solely on the Custom Workflow Activities. Custom XAML Workflows are a whole other topic of discussion and well worth a separate article for themselves.
Let’s then dig deeper into creating Custom Workflow Activities. Below are the prerequisites for developing a custom workflow activity:
Prerequisite |
Detail |
Which .NET Framework version to target? |
.NET 4.5.2 |
Which DLL’s from the SDK do we need to reference |
Microsoft.Xrm.Sdk.dll Microsoft.Xrm.Sdk.Workflow.dll |
Now for the code itself:
using System.Activities
using Microsoft.Xrm.Sdk;
using Microsoft.Xrm.Sdk.Workflow
namespace CodeSamples
{
public class MyVeryFirstCodeActivity : CodeActivity
{
protected override Execute(CodeActivityContext context) {}
}
}
Since the underlying workflow technology is Windows Workflow Foundation 4.0, we will require a reference to it (System.Activities)
Every custom code activity will be required to extend the System.Activities.CodeActivity class (hence the inheritance shown above)
Finally, much like the Main function on a C program or the Main method on a C# program, we will need a method where the execution will take place. Since the CodeActivity class is an abstract class and and the method Execute within it is also an abstract method, we will then need to override the Execute method (as per object oriented programming concepts) in order to run the code activity.
Now, is this all there is to it? Unfortunately, that is not the case. Like a plug-in, custom code activities will also require to know what are their input parameters and all of the necessary metadata so that it can then work with CRM information. This documentation link (click here) explains it in greater detail.
Once you’ve set all necessary info, and signed your assembly (remember: All assemblies in CRM need to be strongly signed), it is now time to build it.
Let’s then go to the CRM SDK (note: for this we’re focusing on CRM 2016, so get it from here). Once you’ve opened up the SDK folder, find and execute the Plugin Registration Tool (found in SDK\Tools\PluginRegistration in your CRM SDK installation folder).
Once you’ve registered your workflow assembly by giving it a name and a group name (more details here), it is time that you use it, so go into creating a new workflow, or editing an existing one (assuming you’ve deactivated it first prior to editing) and just click on ”Add Step” and you’ll see your brand new code activity.
That’s it for this in-depth look into workflows and how you can create them both from the UI and within code.
Best Regards
EMEA Dynamics CRM Support Team
Share this Blog Article on Twitter
Follow Us on Twitter


