Configuring SharePoint User Profile Service Synchronization on « InetOrgPerson » object
This is the first post of a series regarding all my interests, and the big thing here will be the User Profile Services and especially how you can configure the existing service in order to synchronize InetOrgPerson object in the existing Active Directory. Basically it was a customer need.
Context Overview :
So here is a set of InetOrgPerson object in the Active Directory:
SharePoint Synchronization process is based upon FIM (Forefront Identity Manager), and moreover you have a tool in order to configure the process here:
C:\Program Files\Microsoft Office Servers\14.0\Synchronization Service\UIShell\msiisclient.exe
Operations tab allows you to see all past and running processes, while Management Agents allows you to see FIM agents (that’s here where you can customize synchronization flow).
In order to configure InetOrgPerson, we need to configure:
- Active Directory Domain Services Agent
- Extensible Connectivity Agent (MOSS-<GUID>)
Configuring Active Directory Domain Services Management Agent :
In order to configure Active Directory Domain Services Agent, the first step is to go to properties window (Right click, then Properties).
- In Select Object Types area, make sure InetOrgPerson is selected
- In « Select Attributes » section: Make sure « cn » attribute is selected if you want a nice display name on SharePoint.
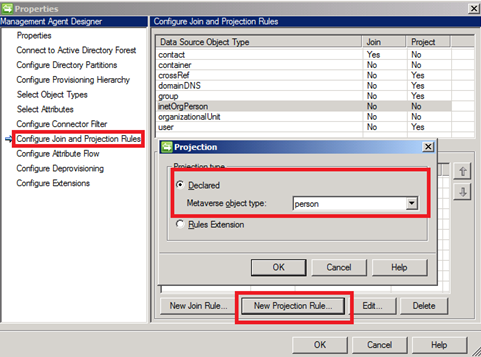
- In « Configure Join and Projection Rules » section: Add a declared Projection rule on « person » Metaverse object type.
- In « Configure Attribute Flow » section: Copy the properties from the «Object Type: User» to the « Object Type: inetOrgPerson » including the setting for the Type (Direct | Rules Extension | Constant) (but map « cn » to « displayname »)
That’s all for the Active Directory Agent, now we just need to configure the « Extensible Connectivity Agent ».
Configuring Extensible Connectivity Agent (MOSS<Guid>) Agent :
- Same step as the Active Directory Agent, we need to go to the properties (Right click, properties)
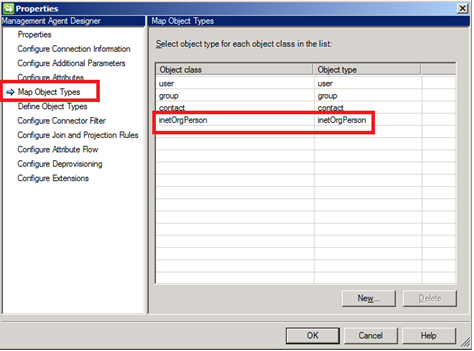
- In «Map Object Types» section, add a new Object type for «inetOrgPerson» of Object type «inetOrgPerson» to the Map Object Types list.
- «Define Object Types» : Mirror the settings for "user" to the «inetOrgPerson» Object type
- «Configure Join and Projection Rules» : Mirror the settings for «user» to the «inetOrgPerson» Object type
- «Configure Attribute Flow» : Mirror the settings for "user» to the «inetOrgPerson» Object type
Running Full Import from SharePoint Central Administration:
- Make sure the selected folder is included for synchronization («Configure Synchronization Connections»)
- Go ahead and re-run a Full import from SharePoint Central Administration.
- Now we can see those test «inetOrgPerson» objects in the search.
Comments
Anonymous
December 06, 2011
Great and useful article. How would this work if you wanted contact items to be displayed as a person also?Anonymous
February 02, 2012
I was able to get my inetorgpersons into SharePoint per your directions. I am having trouble however using the Edit Connection Filters on inetorgperson objects. Any suggestions?Anonymous
March 15, 2012
Your directions were such a life-saver. I finally managed to get inetorgpersons to synchronize. However, nothing I do seems to skip inactive accounts. These come through as well and setting "userAccountControl - bit on equals - 2" is not working. Ideas?Anonymous
March 20, 2012
I found the answer to my question above (skipping inactive accounts). While in the <<Active Directory Domain Services Management Agent>> I had to select <<Configure Connector Filter>> and click <<inetOrgPerson>>, then click the New button. I then selected the data source attribute <<userAccountControl>> with an Operator of <<Bit on equals>> and a selection of <<0x2>> and click <<Add Condition>>, then click OK to save changes.


