OAuth 2.0 Confidential Clients and Active Directory Federation Services on Windows Server 2016
In this blog post, I want to clarify just how you can make your OAuth 2.0 Confidential Client work against Active Directory Federation Services on Windows Server 2016 (AD FS) using different forms of client authentication. Although there is a great article on the Microsoft web on this topic, it doesn’t disclose how you can utilize either Certificate Based- or Windows Integrated Authentication-Based authentication for your confidential client.
Important note: This article assumes you are using AD FS Farm Behavior Level 2 (AD_FS_BEHAVIOR_LEVEL_2) or higher.
Shared Secret
Whenever you code against Azure Active Directory (using version 1.0 or version 2.0 endpoints), you would use Client Credentials in the form of a shared secret to authenticate your client;
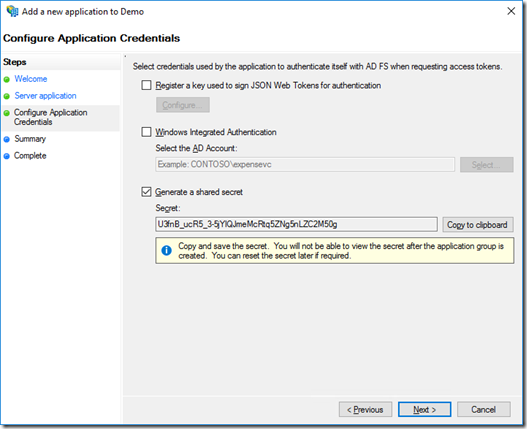
This also works against AD FS; You can create an Application Group and add a Confidential Client (called Server application in AD FS) to the Application Group. During the setup of the Server application, or by modifying its configuration, you can configure a shared secret by selecting “Generate a shared secret” from the Configure Application Credentials page:
Using this form of Client Authentication, you would POST your client identifier (as client_id) and your client secret (as client_secret) to the STS endpoint. Here is an example of such an HTTP POST (using Client Credentials Grant, added line breaks only for readability):
resource=https%3a%2f%2fdemo.api.com
&client_id=2954b462-a5de-5af6-83bc-497cc20bddde
&client_secret=56V0RnQ1COwhf4YbN9VSkECTKW9sOHsgIuTl1FV9
&grant_type=client_credentials
Note that AD FS supports two other forms of authenticating the confidential client:
- Register a key used to sign JSON Web Tokens for authentication
This option is used to allow a confidential client to authenticate itself using a certificate. - Windows Integrated Authentication
This option is used to allow a confidential client to authenticate itself using WIA; a Windows user context.
Let’s take a closer look at these two other options to authenticate a confidential client.
Signed JSON Web Tokens
When you don’t want to use a shared secret to authenticate your confidential client, nor does the client run on a Domain-Joined machine under an Active Directory User context, you can use Signed JSON Web Tokens to authenticate the client to AD FS. This option is typically chosen when you want the client to authenticate itself using Certificate Based-Authentication. Next to using Certificates, this option would also allow you to use JSON Web Key Sets (JWK Sets). In this article, I will focus on using Certificates.
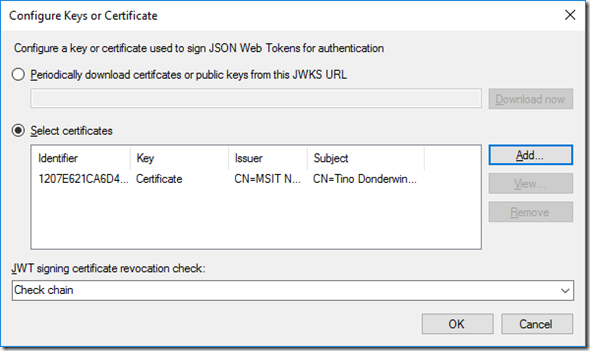
Select “Register a key used to sign JSON Web Tokens for authentication” and click on Configure…
From there, click Add… to add the (public key) of the certificate(s) that you want to use with your client.
Under “JWT signing certificate revocation check”, select the CRL checking that you want. Remember that, for AD FS to do any CRL checking, AD FS would require Internet access (on port 80).
Now comes the hard part. Although the HTTP protocol defines certificate based authentication for clients, this is not actually what we will be using. Instead, we will use a JSON Web Token which is signed using the private key of the certificate you chose. This token is passed as the client_assertion in the request.
Hence, in our client we need to craft such a JWT and sign it accordingly. In this post, I will use RS256 to sign the JWT. Signing a JWT is a straight-forward process: You Base64-Url-encode the header, you Base64-Url-Encode the content, you concatenate the two with a dot (‘.’), you create a SHA256 hash on that string, and you sign it using your certificate.
The header should contain the algorithm (alg) used to create the signature (in our case; RS256). It should also contain the Certificate Hash in the x5t field. In “Pseudo-code”:
{
“alg”: “RS256”,
“x5t”: Base64UrlEncode(certificate.GetCertHash()
}
The token itself would need the intended audience (“aud”), which is the AD FS token endpoint, the Issuer (“iss”) which is the client identifier of our client, a Subject (“sub”) which in our case is also the client identifier, an issuance datetime (“nbf”) and expiry datetime (“exp”), both in Unix Epoch Time (e.g. seconds passed since 01-01-1970) and a unique identifier of the request (“jti”). In “Pseudo-code”:
{
“aud”: “https://adfs.contoso.com/adfs/oauth2/token”,
“iss”: “2954b462-a5de-5af6-83bc-497cc20bddde”,
“sub”: “2954b462-a5de-5af6-83bc-497cc20bddde”,
“nbf”: (int)DateTime.UtcNow.Subtract(new DateTime(1970, 1, 1, 0, 0, 0, DateTimeKind.Utc)).TotalSeconds,
“exp”: nbf + 60 * 10,
“jti”: Guid.NewGuid().ToString()
}
We Base64-Url-Encode these two (which is the same as Base64 Encode but remove the trailing ‘=’ characters and replace ‘+’ by ‘-‘ and replace ‘/’ by ‘_’) and glue them together with a dot (‘.’).
Let’s get the SHA256 hash we need to sign:
var bytesToSign = Encoding.UTF8.GetBytes($"{Base64UrlEncode(tokenHeader)}.{Base64UrlEncode(tokenContent)}");
var sha256 = SHA256.Create();
var hash = sha256.ComputeHash(bytesToSign);
In this sample, hash contains the bytes to sign using SHA256.
The only thing left is to use the Private Key of our Certificate to sign the hash bytes using SHA256. This proves to be non-trivial. Typically, you’d use a System.Security.Cryptography.RSACryptoServiceProvider to handle this. Yet, SHA256 signing is not part of any of the default providers. Hence, we need to come up with our own. I took a look at the Active Directory Authentication Library (ADAL) to see how they handle this. It turns out, it’s in the CryptographyHelper.cs file. From that file, I derived a new SignatureDescrption class:
using System;
using System.Security.Cryptography;
public class ManagedSHA256SignatureDescription : SignatureDescription
{
public ManagedSHA256SignatureDescription()
{
KeyAlgorithm = typeof(RSACryptoServiceProvider).FullName;
DigestAlgorithm = typeof(SHA256Managed).FullName;
}
public override AsymmetricSignatureDeformatter CreateDeformatter(AsymmetricAlgorithm key)
{
if (key == null)
{
throw new ArgumentNullException(nameof(key));
}
var deformatter = new RSAPKCS1SignatureDeformatter(key);
deformatter.SetHashAlgorithm(typeof(SHA256Managed).FullName);
return deformatter;
}
public override AsymmetricSignatureFormatter CreateFormatter(AsymmetricAlgorithm key)
{
if (key == null)
{
throw new ArgumentNullException(nameof(key));
}
var provider = (RSACryptoServiceProvider)key;
var cspParams = new CspParameters();
cspParams.ProviderType = 24;
cspParams.KeyContainerName = provider.CspKeyContainerInfo.KeyContainerName;
cspParams.KeyNumber = (int)provider.CspKeyContainerInfo.KeyNumber;
if (provider.CspKeyContainerInfo.MachineKeyStore)
{
cspParams.Flags = CspProviderFlags.UseMachineKeyStore;
}
cspParams.Flags |= CspProviderFlags.UseExistingKey;
provider = new RSACryptoServiceProvider(cspParams);
var formatter = new RSAPKCS1SignatureFormatter(provider);
formatter.SetHashAlgorithm(typeof(SHA256Managed).FullName);
return formatter;
}
}
This class can now be used to sign our hash. The resulting signature has to be Base64-Url-Encoded once more and added as the signature to the JWT token created earlier:
var cryptoProvider = (RSACryptoServiceProvider)certificate.PrivateKey;
var cryptoDescription = new ManagedSHA256SignatureDescription();
var formatter = cryptoDescription.CreateFormatter(certificate.PrivateKey);
formatter.SetHashAlgorithm("SHA256");
var signature = formatter.CreateSignature(hash);
var tokenSignature = Base64UrlEncode(signature);
var clientCred = $"{tokenHeader}.{tokenContent}.{tokenSignature}";
The resulting JWT is in the clientCred variable. This can now be passed to AD FS as the client_assertion. The type of assertion will also have to be passed. The type is urn:ietf:params:oauth:client-assertion-type:jwt-bearer and needs to be set as the client_assertion_type in the request.
The resulting HTTP POST to the AD FS Token Endpoint does now look like this (added line breaks only for readability):
resource=https%3A%2F%2Fdemo.api.com
&client_id=2954b462-a5de-5af6-83bc-497cc20bddde
&client_assertion_type=urn%3Aietf%3Aparams%3Aoauth%3Aclient-assertion-type%3Ajwt-bearer
&client_assertion=eyJhbGciOiJSU9.eyJhdRmIn0.wq9E17Q
&grant_type=client_credentials
This is an HTTP POST using Client Credentials Grant, but of course you can use other grants or OAuth flows as well.
Windows Integrated Authentication
When your client runs on a domain-joined machine, you can use the “Windows Integrated Authentication” checkbox in the Configure Application Credentials dialog. You can either use the security context the client is running under, or you can pass other domain user credentials. Although the latter is possible, the feature is intended to be used against the currently user context. Should you use the current context, the client itself does not store these credential anywhere, which is obviously a security benefit.
This can be used with the security context of the IIS Application Pool (if it's a Web Application) or perhpaps the credentials used to schedule a task that runs the client. So it’s really great for scheduled tasks, daemons etc.!
When you select the “Windows Integrated Authentication” checkbox, you can select a user account in your Active Directory that the client needs to run under. (Although the dialog only allows you to select actual User objects, through PowerShell, you can also use (Group-) Managed Service Accounts using the Set-AdfsServerApplication command, in combination with the ADUserPrincipalName parameter.)
After selecting this form of authentication, your client needs to send the client identifier (as client_id) to AD FS, and it needs to ‘tell’ AD FS that the client is using Windows Integrated Authentication by adding this field and value to the request:
use_windows_client_authentication=true
Remember; you do not send a client_secret in the request.
Instead, you send your Windows Credentials whenever you POST the request to AD FS:
var request = HttpWebRequest.CreateHttp(endpoint);
request.Headers.Add("client-request-id", Guid.NewGuid().ToString());
request.Accept = "application/json";
request.UseDefaultCredentials = true;
var postBytes = Encoding.UTF8.GetBytes(content);
request.Method = "POST";
request.ContentType = "application/x-www-form-urlencoded";
request.ContentLength = postBytes.Length;
If you do not want to send your current context as the credential, simply replace the highlighted line with this one (where networkCredential is an instance of System.Security.NetworkCredential:
request.Credentials = networkCredential;
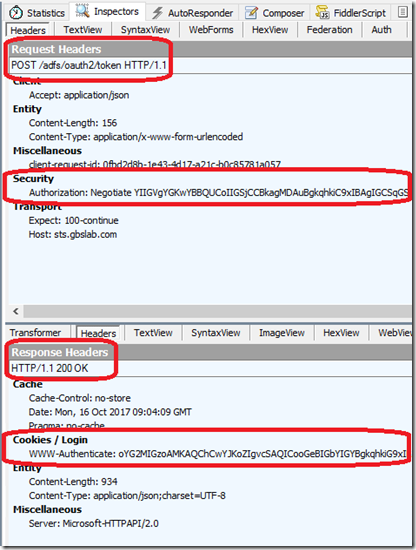
When the request is POSTed to the STS (typically the token-endpoint), no authorization header is sent, and AD FS replies with an HTTP 401 (Unauthorized) . AD FS adds two WWW-Authenticate headers in the 401 response; one for Negotiate and one for NTLM. The client then retries the HTTP POST, but now with the proper Authorization header in the request. If the credentials are valid, and the account is the one configured on AD FS, AD FS should reply properly. Here is an example of a successful request to AD FS (taken with Fiddler):
Conclusion
AD FS offers multiple ways of authenticating a client:
- Shared Secret
- Signed JWT’s
- Windows Integrated Authentication
In this post, you have seen examples on all three of these authentication mechanisms in action without using any 3rd party library. Although we’ve been using Client Credentials Grant in our examples, you can use the same mechanism in your On Behalf Of or Resource Owner Password Credential Grant flows. (Code Flow and Implicit Flow would generally not require the use of Confidential Clients.)
Happy AuthZ!


