Automating database migration to SQL Azure
Migrating databases to a new environment can be a tedious but necessary task. For years DBAs have been dealing with the process of rolling out SQL Server upgrades, and have achieved this in On Premises environments in a variety of ways including:
1. Backup and Restore database
2. Attach / Detach database
3. SAN magic (typically snapshotting LUNs or moving LUNs from one host to another)
4. In Place upgrades (Note: just because you can, doesn’t mean you should)
Over the years a variety of tools have been created to support the tedium of these migrations including Scalability Expert’s SQL Server Upgrade Assistant which aids in detecting compatibility issues with your database upgrade.
My intent in writing this blog post is to focus on brute force automation of the migration process. The topics of “what tools are available to assess the compatibility of my database” and “what features in SQL Server are not supported Azure SQL” are rather well documented. For the sake of completeness here are two resources to help you out in that regard:
· Carl Rabeler, formerly of the SQL Customer Advisory Team, has a great article (SQL Server database migration to SQL Database in the cloud) that gives a detailed audit of all the tools available for taking a database from an on Premises Database to the cloud and goes into their pros and cons of each tool.
· There is also an article by Rick Byham (Azure SQL Database Transact-SQL differences) that gives a good overview of specific transact SQL features that are not supported in the cloud.
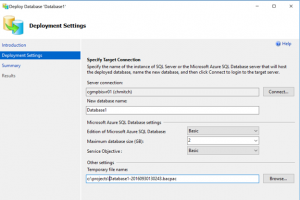
With that backdrop let’s assume you have gone through the process of assessing your databases and determined the databases are ready for the cloud. Now you are ready to execute the migration, but are looking at the volume of work and decided “right click -> migrate database to sql azure” is too labor intensive, what’s next? The answer… automation, to do this let’s take a brief look at what the migrate wizard does.

Notice, this is a one step process according to the wizard, and unfortunately it doesn’t give you an opportunity to script things out either. To run, it effectively asks for just a few pieces of information:
1. Source Database which is defined by which database you right click on.
2. Destination Details:
a. What Azure SQL Server do you want this database on?
b. What should the database be called?
c. What size is the database?
3. Where do I store the intermediate bacpac file?
To script the same capabilities, we need to use the following:
· The SqlPackage utility, which is a command line tool that can be used to generate bacpac and dacpac files from your database among other things.
· The New-AzureRMSqlDabaseImport command to restore the generated bacpac file as an Azure SQL Database.
The following commands are snippets that conceptually handle each part of the process.
Part 1, execute SqlPackage to save the file locally:
#setup the local variables. $server = "localhost" $database = "Database1" $path = "c:\projects\" + $database + ".bacpac" #Define the path to the sqlpackage.exe and the command line parameters $cmd = "C:\Program Files (x86)\Microsoft SQL Server\130\DAC\bin\sqlpackage.exe" $params = "/Action:Export /ssn:" + $server + " /sdn:" + $database + " /tf:" + $path $p = $params.Split(" ") #shell out the export command for the bacpac & "$cmd" $p
Part 2, upload the generated file to Azure blob storage:
#set variables $fileName = "Database1.bacpac" $storageName = "[storage account]" $storageKeyType = "StorageAccessKey" $storageContainer = "backups" $storageUri = "https://$StorageName.blob.core.windows.net/$storageContainer/$filename" $localpath = "c:\Projects\$filename" $StorageKey = "[storage key]" #Set storage context and upload blob file $context = New-AzureStorageContext -StorageAccountName $storageName -StorageAccountKey $storageKey Set-AzureStorageBlobContent -File $localpath -Container "backup" -Context $context
Part 3, restore the uploaded bacpac file as a new database:
$importRequest = New-AzureRmSqlDatabaseImport –ResourceGroupName $ResourceGroupName ` –ServerName $ServerName ` –DatabaseName $DatabaseName ` –StorageKeytype $StorageKeyType ` –StorageKey $StorageKey ` -StorageUri $StorageUri ` –AdministratorLogin $credential.UserName ` –AdministratorLoginPassword $credential.Password ` –Edition Premium ` –ServiceObjectiveName p1 ` -DatabaseMaxSizeBytes 50000
I pull all of these things together in a more sophisticated script that accounts for scenarios like choosing the service level of the database based on its size, and uses SQL Power Shell to enumerate the local databases. Finally the script uploads the content and restores the database in SQL Azure. You can find the complete script on my git hub page .