Visual Studio 2010 Templates for Add-ins in Microsoft Dynamics NAV 2009 RoleTailored client
When Dynamics NAV 2009 SP1 had been released with the possibility to host your own client controls in the metadata driven UI of the RoleTailored client, I heard the need from partner for tools that help with the firsts steps to create such an Add-in. I had released a number of templates for Visual Studio at that time.
Now I felt that it is time for an update. An Visual Studio Extension that can be managed with the the easy to use Extension Manager within Visual Studio.

You can download the Visual Studio templates for VS 2010 here. (Dynamics NAV 2009)
The last version templates for previous version of Visual Studio are still available here. (Dynamics NAV 2009)
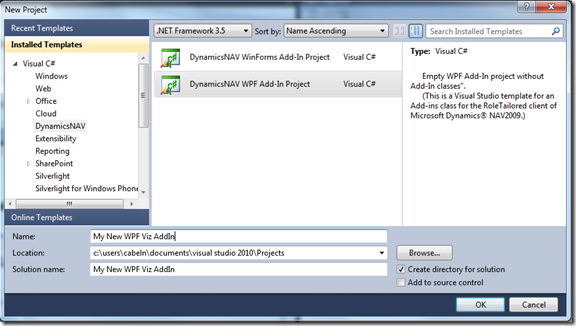
After the installation Visual Studio will offer you a few new Project and Item templates. The creation of a new Add-in is very easy. First select the project type based on the .NET client framework your Add-in control is built upon: WinForms or WPF.
Be sure to leave the Target Framework to highest 3.5. The .NET framework version 4.0 is not yet supported by the Dynamics NAV versions that we have shipped so far. (But it certainly will be in next release.)
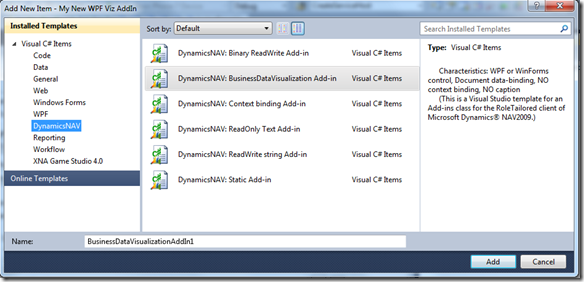
Next step is to create an Add-in class, the factory for the .NET control you whish to host in the RTC. A view templates are provided, for the typical communication types. For example single value binding through the source expression of the field, string document binding, binary data binding, getting information from the Add-in context, etc.
Select to add a new item to your project and pick one of the Add-in templates from the Dynamics NAV category. You will find a short description for each Add-in template on the right side.
Next the Wizard will ask you to enter some basic information and then create the class for you in the VS project.
Please note the Help icon – it opens the API help for Add-ins in the RoleTailored client from MSDN. In the next step you will customize the Add-in class code which the wizard has created for you. This is pretty straight forward.
- Update the reference to the Microsoft.Dynamics.Framework.UI.Extensibility.dll library to your RoleTailored client installation
- Implement the CreateControl method to return an instance of the .NET control you want to host.
- For data binding and trigger support there are a few further methods which you can customize
- After registration in the Add-ins table you are ready to use your new Add-in for fields on your pages in NAV.
If you ever want to remove the templates, simply open the Extension manager I Visual Studio 2010 and identify the Template package and press “Uninstall”.

You can download the updated Visual Studio template here.
Christian Abeln
Senior Program Manager
Microsoft Dynamics NAV
Comments
- Anonymous
May 09, 2011
That is just fantastic. Thank you Christian. - Anonymous
June 05, 2011
Excellent, thank youIt realy helps to easily create add-Ins in RTC. - Anonymous
June 08, 2012
Wow. I wish I would have seen this earlier. I had to host a custom WPF user control inside of a WinForms user control, inside of an RTC page. This would have saved me the trouble! Although I'm currently stuck with Visual Studio 2008 (can't use add-ins for Visual Studio Express editions), so I guess I can't use this yet. Still, I'm looking forward to trying it out once I'm able to upgrade Visual Studio. - Anonymous
July 02, 2012
I have added the download for the previous version of the AddIn templates for Visual Studio 2008 to the Blog post.Have fun! - Anonymous
January 24, 2013
Hi, these templates look absolutely fantastic. Do you have any plans to move these over to VS2012. I only have a license for that and am going to be doing quite a bit of .NET to NAV2013 integration. Thanks! - Anonymous
January 24, 2013
Hi Kevin,yes I have the templates available also for VS 2012.Look in the post with all the downloads: "Sticky Post: Download links from the blog posts in one spot"Have fun!


