Uwaga
Dostęp do tej strony wymaga autoryzacji. Może spróbować zalogować się lub zmienić katalogi.
Dostęp do tej strony wymaga autoryzacji. Możesz spróbować zmienić katalogi.
Intel AMT Deployment
This part will cover the procedure to provision Intel AMT computers. As a prerequisite, we strongly recommend executing the following 3 tasks on each client computer. To obtain these modules, please contact vendor of client computers.
- Update BIOS
- Intel Management Engine Interface (Intel MEI) installation
- Local Manageability Service (LMS.exe) installation
For more details about prerequisites, please refer to the section 2.2 Supported Intel AMT Versions of Intel(R)_SCS_User_Guide.pdf document included in the Intel SCS for Microsoft System Center Configuration Manager package.
Firewall configuration
1. On the client computer, run the “Windows Firewall wit Advanced Security] console. In the [Inbound Rules], create a [New Rule].
2. Select [Port] and click on [Next].
3. Select [TCP], select [Specific local ports] and type “16993” and “16995”. Click [Next]

4. Select [Allow the connection] and click [Next]
5. Put a check on [Domain], [Private] and [Public] and click [Next]
6. Type a name for the new rule and click [Finish]
Adding Enterprise Root CA certificate thumbprint into AMT computers
≪Warning≫
If using a public certificate, this section can be skipped.
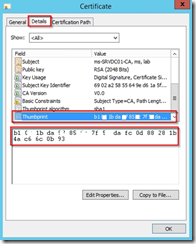
1. Select the Enterprise CA Root certificate and open properties.
2. From the [Details] tab, select [Thumbprint] and note the thumbprint.

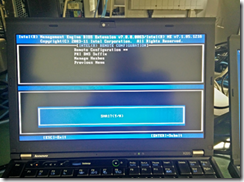
3. Turn on an Intel AMT computer and press <Ctrl+P> during boot to trigger the Intel ME interface. Default password is “Admin”.

※the way to access to Intel ME console might be different on some computer hardware.
4. Select [Intel AMT Configuration]

5. Select [Remote Setup And Configuration]

7. Select [Manage Hashes] then to add a new entry, type the <ins> key.

8. Enter hash name ”Contoso Root CA”

9. To the question [SHA1?], type “Y”.

10. Type the hash we got on step 2

11. Set the newly added hash in “Active” status and leave Intel MBEx saving changes.
Enable Intel SCS Platform Discover task sequence
1. From [Software Library]-[Overview]-[Operating Systems]-[Task Sequence], right-click on [Intel SCS: Platform Discovery] task sequence and [Enable] it.

2. Click [OK] on the dialog box.
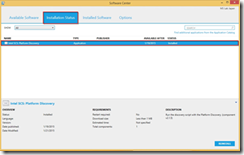
3. On the client computer, run [Start]-[All Programs]-[Microsoft System Center 2012 R2]-[Configuration Manager]-[Software Center]. Verify that [Intel SCS: Platform Discovery] task sequence has ended successfully.
4. From [Assets and Compliance]-[Overview]-[Device Collections], right-click on [Intel AMT: Exists] and click on [Update membership].

5. Click [OK] to the warning dialog box.
6. Verify that membership of [Intel AMT: Exists] collection has been updated.
Enable Intel AMT Discovery and Report task sequence
1. From [Software Library]-[Overview]-[Operating Systems]-[Task Sequence], right-click on [Intel AMT: Discovery and Report] task sequence and [Enable] it.

2. Click [OK] on the dialog box.
3. On the client computer, run [Start]-[All Programs]-[Microsoft System Center 2012 R2]-[Configuration Manager]-[Software Center]. Verify that [Intel AMT: Discovery and Report] task sequence has ended successfully.

4. From [Assets and Compliance]-[Overview]-[Device Collections], right-click on [Intel AMT: Not Configured] and click on [Update membership].

5. Click [OK] to the warning dialog box.
6. Verify that membership of [Intel AMT: Not Configured] collection has been updated.
Enable Intel AMT Remote Configuration task sequence
1. From [Software Library]-[Overview]-[Operating Systems]-[Task Sequence], right-click on [Intel AMT: Remote Configuration] task sequence and [Enable] it.

2. Click [OK] on the dialog box.
3. On the client computer, run [Start]-[All Programs]-[Microsoft System Center 2012 R2]-[Configuration Manager]-[Software Center]. Verify that [Intel AMT: Remote Configuration] task sequence has ended successfully.

4. From [Assets and Compliance]-[Overview]-[Device Collections], right-click on [Intel AMT: Configured] and click on [Update membership].

5. Click [OK] to the warning dialog box.
6. Verify that membership of [Intel AMT: Configured] collection has been updated.
Enable Intel AMT Remote Maintenance task sequence
1. From [Software Library]-[Overview]-[Operating Systems]-[Task Sequence], right-click on [Intel AMT: Remote Maintenance] task sequence and [Enable] it.

2. Click [OK] on the dialog box.
AMT Status discovery
1. From [Assets and Compliance]-[Overview]-[Device Collections], double-click on [Intel AMT: Configured] collection. From the computer list, right-click on a computer and click on [Manage Out of Band]-[Discover AMT Status].

2. Click [OK] to the dialog box
3. Select [Intel AMT: Configured] collection and add [AMT Status] and [AMT Version] columns by right-clicking on the column name bar.

4. Verify [AMT Status] and [AMT Version]
Intel AMT provisioning is, then, over.


