How to install Office using a Provisioning Package
Hi everyone,
Sorry, it took me quite a while to write that article about how to install Office using a Provisioning Package (PPKG).
As you might know, there's some challenges deploying a Win32 apps using PPKG because of the limitation of the file you can upload inside a PPKG to use with "ProvisioningCommands" feature. Indeed, it's not currently possible to have a folder structure within the "CommandFiles" field; only files, not folders. This makes importing Office sources a big challenge since Office has a quite deep folder structure.
Fortunately there's a workaround for that!
Let me show you how to install Office using PPKG and in the below explanation, i will use the Click-to-Run version of Office 2016 but it would work the same for Office 2016 Professional Plus (you might have to modify the PowerShell script to reflect the correct installation command line).
Creating the ZIP file containing Office source
The first thing you need to do is downloading the source of Office 2016 Click-to-Run and to do that, you need a free tool called "Office 2016 Deployment Tool" that you can download here.
- Create a folder named "C:\O365" on the computer where you installed Windows ICD
- Extract the Office Deployment Tool inside "C:\O365" folder.
- Edit the "Configuration.xml" file using Notepad. I put an example below.
 <Configuration>
  <Add SourcePath="" OfficeClientEdition="32" Branch="Current">
    <Product ID="O365ProPlusRetail">
      <Language ID="en-us" />
    </Product>
  </Add>
  <!--  <Updates Enabled="TRUE" Branch="Current" /> -->
  <Display Level="None" AcceptEULA="TRUE" />
  <Logging Level="Standard" Path="C:\Windows\Debug" />
  <!--  <Property Name="AUTOACTIVATE" Value="1" />  -->
</Configuration>
Open a Command Prompt and run the following command to download Office source.
C:\O365\setup.exe /download configuration.xml- That will download Office source inside "C:\O365" folder
ZIP the "C:\O365" folder into a file called "O365.zip"
Create the PowerShell script to install silently Office
- Copy the sample code below and save it into a file called "Start-ProvisioningCommands.ps1"
 <#
.Synopsis
 Office 2016 installation sample script
.DESCRIPTION
 Extract the ZIP and run the Office setup.exe with the configuration file as a parameter
#>
[CmdletBinding()]
[Alias()]
[OutputType([int])]

Param
(
 [Parameter(Mandatory=$false,
 ValueFromPipelineByPropertyName=$true,
 Position=0)]
 $Log = "$env:windir\debug\Start-ProvisioningCommands.log"
)

Begin
{
 <#
 # Start logging
 #>
 Start-Transcript -Path $Log -Force -ErrorAction SilentlyContinue

<#
 # Extract the ZIP
 #>
 $Archives = Get-ChildItem -Path $PSScriptRoot -Filter *.zip | Select-Object -Property FullName
 ForEach-Object -InputObject $Archives -Process { Expand-Archive -Path $_.FullName -DestinationPath "$env:TEMP" -Force }
}

Process
{
 <#
 # Office 2016 installation
 #>
 $WorkingDirectory = "$env:TEMP\O365"
 $Configuration = Get-ChildItem -Path $WorkingDirectory -Filter *.xml | Select-Object -Property FullName
 [XML]$XML = Get-Content -Path $Configuration.FullName
 $XML.Configuration.Add.SourcePath = $WorkingDirectory
 $XML.Save($Configuration.FullName)

 # Run Office 2016 setup.exe
 Start-Process -FilePath "$WorkingDirectory\Setup.exe" -ArgumentList ('/Configure "{0}"' -f $Configuration.FullName) -WorkingDirectory $WorkingDirectory -Wait -WindowStyle Hidden

 # If you want to remove the extracted Office source, uncomment below
 # Remove-Item -Path $WorkingDirectory -Force
}
End
{
 <#
 # Stop logging
 #>
 Stop-Transcript -ErrorAction SilentlyContinue
}
Create the Provisioning Package using Windows ICD
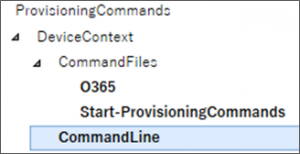
- Open Windows ICD and navigate to [Runtime Settings]>[ProvisioningCommands]>[DeviceContext]
Under [CommandFiles] add "O365.zip" and "Start-ProvisioningCommands.ps1" files
Under [CommandLine], type the following command which will install silently Office:
PowerShell.exe -ExecutionPolicy Unrestricted .\Start-ProvisioningCommands.ps1
You should get something which look like this:
Create the PPKG and voila :)
PS: I want to thank my coworker Ryan Hall working as a Senior PFE in Australia who explained me that method to deploy Office using PPKG.
Comments
- Anonymous
July 06, 2016
Excellent, worked like a charm!keep up the good work, i owe you a drink if/when you come to Paris for such a great support.and...it's time to go to sleep ain't it over there?thanks a lot!Best regards,Pierre.- Anonymous
July 07, 2016
Happy that it helped :)
- Anonymous
- Anonymous
July 11, 2016
nice job - Anonymous
July 13, 2016
Are there any logfiles for troubleshooting?- Anonymous
July 13, 2016
The comment has been removed
- Anonymous
- Anonymous
July 20, 2016
Thank you.How it comes with Office 2016 Plus?What changes should I make?- Anonymous
July 20, 2016
The comment has been removed
- Anonymous
- Anonymous
August 05, 2016
I am missing the ProvisioningCommands option from windows icd, what might I be missing?- Anonymous
August 07, 2016
If you miss the ProvisioningCommands options in WICD, it means your ICD version is not the latest 1511 but the RTM version (10240).You should download the latest Windows ADK then you will get the ProvisioningCommands option :)
- Anonymous
- Anonymous
August 20, 2016
Hi Samir,What do I have to change in your Powershell script for Office 2016 Professional Plus. I'm a beginner in Powershell and I don't know what to modify in your script to work with Office 2016 Professional Plus ?- Anonymous
August 21, 2016
The comment has been removed- Anonymous
September 01, 2016
Thank you very much, it's working for me.- Anonymous
September 02, 2016
Great!!
- Anonymous
- Anonymous
- Anonymous
- Anonymous
September 16, 2016
The comment has been removed
