Come visit/revisit The Beer House! (Continuous Integration)
Isn’t it funny how a simple word like Beer can grab your attention? In this post we will look at migrating The Beer House (TBH) sample application database to be managed by VSTS:DB. For those in the NW you may have seen this previously as I have presented this to the PNWSQL User Group. Since then I have received many requests for sharing the demo walkthrough.
This post illustrates how Visual Studio Team System Database Edition enables continuous integration for databases. The walkthrough demonstrates how to setup Team Build to automate building and deploying databases. Using VSTSDB’s incremental deployment engine in conjunction with Team Build build automation enables database continuous integration for teams working with Team System.
The best thing about this walkthrough is that anyone with a PC capable of running a VM (VPC or Hyper-V) can follow along on their own boxes because everything I will be using is FREE! Well, it’s free as in Trial Software and Sample Applications.
This post will include the following sections:
1. Why continuous integration?
2. Migrating the Beer House Sample Application to use Database Projects
3. Setting up the Database Projects for Sandbox Development
4. Adding our Solution to Source Code Control
5. Setting up our Database for Rolling Builds/Continuous Integration
6. Overriding a SQLCMD variable to Version Stamp DBs
Why continuous integration?
Continuous Integration (CI) is a core tenant of being an agile team. Teams that use agile methodologies typically work on producing software in short iterative cycles producing a functional piece of software with every check-in, at the end of every day, and at the completion of every iteration or sprint. Basically, the codebase that is checked into the shared repository should be functional at all times. CI is practice where each check-in results in a build being run which produces a software product that can be assessed for quality, completeness, and other indicators that communicate the project is moving in the right direction. This assessment typically includes build verification tests (BVTs), but may also include other tests as well. Since the CI build, or sometimes called rolling build, is automated many teams run all their automated tests. This frees up the development team from having to run long running test suites that may impact productivity if ran by multiple individuals of the team many times a day.
Some of the benefits of CI include: spotting integration issues early; early build break detection; complete and regular test runs; automated code promotion; deployment issues identified early; redundant tasks automated; stakeholder visibility into project progression increased. While CI is by no means a new concept, in fact it has been used by many teams successfully for years now, what teams continue to struggle with is how to integrate their database components into their CI process. The challenge is the same I outlined in a previous post in regards to database deployment; it is the existence of state.
With Team System Database Edition GDR and Team Foundation Server you can enable CI for Visual Studio projects. Using the Incremental Deployment Engine of VSTS:DB and the build automation platform of Team Build you can enable CI for your databases. In this post I outline the walkthrough I have presented a few times. I hope this inspires teams to automate their builds and reap the many benefits CI has to offer.
If you want to dig into CI more I recommend the following reading:
Continuous Integration – Martin Fowler
https://martinfowler.com/articles/continuousIntegration.html
See also his related whitepaper on Evolutionary Database Design.
Before we get rolling here is what you will need:
· Microsoft® Visual Studio® Team System 2008 Team Foundation Server SP1 and Team Suite SP1 VPC or Hyper-V Image (Trial)
· Microsoft® Visual Studio Team System 2008 Database Edition GDR R2
· TheBeerHouse: CMS & E-commerce Site Starter Kit (Code Plex Project)
If you have Windows Server x64 and a spare 2GB RAM free I highly recommend using the Hyper-V image. The performance of the Hyper-V image is superior to that of VPC. I will assume in this article that you can effectively use VPC or Hyper-V. If you need help, please see Hyper-V/VPC.
Migrating the Beer House Sample Application to use Database Projects
Once you have your virtualized environment setup you can start migrating the application. Do this by downloading the starter kit from the link above. Unzip the file on your VM to a directory called DasRoot. You should end up with a directory structure that looks like this:
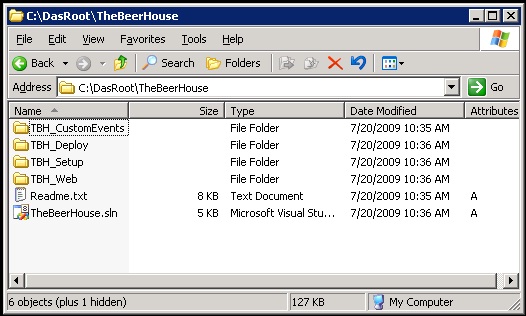
Let’s now attach the app’s Database to the default SQL Instance. Note there are 2 SQL instances on this VM. The default instance running is 2005 SQL Enterprise along with other services like SSRS. The default instance also has the TFS databases on it. We will consider this our production server for this walkthrough. The other instance is a 2005 SQL Express instance. This is installed as a part of VSTS. We will use this instance as our development and integration server. You can also install SQL 2008 on the VM if you like. I have run 4 instances of SQL on a VM with 2GB RAM with acceptable performance for evaluation and proofing purposes.
To easily attach the TBH database to the production server copy the sql files to the default data directory of the default instance and run this T-SQL script:
Copy Command
C:\DasRoot>copy "C:\DasRoot\TheBeerHouse\TBH_Web\App_Data\ASPNETDB.MDF" "C:\Program Files\Microsoft SQL Server\MSSQL.1\MSSQL\Data\TBHDB.mdf"
1 file(s) copied.
C:\DasRoot>copy "C:\DasRoot\TheBeerHouse\TBH_Web\App_Data\ASPNETDB_log.LDF" "C:\Program Files\Microsoft SQL Server\MSSQL.1\MSSQL\Data\TBHDB_log.ldf"
1 file(s) copied.
T-SQL to attach DB and add a login
EXEC sp_attach_db @dbname=N'TheBeerHouse',
@filename1=N'C:\Program Files\Microsoft SQL Server\MSSQL.1\MSSQL\Data\TBHDB.mdf',
@filename2=N'C:\Program Files\Microsoft SQL Server\MSSQL.1\MSSQL\Data\TBHDB_log.ldf'
GO
USE TheBeerHouse
GO
EXEC sp_addlogin 'TheBeerHouseApp', 'BeerNow!', 'master'
GO
EXEC sp_grantdbaccess 'TheBeerHouseApp', 'TheBeerHouseApp'
GO
EXEC sp_addrolemember 'db_datareader', 'TheBeerHouseApp'
GO
EXEC sp_addrolemember 'db_datawriter', 'TheBeerHouseApp'
GO
EXEC sp_addrolemember 'db_owner', 'TheBeerHouseApp'
GO
You will need to also change your databases to use mix mode security since the application will be using a SQL Login for authentication. You can change the script to use a Windows login if you like, but for this walkthrough we will be using SQL Login.
This sample database includes some of the SQL diagramming tables. We won’t need these so you can clean them up by executing this T-SQL:
USE [TheBeerHouse]
GO
IF EXISTS (SELECT * FROM sys.objects WHERE object_id = OBJECT_ID(N'[dbo].[sp_alterdiagram]') AND type in (N'P', N'PC'))
DROP PROCEDURE [dbo].[sp_alterdiagram]
GO
IF EXISTS (SELECT * FROM sys.objects WHERE object_id = OBJECT_ID(N'[dbo].[sp_creatediagram]') AND type in (N'P', N'PC'))
DROP PROCEDURE [dbo].[sp_creatediagram]
GO
IF EXISTS (SELECT * FROM sys.objects WHERE object_id = OBJECT_ID(N'[dbo].[sp_dropdiagram]') AND type in (N'P', N'PC'))
DROP PROCEDURE [dbo].[sp_dropdiagram]
GO
IF EXISTS (SELECT * FROM sys.objects WHERE object_id = OBJECT_ID(N'[dbo].[sp_helpdiagramdefinition]') AND type in (N'P', N'PC'))
DROP PROCEDURE [dbo].[sp_helpdiagramdefinition]
GO
IF EXISTS (SELECT * FROM sys.objects WHERE object_id = OBJECT_ID(N'[dbo].[sp_helpdiagrams]') AND type in (N'P', N'PC'))
DROP PROCEDURE [dbo].[sp_helpdiagrams]
GO
IF EXISTS (SELECT * FROM sys.objects WHERE object_id = OBJECT_ID(N'[dbo].[sp_renamediagram]') AND type in (N'P', N'PC'))
DROP PROCEDURE [dbo].[sp_renamediagram]
GO
IF EXISTS (SELECT * FROM sys.objects WHERE object_id = OBJECT_ID(N'[dbo].[sp_upgraddiagrams]') AND type in (N'P', N'PC'))
DROP PROCEDURE [dbo].[sp_upgraddiagrams]
GO
IF EXISTS (SELECT * FROM sys.objects WHERE object_id = OBJECT_ID(N'[dbo].[sysdiagrams]') AND type in (N'U'))
DROP TABLE [dbo].[sysdiagrams]
GO
Ok, the database is there now so let’s adjust the solution to use this database. The application comes as a RANU Database. Since we will be maintaining the database as a project we don’t need the contents in App_Data anymore. We also need to change the connection string for the application. Before doing those things we also want everything in the same solution. We do this by:
1. Create a new solution [C:\DasRoot\TheBeerHouse\TBH.sln]. You do this by selecting File->New->Project->Other Project Types->Visual Studio Solutions.
2. Move both [C:\DasRoot\TheBeerHouse\TBH_Web] and [C:\DasRoot\TheBeerHouse\TBH_CustomEvents\TBHCustomEvents.csproj] directories under the TBH folder [C:\DasRoot\TheBeerHouse\TBH].
3. Add the website project to the new solution. You do this be right clicking the solution file in the Solution Explorer and selecting Add->Existing Website->Select Folder on Disk [C:\DasRoot\TheBeerHouse\TBH\TBH_Web]. Answer yes to upgrade question.
4. Add the Custom Events project to the new solution. You do this be right clicking the solution file in the Solution Explorer and selecting Add->Existing Project->Select Folder on Disk [C:\DasRoot\TheBeerHouse\TBH\TBH_CustomEvents\TBHCustomEvents.csproj]. Answer yes to upgrade question.
5. In the Web Project locate the App_Data folder and delete the ASPNETDB.MDF files.
6. In the Web Project open the web.config and update the connection string to use our new database. You do this by replacing the connection string section with this element:
<connectionStrings>
<remove name="LocalSqlServer"/>
<add name="LocalSqlServer" connectionString="Data Source=.\;Initial Catalog=TheBeerHouse;User=TheBeerHouseApp;Password=BeerNow!" providerName="System.Data.SqlClient"/>
</ connectionStrings >
7. Set the Web Project as the Start Up Project. (It should have already defaulted to this)
8. F5 to run the Web App against our newly attached Database. You should see something like this:
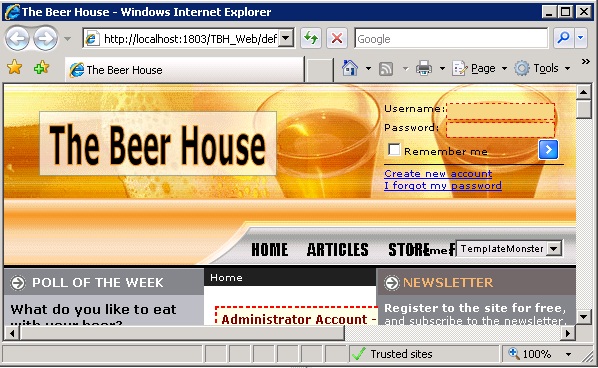
If you get errors then you probably didn’t set the SQL Security to Mixed Mode. ;)
We now have a working Web App running against our “production” database. Let’s now put the database into a database project. We will be using a 2005 Database Project and a 2005 Database Server Project. The Database Project is for the user created database objects. This is for all the database objects used by the web application. The Database Server Project is for our server level objects. We only have one, the SQL Login the web application uses to log into database. You accomplish this by:
1. Add a 2005 Database Project to the solution called TBHDB. You do this by right clicking the solution file in the Solution Explorer and selecting Add->New Project->Database Projects->SQL Server 2005.
2. Add a 2005 Database Server Project to the solution called TBHDBServer. You do this by right clicking the solution file in the Solution Explorer and selecting Add->New Project->Database Projects->SQL Server 2005.
Your solution should now look like:
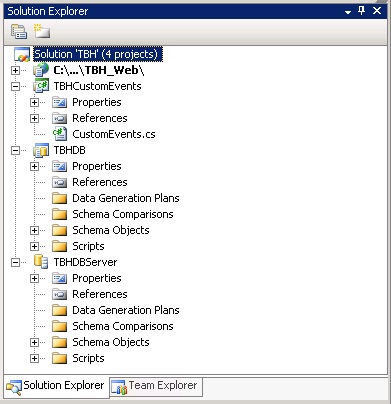
We now need to populate the Database Project. We do this be reverse engineering the database we setup previously. You do this by importing the database into the database project [TBHDB]. When you import the database the database is shredded into individual SQL files. These individual files represent the schema of the Database. Since these files are simply SQL files and the files contain individual objects they are suitable to maintain and version in the project system. You import the database by right clicking on the database project node in Solution Explorer and select “Import Database Objects and Settings”. You will be presented with a dialog where you can define the connection to the database and define import settings. Let’s import the database by:
1. Defining a new connection to the TheBeerHouse database on the default instance. Click new connection. Server Name = “.”. Database Name = “TheBeerHouse”
2. Keep the “Script the column collation only when it..” option checked.
3. Keep the “Import extended properties” option checked.
4. Check the “Import permissions” and check the “Add imported permissions to the project model” also. We want to work with permissions for this walkthrough.
5. Check the “Override configuration with imported schema settings” . This will import all the database settings along with the schema. An example would be the collation of the database.
6. Leave the Max files per directory at 1000. This walkthrough doesn’t have very many files, but if you are working on a large schema you may want to drop this down to 250-500. Lots of files in one directory makes VS sluggish for some operations.
7. Click Start. When the database schema import completes click finish.
Setting up the Database Projects for Sandbox Development
You will notice that VS is now displaying status messages that it is building out the project’s model. It should complete quickly as the TBH schema is pretty simple. When it says “Ready” take a look at the VS Error List. You can do this by selecting View->Error List from the Main menu. You should see 9 Warnings and 1 Error.
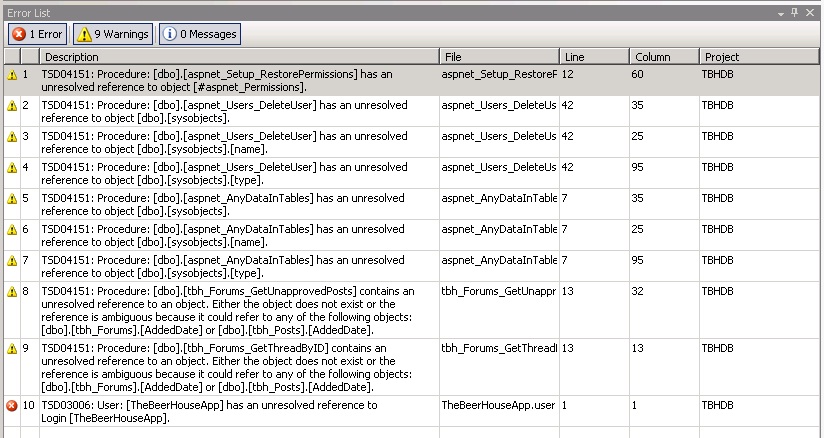
When you import Database Projects the Error List is the first place you want to start. It will help you work through any Errors and Warnings as you do your house keeping to tidy up the database. Just like other VS project types, Errors block the build and Warnings are warnings that something may not be right with the project.
Let’s take care of the error first. The error is for an unresolved reference to a Login object from a database user object. The Login is the same login we previously added when setting up the database. Since Logins are a server level object it was not imported into the database project. We need to add it to our server project [TBHDBServer]. We could import the master database from the server into our server project to get the login. This would also bring down all the other user created objects in master. Since it is only one object let’s just add it to the server project ourselves. You do this by:
1. Locate the Server Project in Solution Explorer
2. Expand the Schema Objects->Server Level Objects->Security folder.
3. Right click on the Security folder and select Add->New Item.
4. Select the Login (SQL) template from the New Item Dialog.
5. Name the Login “TheBeerHouseApp” and click Ok.
6. You should now be staring at the CREATE LOGIN Script. Update password variable to “BeerNow!” and save the file.
7. Your TheBeerHouseApp.login.sql file should look like this:

8. We now need to create a database reference from the database project to the server project to resolve our error. Right click on the “References” folder under the TBHDB project. Select Add Database Reference.
9. You are now presented with a dialog for creating new Database References. It has selected the TBHDBServer project already. It has also added “master” as the literal for database variable. It does this since master is always master on the database server.
10. Click Ok. You will see the reference is added under the “References” folder of the TBHDB project. This dialog should look like:
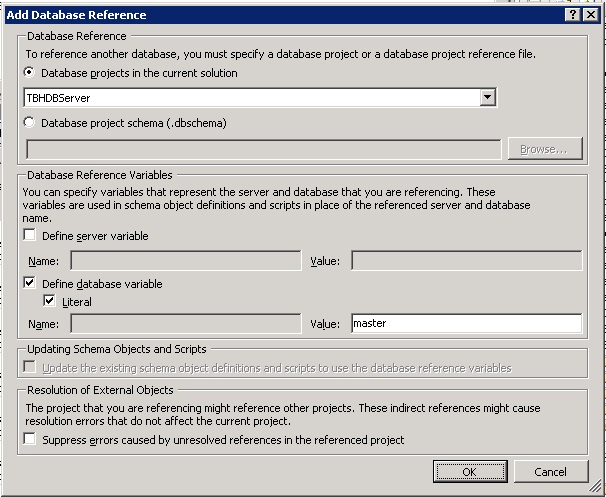
11. Right Click on the TBHDBServer project and click Build. You do this so the database server project is validated and its model is updated.
12. Notice how the Error disappears from the error list. We now are resolving the Login to the database server project.
We should be left with 9 warnings. All the warnings are from stored procedures in the TBHDB project. One thing to note here is that unresolved references in stored procedures are usually warnings. The reason is that stored procedures have deferred name resolution. This means it is possible to create a stored procedure without the objects it uses as table sources existing. Out of the 9 warnings we will resolve 8 of them. 6 of these warnings are for references to sysobjects. Database and server projects do not include all built-ins like system tables, views, and catalogs. You need another database reference for these. Much like how we resolved the error to the login, we will resolve these warnings for sysobjects by referencing a logical model of the master database that contains all these built-ins. You may be thinking “why is this not in the server project we just created”? The fact is that database server projects only include user level created objects. You can resolve these reference warnings to sysobjects by:
1. Right click on the “References” folder under the TBHDB project again. Select Add Database Reference.
2. Select the “dbschema” option.
3. Select the master.dbschema file from disk located: C:\Program Files\Microsoft Visual Studio 9.0\VSTSDB\Extensions\SqlServer\2005\DBSchemas\master.dbschema
4. Leave database variable literal as “master”
5. The database reference dialog should look like this. Click Ok.
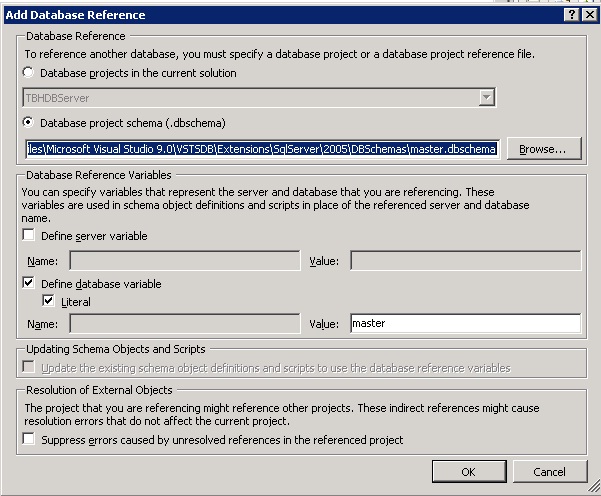
After a little while you should see 6 of the warnings for the missing [sysobjects] object disappear. What we have done to resolve this is added the master.dbschema model to our project that represents all the built-ins provided by master. We now have 2 references and both represent the master database. Yes, this is possible. You may have also noticed that processing the reference to master.dbschema takes much longer than it did for the server project. That is because the model for master.dbschema is much larger. Even though we only need the definition for the sysobjects table we took on the overhead of the whole master.dbschema. You may want to check this out for how to customize your master.dbschema file. Note: If you use customized dbschema files you will want to add them to your solution so everyone on the team can reference the same file. This also will become a part of the source and will be available when or where ever you do your builds.
We should be left with 3 warnings now. 2 of the warnings are for ambiguous column references in the ORDER BY clause of 2 stored procedures. The 2 table sources in each of the stored procedures both have the column that the results are ordered by. While this is fine for SQL to execute (it assumes the column in the SELECT list) it makes maintenance problematic. It’s better to be explicit in this case to prevent runtime errors should the other Added Date be included in the SELECT list. To resolve the warnings simply double click on each other warnings for tbh_Forums_GetUnapprovedPosts and tbh_Forums_GetUnapprovedPosts and replace the Added column in the ORDER BY clause with tbh_Posts.AddedDate. Save and close both files. You should see 2 warnings disappear. This leaves one warning left. The warning is for a session level temporary table. GDR R2 does not resolve references to session level temporary tables. Using session level temp tables is not a good design practice. Our guidance is to use table parameter instead as it makes the code more maintainable and design clearer. Since we don’t plan to resolve this warning we can suppress it. You can suppress the warning by:
1. Locate the aspnet_Setup_RestorePermissions.proc.sql in Solution Explorer
2. Right Click on file and select “Properties”
3. On the “Properties” dialog enter the warning number for this warning (4151).
4. The properties window will look like this:
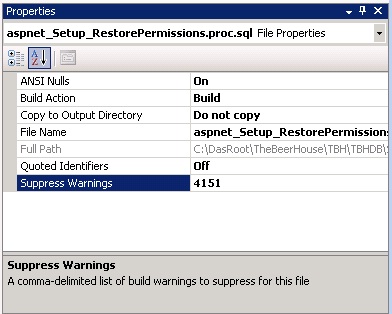
5. Save the file.
You have no warnings now. Caution: By suppressing the warning 4151 for the aspnet_Setup_RestorePermissions.proc.sql file we just suppressed all 4151 warnings for this file. This might not be desirable as you will probably still want to know if other objects are unresolved. Unfortunately warning suppression is only supported at the file and project levels. If you want other unresolved warnings for the file you will have to live with the unresolved session level temporary warning or refactor the code to use a table variable instead. Sorry.
Now that we have dealt with our errors and warnings we have our solution in good shape to move on. Next we should deploy the database to our local sandbox. Deploying it locally and running the app against the sandbox database will give us the confidence that the database and application is fully functional. But, before we can do that we need to consider reference data. TBH application depends on some simple version metadata for the ASPNET User Profile components. We could run the Aspnet_regsql.exe that adds this data everytime we deploy a new database or we can just deploy it ourselves. After all, we are already versioning the User Profile tables we might as well version the reference data required for ASPNET to make use of them. To do this easily we just simply add this T-SQL to the post deployment script of our TBHDB project:
IF NOT EXISTS
(SELECT * FROM dbo.aspnet_SchemaVersions)
BEGIN
SET NOCOUNT ON
PRINT 'Adding [dbo].[aspnet_SchemaVersions] Data'
INSERT INTO [dbo].[aspnet_SchemaVersions]([Feature],[CompatibleSchemaVersion],[IsCurrentVersion])
VALUES('common',1,1)
INSERT INTO [dbo].[aspnet_SchemaVersions]([Feature],[CompatibleSchemaVersion],[IsCurrentVersion])
VALUES('health monitoring',1,1)
INSERT INTO [dbo].[aspnet_SchemaVersions]([Feature],[CompatibleSchemaVersion],[IsCurrentVersion])
VALUES('membership',1,1)
INSERT INTO [dbo].[aspnet_SchemaVersions]([Feature],[CompatibleSchemaVersion],[IsCurrentVersion])
VALUES('personalization',1,1)
INSERT INTO [dbo].[aspnet_SchemaVersions]([Feature],[CompatibleSchemaVersion],[IsCurrentVersion])
VALUES('profile',1,1)
INSERT INTO [dbo].[aspnet_SchemaVersions]([Feature],[CompatibleSchemaVersion],[IsCurrentVersion])
VALUES('role manager',1,1)
SET NOCOUNT OFF
END
Now let’s configure the projects to deploy locally so we can proof the deployment. To do this:
1. Right click on the TBHDB project and select properties
2. Select the Deploy tab
3. In the second combo box select “My isolated development environment” for the Configure deployment settings for option.
4. In the first combo box select “Create and deployment script and deploy…” for the Deployment Acton option
5. In the Target Connection click edit.
6. Add the server name as “.\SQLEXPRESS”
7. Leave the database name the same as the project [TBHDB]
8. Save and close the Project Properties
9. Repeat the same steps for the database server project [TBHDBServer], but leave the database name as master on this one
10. Right click on the TBHDBServer project and select Deploy
11. Here is the output for the database server project deployment:

12. Now, Deploy the TBHDB database project.
13. Here is the output for the database project deployment:

Note how when we deploy the Database Project that it also deploys the database server project. This is because there is a dependency between the database and the database server project that is managed by VS. If you deployed from the command line you would not have this dependency checking and would need to deploy them in the correct order. This is true of all database references except references to dbschema files.
Let’s go back and edit the web.config of the project. We need to point it at our sandbox database. We do this by changing the connection string to:
<add name="LocalSqlServer" connectionString="Data Source=.\SQLEXPRESS;Initial Catalog=TBHDB;User=TheBeerHouseApp;Password=BeerNow!" providerName="System.Data.SqlClient"/>
Now we can view the TBH app with it using the local sandbox database. Again, you can start up the web app by F5 (Debugging) or by right clicking on web project and select “View in Browser”. We see TBH app working! Note how this app instance has no data as compared to what we saw earlier. This is because when we deployed locally we only deployed the schema, security, and the minimum reference data. You could use the Data Compare feature if you want to easily pump the data into our sandbox database. You could also generate test data for this database using the Data Generation feature, but for now we will move forward with configuring our database projects.
Adding our Solution to Source Code Control
We now have our solution and projects setup (mostly) and its time to check-in! Before we can check-in we need a team project with source control. To create source control for this solution:
1. Click on the Team Explorer Window. (If Team Explorer is not shown select it from VS Menu View->Team Explorer)
2. Right click on the Server Node [TFSRTM08] and select “New Team Project”
3. A wizard dialog will be presented to help you configure your Team Project. On this first screen add the name of the project “TheBeerHouse” and click next.
4. On the second screen select “MSF for Agile...” instead of CMMI because at the Beer House we are an agile team!
5. Click Finish and wait….
6. When it is done creating and hooking up your Team Project Click Close. The process guidance should be loaded up in VS main window. If you can see it that is good because the associated SharePoint site is functioning properly.
Your Team Project in Team Explorer should now look like this:

Now that we have our TFS project we can add our solution to Source Code Control. There are a few different ways to do this, but I will do it from Solution Explorer.
1. Right click on the solution in Solution Explorer and select “Add Solution to Source Code Control”
2. You will be presented a dialog that will help you add the project to source control. You can see there are handfuls of other projects there as well. Feel free to check those out, go on, I will wait here for you.
3. Select the TheBeerHouse project.
4. In the box for the name of the solution folder clear “TBH” and enter “MAIN”. This will make more sense later.
5. Click OK. This process is quick, usually.
6. Right click on the Solution again and select “View Pending Changes”
7. The Pending Changes window will appear showing you all the changes that you can commit to the repository. Click the Check In button.
8. Go back to Team Explorer and open the Source Control in your team project. You will see a branch of code now under in source control that has just been checked-in.
Your Source Control for your project should look like this:

A couple of things to mention: when you are adding to source control from the IDE the file filtering is managed for you. If you are adding the project to source control from the file system you will not want to add the following files:
· <ProjectName>.dbmdl – This file is the cached project model. It should not be source controlled. You always need read/write access to this file while the project is open in the IDE. The cache should be rebuilt for each developer on the team.
· <ProjectName>.dbproj.user – This file is the user project settings like deployment settings for isolated development environments. Each developer should have their own settings files.
· Sql Folder – This folder under the database project will contain build outputs. Files in this directory need to read/write on each build/deploy.
· Obj Folder - This folder under the database project will contain temporary build outputs. Files in this directory need to read/write on each build/deploy.
Setting up our Database for Rolling Builds/Continuous Integration
We now have our solution and projects setup and in source control. Given that we will be often doing our database development in our local sandbox environments we need an integration server so that all our changes can be integrated into a single database instance that our team can reference. This integration environment is where we will also regularly run our TBH application and any automated build validation testing. Our integration environment will be regularly updated with the latest code and changes integrated into database. This is often called Rolling Builds where a build is produced everyday or every check-in. Any issues with incremental database deployment or application runtime failures can be communicated to the team immediately. This allows the team to know early when a build break occurs as a result of integration. It also builds the confidence of the team through the integration environment being upgraded many, many times during the iteration cycle. This is our continuous integration environment and is critical for any agile team. If possible, you want this environment to mimic the production environment even it is only on a small scale.
To create our integration environment I continue to configure our solution. Specifically I will configure the Debug configuration to deploy and update our integration environment automatically as a result of code churn. For our Release configuration I will configure it to deploy to script so that the upgrade can be manually or semi-manually run. I will only be configuring the database projects for deployment in this post, but you can certainly automate the deployment of the other projects as well.
For the Debug Configuration I make the following changes:
1. Right click on the TBHDB project and select properties
2. Select the Deploy tab
3. In the second combo box select “My project settings” for the Configure deployment settings for option.
4. In the first combo box select “Create and deployment script and deploy…” for the Deployment Acton option
5. In the Target Connection click edit.
6. Add the server name as “.\SQLEXPRESS”
7. For the database name, name it [TBHDB-INT]
8. Save and close the Project Properties
9. Do the same for the server project, but leave the database names as “master”
For the Release Configuration I make the following changes:
1. Right click on the TBHDB project and select properties
2. Select the Deploy tab
3. In the second combo box select “My project settings” for the Configure deployment settings for option.
4. In the first combo box select “Create deployment script” for the Deployment Acton option
5. In the Target Connection click edit.
6. Add the server name as “.”
7. For the database name, name it [TheBeerHouse]
8. Save and close the Project Properties
9. Do the same for the server project, but leave the database names as “master”
I now need a build definition that will define my build and build process. I will create 2 build definitions. One will be my Debug build and the other my Release build. To create the Debug build definition See (Brian Randell’s MSDN article on this topic):
1. Expand my project in Team Explorer.
2. Right click on the Builds directory and select “New Build Definition”
3. You will be presented with a dialog that will walk you through creating a TeamBuild Build Definition.
4. On the fist tab [General] enter TBH-INT for the name of the definition.
5. On the second tab [Workspace] specify “$/TheBeerHouse/MAIN” as the Source Control Folder.
6. On the third tab [Project File] accept the default name of the MSBuild Project file and click Create. On the subsequent screens select the solution from the Main directory in source control and specify Debug as the configuration.
7. On the fifth tab [Build Defaults] click “New” for the agent. On the Build Agent Properties dialog just specify “BUILDBOT” and “TFSRTM08” and click Ok. For the build staging share specify “\\TFSRTM08\Drops”
8. On the sixth tab [Trigger] select the Build each check-in option.
9. Click Ok to close dialog. The new build definition should appear.
10. Click on Source Control in Team Explorer. Locate $/TheBeerHouse/TeamBuildTypes/TBH-INT/TFSBuild.proj and Get Latest Version of file.
11. Open file once you have it on disk and add the following Target right before the closing </Project> tag:
<Target Name="AfterDropBuild">
<MSBuild Projects="$(SolutionRoot)\TBHDBServer\TBHDBServer.dbproj" Properties="Configuration=Debug;OutDir=$(DropLocation)\$(BuildNumber)\Debug\"
Targets="Deploy"/>
<MSBuild Projects="$(SolutionRoot)\TBHDB\TBHDB.dbproj" Properties="Configuration=Debug;OutDir=$(DropLocation)\$(BuildNumber)\Debug\"
Targets="Deploy"/>
</Target>
You have your Debug TeamBuild setup now. There are only a few more changes to make. The following changes make it where you can deploy the database projects from any path and to any database instance.
1. Right click on the solution in Solution Explorer and select Add->New Solution Folder. Call it “RefDbschemas”.
2. Copy the dbschema file from:
“C:\Program Files\Microsoft Visual Studio 9.0\VSTSDB\Extensions\SqlServer\2005\DBSchemas\master.dbschema” to: “C:\DasRoot\TheBeerHouse\TBH\RefDbschemas\master.dbschema”.
12. Reestablish the reference from the TBHDB project to the local copy of the master.dbschema. This will make sure the dbschema can always be resolved to a relative path.
13. Add this copy master.dbschema to the new solution folder by right clicking on the folder and selecting Add->Existing->Item.
14. Locate the ASPNETDB.MDF.sqlfile.sql and the ASPNETDB_log.LDF.sqlfile.sql under the TBHDB project->Schema Objects->Database Level Objects->Storage-> Files and delete both of these files. Since we are not using any specific configuration for our SQL files and we plan to deploy this database multiple times to the same database instance we need the file configurations to be unique. With the files removed any time a database is created it will be done using the server’s default configuration for SQL files. Alternatively, we could have updated the file definitions to be unique to the target and kept them in the project, but for this database that would be unnecessary since it has only simple sql file configuration.
15. Right Click the solution file in Solution Explorer and select check-in.
After you check-in you might notice your box starts chugging. This is because TeamBuild just kicked off a build based on your last check-in. You can watch the progress of the build by double clicking on the [TBH-INT] build definition under Builds in Team Explorer. When the Build Explorer opens you can click on the current active build to see where it is at in the build process. When the build is complete you will have the TBH-INT deployed on your SQLEXPRESS instance. You can also find the build outputs and scripts to create the database in your build drop folder similar to: C:\Drops\TBH-INT_2009XXXX.1
Here is what your build log will look like:
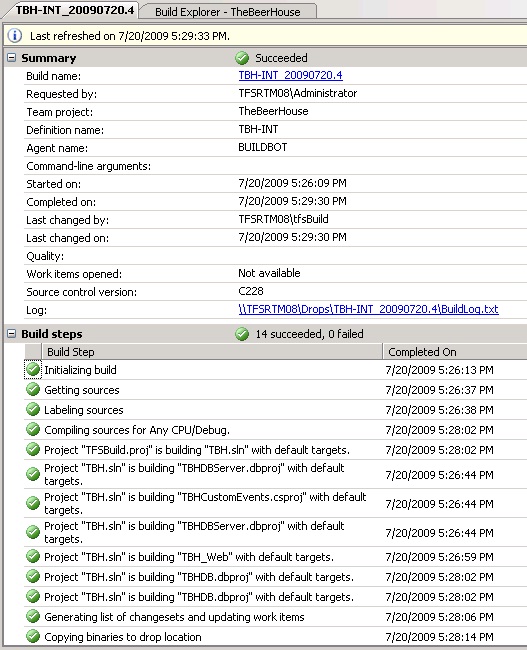
One thing you might notice is how the database projects are being listed twice in the team build log. The is caused by building the solution which results in each database project to be built in the correct dependency order, but the solution will also emit additional builds for each database project in the solution. Since the database project is already built, the build will short circuit since all the outputs are current. Essentially it’s a no-op and does not impact your build.
To setup your Release build definition is a breeze. Most the work has already been done. To create the Release build definition:
1. Expand my project in Team Explorer.
2. Right click on the Builds directory and select “New Build Definition”
3. You will be presented with a dialog that will walk you through creating a TeamBuild Build Definition.
4. On the fist tab [General] enter TBH-RET for the name of the definition.
5. On the second tab [Workspace] specify “$/TheBeerHouse/MAIN” as the Source Control Folder.
6. On the third tab [Project File] accept the default name of the MSBuild Project file and click Create. On the subsequent screens select the solution from the Main directory in source control and specify Release as the configuration.
7. On the fifth tab [Build Defaults] select BUILDBOT as the Build Agent and “\\TFSRTM08\Drops” as the drop location.
8. On the sixth tab [Trigger] select the Check-ins do not trigger builds option.
9. Click Ok to close dialog. The new build definition should appear.
10. Open the Team Build project [C:\DasRoot\TheBeerHouse\Build Projects\TeamBuildTypes\TBH-RET] once you have it on disk and add the following Target right before the closing </Project> tag:
<Target Name="AfterDropBuild">
<MSBuild Projects="$(SolutionRoot)\TBHDBServer\TBHDBServer.dbproj" Properties="Configuration=Debug;OutDir=$(DropLocation)\$(BuildNumber)\Debug\"
Targets="Deploy"/>
<MSBuild Projects="$(SolutionRoot)\TBHDB\TBHDB.dbproj" Properties="Configuration=Debug;OutDir=$(DropLocation)\$(BuildNumber)\Debug\"
Targets="Deploy"/>
</Target>
11. Right click on the TBH-RET build definition and select “Queue New Build”.
The RET build does not deploy the database, but will produce incremental deploy scripts whenever the TBH-RET build definition is run. Remember that we configure release to deploy to script. The deployment scripts and the build outputs can be found in the drops folder. Your first RET build will only contain the incremental scripts to modify the 2 stored procedures we adjust earlier in the walkthrough. Remember that?
Overriding a SQLCMD variable to Version Stamp DBs
With our rolling builds setup and deployment automated we can now focus on improving on the existing database schema. A simple and valuable way to monitor changes as they make their way through the code promotion paths is to add a version stamp. For databases there is not an immutable version like assemblies, but we can add a version to the deployed database in the form of an extended property. The version of the database will then be ambient and I can tie other scripts to the version of the database.
I do this by first adding a variable to the Database.Sqlcmdvars file. Under the properties folder of the database project [TBHDB] open the Database.Sqlcmdvars file. Add a variable called “DBVersion” and provide a value like “UNDEF”. This will look like the following in the IDE:

I then add an extended property to the database project by right clicking on the Schema Objects folder of the TBHDB database project and selecting Add->New Item->Extended Property and call it “DBBUILD”. A file named DBBUILD.extendedproperty.sql will be added to the project. You need only to add the variable to the value of the extended property. This looks like:
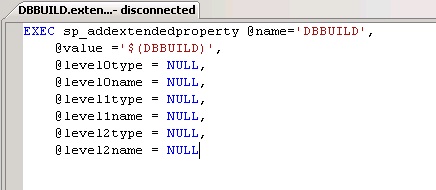
You can now deploy to your local sandbox database and see the extended property. Remember this is the [TBHDB] database on your SQLEXPRESS instance. If you open the TBH project properties you can simply change the Configure Deployment settings for “My isolated development environment” and you previous settings are there. Deploy the TBHDB project by right clicking on the TBHDB project in Solution Explorer and select “Deploy”. You will see the extended property is added to the database. Here is what it looks like from SSMS:

Ok, so UNDEF is not that useful as a version. You can manually change it from the Database.sqlcmdvars file or you can update it as a part of the deployment process. To set the version as a part of the deployment process you need to first edit the project file of the TBHDB project. To do this:
1. Right click on the TBHDB project in Solution Explorer and select “Unload Project”
2. Right click on the TBHDB unloaded project in Solution Explorer and select “Edit”
3. Add this XML to the Item Group that follows the Import Project element (approx line 57):
<ItemGroup>
<!--BEGIN SqlCommandVariableOverride-->
<SqlCommandVariableOverride Include="DBBuild=$(DBBuild)" Condition="'$(DBBuild)' != ''"/>
<!--END SqlCommandVariableOverrides-->
4. Right click on the TBHDB project in Solution Explorer and select “Reload”
5. Go back to Source Control and edit the TBH-INT definition [C:\DasRoot\TheBeerHouse\Build Projects\TeamBuildTypes\TBH-INT\TeamBuild.proj]. Update the Deploy target call to include the variable as a property. This looks like:
<Target Name="AfterDropBuild">
<MSBuild Projects="$(SolutionRoot)\TBHDBServer\TBHDBServer.dbproj" Properties="Configuration=Debug;OutDir=$(DropLocation)\$(BuildNumber)\Debug\"
Targets="Deploy"/>
<MSBuild Projects="$(SolutionRoot)\TBHDB\TBHDB.dbproj" Properties="Configuration=Debug;OutDir=$(DropLocation)\$(BuildNumber)\Debug\;DBBuild=$(BuildNumber)"
Targets="Deploy"/>
</Target>
6. Do this also for the TBH-RET build definition.
7. Check-in your pending changes.
Once you check-in these changes your build will take off and update the integration database. After it finishes the build and deploy we can check out the extended property in SSMS and see the DBBuild Extended Property looks like this now:

Also, if you Queue a RET build it include the T-SQL to add the extended property as well as the 2 stored procedures. Since we never applied the incremental script it will continue to include all the changes we have made until we upgrade the production database to bring them in synch.
For those of you thinking, “wow!, that’s cool for folks with TeamBuild, but what about shops not running TeamBuild?” You can also pass the build version through MSBUILD. Here is the MSBUILD command with variable specified:
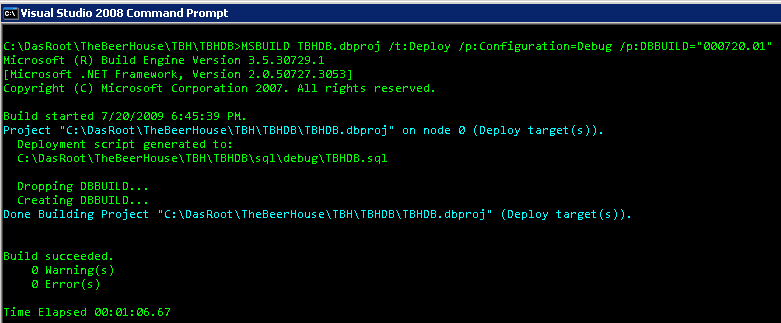
Deployment is now a snap! So whether I want to deploy a change to my sandbox, or check-in and have my changes deployed to integration or even generate a script to upgrade production I can focus on my code, not build and release mechanics. In addition, I can be assured that build breaks can be detected early and before the end of the iteration cycle/sprint where they are most costly.
That’s the end of the walkthrough. Now you have a test bed to try out all kinds of changes to the schema and have the changes deployed for you. Once I have reached this point in the demo folks are interested to see how refactoring and other incremental changes are deployed. This is a good point to snapshot your VM so you can return to this point if you make a lot of changes and want to keep them.
Depending on reader interest, I may use this VM as the foundation for future posts. It will be hard not to now that we have a known starting place for everyone that follows along. Bonus, you can bypass the whole setup process by downloading the VM. Convinced yet? Besides, who doesn’t like talking about Beer even if it is not directly related to the subject matter?
Once you have your environment setup in a VM you can start trying out all kinds of things and easily revert back to a previous state. You can even jump forward to another snapshot. Go and experiment! I highly recommend folks that have the hardware and OS give Hyper-V a whirl. I have found it to be indispensible. Everything I have now runs on a Hyper-V VM besides my email box. I better stop before this post turns into a Hyper-V love fest.
Let me know if this was helpful or any parts unclear. It’s a long post and I may have glossed over some details here and there. It is such a long post I also attached it in PDF format.
Welcome to the beer house!.pdf
Comments
- Anonymous
August 03, 2009
The comment has been removed - Anonymous
September 27, 2010
Very helpful post! Any tips on implementing the MSBuild call from a TFS 2010 BuildTemplate.xaml file? - Anonymous
August 03, 2011
Other than trouble using <SQLCommandVariableOveride... with VS2010, great article, thanks! - Anonymous
March 08, 2012
The same process can Database Project ca