Azure AD – Manually add authentication code to your app
Creating (web) applications which use Azure Active Directory for authentication can be quite simple. As a developer, you don’t have to know which code is added to your application for authentication. Visual Studio will handle that burden for you. But, what if something goes wrong and you suddenly have to debug your code. Or you’re just curious and want to know what happens under the hood.
In this post, I’m going to add the code for authenticating my MVC application to Azure manually. This will provide more insights in the different parts which are added by Visual Studio using the project templates. The insights you might need in the future when troubleshooting more complex scenarios.
Let’s start with a little bit of background information…
OWIN, Katana and OpenId Connect
In.Net Framework 3.5, Microsoft introduced WIF (Windows Identity Foundation). This was the first library entirely devoted to claims-based identity development for ASP.Net applications. WIF eventually evolved into .Net framework 4.5, which was re-engineered to root all identity representations to one base class, called ClaimsPrincipal.
However, as the WIF classes are still supported today, these classes are not suited for the new protocols used in Azure. WIF is strongly xml based, which makes it hard to extend. That’s why OWIN is introduced for implementing modern protocols.
OWIN stands for Open Web Interface for .Net, a community owned specification for the creation of highly portable HTTP processing components that can be used and reused on any web server, hosting process or OS, as long as the .Net framework is available on the target platform.
As OWIN does not provide any classes for implementation, Katana does. “Katana” is the original code name of the project and is completely open source. The source code for all ASP.NET OWIN components is available under https://github.com/aspnet/AspNetKatana/ .
OpenId Connect is a simple identity layer built on top of the OAuth 2.0 protocol. OpenId Connect extends OAuth2 with a new token, the ID token, that verifies the identity of the user and provides basic profile information about the user. This ID token comes in the form of a JSON Web Token (JWT Token).
This is just a very brief introduction on this topic. If you want more information you can refer to https://owin.org/ , /en-us/aspnet/aspnet/overview/owin-and-katana/ or https://openid.net/ .
Creating the App
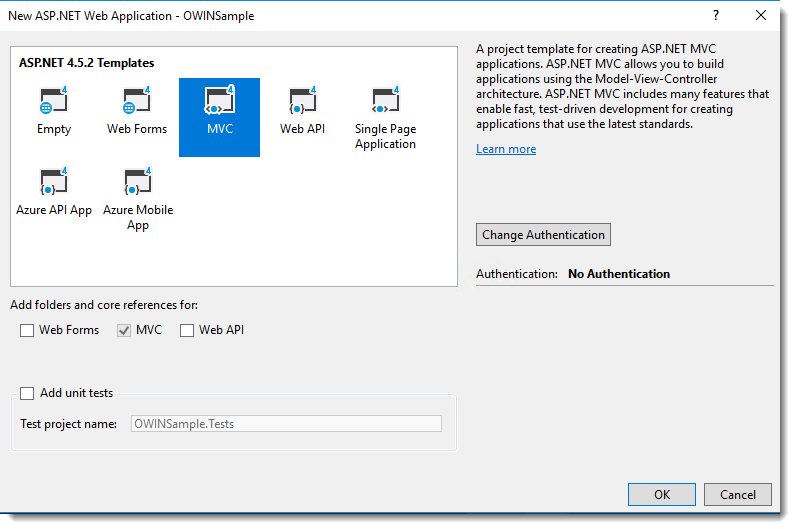
Begin by creating a new MVC project with no authentication targeting the .NET Framework 4.6.
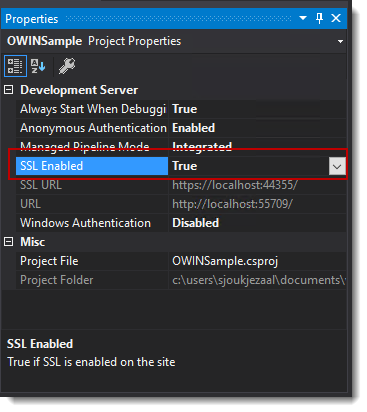
First, change the project URL to HTTPS instead of the default HTTP. Go to the Project properties and set SSL Enable to true.
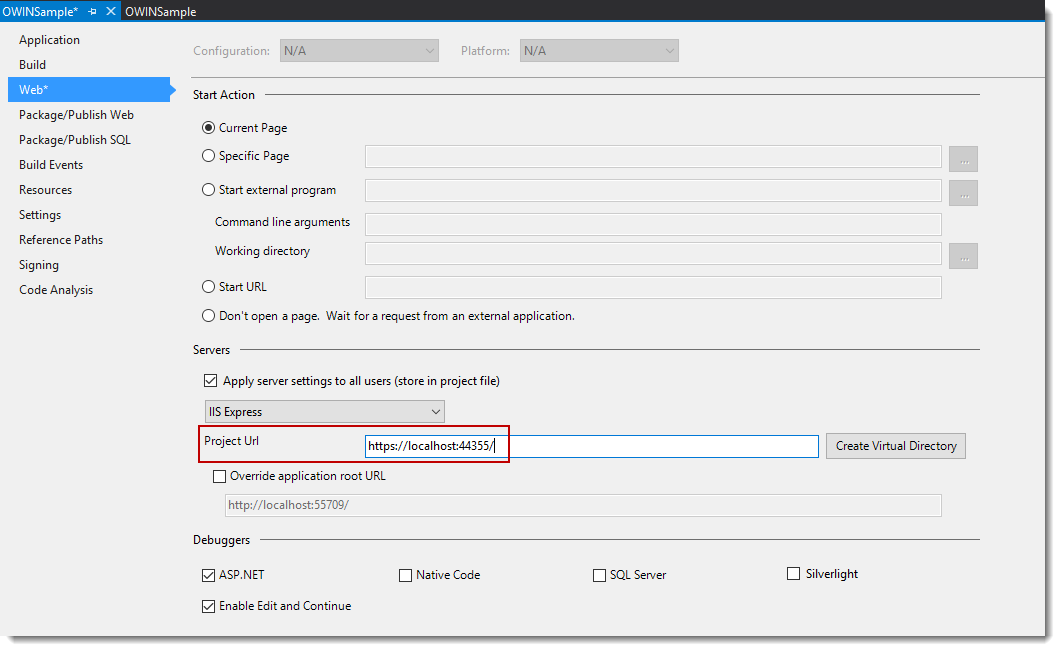
Notice that the SSL URL is now filled with the following URL: https://localhost:44355/. Copy this to the clipboard.
In the Solution Explorer, right click the project and choose properties. Open the Web Tab and replace the original URL with the copied URL.
Press F5 to check if your application still works.
Install the Azure Authentication Packages
The first thing to do is to add the required NuGet packages. Open the Package Manager Console, and add the following commands:
 [code]

Install-Package Microsoft.Owin.Host.SystemWeb
This package installs the assemblies to host the OWIN middleware pipeline in your application.
 [code]

Install-Package Microsoft.Owin.Security.Cookies
Most redirect-based web applications request a token for the initial authentication and rely on a cookie-based session for all further interactions. The cookie middleware generates and tracks such a session. This package also brings in the Microsoft.Owin.Security as a dependency, which is a repository of classes that creates the building blocks of security-related middlewares.
 [code]

Install-Package Microsoft.Owin.Security.OpenIdConnect
This package contains the OpenId Connect middleware parts. It pulls down the JWT Handler (System.IdentityModel.Protocol.Extensions) and Microsoft.IdentityModel.Protocol.Extensions. These packages are separated from the OWIN package because you can use them if you want to build a stack without OWIN.
Add your application to Azure AD.
For adding your application to Azure AD, you can refer to the previous article I wrote called: 4 ways of adding your application to Azure Active Directory
After adding your application to Azure Active Directory, copy the Application ID to the clipboard.
Edit the class declaration to include the partial keyword. The result will look like the following:
 [code]
using System;
using System.Threading.Tasks;
using Microsoft.Owin;
using Owin;

[assembly: OwinStartup(typeof(OWINSample.Startup))]

namespace OWINSample
{
    public partial class Startup
    {
        public void Configuration(IAppBuilder app)
        {
            // For more information on how to configure your application, visit https://go.microsoft.com/fwlink/?LinkID=316888
        }
    }
}
The OWINStartup attribute will cause the Configuration method to be invoked at assembly load time. You can use this method to add all your initialization code.
To initialize the cookie and the OpenId Connect middleware, add a new class and call it Startup.Auth.cs. Replace the public declaration with partial.
Add the following using directives:
 [code]
using Owin;
using Microsoft.Owin.Security;
using Microsoft.Owin.Security.Cookies;
using Microsoft.Owin.Security.OpenIdConnect;
Add the following identity-initialization method to the Startup class:
[code]
public void ConfigureAuth(IAppBuilder app) {
app.SetDefaultSignInAsAuthenticationType(CookieAuthenticationDefaults.AuthenticationType);
app.UseCookieAuthentication(new CookieAuthenticationOptions());
app.UseOpenIdConnectAuthentication(
new OpenIdConnectAuthenticationOptions
{
ClientId = "<Your Azure AD Application Id>",
Authority = "https://login.microsoftonline.com/&amp;amp;lt;your-active-directory-tenant&amp;amp;gt;.onmicrosoft.com/"
});
}
The first line sets the default sign in authentication to accept cookies. The UseCookieAuthentication adds an instance of the cookie middleware to the pipeline. The UseOpenIdConnectAuthentication does the same for the OpenId Connect middleware. The order is important here. The first middleware you add will be invoked first after a request. The last one will be the one which works on the response.
The OpenId Connect middleware allows you to control every aspect of the authentication flow. By adding the OpenIdConnectAuthenticationOptions initialization parameters:
- ClientId: This is the Application Id assigned to your app when adding it to Azure Active Directory. You have copied this value to the clipboard (or you retrieve it from the Azure Portal).
- Authority: This is the complete url of your Azure AD tenant (You can retrieve this from the Azure Portal as well).
Almost there. You have to ensure that the above code is called at load time. Open the Startup.cs class again and add the following code:
 [code]
public void Configuration(IAppBuilder app)
{
   ConfigureAuth(app);
}
Your application is now configured to use OpenId Connect against your Azure AD tenant for authentication!
Test your application
To test your application, add a trigger for authentication. Open the HomeController.cs and add the following directive:
[code]
using System.Security.Claims;
Replace the Contact method with the following:
[code]
[Authorize]
public ActionResult Contact()
{
string userfirstName = ClaimsPrincipal.Current.FindFirst(ClaimTypes.GivenName).Value;
ViewBag.Message = String.Format("Welcome {0}!", userfirstName);
return View();
}
Press F5. The application will open like it did earlier. Click the Contact link in top bar. You should be directed to the Azure AD Authentication Page (caused by the [Authorize]). Fill in your credentials and you should be directed back to the Contact view. If everything went well, the users first name will be displayed in the top bar of the page!
Conclusion
In this post, I’ve shown what it takes to add the authentication code to your application manually. I gave some brief background information on the different parts what makes up your authentication code. Hopefully, by now, you have just enough information to debug and troubleshoot your code when anything goes wrong in the future.
Downloads
You can download the sample app from the Technet Gallery.
Comments
- Anonymous
May 01, 2017
Trying to highjack Azure AD as my favorite topic?Just kidding, it's great to see more posts on AAD :)And of course, I highly recommended going through the experience of manually adding things to understand it better. If you just rely on the wizards you'll have a hard time when it breaks for some reason.


