Set up an Application Developers Controlled Distribution (ADCD) in IBM zD&T v12
In a post back in September, I described how to setup the IBM zD&T environment in Azure. The IBM zD&T environment is an emulation of the IBM Z Series Architecture that runs on the x86/x64 platforms. It can host a variety of Z Series operating systems/installations (also called Z instances or packages). These are available through what IBM calls Application Developers Controlled Distributions (ADCDs). They are complete Z Series OS implementations for development and testing environments that run in IBM zD&T. Just like IBM zD&T, they are only available to IBM customers and partners and are exclusively for development and testing purposes (that is, not production). They are available through IBM PartnerWorld for partners. Here is a list of the packages available.
In this post you are going to walk through setting up an ADCD instance in IBM zD&T. You may recall that in the previous post you installed zD&T in an Ubuntu 16.04 VM. You are going to use the same VM image. Before you get started, it's worth mentioning that I am using a Windows PC to access the Azure portal and to download the IBM media. If you are using a Mac or Ubuntu desktop, the commands and process for obtaining the IBM media may differ slightly.
Let's get started.
First a note about the Licensing Server
There are two ways to implement the Licensing Server that is necessary to run IBM zD&T. This can vary based on how you licensed the software from IBM.
- Hardware-based licensing server: This method requires a USB hardware device that contains the Rational Tokens necessary to access all portions of the software. You will need to obtain this from IBM.
- Software-based licensing server: When you use this method, you will need to set up a centralized server for the management of the licensing keys. This would be the preferred method and requires you to set up the keys you receive from IBM in the management server.
Since these methods differ based on your licensing relationship with IBM, they are beyond the scope of this blog post. For more information on installing the Licensing Server go here.
Download the installation packages from Passport Advantage
As mentioned previously, you will need to have access to the ADCD media. You can gain access through either IBM PartnerWorld or Passport Advantage if you are an IBM customer or partner.
- Log on to Passport Advantage.
- Select Software Downloads and Media Access.
- Select Program offering and agreement number, and click Continue.
- Enter the part description or part number, and click Finder. Optionally, you can click the alphabetical order list to display and view the product by name.
- Select All Operating Systems in the Operating system field, and All Languages in the Languages field. Then, click Go.
- If you want to download the individual media from the list, click Select individual files to expand the list.
- Verify the package(s) that you want to download, select Download, and download the files to the directory of your liking.
Upload the ADCD package(s).
Now that you have the package(s) you want, you need to upload them to your VM in Azure.
- Initiate a ssh session with the Ubuntu VM you created. You can get this from the Azure portal by navigating to the VM, selecting the overview blade, and then selecting Connect.
- Select the SSH tab then copy the ssh command to the clipboard.
- Log in with the credentials using your SSH client of choice. I am using the Linux extensions for Windows 10, which adds the bash shell to the Windows command prompt, but Putty would work just as well.
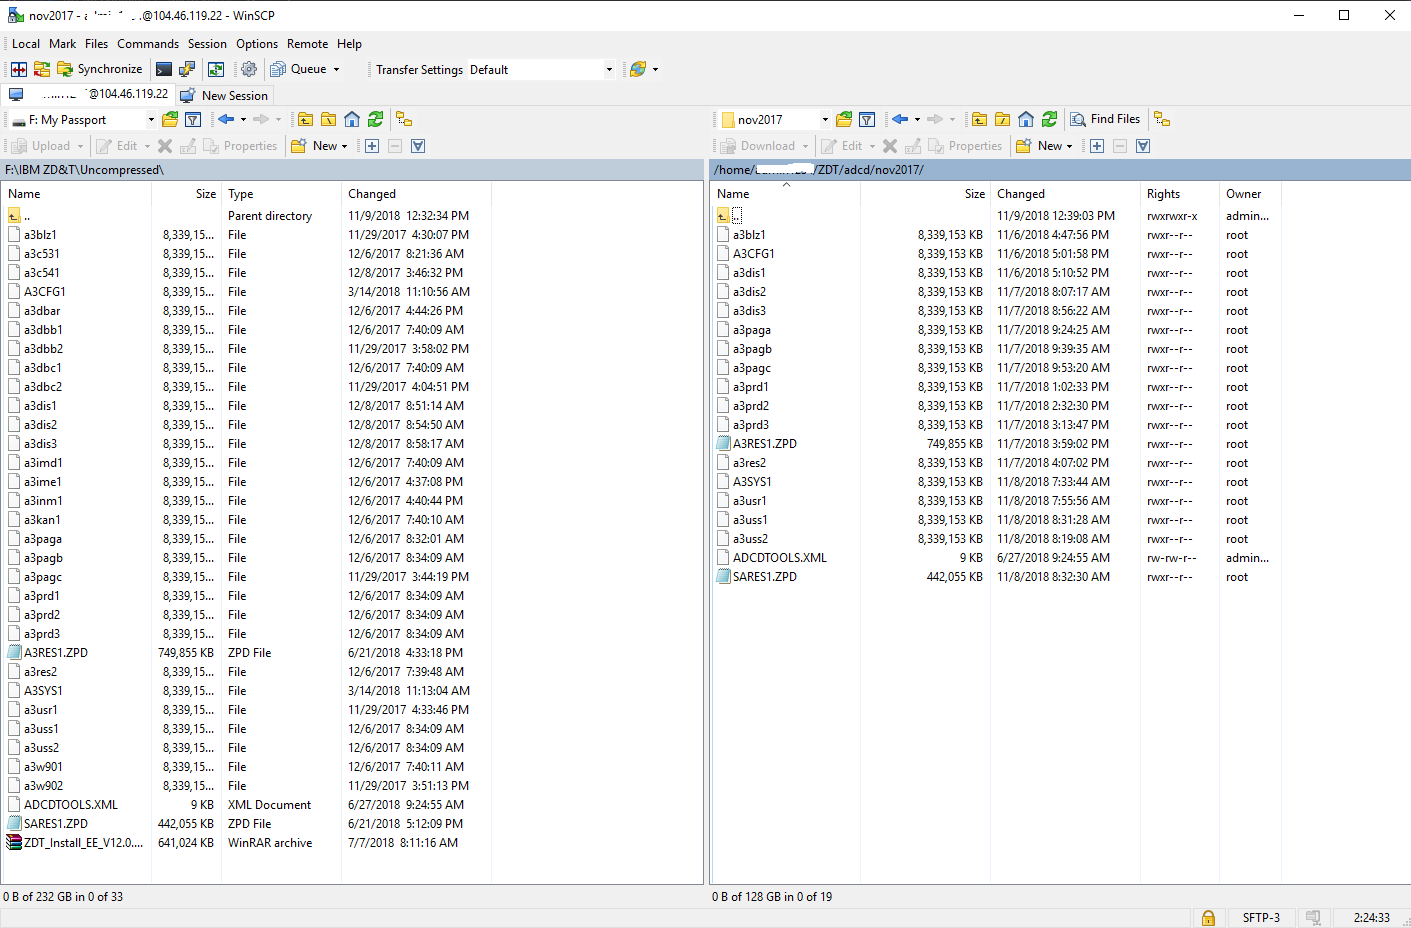
- Once logged in, you need to create a directory to upload the IBM packages. I created the following /home/(Your user id)/ZDT/adcd/nov2017/volumes this is where you will upload the packages. I will explain the path later in the post. Keep in mind Linux is case sensitive.
- Since I am using Windows and need to upload about 20 files, I'm going to use my favorite tool for this WinSCP. Since scp is a part of ssh, it will use port 22, which is what ssh uses.
- If you are on a different local machine (that is, Mac or Ubuntu) you can just type the scp command in via your ssh session. Here is the syntax for the scp command.
- Using either tool, initiate the upload to the Azure VM directory. This will become the image storage for IBM zD&T.
- Very important: Make sure that ADCDTOOLS.XML is included in the upload to the home/(Your user id)/ZDT/adcd/nov2017 directory. You will need it later.
- Since these files are rather large, this part of the walk through will take a while depending on your connection to Azure.
- When the uploads are complete, navigate to the volumes directory and decompress all of the gz volumes.
- gunzip *.gz
Configure Image Storage
Now that we have the package(s) uploaded, we need to configure IBM zD&T to use them via Image Storage. This is a process within IBM zD&T that will allow us to mount and use the images. It can use SSH or FTP.
- First you need to start the zDTServer. To do this you need to be at the root level. Enter
- sudo su - and then
- /opt/ibm/zDT/bin/startServer
- After the command runs, it will present you with the URL for accessing the web server. It will be similar to https://(your VM Name or IP address):9443/ZDTMC/index.html. Remember your web access will be using port 9443. Use this to log on to the web server. The User ID for ZD&T is zdtadmin and the password is password.

- Now from the Quick Start page select Image Storage in the Configure window.
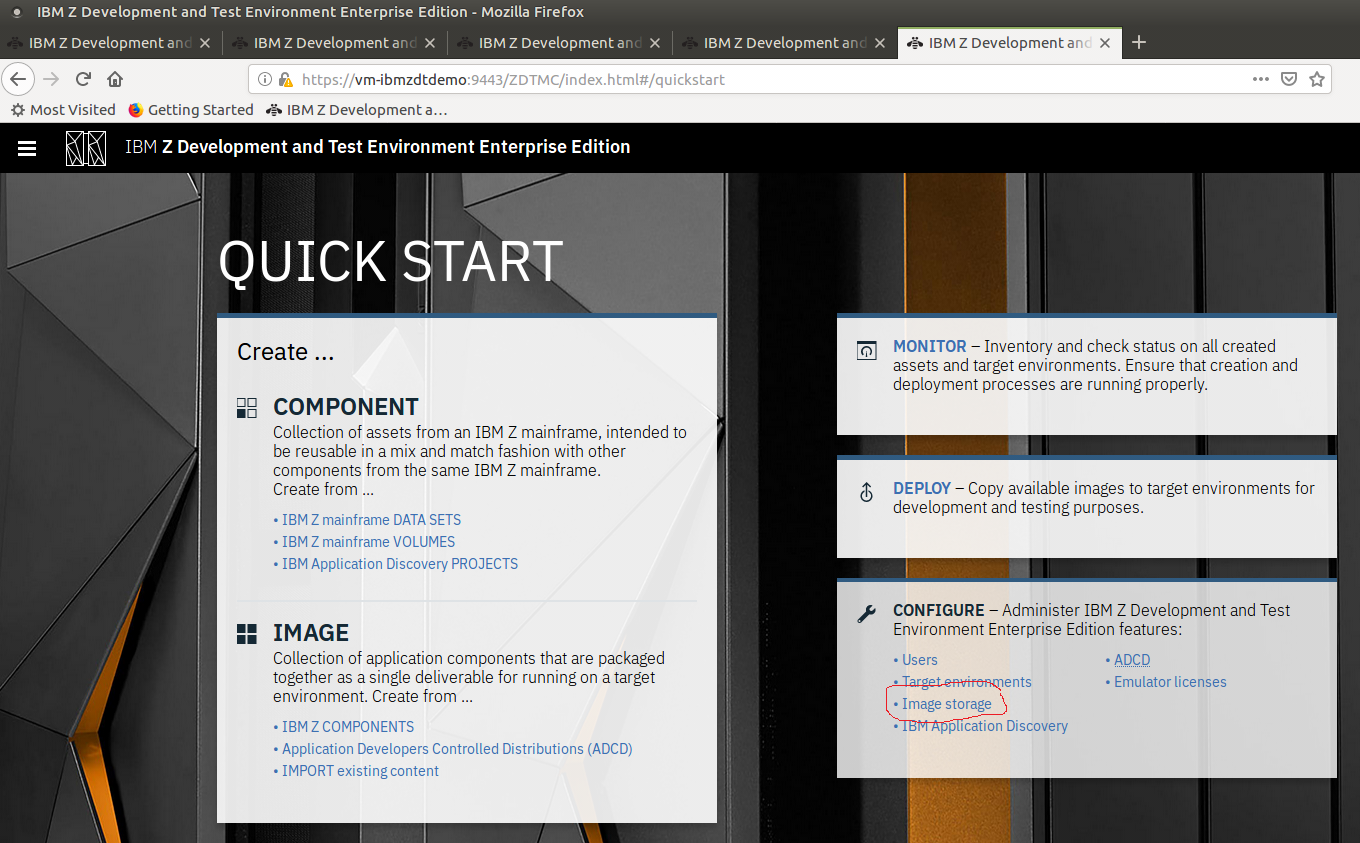
- On the Configure image storage page, select SSH File Transfer Protocol, enter Localhost for the Host Name and the directory path for where you uploaded the images. I used /home/(Your user id)/ZDT/adcd/nov2017/volumes.
- You will also need to enter the User ID and password for the VM (i.e. not for ZD&T).
- Test the Connection to make sure you have access and then select Save to save the Configuration.
Configure Target Environments
Now that you have the package(s) uploaded, you need to configure IBM zD&T Target Environment. This is the emulated hosted environment your images will run in.
- Now go back to the Quick Start page and select Target environments from the Configure Window.
- Next from the Configure target environments page, select Add Target.
- Currently IBM supports two types of environments: Linux and Cloud(OpenStack). Lets select Linux since that is our OS.
- On the Add target environment windows, enter localhost for the Host name and keep the SSH port with 22.
- Enter a label for the environment. I choose MyCICS.

Configure ADCD and Deploy
Now that you have the package(s) uploaded and the Target Environment Configured, you need to configure IBM zD&T to use them via Image Storage. This is a process within IBM zD&T that will allow you to mount and use the images. It can use SSH or FTP.
- Go back to the Quick Start page and select ADCD from the Configure Window.
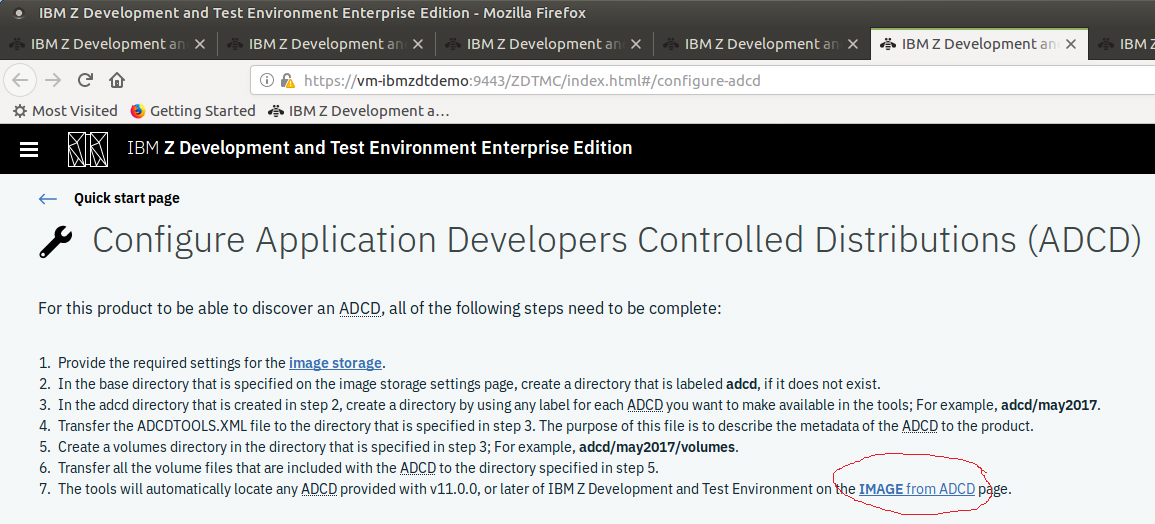
- You will see the steps that need to be competed before we can mount an ADCD package. This explains why we named the target directory the way we did in step 2.
- Now if the images were uploaded to the proper directories, we should be able to select IMAGE from ADCD and the bottom of the page.
Create the Image
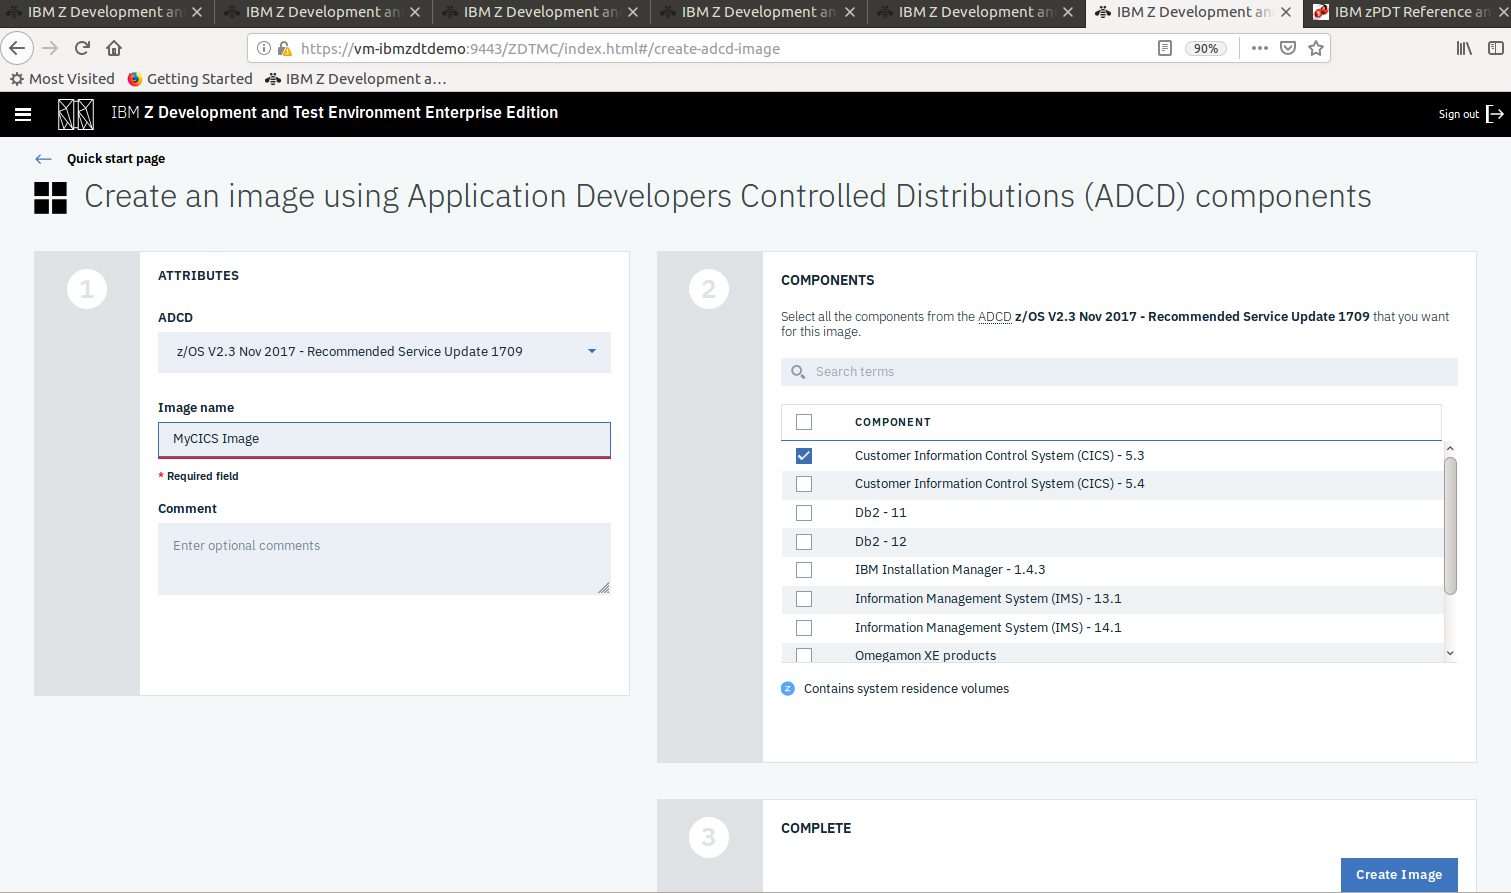
- This will take us to the Create an image using ADCD Components page where you can select the volume (nov2017 in this case) and the different packages that are in that volume. For this walk through, select Customer Information Control System (CICS) - 5.3.
- Enter a Name for the image.
- Now select Create Image at the bottom of the page.
- You should see window telling you the image was deployed successfully giving you the option to Create Another Image, Monitor and Manage the image or Deploy images.
- Lets choose Deploy images.
- Next, on the Deploy an image to a target environment, select the image you created on the previous page (MyCICS Image) and the Target Environment we created in Step 4 (MyCICS).
- On the next screen you need to give it your credentials for the VM (i.e. not ztadmin).
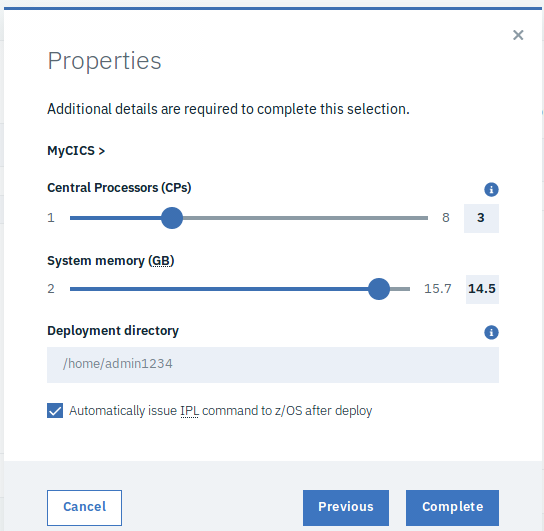
- Now we need to configure how many CPUs, how much memory and the deployment directory for the running image . Since this is a demo, keep it small.
- Make sure the box is selected for Automatically issue IPL command to z/OS after deploy.
- Select Complete.
- Select Deploy Image from the Deploy an image to a target environment page.
- At this point, your image should deploy and be about to by mounted by a 3270 terminal emulator.
- One of the errors you might run into is not having enough disk space. The region requires 151 Gb.
Congratulations, you are now running an IBM Mainframe Environment in Azure. If you have any questions, email at sread@microsoft.com.
See Also
AzureCAT Guidance
"Hands-on solutions, with our heads in the Cloud!"
Comments
- Anonymous
December 18, 2018
I added the "See Also" link to the Mainframe Migration portal: https://blogs.msdn.microsoft.com/azurecat/2018/11/16/mainframe-migration-to-azure-portal/