Customizing the recovery partition after upgrading the OS from Windows 8.1 to Windows 10
Hi Everyone, my name is Suganya and I am from the Windows Devices and Deployment Team. I would like to discuss one of the common issues customers face today; “Customizing the recovery partition after upgrading from Windows 8.1 to Windows 10”.
What is Windows RE and why is it used?
The Windows Recovery Environment (Windows RE) is a recovery environment that can repair common causes of unbootable operating systems. Windows RE is based on Windows Preinstallation Environment (Windows PE), and can be customized with additional drivers, languages, Windows PE Optional Components, and other troubleshooting and diagnostic tools. By default, Windows RE is preloaded into the Windows 8.1 and Windows Server 2012 R2 installations. (For more information please refer to the following article:
Windows Recovery Environment (Windows RE) Overview
https://technet.microsoft.com/en-in/library/hh825173.aspx
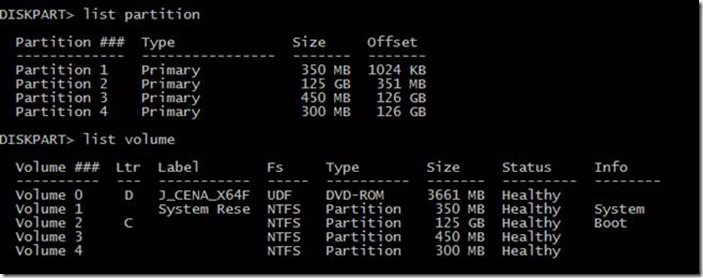
Consider the following scenario: You are planning an upgrade from Windows 8.1 to Windows 10. Before upgrading the OS, you see the following partitions in the diskpart:
- System reserved partition (350 MB)
- OS partition (126 GB)
- Recovery partition (300 MB)
After the upgrade you see the following partitions:
- Recovery partition from the old OS (300 MB)
- System reserved partition (350 MB)
- OS partition (125GB)
- New Recovery partition (450MB)
Now we have two recovery partitions, but we would like to only have one and customize the partition based on our requirements.
Delete both of the current recovery partitions on the drive and follow these steps to create a new recovery partition and customize it.
- Open the command prompt with admin privileges and run the following commands:
- Type diskpart
- Sel disk 0
- create partition primary size=450
- format quick fs=ntfs label="Recovery tools"
- assign letter="R" (This is assuming that the drive letter R is not already in use)
- Create the folders “Recovery” and “WindowsRE” on the R:\ drive.
Use the Windows 10 ISO to copy the winre.wim to a local drive using the following command:
- dism /mount-wim /wimfile:"D:\sources\install.wim" /index:1 /mountdir:C:\test\ /readonly
You will now have the winre.wim file in the following location: “C:\Test\Windows\System32\Recovery”
- Copy the winre.wim to the c:\perflogs folder
- Unmount the image with this command: dism /unmount-wim /mountdir:c:\test /discard
Note: This is an example as drive letters may differ in your environment. Verify drive letters in WinRE with Diskpart.
- Copy the Winre.wim to the “R:\Recovery\WindowsRE” folder.
Now, to configure the Windows® Recovery Environment, run the following command.
- reagentc /setreimage /path R:\Recovery\WindowsRE
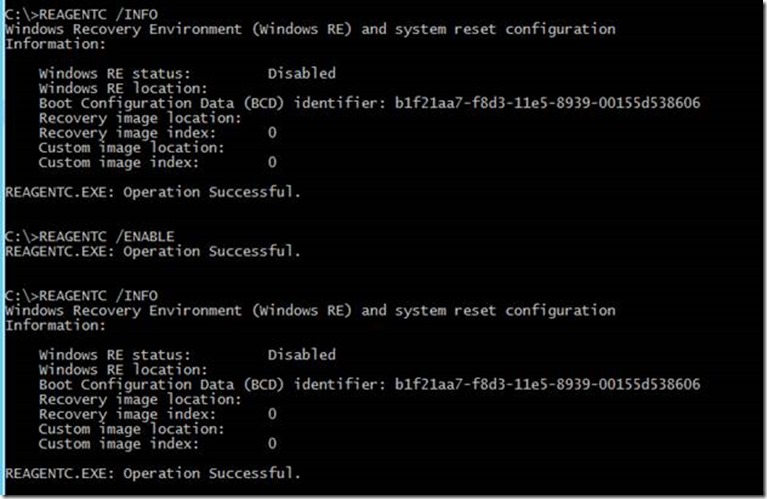
Now if you run the command “reagentc /info” from a command prompt it shows the Status as Disabled. When you enable it using the command “reagentc /enable”, the Status will still show as Disabled.
This can happen if the Windows Boot Loader is not updated with the correct device information. You will have to edit the recovery.xml which is located in C:\WINDOWS\SYSTEM32\RECOVERY as it contains the older WinRE and OS image configurations. You will have to give everyone full control for the XML file before copying the following lines to the file.
Reagent.xml should be edited to reflect these changes:
<?xml version='1.0' encoding='utf-8'?>
<WindowsRE version="2.0">
<WinreBCD id=""/>
<WinreLocation path="" id="0" offset="0"/>
<ImageLocation path="" id="0" offset="0"/>
<PBRImageLocation path="" id="0" offset="0" index="0"/>
<PBRCustomImageLocation path="" id="0" offset="0" index="0"/>
<InstallState state="0"/>
<OsInstallAvailable state="0"/>
<CustomImageAvailable state="0"/>
<WinREStaged state="0"/>
<ScheduledOperation state="4"/>
<OperationParam path=""/>
<OsBuildVersion path=""/>
<OemTool state="0"/>
</WindowsRE>
Copy the edited reagent.xml to R:\Recovery\WindowsRE. You will need to set the location of the Windows RE boot image using the following command:
- Reagentc /setreimage /path R:\RECOVERY\WINDOWSRE /target c:\windows
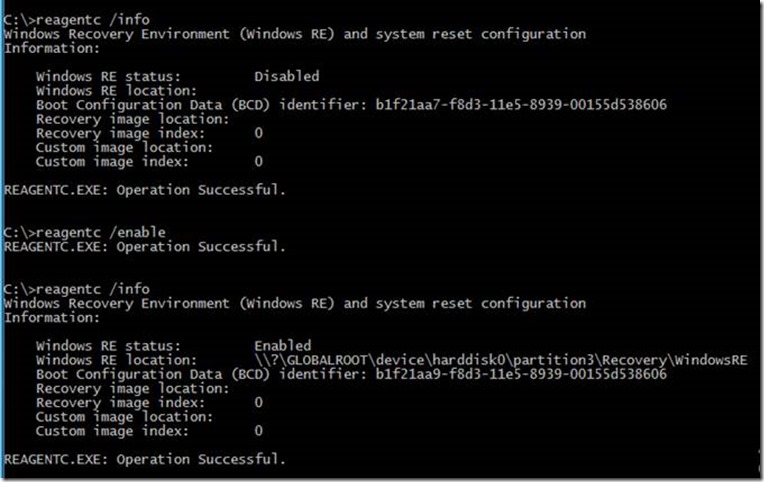
When you run the command “reagent /info”, you will still see the Status as Disabled. When you run the command “reagentc /enable”, the Windows RE Status will now show as Enabled.
Also when you check the output of the command “bcdedit /enum all”, you can see that the windows boot loader is updated with the correct device information.
Now you know how to customize the recovery partitions. For more information, please refer to the article:
Windows PE (WinPE)
https://msdn.microsoft.com/en-us/library/windows/hardware/dn938389(v=vs.85).aspx
I hope this was helpful.
Suganya Natarajan
Technical Advisor
Windows Devices and Deployment Team
Comments
- Anonymous
April 27, 2016
Suganya,It appears that the winre.wim is missing from the 1511 ISO.- Anonymous
April 27, 2016
PS C:\test\Windows\System32\Recovery> dir Directory: C:\test\Windows\System32\RecoveryMode LastWriteTime Length Name---- ------------- ------ -----a---- 2/13/2016 7:24 1013 ReAgent.xml - Anonymous
May 31, 2016
Hi Will. The doing an "attrib winre.wim" shows it as having System and Hidden attributes. Do an "attrib winre.wim -s -h" and that should do it.
- Anonymous
- Anonymous
April 27, 2016
hi Will,Use the Windows 10 ISO to copy the winre.wim to a local drive using the following command:•dism /mount-wim /wimfile:”D:\sources\install.wim” /index:1 /mountdir:C:\test\ /readonlyYou will now have the winre.wim file in the following location: “C:\Test\Windows\System32\Recovery” - Anonymous
April 28, 2016
Do a "dir -force" on that directory... I suspect the file is marked "system readonly", which isn't shown by default. - Anonymous
April 28, 2016
Very thorough work you've done here. I upgraded to W10 during beta and since then, my external and internal auto-backup systems have had a rather tenacious bug. Surely there will be a user friendly fix for this in a forthcoming W10 update... right? - Anonymous
April 29, 2016
Question: Once you realign the proper WinRE, will subsequent Windows major version updates also update this partition, or is this going to have to be done with each major release of WinX? - Anonymous
May 31, 2016
Didn't work, it still shows up as disabled. However, there are boot entries that point to c:\Recovery, revealed by bcdedit /enum all. - Anonymous
June 02, 2016
I use to be able to add a custom bootkey to the bootmgr in the BCD store, but when I configure the BCD on a Windows 10 machine and press the custom bootkey up rebooting the machine - it freezes. Is that ability removed from the bcedit.exe and reagent.exe? The only ways I read that allow you boot to the recovery environment besides the default methods are as follows:1. reagentc.exe /boottore2. edit the bootmenupolicy legacy in the BCD store, so you can press F8 and it will list the recovery environmentIs there any other way of invoking the recovery environment by pressing a custom bootkey or programmatically? - Anonymous
June 04, 2017
hi,I have downloaded the windows.iso through media creation tool and on mounting it doesn't seem to have the install.wim file instead it has a install.esd file inside the sources folder. On using the command - dism /mount-wim /wimfile:”D:\sources\install.wim” /index:1 /mountdir:C:\test\ /readonlyit gives error:2 = the system cannot find the file specified.Can anyone please guide me through what to do now- Anonymous
June 04, 2017
I am currently converting the esm to wim is there any better way?- Anonymous
June 04, 2017
ohk nvm fixed
- Anonymous
- Anonymous
- Anonymous
November 14, 2017
Hi,I am using Windows Server 2012 R2 Essentials to manage all my computer backups. The clients are Windows 10 Pro (1703) based computers with MBR (BIOS) or GPT (UEFI) partitions, depending on the computer hardware. As a result, it seems that WS 2012 R2 Essentials cannot restore the Windows 10 installation in a way that all the features are working.I was testing a scenario of total hard drive failure, and did the bare metal restore. Luckily I was able to boot the computers after restoring the partitions. But I got into the situation that I lost all the Reset My PC features, and this is due to partition ID and boot manager ID changes. The only differences I noticed that Windows Server 2012 R2 Essentials client restore service does not give the correct IDs to the Recovery Partitions, and I needed to set up the partition IDs by using diskpart. One time I had to manually give BCDBOOT C:\Windows on an UEFI-based computer to make Windows bootable again. Additionally, The restore service cannot restore the partitions at all on an empty GPT disk without any partitions. By creating the default partition layout the service can restore the Windows and recovery partition contents correctly.I took all the steps described above to restore the WinRE, and managed to get it work. I continued the tests, and performed the total Reset My PC successfully.But, there is something in the instructions above that are different to Windows installation process. The steps above require that I have a drive letter assigned to the recovery partition (R:). If I remove the drive letter assignment -- as this is the case for the Recovery Partitions -- the reagentc /info shows the Windows RE is disabled, and I am unable to reactivate the RE.I checked the bcdedit -enum all -v for a default Windows 10 installation on an UEFI computer and it shows the reference to recovery partition asWindows Boot Loader-------------------identifier {ca885bb6-c366-11e7-82f7-a10464345fbc}device ramdisk=[\Device\HarddiskVolume4]\Recovery\WindowsRE\Winre.wim,{ca885bb7-c366-11e7-82f7-a10464345fbc}How can I refer to my recovery partition using the \Device\HarddiskVolume4 in Reagentc /SetREImage ? It does not accept "Reagentc /SetREImage /Path \Device\HarddiskVolume4\Recovery\WindowsRE /target c:\windows" at allDoes Microsoft have any plans to fix the Client restore process in WS2012R2Essentials for the Windows 10 clients so that the partitions are created on UEFI/BIOS computers and the RE is activated automatically?


