SSL for Web Sites on Windows Server for Hosting Service Providers
Microsoft is bringing Windows Azure Web Sites, Virtual Machines, Service Management Portal and API to Windows Server, enabling service providers to easily deliver high-density website hosting and Infrastructure as a Service scenarios in a Windows Server-based environment.
For more information regarding this exciting product, check out the document here.
One of the coolest feature for this products is SSL. Instead of using a wild card certificate for all web sites, with the Centralized Certificate Store feature introduced by IIS 8, it allows customer using their own certificate for SSL web site which exactly match their web site DNS name. This significantly brings the SSL web sites density to a higher level.
Instead of setup secure connection between clients and web workers directly, we are using SSL-OFF-Loading with ARR. The secure connection is setup between clients and sites Front End. Front End has Web Sites-specific version of Application Request Routing (ARR) installed which accepts web requests from clients, routes requests to Web Workers and returns web worker responses to clients.
Won has a blog talked about this years ago.
https://blogs.iis.net/wonyoo/archive/2008/07/10/ssl-off-loading-in-application-request-routing.aspx
On Front End, two SSL Certificate bindings were created while installation. Here is a screenshot of these two bindings.
As you can see, one is Central Certificate Store binding, and another one is IP:port binding which bind to 0.0.0.0:443. This binding uses a self-signed certificate issued to “Default”.
You can find the certificate on Frontend role’s computer certificate store.
Also, you can find the CCS (Central Certificate Store ) settings on Frontend role as well. It is stored under HKLM\SOFTWARE\Microsoft\IIS\CentralCertProvider.
On IIS 8, HTTP.SYS uses follow order to setup a secure connection.
Order |
Bindings |
Description |
1 |
IP:Port |
An exact IP:Port SSL configuration is found. MY/LM or MY/Web Hosting certificate stores are used. |
2 |
Hostname:Port |
An exact Hostname:Port SSL configuration is found. This is the SNI configuration and is applied only if SSL connection is initiated by SNI capable client. MY/LM or MY/Web Hosting certificate stores are used. |
3 |
CCS:Port |
This is the Centralized SSL Certificate Support (CCS) configuration. In this configuration, CCS provider is used to locate the SSL certificate. By default, IIS provides a file based CCS provider. |
4 |
[::]:Port |
IPv6 wildcard match and the connection must be IPv6. |
5 |
0.0.0.0:Port |
IPv4 wildcard match and the connection can be either IPv4 or IPv6. |
So, during SSL connection setup, HTTP.SYS first check CCS binding and looking for a certificate match with the web site host name in the centralized certificate store (priority 3) . If found, then this certificate will be used for the HTTPS communication. Otherwise, it falls to the 0.0.0.0:443 (priority 5) binding, a default installed certificate will be used.
This means, for Web Sites on Windows Server for Hosting Service Providers, SSL is supported by default. You can access your site using HTTPS without upload a certificate.
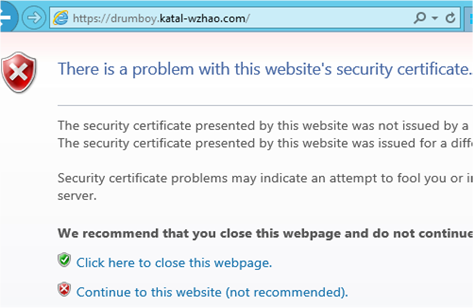
I created an empty site and the access with HTTPS. I got this warning. Since I don’t upload my own certificate. The 0.0.0.0:443 binding is used and the “Default” certificate used by this binding is not match my site name.
Definitely, this gives bad experience to your customer. In addition, you got similar warnings when:
- You publish your site via webDeploy
- Publish with GIT
- Other places where HTTPS get involved.
Here is the steps to resolve this issue.
1. Create a wildcard certificate. For example, if you cloud DNS suffix is katal.com, you need create a wildcard certificate with CN=*.katal.com.
2. Logon to Frontend role with admin account
3. Run “netsh http delete sslcert ipport=0.0.0.0:443” to delete the original binding.
4. Run “netsh http add sslcert ipport=0.0.0.0:443 certhash=[hash value of *.katal.com certificate] appid={4dc3e181-e14b-4a21-b022-59fc669b0914} certstorename=MY”
5. Now, you should never see the certificate error.
Note 1: If your CA is not listed in the Windows trusted CA list, you need to import the CA root certificate to the Trusted Root Certification Authorities Store on Frontend role and client machines.
Note 2: The default installation installs a “Default” certificate and creates default SSL bindings on management portal and SitesRestAPI roles as well. You can use the same way to replace the in-secure self-signed “Default” certificate.
See you next time,
Wei


