Een AD FS-implementatie instellen met AlwaysOn-beschikbaarheidsgroepen
Een maximaal beschikbare geografisch gedistribueerde topologie biedt:
- Verwijdering van een single point of failure: Met failovermogelijkheden kunt u een maximaal beschikbare AD FS-infrastructuur bereiken, zelfs als een van de datacenters in een deel van een wereldbol uitvalt.
- Verbeterde prestaties: u kunt de voorgestelde implementatie gebruiken om een krachtige AD FS-infrastructuur te bieden
AD FS kan worden geconfigureerd voor een maximaal beschikbaar geografisch gedistribueerd scenario. De volgende handleiding doorloopt een overzicht van AD FS met SQL AlwaysOn-beschikbaarheidsgroepen en biedt overwegingen en richtlijnen voor de implementatie.
Overzicht - AlwaysOn-beschikbaarheidsgroepen
Zie Overzicht van AlwaysOn-beschikbaarheidsgroepen (SQL Server) voor meer informatie over AlwaysOn-beschikbaarheidsgroepen
Vanuit het perspectief van de knooppunten van een AD FS SQL Server-farm vervangt de AlwaysOn-beschikbaarheidsgroep het enkele SQL Server-exemplaar als de beleids-/artefactdatabase. De listener van de beschikbaarheidsgroep is wat de client (de AD FS-beveiligingstokenservice) gebruikt om verbinding te maken met SQL. In het volgende diagram ziet u een AD FS SQL Server-farm met AlwaysOn-beschikbaarheidsgroep.
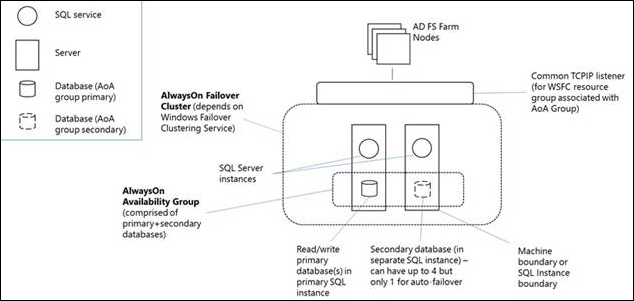
Een Always On-beschikbaarheidsgroep (AG) bestaat uit een of meer gebruikersdatabases die gezamenlijk een failover uitvoeren. Een beschikbaarheidsgroep bestaat uit een primaire beschikbaarheidsreplica en een tot vier secundaire replica's die worden onderhouden via gegevensverplaatsing op basis van SQL Server-logboekgegevens voor gegevensbeveiliging zonder dat er gedeelde opslag nodig is. Elke replica wordt gehost door een exemplaar van SQL Server op een ander knooppunt van de WSFC. De beschikbaarheidsgroep en een bijbehorende naam van een virtueel netwerk worden geregistreerd als resources in het WSFC-cluster.
Een listener van een beschikbaarheidsgroep op het knooppunt van de primaire replica reageert op binnenkomende clientaanvragen om verbinding te maken met de naam van het virtuele netwerk. Op basis van kenmerken in de verbindingsreeks wordt elke aanvraag omgeleid naar het juiste SQL Server-exemplaar. In het geval van een failover wordt WSFC ingezet om een secundaire replica op een ander SQL Server-exemplaar te herconfigureren zodat deze de primaire replica van de beschikbaarheidsgroep wordt, in plaats van het eigendom van gedeelde fysieke resources over te dragen naar een ander knooppunt. De resource voor de naam van het virtuele netwerk van de beschikbaarheidsgroep wordt vervolgens overgebracht naar dat exemplaar. Op elk moment kan slechts één SQL Server-exemplaar de primaire replica van de databases van een beschikbaarheidsgroep hosten. Alle gekoppelde secundaire replica's moeten zich op een afzonderlijk exemplaar bevinden en elk exemplaar moet zich op afzonderlijke fysieke knooppunten bevinden.
Notitie
Als machines worden uitgevoerd in Azure, stelt u de virtuele Azure-machines in om de listenerconfiguratie in te schakelen voor communicatie met AlwaysOn-beschikbaarheidsgroepen. Voor meer informatie, Virtuele machines: SQL Always On Listener.
Zie Overzicht van AlwaysOn-beschikbaarheidsgroepen (SQL Server)voor een extra overzicht van AlwaysOn-beschikbaarheidsgroepen.
Notitie
Als de organisatie failover voor meerdere datacenters vereist, is het raadzaam om een artefactdatabase in elk datacenter te maken en een achtergrondcache in te schakelen die de latentie tijdens de verwerking van aanvragen vermindert. Volg de instructies om dit te doen in SQL afstemmen en latentie verminderen.
Implementatierichtlijnen
- Overweeg de juiste database voor de doelstellingen van de AD FS-implementatie. AD FS maakt gebruik van een database voor het opslaan van configuratie en in sommige gevallen transactionele gegevens met betrekking tot de Federation-service. U kunt AD FS-software gebruiken om de ingebouwde Windows Internal Database (WID) of Microsoft SQL Server 2008 of hoger te selecteren om de gegevens op te slaan in de federatieservice. In de volgende tabel worden de verschillen in ondersteunde functies tussen een WID- en SQL-database beschreven.
| Categorie | Eigenschap | Ondersteund door WID | Ondersteund door SQL |
|---|---|---|---|
| AD FS-functies | Implementatie van federatieserverfarm | Ja | Ja |
| AD FS-functies | SAML-artefactomzetting. Opmerking: dit is niet gebruikelijk voor SAML-toepassingen | Nee. | Ja |
| AD FS-functies | Detectie van het opnieuw afspelen van tokens met SAML/WS-Federation. Opmerking: alleen vereist wanneer AD FS tokens ontvangt van externe IDP's. Dit is niet vereist als AD FS niet fungeert als federatiepartner. | Nee. | Ja |
| Databasefuncties | Basisdatabaseredundantie met behulp van pull-replicatie, waarbij een of meer servers die een alleen-lezen kopie hosten van de databaseaanvraagwijzigingen die zijn aangebracht op een bronserver een lees-/schrijfkopie van de database hosten | Nee. | Nee. |
| Databasefuncties | Databaseredundantie met behulp van oplossingen voor hoge beschikbaarheid, zoals clustering of spiegeling (op de databaselaag) | Nee. | Ja |
| Aanvullende functies | OAuth-verificatiecodescenario | Ja | Ja |
Als u een grote organisatie bent met meer dan 100 vertrouwensrelaties die zowel hun interne gebruikers als externe gebruikers met eenmalige aanmelding toegang moeten bieden tot federatietoepassingen of -services, is SQL de aanbevolen optie.
Als u een organisatie bent met 100 of minder geconfigureerde vertrouwensrelaties, biedt WID redundantie van gegevens en federation-services (waarbij elke federatieserver wijzigingen repliceert naar andere federatieservers in dezelfde farm). WID biedt geen ondersteuning voor replay-detectie van tokens of artefactresoluties en heeft een limiet van 30 federatieservers. Ga naar hiervoor meer informatie over het plannen van uw implementatie.
Oplossingen voor hoge beschikbaarheid van SQL Server
Als u SQL Server gebruikt als uw AD FS-configuratiedatabase, kunt u georedundantie instellen voor uw AD FS-farm met behulp van SQL Server-replicatie. Met georedundantie worden gegevens tussen twee geografisch verre sites gerepliceerd, zodat toepassingen van de ene site naar de andere kunnen overschakelen. Op deze manier kunt u, in het geval van een storing van één site, nog steeds alle configuratiegegevens beschikbaar hebben op de tweede site. Als SQL de juiste database is voor uw implementatiedoelen, gaat u verder met deze implementatiehandleiding.
In deze handleiding wordt het volgende beschreven
- AD FS implementeren
- AD FS configureren voor het gebruik van een AlwaysOn-beschikbaarheidsgroepen
- De failoverclusterrol installeren
- Clustervalidatietests uitvoeren
- AlwaysOn-beschikbaarheidsgroepen inschakelen
- Back-up maken van AD FS-databases
- AlwaysOn-beschikbaarheidsgroepen maken
- Databases toevoegen op tweede knooppunt
- Een beschikbaarheidsreplica toevoegen aan een beschikbaarheidsgroep
- De SQL-verbindingsreeks bijwerken
AD FS implementeren
Notitie
Als machines worden uitgevoerd in Azure, moeten de virtuele machines op een specifieke manier worden geconfigureerd, zodat de listener kan communiceren met de AlwaysOn-beschikbaarheidsgroep. Zie Een load balancer configureren voor een beschikbaarheidsgroep op Azure SQL Server-VM's voor informatie over configuratie
In deze implementatiehandleiding ziet u een farm met twee knooppunten met twee SQL-servers als voorbeeld. Als u AD FS wilt implementeren, volgt u de eerste koppelingen hieronder om de AD FS-functieservice te installeren. Als u wilt configureren voor een AoA-groep, zijn er extra stappen voor de rol.
- een computer toevoegen aan een domein
- een SSL-certificaat inschrijven voor AD FS-
- de AD FS-functieservice installeren
AD FS configureren voor het gebruik van een AlwaysOn-beschikbaarheidsgroep
Voor het configureren van een AD FS-farm met AlwaysOn-beschikbaarheidsgroepen is een kleine wijziging in de AD FS-implementatieprocedure vereist. Zorg ervoor dat op elke serverinstantie dezelfde versie van SQL draait. Lees hierom de volledige lijst met vereisten, beperkingen en aanbevelingen voor AlwaysOn-beschikbaarheidsgroepen weer te geven.
- De databases die u wilt back-uppen, moeten worden gemaakt voordat de AlwaysOn-beschikbaarheidsgroepen kunnen worden geconfigureerd. AD FS maakt de databases als onderdeel van de installatie en initiële configuratie van het eerste federation-serviceknooppunt van een nieuwe AD FS SQL Server-farm. Geef de naam van de databasehost op voor de bestaande farm met behulp van SQL Server. Als onderdeel van de AD FS-configuratie moet u een SQL-verbindingsreeks opgeven, zodat u de eerste AD FS-farm moet configureren om rechtstreeks verbinding te maken met een SQL-exemplaar (dit is alleen tijdelijk). Zie Een federatieserver configurerenvoor specifieke richtlijnen voor het configureren van een AD FS-farmknooppunt, waaronder het configureren van een AD FS-farmknooppunt met een SQL-serververbindingsreeks.
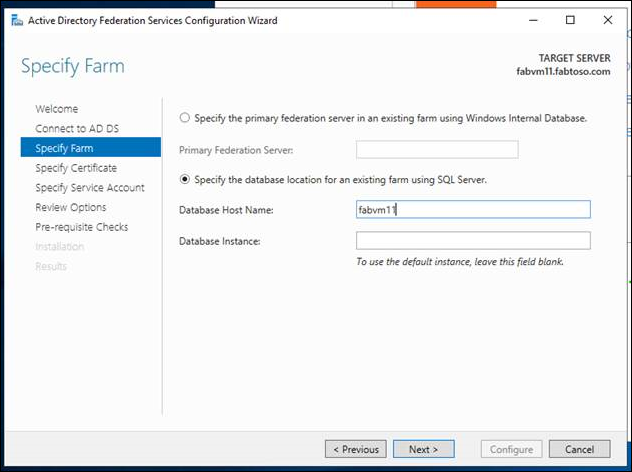 opgeven
- Controleer de verbinding met de database met behulp van SSMS en maak vervolgens verbinding met de hostnaam van de doeldatabase. Als u een ander knooppunt toevoegt aan de federatiefarm, maakt u verbinding met de doeldatabase.
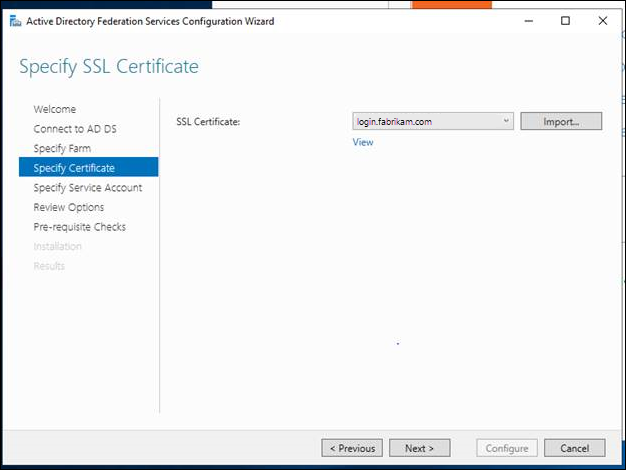
- Geef het SSL-certificaat voor de AD FS-farm op.
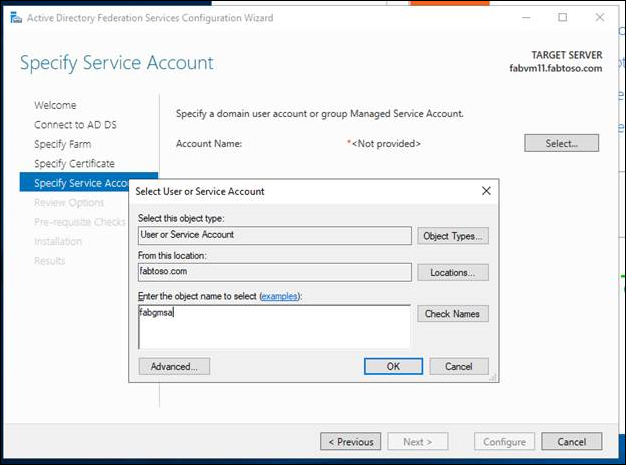
- Verbind de farm met een serviceaccount of gMSA.
- Voltooi de configuratie en installatie van de AD FS-farm.
Notitie
SQL Server moet worden uitgevoerd onder een domeinaccount voor de installatie van AlwaysOn-beschikbaarheidsgroepen. Het wordt standaard uitgevoerd als een lokaal systeem.
De rol voor failoverclustering installeren
De rol voor Windows Server-failoverclusters biedt meer informatie over Windows Server-failoverclusters.
- Start Server Manager.
- Selecteer Functies en onderdelen toevoegen in het menu Beheren.
- Selecteer Volgende op de pagina Voordat u begint.
- Selecteer op de pagina Installatietype selecteren de optie Installatie op basis van rollen of onderdelen en selecteer vervolgens Volgende.
- Selecteer op de pagina Doelserver selecteren de SQL-server waarop u de functie wilt installeren en selecteer vervolgens Volgende.
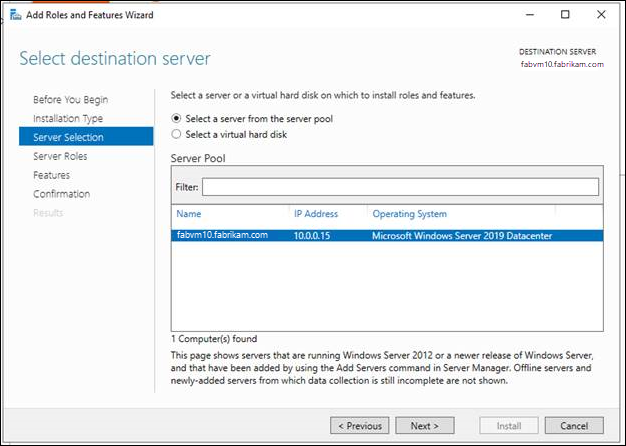
- Klik op Volgende op de pagina Serverrollen selecteren.
- Schakel op de pagina Functies selecteren het selectievakje Failover Clustering in.
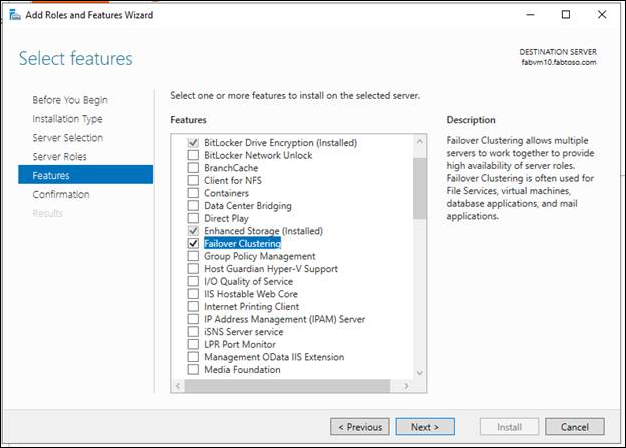
- Selecteer Installeren op de pagina Installatieselecties bevestigen. Het opnieuw opstarten van de server is niet vereist voor de functie Failoverclustering.
- Wanneer de installatie is voltooid, selecteert u Sluiten.
- Herhaal deze procedure op elke server die u wilt toevoegen als een failoverclusterknooppunt.
Clustervalidatietests uitvoeren
- Start Failoverclusterbeheer op een computer waarop de hulpprogramma's voor failoverclusterbeheer zijn geïnstalleerd vanuit de externe-serverbeheerprogramma's of op een server waarop u de functie Failoverclustering hebt geïnstalleerd. Als u dit wilt doen op een server, start u Serverbeheer, en selecteert u Failoverclusterbeheer in het menu Extra.
- Selecteer in het deelvenster Failoverclusterbeheer, onder beheer, de optie Configuratie valideren.
- Selecteer Volgende op de pagina Voordat u begint.
- Voer op de pagina Servers of een cluster selecteren in het vak Naam invoeren de NetBIOS-naam of de FQDN-naam in van een server die u wilt toevoegen als een failoverclusterknooppunt en selecteer vervolgens Toevoegen. Herhaal deze stap voor elke server die u wilt toevoegen. Als u meerdere servers tegelijk wilt toevoegen, scheidt u de namen door een komma of door een puntkomma. Typ bijvoorbeeld de namen in de notatie server1.contoso.com, server2.contoso.com. Wanneer u klaar bent, selecteert u Volgende.
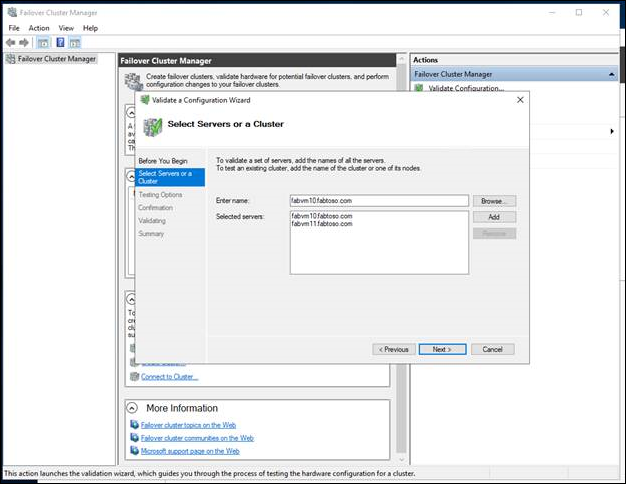
- Selecteer op de pagina Testopties alle tests uitvoeren (aanbevolen) en selecteer vervolgens Volgende.
- Selecteer Volgende op de bevestigingspagina. Op de pagina Valideren wordt de status van de uitgevoerde tests weergegeven.
- Voer een van de volgende handelingen uit op de pagina Samenvatting:
- Als de resultaten aangeven dat de tests zijn voltooid en dat de configuratie geschikt is voor clustering en u het cluster onmiddellijk wilt maken, controleert u of het selectievakje Nu het cluster maken met behulp van het gevalideerde knooppunt is ingeschakeld en selecteert u Voltooien. Ga vervolgens verder met stap 4 van de procedure voor het maken van het failovercluster.
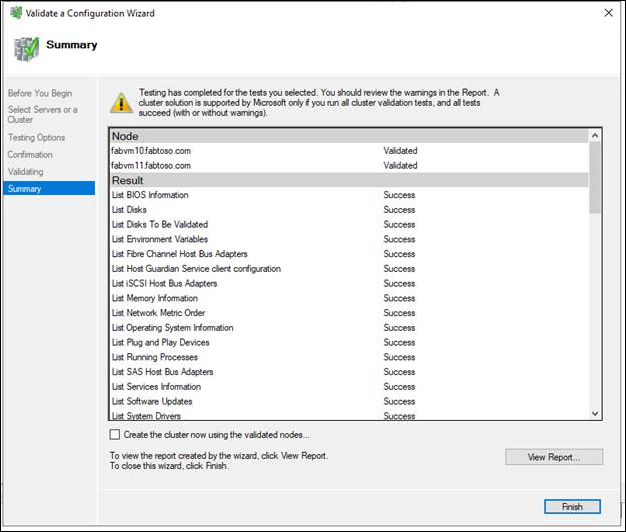
- Als de resultaten aangeven dat er waarschuwingen of fouten zijn opgetreden, selecteert u Rapport weergeven om de details weer te geven en te bepalen welke problemen moeten worden gecorrigeerd. Realiseer u dat een waarschuwing voor een bepaalde validatietest aangeeft dat dit aspect van het failovercluster kan worden ondersteund, maar mogelijk niet voldoet aan de aanbevolen aanbevolen procedures.
Notitie
Als u een waarschuwing ontvangt voor de test van de validatie van permanente reserveringen voor Opslagruimten, raadpleegt u het blogbericht waarin wordt aangegeven dat uw schijven geen ondersteuning bieden voor de permanente reserveringen voor Opslagruimten voor meer informatie. Zie Hardware valideren voor een failoverclustervoor meer informatie over hardwarevalidatietests.
Creëer het failovercluster
Als u deze stap wilt voltooien, moet u ervoor zorgen dat het gebruikersaccount waaraan u zich aanmeldt voldoet aan de vereisten die worden beschreven in de Controleer de vereisten sectie van dit onderwerp.
- Start Server Manager.
- Selecteer Failover Cluster Manager in het menu Extra.
- Selecteer in het venster Failoverclusterbeheer onder Beheer de optie Cluster maken. De wizard voor het maken van een cluster wordt geopend.
- Selecteer Volgende op de pagina Voordat u begint.
- Als de pagina Servers selecteren wordt weergegeven, voert u in het vak Naam invoeren de NetBIOS-naam of de volledig gekwalificeerde domeinnaam in van een server die u wilt toevoegen als failoverclusterknooppunt en selecteert u Vervolgens Toevoegen. Herhaal deze stap voor elke server die u wilt toevoegen. Als u meerdere servers tegelijk wilt toevoegen, scheidt u de namen door een komma of puntkomma. Voer bijvoorbeeld de namen in als server1.contoso.com; server2.contoso.com. Wanneer u klaar bent, selecteert u Volgende.
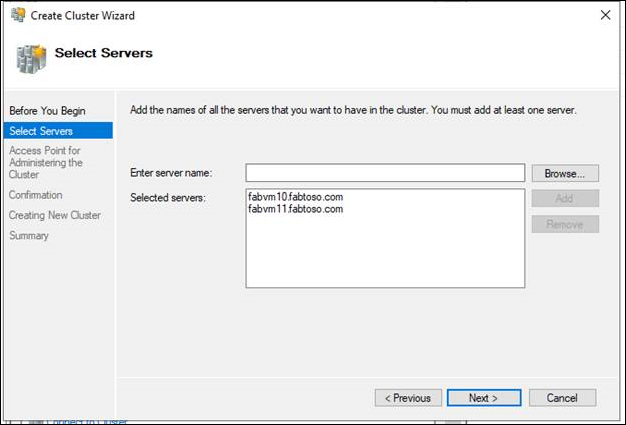
Notitie
Als u ervoor hebt gekozen om direct het cluster te maken na het uitvoeren van validatie in de -configuratievalidatieprocedure, ziet u de Selecteer Servers-pagina niet. De gevalideerde knooppunten worden automatisch toegevoegd aan de wizard Cluster maken, zodat u ze niet opnieuw hoeft in te voeren.
- Als u de validatie eerder hebt overgeslagen, wordt de pagina Validatiewaarschuwing weergegeven. We raden u ten zeerste aan om clustervalidatie uit te voeren. Alleen clusters die aan alle validatietests voldoen, worden ondersteund door Microsoft. Als u de validatietests wilt uitvoeren, selecteert u Ja en selecteert u vervolgens Volgende. Voltooi de wizard 'Configuratie valideren' zoals beschreven in 'Valideer de configuratie' .
- Ga als volgt te werk op de pagina Toegangspunt voor het beheren van het cluster:
- Voer in het vak Clusternaam de naam in die u wilt gebruiken om het cluster te beheren. Raadpleeg de volgende informatie voordat u dit doet:
- Tijdens het maken van het cluster wordt deze naam geregistreerd als het clustercomputerobject (ook wel het clusternaamobject of CNO genoemd) in AD DS. Als u een NetBIOS-naam voor het cluster opgeeft, wordt de CNO gemaakt op dezelfde locatie waar de computerobjecten voor de clusterknooppunten zich bevinden. Dit kan de Standaardcomputercontainer of een organisatie-eenheid zijn.
- Als u een andere locatie voor de CNO wilt opgeven, kunt u de onderscheiden naam van een organisatie-eenheid invoeren in het Clusternaamveld. Bijvoorbeeld: CN=ClusterName, OU=Clusters, DC=Contoso, DC=com.
- Als een domeinbeheerder de CNO in een andere organisatie-eenheid heeft voorbereid dan waar de clusterknooppunten zich bevinden, geeft u de onderscheidende naam op die de domeinbeheerder biedt.
- Als de server geen netwerkadapter heeft die is geconfigureerd voor het gebruik van DHCP, moet u een of meer statische IP-adressen configureren voor het failovercluster. Schakel het selectievakje in naast elk netwerk dat u wilt gebruiken voor clusterbeheer. Selecteer het veld Adres naast een geselecteerd netwerk en voer vervolgens het IP-adres in dat u wilt toewijzen aan het cluster. Dit IP-adres (of adressen) wordt gekoppeld aan de clusternaam in DNS (Domain Name System).
- Wanneer u klaar bent, selecteert u Volgende.
- Controleer de instellingen op de bevestigingspagina. Standaard is het selectievakje Alle in aanmerking komende opslag toevoegen aan het cluster ingeschakeld. Schakel dit selectievakje uit als u een van de volgende handelingen wilt uitvoeren:
- U wilt de opslag later configureren.
- U bent van plan om geclusterde opslagruimten te maken via Failoverclusterbeheer of via de Windows PowerShell-cmdlets voor failoverclustering en u hebt nog geen opslagruimten gemaakt in Bestands- en opslagservices. Zie Geclusterde opslagruimten implementerenvoor meer informatie.
- Selecteer Volgende om het failovercluster te maken.
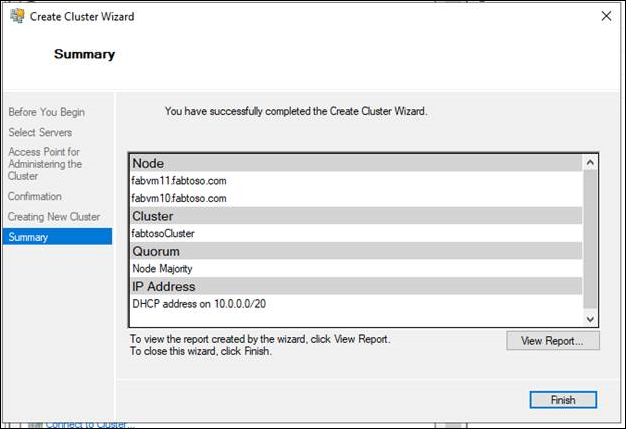
- Controleer op de pagina Samenvatting of het failovercluster met succes is aangemaakt. Als er waarschuwingen of fouten zijn opgetreden, bekijkt u de samenvattingsuitvoer of selecteert u Rapport weergeven om het volledige rapport weer te geven. Klik op Voltooien.
- Om te bevestigen dat het cluster is aangemaakt, controleer of de clusternaam wordt vermeld onder Failoverclusterbeheer in de navigatiestructuur. U kunt de clusternaam uitvouwen en vervolgens items selecteren onder Knooppunten, Opslag of Netwerken om de bijbehorende resources weer te geven. Het kan enige tijd duren voordat de clusternaam is gerepliceerd in DNS. Als u alle servers in Serverbeheer selecteert nadat de DNS-registratie en replicatie is geslaagd, moet de clusternaam worden vermeld als een server met de status Beheerbaarheid van Online.
AlwaysOn-beschikbaarheidsgroepen inschakelen met SQL Server Configuration Manager
- Maak verbinding met het WSFC-knooppunt (Windows Server Failover Cluster) dat als host fungeert voor het SQL Server-exemplaar waar u AlwaysOn-beschikbaarheidsgroepen wilt inschakelen.
- Wijs in het menu Start alle programma's aan, wijs Microsoft SQL Server aan, wijs Configuratiehulpprogramma's aan en klik op SQL Server Configuration Manager.
- Klik in SQL Server Configuration Manager op SQL Server Services, klik met de rechtermuisknop op SQL Server (
<instance name>), waarbij<instance name>de naam is van een lokale serverinstantie waarvoor u AlwaysOn-beschikbaarheidsgroepen wilt inschakelen en klik op Eigenschappen. - Selecteer het tabblad AlwaysOn Hoge beschikbaarheid.
- Controleer of het naamveld van het Windows-failovercluster de naam van het lokale failovercluster bevat. Als dit veld leeg is, ondersteunt deze serverinstantie momenteel geen Always On- beschikbaarheidsgroepen. De lokale computer is geen clusterknooppunt, het WSFC-cluster is afgesloten of deze editie van SQL Server die geen ondersteuning biedt voor AlwaysOn-beschikbaarheidsgroepen.
- Schakel het selectievakje AlwaysOn-beschikbaarheidsgroepen inschakelen in en klik op OK. Sql Server Configuration Manager slaat uw wijziging op. Vervolgens moet u de SQL Server-service handmatig opnieuw opstarten. Hiermee kunt u een herstarttijd kiezen die het beste is voor uw zakelijke vereisten. Wanneer de SQL Server-service opnieuw wordt gestart, wordt AlwaysOn ingeschakeld en wordt de eigenschap IsHadrEnabled-server ingesteld op 1.
AoA-
Back-up maken van AD FS-databases
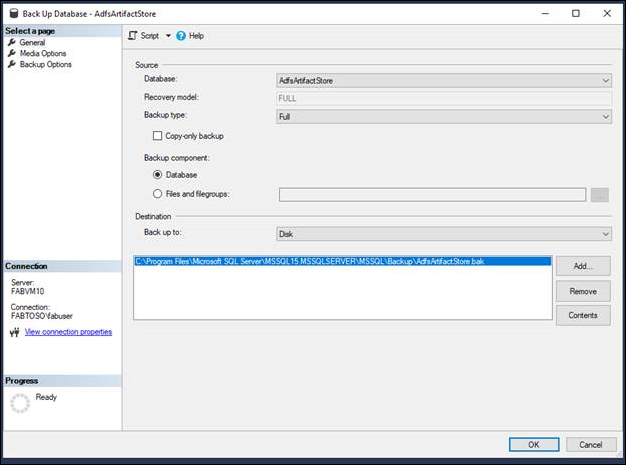
Maak een back-up van de AD FS-configuratie- en artefactdatabases met de volledige transactielogboeken. Plaats de back-up op de gekozen bestemming. Maak een back-up van de AD FS-artefact- en configuratiedatabases.
- Taken > Backup > Volledig > Toevoegen aan een back-upbestand > oké om aan te maken
Nieuwe beschikbaarheidsgroep maken
- Maak in Objectverkenner verbinding met het serverexemplaar dat de primaire replica host.
- Vouw het knooppunt AlwaysOn hoge beschikbaarheid en het knooppunt Beschikbaarheidsgroepen uit.
- Om de wizard Nieuwe beschikbaarheidsgroep te starten, selecteert u de opdracht Nieuwe beschikbaarheidsgroep-wizard.
- De eerste keer dat u deze wizard uitvoert, wordt er een introductiepagina weergegeven. Als u deze pagina in de toekomst wilt overslaan, kunt u op Deze pagina niet meer weergeven klikken. Nadat u deze pagina hebt gelezen, klikt u op Volgende.
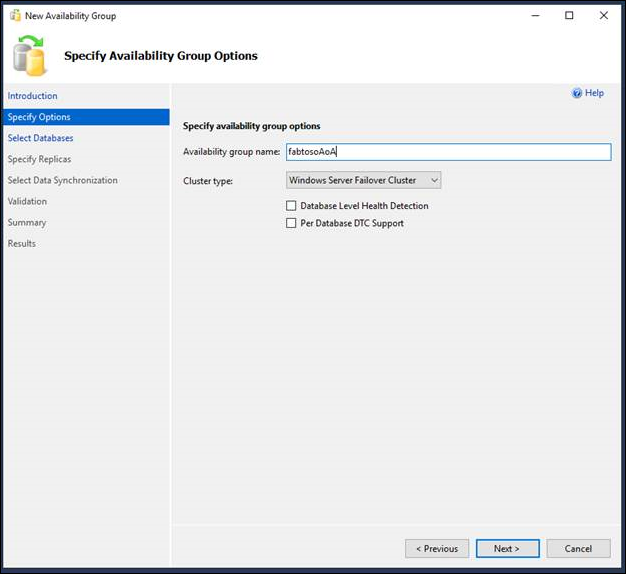
- Voer de naam van de nieuwe beschikbaarheidsgroep in het veld Beschikbaarheidsgroepnaam in op de pagina Opties voor beschikbaarheidsgroep opgeven. Deze naam moet een geldige SQL Server-id zijn die uniek is in het cluster en in uw domein als geheel. De maximale lengte voor de naam van een beschikbaarheidsgroep is 128 tekens. e
- Geef vervolgens het clustertype op. De mogelijke clustertypen zijn afhankelijk van de SQL Server-versie en het besturingssysteem. Kies WSFC, EXTERNAL of NONE. Zie Naam van beschikbaarheidsgroep opgeven pagina voor meer informatie
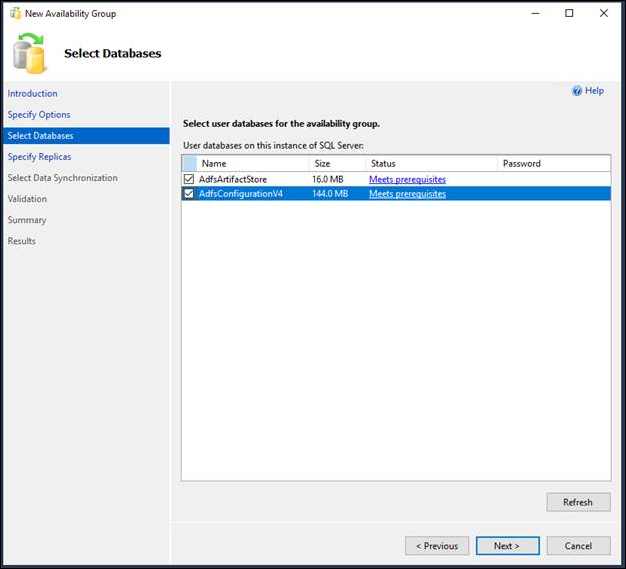
- Op de pagina Databases selecteren bevat het raster gebruikersdatabases op de verbonden serverexemplaar die in aanmerking komen als beschikbaarheidsdatabases. Selecteer een of meer van de vermelde databases om deel te nemen aan de nieuwe beschikbaarheidsgroep. Deze databases zijn in eerste instantie de eerste primaire databases. Voor elke vermelde database wordt in de kolom Grootte de databasegrootte weergegeven, indien bekend. De kolom Status geeft aan of een bepaalde database voldoet aan de vereisten voor beschikbaarheidsdatabases. Als niet aan de vereisten wordt voldaan, geeft een korte statusbeschrijving de reden aan waarom de database niet in aanmerking komt; Als het model bijvoorbeeld niet het volledige herstelmodel gebruikt. Klik op de statusbeschrijving voor meer informatie. Als u een database wijzigt zodat deze in aanmerking komt, klikt u op Vernieuwen om het databaseraster bij te werken. Als de database een databasehoofdsleutel bevat, voert u het wachtwoord voor de databasehoofdsleutel in de kolom Wachtwoord in.
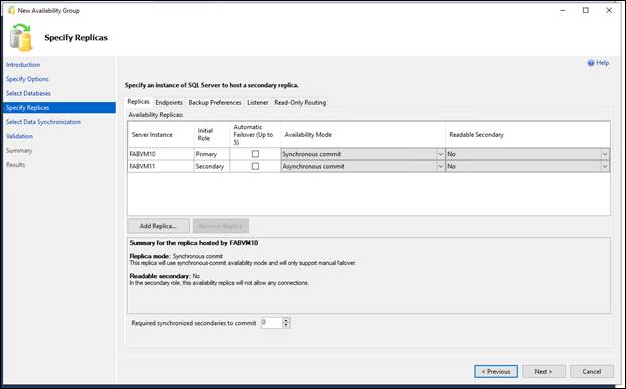
Op de pagina Replica's specificeren en configureren, geef een of meer replica's op en configureer deze voor de nieuwe beschikbaarheidsgroep. Deze pagina bevat vier tabbladen. In de volgende tabel worden deze tabbladen geïntroduceerd. Zie de Pagina Replica's opgeven (wizard Nieuwe beschikbaarheidsgroep: Wizard Replica toevoegen) onderwerp voor meer informatie.
| Tab | Korte beschrijving |
|---|---|
| Replica's | Gebruik dit tabblad om elk exemplaar van SQL Server op te geven dat als host fungeert voor een secundaire replica. Houd er rekening mee dat het serverexemplaar waarmee u momenteel verbonden bent, de primaire replica moet hosten. |
| Eindpunten | Gebruik dit tabblad om bestaande eindpunten voor databasespiegeling te controleren en als dit eindpunt ontbreekt op een serverexemplaar waarvan de serviceaccounts gebruikmaken van Windows-verificatie, om automatisch het eindpunt te maken. |
| Voorkeuren voor back-up | Gebruik dit tabblad om uw back-upvoorkeur op te geven voor de beschikbaarheidsgroep als geheel en uw back-upprioriteiten voor de afzonderlijke beschikbaarheidsreplica's. |
| Luisteraar | Gebruik dit tabblad om een listener voor een beschikbaarheidsgroep te maken. De wizard maakt standaard geen listener. |
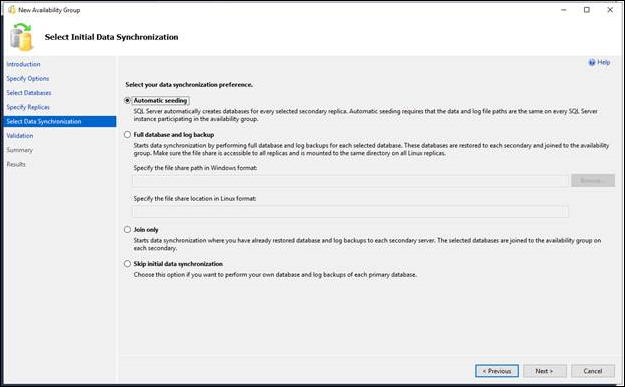
- Kies op de pagina Eerste gegevenssynchronisatie selecteren hoe u wilt dat uw nieuwe secundaire databases worden gemaakt en gekoppeld aan de beschikbaarheidsgroep. Kies een van de volgende opties:
- Automatisch verspreiden
- SQL Server maakt automatisch de secundaire replica's voor elke database in de groep. Automatische seeding vereist dat de gegevens- en logboekbestandspaden hetzelfde zijn op elk SQL Server-exemplaar dat deelneemt aan de groep. Beschikbaar op SQL Server 2016 (13.x) en hoger. Zie AlwaysOn-beschikbaarheidsgroepen automatisch initialiseren.
- Volledige database en logboekback-up
- Selecteer deze optie als uw omgeving voldoet aan de vereisten voor het automatisch starten van de initiële gegevenssynchronisatie (zie vereisten, beperkingen en aanbevelingen, eerder in dit onderwerp). Als u Volledig selecteert nadat u de beschikbaarheidsgroep hebt gemaakt, maakt de wizard een back-up van elke primaire database en het transactielogboek naar een netwerkshare en herstelt u de back-ups op elk serverexemplaren waarop een secundaire replica wordt gehost. De wizard voegt vervolgens elke secundaire database toe aan de beschikbaarheidsgroep. Specificeer in het veld Geef een gedeelde netwerklocatie op die toegankelijk is voor alle replica's, een back-upshare waarop alle serverinstanties die replica's hosten lees-/schrijftoegang hebben. Zie Vereisten eerder in dit onderwerp voor meer informatie. In de validatiestap voert de wizard een test uit om ervoor te zorgen dat de opgegeven netwerklocatie geldig is. De test maakt een database op de primaire replica met de naam 'BackupLocDb_', gevolgd door een GUID en voert een back-up uit naar de opgegeven netwerklocatie en herstelt deze vervolgens op de secundaire replica's. Het is veilig om deze database te verwijderen, samen met de back-upgeschiedenis en het back-upbestand als de wizard deze niet kan verwijderen.
- Alleen deelnemen
- Als u handmatig secundaire databases hebt voorbereid op de serverexemplaren waarop de secundaire replica's worden gehost, kunt u deze optie selecteren. De wizard voegt de bestaande secundaire databases toe aan de beschikbaarheidsgroep.
- Initiële gegevenssynchronisatie overslaan
- Selecteer deze optie als u uw eigen database en logboekback-ups van uw primaire databases wilt gebruiken. Zie Gegevensverplaatsing starten op een AlwaysOn Secondary Database (SQL Server)voor meer informatie.
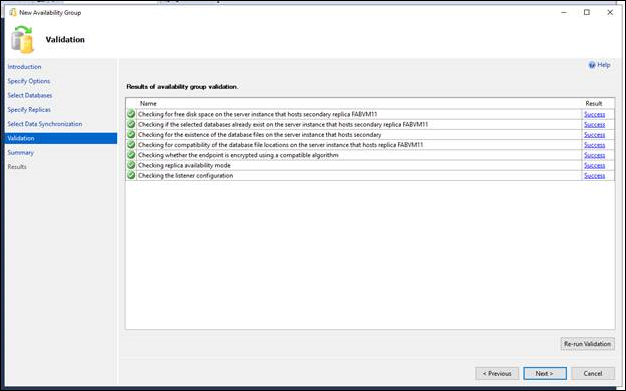
Op de pagina Validatie wordt gecontroleerd of de waarden die u in deze wizard hebt opgegeven, voldoen aan de vereisten van de wizard Nieuwe beschikbaarheidsgroep. Als u een wijziging wilt aanbrengen, klikt u op Vorige om terug te keren naar een eerdere wizardpagina om een of meer waarden te wijzigen. Klik op Volgende om terug te keren naar de pagina Validatie en klik op Validatie opnieuw uitvoeren.
Bekijk uw keuzes voor de nieuwe beschikbaarheidsgroep op de pagina Samenvatting. Als u een wijziging wilt aanbrengen, klikt u op Vorige om terug te keren naar de relevante pagina. Nadat u de wijziging hebt aangebracht, klikt u op Volgende om terug te keren naar de pagina Samenvatting.
Notitie
Wanneer het SQL Server-serviceaccount van een serverexemplaar dat een nieuwe beschikbaarheidsreplica zal hosten nog niet bestaat als aanmelding, moet de wizard Nieuwe beschikbaarheidsgroep de aanmelding maken. Op de pagina Samenvatting geeft de wizard de informatie weer voor de aanmelding die moet worden gemaakt. Als u op Voltooien klikt, maakt de wizard deze aanmelding voor het SQL Server-serviceaccount en verleent de aanmeldingsmachtiging CONNECT. Als u tevreden bent met uw selecties, klikt u eventueel op Script om een script te maken van de stappen die door de wizard worden uitgevoerd. Als u vervolgens de nieuwe beschikbaarheidsgroep wilt maken en configureren, klikt u op Voltooien.
- Op de pagina Voortgang ziet u de voortgang van de stappen voor het maken van de beschikbaarheidsgroep (het configureren van eindpunten, het maken van de beschikbaarheidsgroep en het toevoegen van de secundaire replica aan de groep).
- Wanneer deze stappen zijn voltooid, wordt op de pagina Resultaten het resultaat van elke stap weergegeven. Als al deze stappen slagen, is de nieuwe beschikbaarheidsgroep volledig geconfigureerd. Als een van de stappen een fout oplevert, moet u mogelijk de configuratie handmatig voltooien of een wizard gebruiken voor de mislukte stap. Klik op de gekoppelde koppeling Fout in de kolom Resultaat voor informatie over de oorzaak van een bepaalde fout. Wanneer de wizard is voltooid, klikt u op Sluiten om af te sluiten.
Databases toevoegen aan secundair knooppunt
Herstel de artefactdatabase via de gebruikersinterface op het secundaire knooppunt met behulp van de gemaakte back-upbestanden.
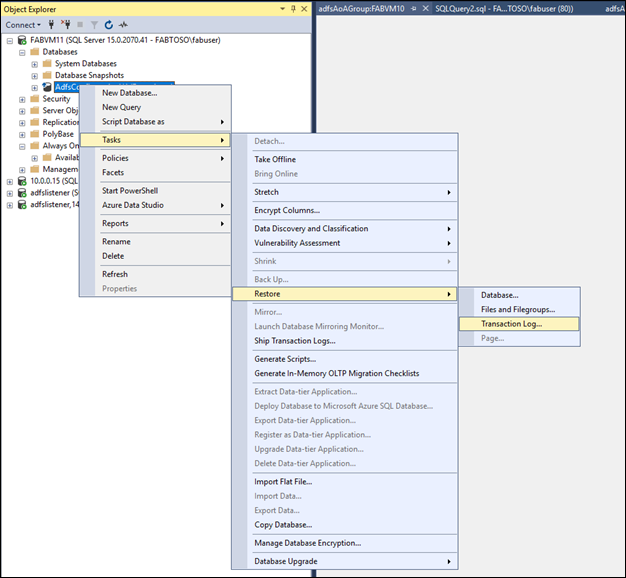
Herstel de database in een NON-RECOVERY status.
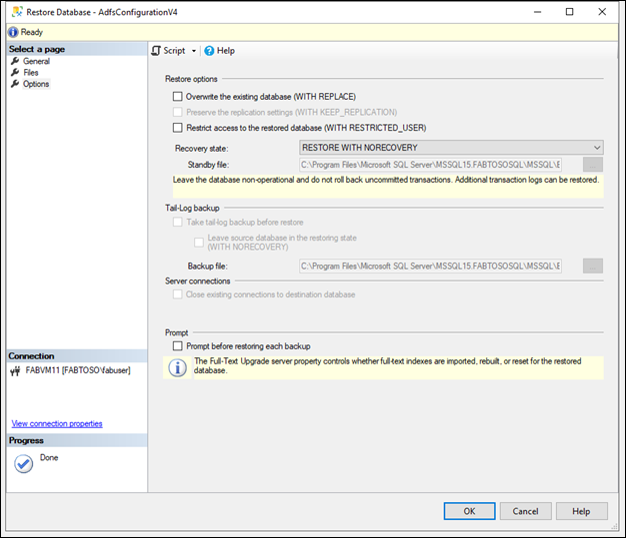
Herhaal het proces om de configuratiedatabase te herstellen.
Beschikbaarheidsreplica toevoegen aan een beschikbaarheidsgroep
- Maak in Objectverkenner verbinding met het serverexemplaar dat de secundaire replica host en klik op de servernaam om de serverstructuur uit te vouwen.
- Vouw het knooppunt AlwaysOn hoge beschikbaarheid en het knooppunt Beschikbaarheidsgroepen uit.
- Selecteer de beschikbaarheidsgroep van de secundaire replica waarmee u bent verbonden.
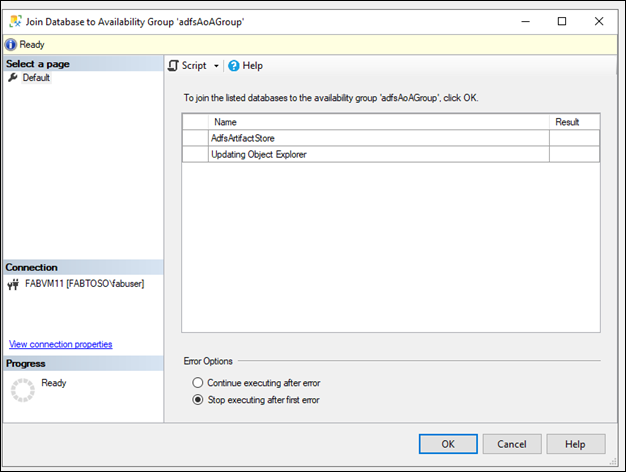
- Klik met de rechtermuisknop op de secundaire replica en klik op Deelnemen aan beschikbaarheidsgroep.
- Hiermee opent u het dialoogvenster Join Replica naar beschikbaarheidsgroep.
- Klik op OK om de secundaire replica aan de beschikbaarheidsgroep toe te voegen.
De SQL-verbindingsreeks bijwerken
Ten slotte gebruikt u PowerShell om de AD FS-eigenschappen te bewerken om de SQL-verbindingsreeks bij te werken om het DNS-adres van de listener van de AlwaysOn-beschikbaarheidsgroep te gebruiken. Voer de configuratiedatabasewijziging uit op elk knooppunt en start de AD FS-service opnieuw op alle AD FS-knooppunten. De oorspronkelijke cataloguswaarde wordt gewijzigd op basis van de farmversie.
PS:\>$temp= Get-WmiObject -namespace root/ADFS -class SecurityTokenService
PS:\>$temp.ConfigurationdatabaseConnectionstring=”data source=<SQLCluster\SQLInstance>; initial catalog=adfsconfiguration;integrated security=true”
PS:\>$temp.put()
PS:\> Set-AdfsProperties –artifactdbconnection ”Data source=<SQLCluster\SQLInstance >;Initial Catalog=AdfsArtifactStore;Integrated Security=True”