How to test a driver package (manual deployment)
This article explains how to use the driver installation INF file to manually install a driver package on a test computer and verify its installation and operation.
Prerequisites
- A driver package that is ready to install. You must first create and build your driver and then create a driver package for installation. For more information, see Building a Driver and Creating a Driver Package.
- A target PC, configured to accept the test signed driver.
- Optionally, an installed debugger to examine the newly installed driver.
Overview
The computer where you install the driver is called the target computer or the test computer. Typically, this computer is separate from the computer on which you develop and build the driver package. The computer where you develop and build the driver is called the host computer.
The process of moving the driver package to the target computer and installing the driver is called deploying the driver.
Locate the build output for the driver
In File Explorer, go to the folder that contains the extracted files for the sample. For example, for the echo sample driver, go to
C:\DriverSamples\general\echo\kmdf. Within that folder, the location of the compiled driver files varies depending on the configuration and platform settings that you selected in the Configuration Manager. If you left the default settings unchanged, then the compiled driver files are saved to a folder named\x64\Debugfor a 64-bit debug build.The folder should contain these files:
File Description Echo.sys The driver binary system file. Echo.inf An information (INF) file that contains information needed to install the driver. Echo.cer A .cer certificate file that was generated when the driver was test signed. Echo.pdb The optional debug symbols for the driver for use with the Windows debugger. Locate a USB thumb drive or set up a network share to copy the built driver files from the host to the target test system.
Copy the files to the target system to install and test the driver.
Install the driver sample on the target system
To install the driver on the target system, do the following steps.
Important
Before changing boot settings, you may need to temporarily suspend Windows security features such as BitLocker and Secure Boot on the test PC. Re-enable these security features when testing is complete and appropriately manage the test PC when the security features are disabled.
Disable driver signature enforcement on the target system
Before you deploy a test signed driver, prepare the target computer by enabling test signing.
On the target system, enable test signed drivers:
Open Windows Settings.
In System, select Recovery.
Under Advanced startup, select Restart Now.
When the computer restarts, select Startup options. In Windows 10, select Troubleshoot > Advanced options > Startup Settings , then select Restart.
On the Startup Settings screen, select Disable driver signature enforcement by pressing the F7 key.
Restart the target computer.
Install the test certificate
On the target computer, select and hold or right-click the certificate file, and select Install, then follow the prompts to install the test certificate.
If you need more detailed instructions for setting up the target computer, see Preparing a computer for manual driver deployment.
Install Option #1 - Right click INF file
The following instructions show you how to install and test the sample driver.
On the target computer, open a Command Prompt window as Administrator. Navigate to your driver package folder, right-click the INF file, for example echo.inf file, and then select Install.
A dialog box appears indicating that the test driver is an unsigned driver. Select Install this driver anyway to proceed.

Install Option #2 - Devcon tool
There may be situations, where using a command line tool, such as PnPUtil or Devcon can be handy for a driver development workflow. This section describes how to use the DevCon tool to install the driver.
On the host system, go to the Tools folder in your WDK installation and locate the DevCon tool. For example, look in the following folder: C:\Program Files (x86)\Windows Kits\10\Tools\x64\devcon.exe.
Create a folder on the target for the built driver package, for example, C:\EchoDriver. Copy devcon.exe to the target system.
The following instructions show you how to install and test the sample driver using devcon. Here's the general syntax for the devcon tool that you use to install the driver:
devcon install <INF file> <hardware ID>
In this example, the echo driver is installed. The INF file required for installing this driver is echo.inf. The inf file contains the hardware ID for installing the echo.sys. For the echo sample, the hardware ID is root\ECHO.
On the target computer, open a Command Prompt window as Administrator. Go to your driver package folder, and enter the following command:
devcon install echo.inf root\ECHO
If you get an error message about devcon not being recognized, try adding the path to the devcon tool. For example, if you copied it to a folder called C:\Tools, then try using the following command:
c:\tools\devcon install echo.inf root\ECHO
A dialog box appears that indicates that the test driver is an unsigned driver. Select Install this driver anyway to proceed.
Tip
If you have any issues with the installation, check the following file for more information. %windir%\inf\setupapi.dev.log
Checking the installed driver
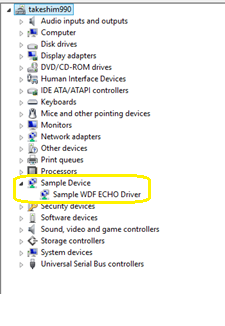
Device Manager
Use Device Manager to confirm that you have successfully installed your driver, and that is loaded and running.
On the target computer, in a Command Prompt window, enter the command devmgmt to open Device Manager.
In Device Manager, on the View menu, choose Devices by type.
In the device tree, locate your driver, for example Sample WDF Echo Driver in the Sample Device node.
PnPUtil
Use PnPUtil to to gather addtional information on your installed driver.
Open a Command Prompt window (Run as administrator).
Type pnputil /? to view command options. See PnPUtil Command Syntax for more information.
Use the
pnputil /enum-drivers /filesto see all of the OEM driver files.Use the
pnputil /enum-devices /problem /deviceidsto display the device IDs for any devices that have problems. In this example output the driver for the OSR FX2 board has an active problem code ofCM_PROB_UNSIGNED_DRIVER.
PS C:\WINDOWS\system32> pnputil /enum-devices /problem /deviceids
Microsoft PnP Utility

Instance ID:                USB\VID_0547&PID_1002\5&353525f&0&3
Device Description:         WDF Sample Driver (DMF Sample 1) for OSR USB-FX2 Learning Kit
Class Name:                 Sample
Class GUID:                 {78a1c341-4539-11d3-b88d-00c04fad5171}
Manufacturer Name:          OSR
Status:                     Problem
Problem Code:               52 (0x34) [CM_PROB_UNSIGNED_DRIVER]
Problem Status:             0xC0000428
Driver Name:                oem40.inf
Hardware IDs:               USB\VID_0547&PID_1002&REV_0000
                            USB\VID_0547&PID_1002
Compatible IDs:             USB\COMPAT_VID_0547&Class_FF&SubClass_00&Prot_00
                            USB\COMPAT_VID_0547&Class_FF&SubClass_00
                            USB\COMPAT_VID_0547&Class_FF
                            USB\Class_FF&SubClass_00&Prot_00
                            USB\Class_FF&SubClass_00
                            USB\Class_FF
For additional command examples, see PnPUtil Examples.
Optionally attach a debugger to examine the newly installed driver
Use the Windows kernel debugger WinDbg to attach to the driver and check its operation. For more information, see Getting Started with Windows Debugging. For information about configuring a target computer and setting up a debug cable using a network connection, see Setting Up KDNET Network Kernel Debugging Automatically
Tip
Unload the driver and then use the .kdfiles (Set Driver Replacement Map) kernel debugger command to copy over newer versions of the driver for further testing.