Aan de slag met onderbrekingspunten in het Visual Studio-foutopsporingsprogramma
Onderbrekingspunten zijn een van de belangrijkste foutopsporingstechnieken in de werkset van uw ontwikkelaar. U stelt onderbrekingspunten in waar u de uitvoering van het foutopsporingsprogramma wilt onderbreken. U kunt bijvoorbeeld de status van codevariabelen bekijken of de aanroepstack op een bepaald onderbrekingspunt bekijken.
Onderbrekingspunten instellen in broncode
U kunt een onderbrekingspunt instellen op elke regel uitvoerbare code. Bekijk bijvoorbeeld deze eenvoudige C#-code waarmee een eenvoudige lus wordt gemaakt.
int testInt = 3;

for (int i = 0; i < 10; i++)
{
    testInt += i;
}
U kunt een onderbrekingspunt instellen op de regel van de code met de variabele toewijzing (int testInt = 3), de for lus of de code binnen de for lus. U kunt geen onderbrekingspunt instellen voor methodehandtekeningen, declaraties voor een naamruimte of klasse of variabeledeclaraties als er geen toewijzing en geen getter/setter is.
Een onderbrekingspunt instellen in broncode:
- Klik in de uiterste linkermarge naast een regel code. U kunt ook de lijn selecteren en op F9-drukken, Foutopsporing>Onderbrekingspuntin- of uitschakelen of met de rechtermuisknop klikken en onderbrekingspunt selecteren>Onderbrekingspunt invoegen. Het onderbrekingspunt wordt weergegeven als een rode stip in de linkermarge.
Voor de meeste talen (inclusief C#) markeert Visual Studio automatisch onderbrekingspunt en huidige uitvoeringslijnen. Voor sommige talen, zoals C++, die niet standaard is gemarkeerd, kunt u het markeren van onderbrekingspunten en huidige regels inschakelen door Extra (of Foutopsporing) te selecteren >Opties>Foutopsporing>Volledige bronregel markeren voor onderbrekingspunten en huidige instructie (alleen C++ ).
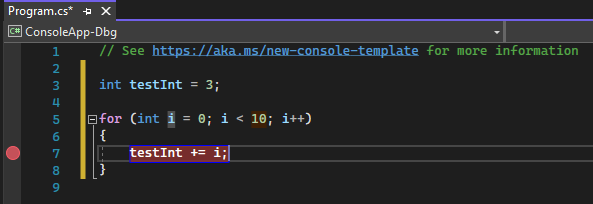
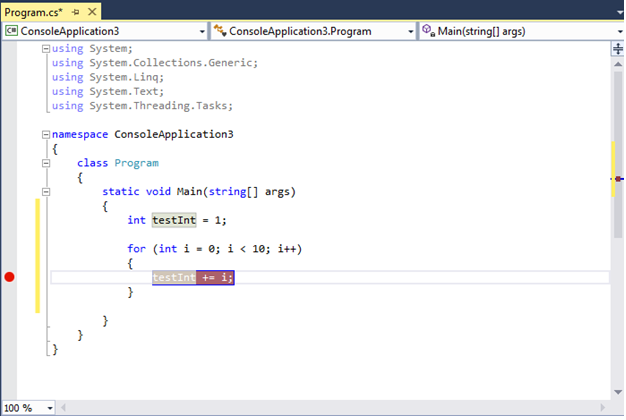
Als u fouten wilt opsporen, drukt u op F5 of selecteert u Fouten opsporen>Foutopsporing starten.
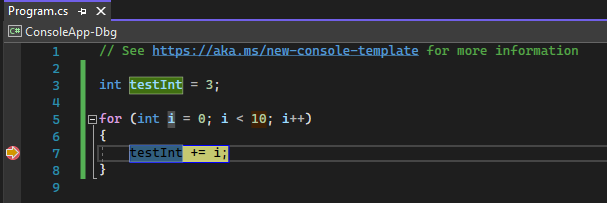
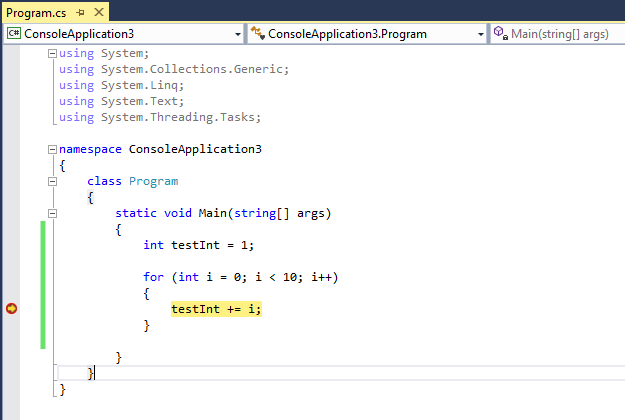
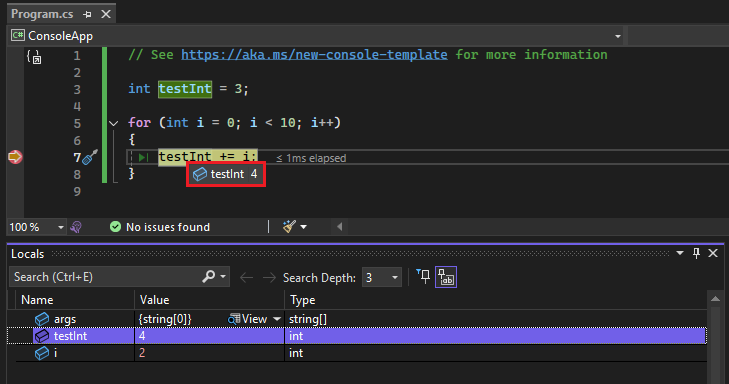
Wanneer u fouten opspoort, wordt de uitvoering onderbroken bij het onderbrekingspunt voordat de code op die regel wordt uitgevoerd. Het onderbrekingspuntsymbool toont een gele pijl.
Op het onderbrekingspunt in het volgende voorbeeld is de waarde van testInt nog steeds 3. De waarde is dus niet gewijzigd sinds de variabele is geïnitialiseerd (ingesteld op een waarde van 3), omdat de instructie in geel nog niet is uitgevoerd.
Op het onderbrekingspunt in het volgende voorbeeld is de waarde van testInt nog steeds 1. De waarde is dus niet gewijzigd sinds de variabele is geïnitialiseerd (ingesteld op een waarde van 1), omdat de instructie in geel nog niet is uitgevoerd.
Wanneer het foutopsporingsprogramma stopt bij het onderbrekingspunt, kunt u de huidige status van de app bekijken, inclusief variabele waarden en de aanroepstack.
In de volgende afbeelding ziet u bijvoorbeeld de waarde van testInt in een gegevenshint en in het venster Locals.
Hier volgen enkele algemene instructies voor het werken met onderbrekingspunten.
Het onderbrekingspunt is een wisselknop. U kunt erop klikken, op F9drukken of Foutopsporing>Onderbrekingspunt in- of uitschakelen gebruiken om het te verwijderen of opnieuw in te voegen.
Als u een onderbrekingspunt wilt uitschakelen zonder het te verwijderen, beweegt u de muisaanwijzer over of klikt u erop met de rechtermuisknop en selecteert u Onderbrekingspunt uitschakelen. Uitgeschakelde breakpoints worden weergegeven als lege stippen in de linkermarge of in het Breakpoints venster. Als u een onderbrekingspunt opnieuw wilt inschakelen, plaatst u de muisaanwijzer op het onderbrekingspunt of klikt u erop met de rechtermuisknop en selecteert u onderbrekingspunt inschakelen.
Voorwaarden en acties instellen, labels toevoegen en bewerken of een onderbrekingspunt exporteren door er met de rechtermuisknop op te klikken en de juiste opdracht te selecteren, of de muisaanwijzer erop te bewegen en het pictogram Instellingen te selecteren.
Typen onderbrekingspunten
Visual Studio ondersteunt verschillende typen onderbrekingspunten ter ondersteuning van verschillende foutopsporingsscenario's, zoals voorwaardelijke onderbrekingspunten die alleen worden geactiveerd op basis van opgegeven criteria. Zie Het juiste type onderbrekingspunt gebruikenvoor meer informatie.
Onderbrekingspunten beheren in het venster Onderbrekingspunten
U kunt het venster onderbrekingspunten gebruiken om alle onderbrekingspunten in uw oplossing te bekijken en te beheren. Deze gecentraliseerde locatie is vooral handig in een grote oplossing of voor complexe foutopsporingsscenario's waarbij onderbrekingspunten essentieel zijn.
In het venster onderbrekingspunten kunt u onderbrekingspunten zoeken, sorteren, filteren, in- of uitschakelen of verwijderen. U kunt ook voorwaarden en acties instellen of een nieuwe functie of een nieuw onderbrekingspunt voor gegevens toevoegen.
Als u het venster Onderbrekingspunten wilt openen, selecteert u Foutopsporing>Windows>onderbrekingspuntenof drukt u op Ctrl+Alt+B.

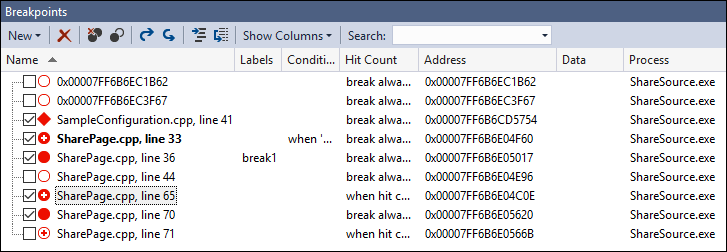
Als u de kolommen wilt selecteren die moeten worden weergegeven in het Breakpoints venster, selecteert u Kolommen weergeven. Selecteer een kolomkop om de lijst met onderbrekingspunten op die kolom te sorteren.
Onderbrekingspuntlabels
U kunt labels gebruiken om de lijst met onderbrekingspunten te sorteren en te filteren in het venster Onderbrekingspunten.
- Als u een label wilt toevoegen aan een onderbrekingspunt, klikt u met de rechtermuisknop op het onderbrekingspunt in de broncode of het venster Onderbrekingspunten en selecteert u vervolgens Labels bewerken. Voeg een nieuw label toe of kies een bestaand label en selecteer vervolgens OK.
- Sorteer de lijst met onderbrekingspunten in het venster Onderbrekingspunten door de Labels, Voorwaardenof andere kolomkoppen te selecteren. U kunt de kolommen selecteren die moeten worden weergegeven door Kolommen weergeven op de werkbalk te selecteren.
Onderbrekingspuntgroepen
Voor complexe foutopsporingsscenario's kunt u onderbrekingspuntengroepen maken om uw onderbrekingspunten te organiseren. Hiermee kunt u logische groeperingen van onderbrekingspunten snel in- en uitschakelen op basis van het huidige scenario dat u probeert op te sporen.
U kunt onderbrekingspunten maken in het venster onderbrekingspunten door nieuwe >onderbrekingspuntgroep te selecteren en een naam op te geven voor de groep. Als u een onderbrekingspunt aan een groep wilt toevoegen, klikt u met de rechtermuisknop op het onderbrekingspunt en kiest u Toevoegen aan onderbrekingspuntgroep><groepsnaam>. Of plaats en sleep de onderbrekingspunten naar de gewenste groep.
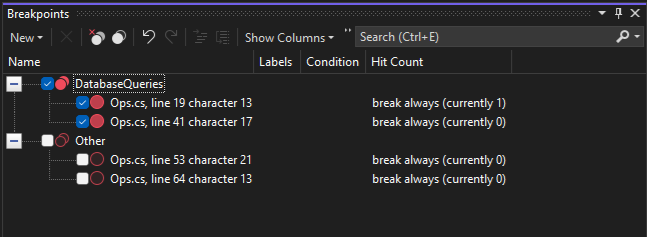
Als u een standaardgroep voor onderbrekingspunten wilt instellen, klikt u met de rechtermuisknop op een groep en selecteert u Instellen als standaardonderbrekergroep. Wanneer u een standaardonderbrekingspuntgroep instelt, worden nieuw gemaakte onderbrekingspunten automatisch toegevoegd aan de groep.
Onderbrekingspunten exporteren en importeren
Als u de status en locatie van uw onderbrekingspunten wilt opslaan of delen, kunt u ze exporteren of importeren.
Vanaf Visual Studio 2022 versie 17.12 Preview 3 worden onderbrekingspuntgroepen ook opgenomen in de geëxporteerde en geïmporteerde onderbrekingspunten.
- Als u één onderbrekingspunt wilt exporteren naar een XML-bestand, klikt u met de rechtermuisknop op het onderbrekingspunt in de broncode of onderbrekingspunten venster en selecteert u Exporteren of Exporteren geselecteerd. Selecteer een exportlocatie en selecteer vervolgens Opslaan. De standaardlocatie is de oplossingsmap.
- Als u verschillende onderbrekingspunten wilt exporteren, selecteert u in het venster onderbrekingspunten de vakken naast de onderbrekingspunten of voert u zoekcriteria in het veld Zoeken in. Selecteer het -pictogram met de tekst 'Exporteer alle onderbrekingspunten die overeenkomen met de huidige zoekcriteria' en sla het bestand op.
- Als u alle onderbrekingspunten wilt exporteren, schakelt u alle vakjes uit en laat u het Zoek veld leeg. Selecteer het -pictogram met de tekst 'Exporteer alle onderbrekingspunten die overeenkomen met de huidige zoekcriteria' en sla het bestand op.
- Als u onderbrekingspunten wilt importeren, selecteert u in het venster Onderbrekingspunten het Onderbrekingspunten importeren uit een bestand pictogram, gaat u naar de locatie van het XML-bestand en selecteert u Openen.
Onderbrekingspunten instellen vanuit foutopsporingsprogrammavensters
U kunt ook onderbrekingspunten instellen vanuit de Call Stack en Disassembly foutopsporingsprogrammavensters.
Een onderbrekingspunt instellen in het venster Oproepstack
Als u een breekpunt wilt instellen bij de instructie of regel waar een functie naartoe terugkeert, kunt u dit doen in het venster Aanroepstack.
Een onderbrekingspunt instellen in het venster Oproepstack:
Als u het venster Aanroepstack wilt openen, moet u pauzeren tijdens het debuggen. Selecteer Fouten opsporen>Windows>Stackaanroepen of druk op Ctrl+Alt+C-.
Klik in het venster Aanroepstack met de rechtermuisknop op de aanroepende functie en selecteer Breekpunt>Breekpunt invoegenof druk op F9.
Er wordt een onderbrekingspuntsymbool weergegeven naast de naam van de functieoproep in de linkermarge van de aanroepstack.
Het aanroepstackonderbrekingspunt wordt weergegeven in het onderbrekingspunten venster als adres, met een geheugenlocatie die overeenkomt met de volgende uitvoerbare instructie in de functie.
Het foutopsporingsprogramma pauzeert bij de instructie.
Zie voor meer informatie over de aanroepstack Hoe: Het venster Oproepstack gebruiken.
Als u onderbrekingspunten visueel wilt traceren tijdens het uitvoeren van code, raadpleegt u Kaartmethoden op de aanroepstack tijdens het opsporen van fouten.
Een onderbrekingspunt instellen in het venster Demontage
Als u het venster Disassemblage wilt openen, moet u gepauzeerd zijn tijdens foutopsporing. Selecteer Debug>Windows>Disassemblyof druk op Ctrl+Alt+D.
Klik in het venster Uitsplitsen in de linkermarge op de instructie die u wilt onderbreken. U kunt het ook selecteren en op F9-drukken of met de rechtermuisknop klikken en onderbrekingspunt selecteren>Onderbrekingspunt invoegen.