Een eenvoudige gegevenstoepassing maken met WPF en Entity Framework 6
Waarschuwing
Als u Visual Studio 2022 gebruikt, moet u Visual Studio 2022 versie 17.3 Preview 3 of hoger gebruiken voor deze zelfstudie.
In deze walkthrough ziet u hoe u een eenvoudige toepassing met 'formulieren over gegevens' maakt in Visual Studio. De app maakt gebruik van SQL Server LocalDB, de Northwind-database, Entity Framework 6 (niet Entity Framework Core) en Windows Presentation Foundation voor .NET Framework (niet .NET Core of .NET 5 of hoger). Het laat zien hoe u eenvoudige gegevensbinding kunt uitvoeren met een hoofddetailweergave en ook een aangepaste bindingnavigator met knoppen voor Volgendeverplaatsen, Vorigeverplaatsen, Verplaatsen naar begin, Verplaatsen naar einde, bijwerken en Verwijderen.
Dit artikel is gericht op het gebruik van gegevenshulpprogramma's in Visual Studio en probeert de onderliggende technologieën niet uitgebreid uit te leggen. Hierbij wordt ervan uitgegaan dat u basiskennis hebt van XAML, Entity Framework en SQL. In dit voorbeeld wordt ook geen MVVM-architectuur (Model-View-ViewModel) gedemonstreert. Dit is standaard voor WPF-toepassingen. U kunt deze code echter met enkele wijzigingen kopiëren naar uw eigen MVVM-toepassing.
De laatste code voor deze zelfstudie vindt u in GitHub op Visual Studio Tutorial Samples - EF6.
Installeren en verbinding maken met Northwind
In dit voorbeeld worden SQL Server Express LocalDB en de Northwind-voorbeelddatabase gebruikt. Als de ADO.NET gegevensprovider voor dat product Entity Framework ondersteunt, moet deze ook met andere SQL-databaseproducten werken.
Als u geen SQL Server Express LocalDB hebt, installeert u deze via het Visual Studio Installer-. In de Visual Studio Installerkunt u SQL Server Express LocalDB installeren als onderdeel van de Gegevensopslag en -verwerking workload of als een afzonderlijk onderdeel.
Installeer de Northwind-voorbeelddatabase door de volgende stappen uit te voeren:
Open in Visual Studio het venster SQL Server-objectverkenner. (SQL Server Object Explorer- is geïnstalleerd als onderdeel van de gegevensopslag en -verwerking workload in de Visual Studio Installer.) Vouw het SQL Server-knooppunt uit. Klik met de rechtermuisknop op uw LocalDB-exemplaar en selecteer Nieuwe query.
Er wordt een venster van de queryeditor geopend.
Kopieer het script Northwind Transact-SQL naar het klembord. Met dit T-SQL-script wordt de volledig nieuwe Northwind-database gemaakt en gevuld met gegevens.
Plak het T-SQL-script in de queryeditor en kies vervolgens de knop uitvoeren.
Na korte tijd wordt de query uitgevoerd en wordt de Northwind-database gemaakt.
Nieuwe verbindingen toevoegen voor Northwind.
Het project configureren
Maak in Visual Studio een nieuw C# WPF App (.NET Framework) project.
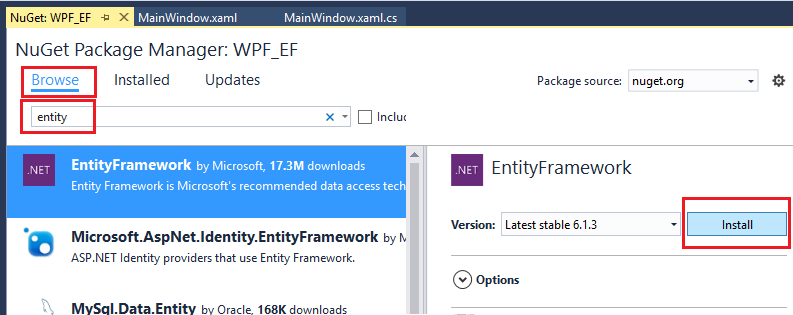
Voeg het NuGet-pakket voor Entity Framework 6 toe. Selecteer in Solution Explorerhet projectknooppunt. Kies in het hoofdmenu Project>NuGet-pakketten beheren.
Klik in de NuGet Package Manager-op de koppeling Bladeren. Entity Framework is waarschijnlijk het beste pakket in de lijst. Klik op installeren in het rechterdeelvenster en volg de aanwijzingen. In het uitvoervenster wordt aangegeven wanneer de installatie is voltooid.

Nu kunt u Visual Studio gebruiken om een model te maken op basis van de Northwind-database.
Het model maken
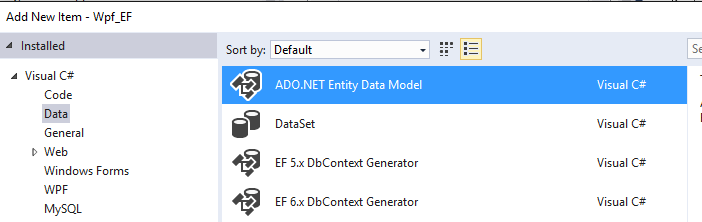
Klik met de rechtermuisknop op het projectknooppunt in Solution Explorer- en kies Toevoegen>nieuw item. Kies in het linkerdeelvenster onder het C#-knooppunt Gegevens en kies in het middelste deelvenster ADO.NET Entiteitsgegevensmodel.
Roep het model aan
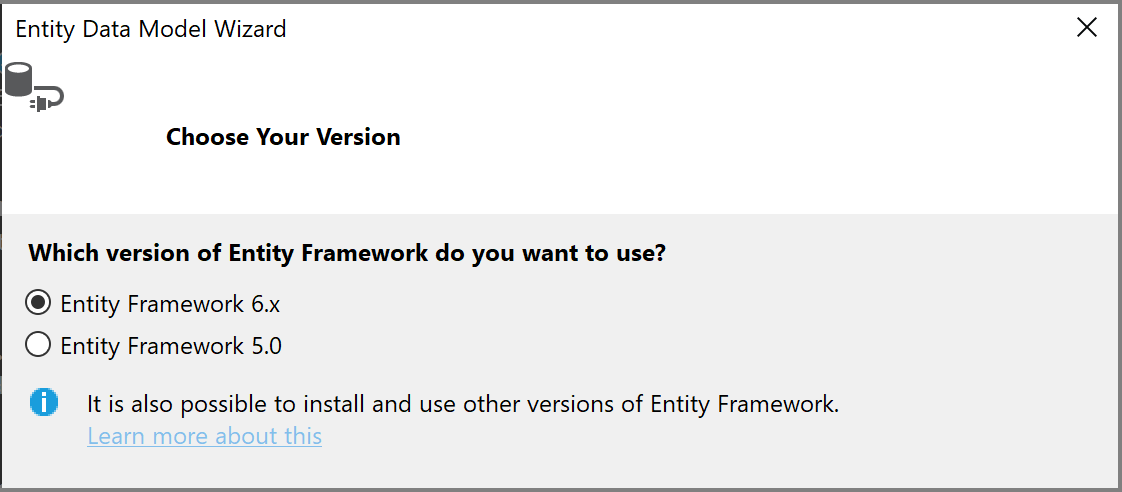
Northwind_modelen kies Toevoegen. De wizard voor Entity Data Model opent. Kies EF Designer in databaseen selecteer vervolgens Volgende.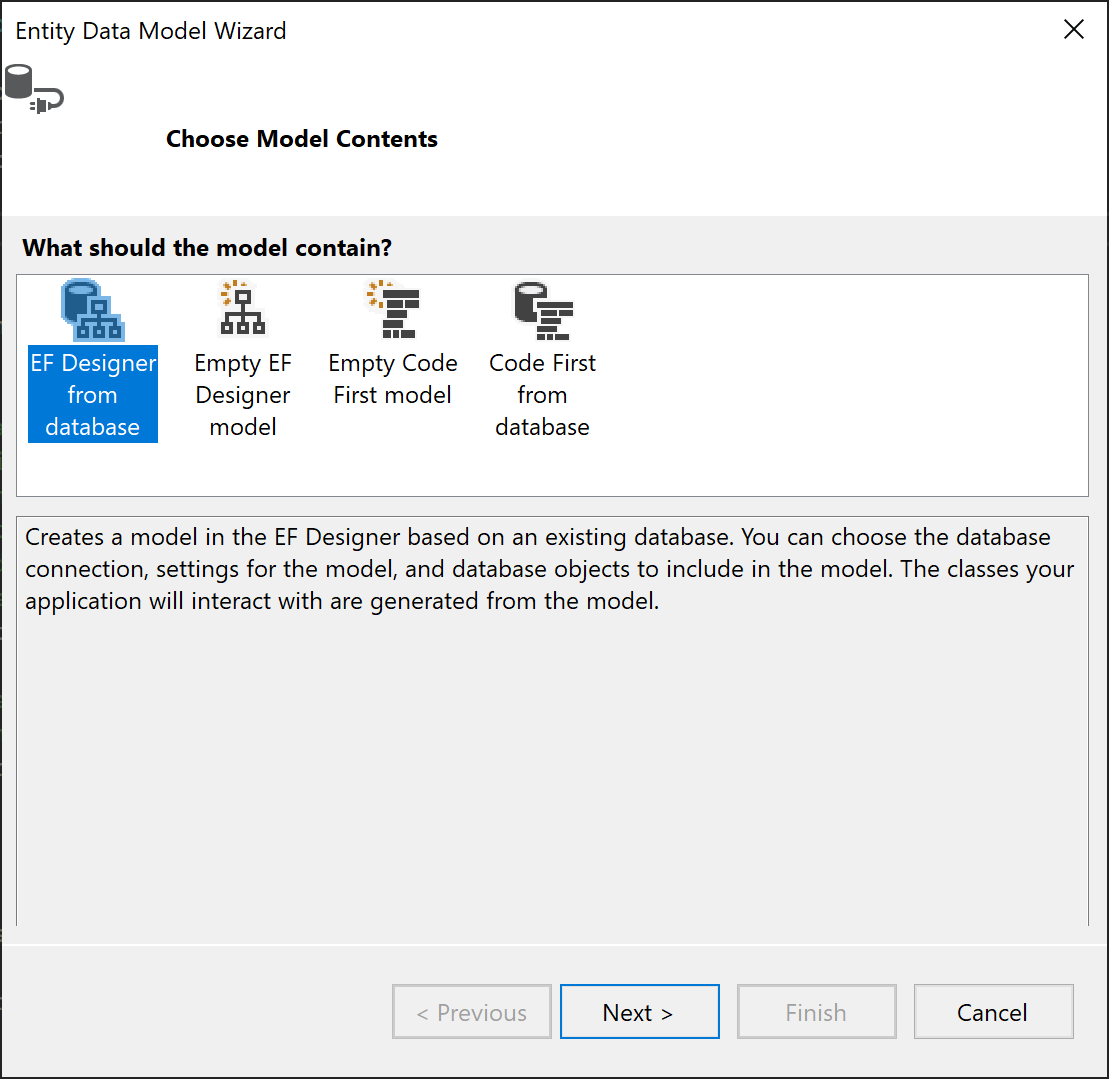
Kies in het volgende scherm de LocalDB Northwind-verbinding (bijvoorbeeld (localdb)\MSSQLLocalDB, geef de Northwind-database op en klik op Volgende.
Als u geen verbinding ziet, kies Nieuwe verbinding, kies vervolgens in het dialoogvenster Gegevensbron de optie Microsoft SQL Server, kies Doorgaan en voer in het dialoogvenster Verbindingseigenschappen
(localdb)\MSSQLLocalDBin. Kies onder Een databasenaam selecteren of invoerende optie Northwind, en druk vervolgens op OK.Als u hierom wordt gevraagd, kiest u de versie van Entity Framework die u gebruikt.
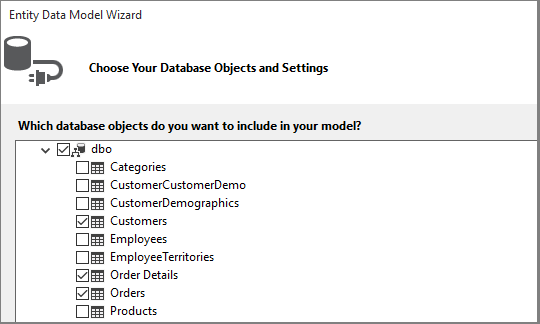
Kies op de volgende pagina van de wizard welke tabellen, opgeslagen procedures en andere databaseobjecten moeten worden opgenomen in het Entity Framework-model. Vouw het dbo-knooppunt uit in de structuurweergave en kies Klanten, Bestellingenen Bestelgegevens. Laat de standaardinstellingen ingeschakeld en klik op voltooien.
De wizard genereert de C#-klassen die het Entity Framework-model vertegenwoordigen. De klassen zijn gewone oude C#-klassen en ze zijn wat we aan de WPF-gebruikersinterface koppelen. Het bestand
.edmxbeschrijft de relaties en andere metagegevens die de klassen aan objecten in de database koppelen. De.ttbestanden zijn T4-sjablonen die de code genereren die op het model werkt en wijzigingen in de database opslaan. U kunt al deze bestanden zien in Solution Explorer- onder het knooppunt Northwind_model: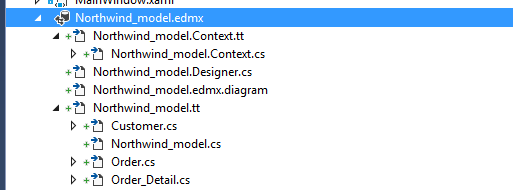
Met het ontwerpoppervlak voor het
.edmx-bestand kunt u bepaalde eigenschappen en relaties in het model wijzigen. In dit scenario gaan we de ontwerpfunctie niet gebruiken.De
.ttbestanden zijn algemeen en u moet een van deze bestanden aanpassen om te werken met WPF-gegevensbinding, waarvoor ObservableCollections zijn vereist. Vouw in Solution Explorerhet Northwind_model-knooppunt uit totdat u Northwind_model.tt-hebt gevonden. (Zorg ervoor dat u zich niet in het .Context.tt-bestand bevindt, dat zich direct onder het.edmxbestand bevindt.)Vervang de twee voorkomens van ICollection door ObservableCollection<T>.
Vervang het eerste voorkomen van HashSet<T> door ObservableCollection<T> rond regel 51. Vervang het tweede exemplaar van HashSet niet.
Vervang het enige exemplaar van System.Collections.Generic (rond regel 431) door System.Collections.ObjectModel.
Druk op F5 of Ctrl+F5 om het project te bouwen en uit te voeren. Wanneer de toepassing voor het eerst wordt uitgevoerd, zijn de modelklassen zichtbaar voor de wizard gegevensbronnen.
U bent nu klaar om dit model te koppelen aan de XAML-pagina, zodat u de gegevens kunt bekijken, navigeren en wijzigen.
Het model koppelen aan de XAML-pagina
Het is mogelijk om uw eigen gegevensbindingscode te schrijven, maar het is veel eenvoudiger om Visual Studio dit voor u te laten doen.
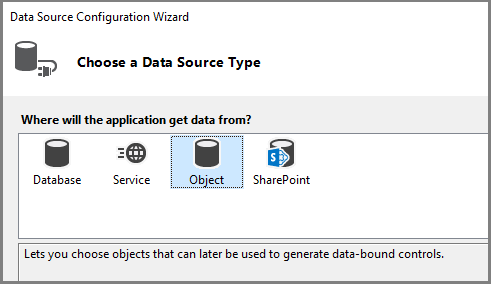
Kies in het hoofdmenu Project>Nieuwe gegevensbron toevoegen om de wizard gegevensbronconfiguratie weer te geven. Kies Object omdat u bent gebonden aan de modelklassen, niet aan de database:
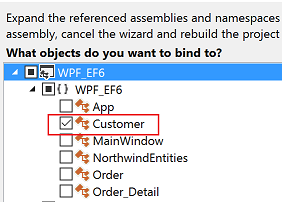
Vouw het knooppunt voor uw project uit en selecteer Klant. (Bronnen voor orders worden automatisch gegenereerd vanuit de navigatie-eigenschap Orders in Klant.)
Klik op voltooien.
Navigeer naar MainWindow.xaml- in de codeweergave. We houden de XAML eenvoudig voor het doel van dit voorbeeld. Wijzig de titel van MainWindow in iets beschrijvender en verhoog de hoogte en breedte voorlopig naar 600 x 800. U kunt deze later altijd wijzigen. Voeg nu deze drie rijdefinities toe aan het hoofdraster, één rij voor de navigatieknoppen, één voor de details van de klant en één voor het raster waarin de orders worden weergegeven:
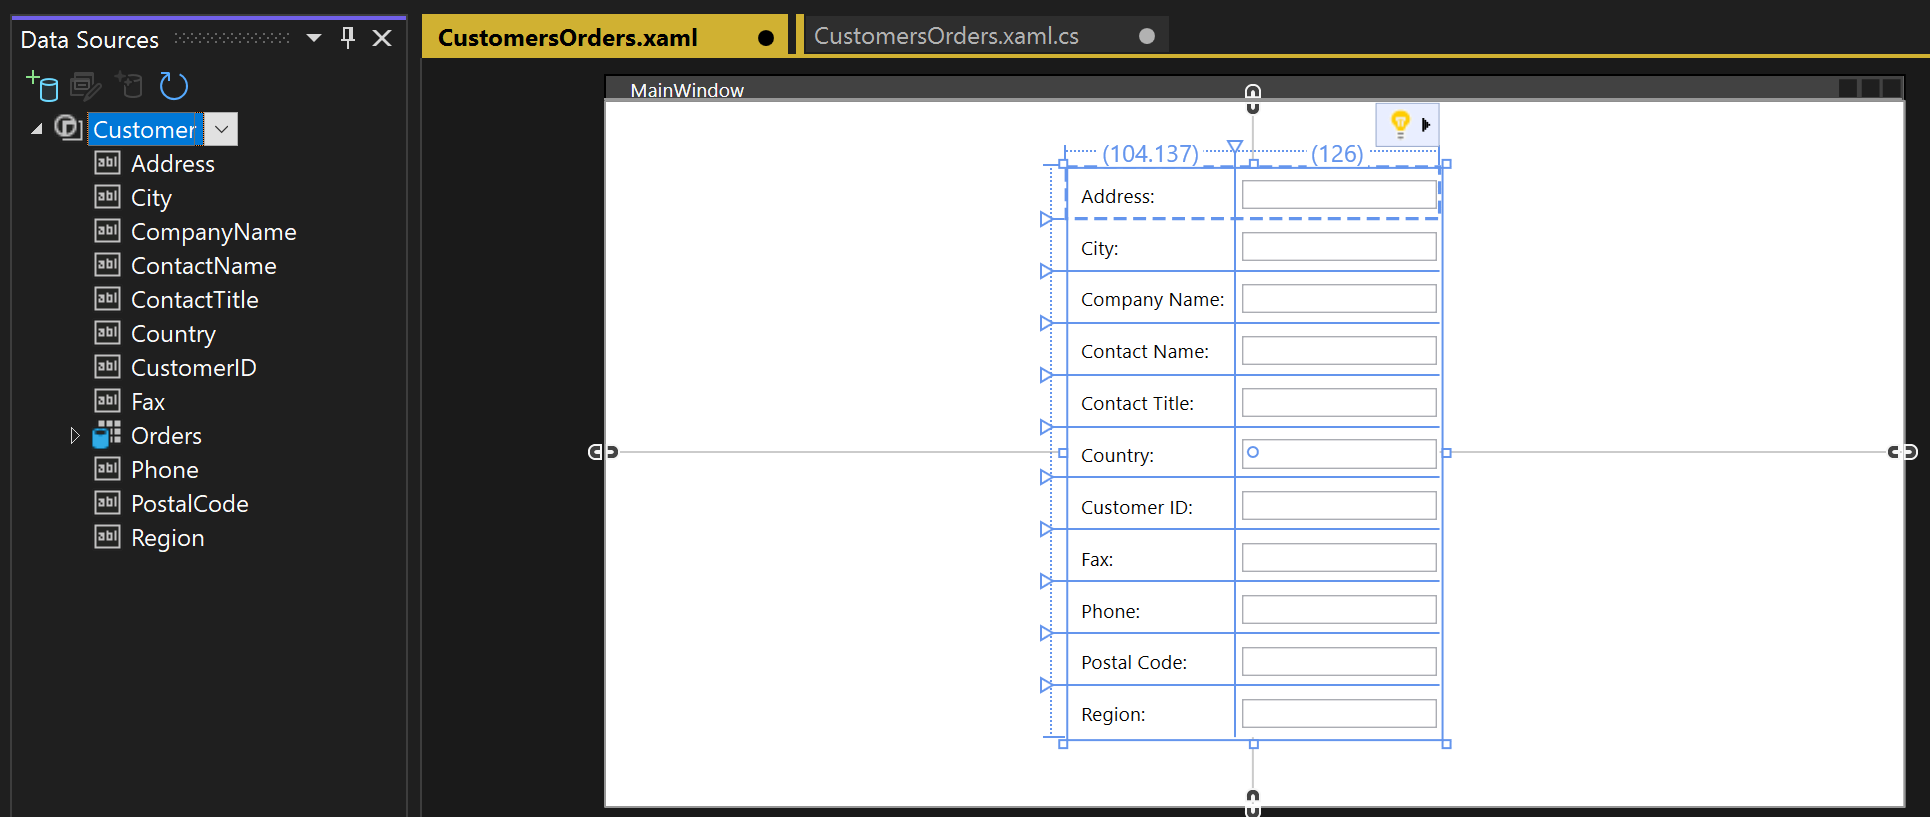
    <Grid.RowDefinitions>
        <RowDefinition Height="auto"/>
        <RowDefinition Height="auto"/>
        <RowDefinition Height="*"/>
    </Grid.RowDefinitions>
Open nu MainWindow.xaml zodat u deze in de ontwerpfunctie bekijkt. Hierdoor wordt het venster gegevensbronnen weergegeven als een optie in de venstermarge van Visual Studio naast de Werkset. Klik op het tabblad om het venster te openen of druk op Shift+Alt+D of kies Weergave>Andere Windows>-gegevensbronnen. We gaan elke eigenschap in de klasse Klanten weergeven in een eigen afzonderlijk tekstvak. Klik eerst op de pijl in de keuzelijst met invoervak Klanten en kies Details. Sleep vervolgens het knooppunt naar het middelste deel van het ontwerpoppervlak, zodat de ontwerper weet dat u het in de middelste rij wilt plaatsen. Als u deze verkeerd opgeeft, kunt u de rij later in de XAML (
Grid.Row="1") handmatig opgeven. Standaard worden de besturingselementen verticaal in een rasterelement geplaatst, maar op dit moment kunt u ze op de gewenste manier rangschikken op het formulier. Het kan bijvoorbeeld zinvol zijn om het tekstvak naam boven het adres te plaatsen. De voorbeeldtoepassing voor dit artikel wijzigt de volgorde van de velden en rangschikt deze in twee kolommen.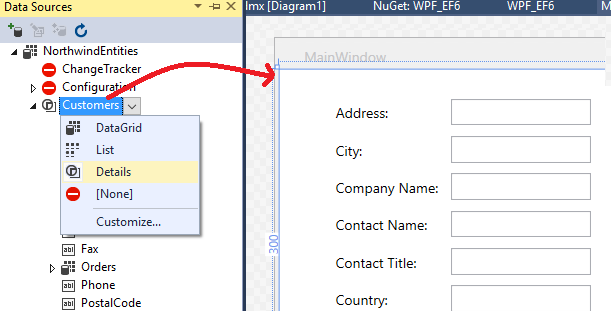
In de XAML-weergave ziet u nu een nieuw
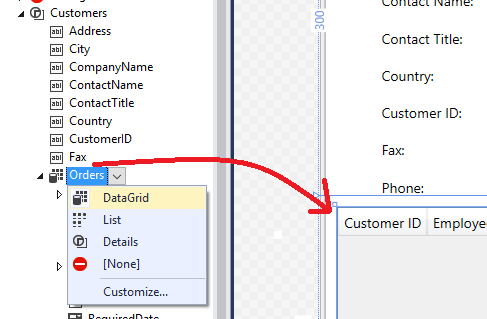
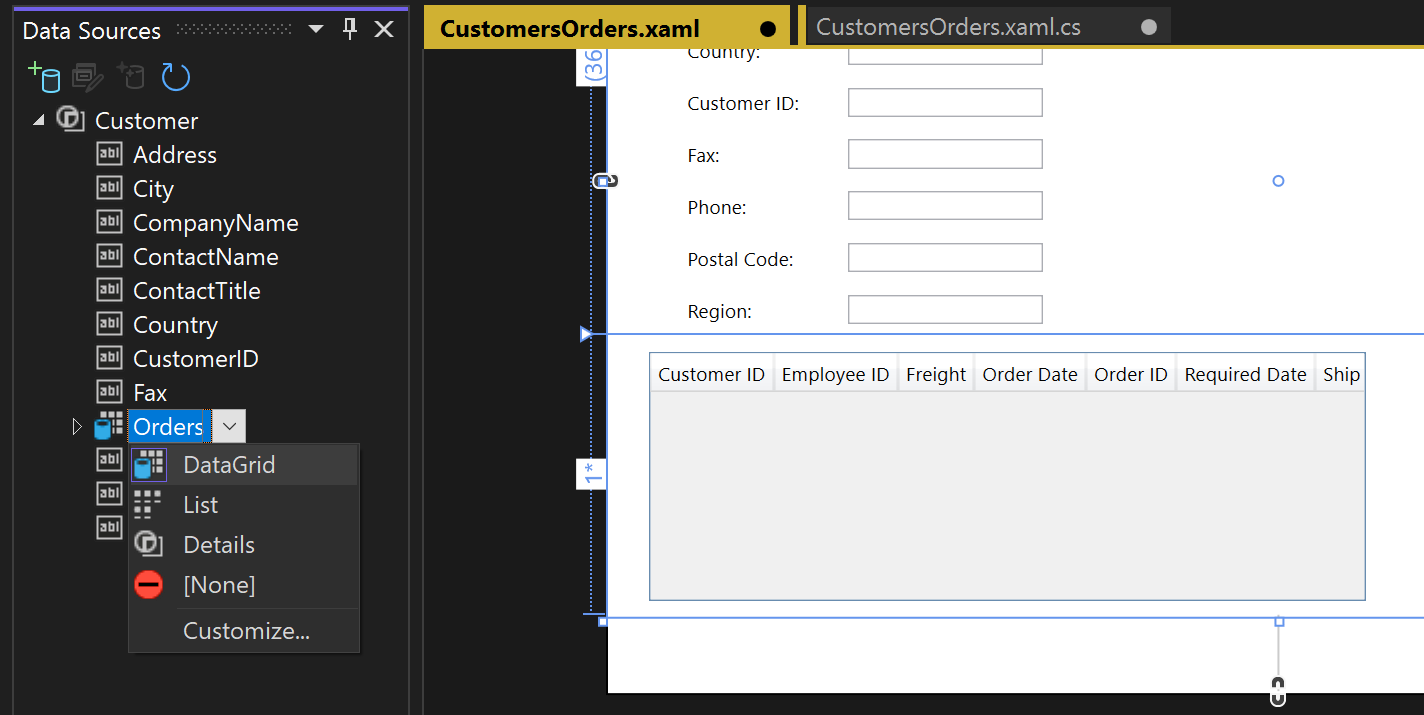
Gridelement in rij 1 (de middelste rij) van het bovenliggende raster. Het ouder raster heeft eenDataContextkenmerk dat verwijst naar een CollectionViewSource die is toegevoegd aan hetWindows.Resourceselement. Gezien de gegevenscontext wordt, wanneer het eerste tekstvak wordt gekoppeld aan Adres, die naam toegewezen aan deAddress-eigenschap van het huidigeCustomer-object in deCollectionViewSource.<Grid DataContext="{StaticResource customerViewSource}">Wanneer een klant zichtbaar is in de bovenste helft van het venster, wilt u de orders in de onderste helft zien. U geeft de orders weer in één rasterweergavebesturingselement. Voor de gegevensbinding van hoofd- en subdetails om naar verwachting te functioneren, is het belangrijk dat u verbinding maakt met de eigenschap Orders in de klasse Klanten, en niet met het afzonderlijke Orders-knooppunt. Sleep de eigenschap Orders van de klasse Klanten naar de onderste helft van het formulier, zodat de ontwerper deze in rij 2 plaatst:
Visual Studio heeft alle bindingscode gegenereerd waarmee de ui-besturingselementen worden verbonden met gebeurtenissen in het model. Om gegevens te zien, hoeft u alleen maar code te schrijven om het model te vullen. Navigeer eerst naar MainWindow.xaml.cs en voeg een gegevenslid toe aan de klasse MainWindow voor de gegevenscontext. Dit object, dat voor u is gegenereerd, fungeert als een besturingselement waarmee wijzigingen en gebeurtenissen in het model worden bijgehouden. U voegt ook CollectionViewSource-gegevensleden toe voor klanten en orders en de bijbehorende constructor-initialisatielogica aan de bestaande constructor
MainWindow(). De bovenkant van de klasse moet er als volgt uitzien:public partial class MainWindow : Window { NorthwindEntities context = new NorthwindEntities(); CollectionViewSource custViewSource; CollectionViewSource ordViewSource; public MainWindow() { InitializeComponent(); custViewSource = ((CollectionViewSource)(FindResource("customerViewSource"))); ordViewSource = ((CollectionViewSource)(FindResource("customerOrdersViewSource"))); DataContext = this; }Als dit nog niet is gebeurd, voegt u een
using-instructie voor System.Data.Entity toe om deLoad-extensiemethode binnen het bereik te brengen:using System.Data.Entity;Schuif nu omlaag en zoek de
Window_Loadedeventhandler. U ziet dat Visual Studio een CollectionViewSource-object heeft toegevoegd. Dit vertegenwoordigt het NorthwindEntities-object dat u hebt geselecteerd toen u het model maakte. U hebt dat al toegevoegd, dus u hebt deze hier niet nodig. Laten we de code inWindow_Loadedvervangen, zodat de methode er nu als volgt uitziet:private void Window_Loaded(object sender, RoutedEventArgs e) { // Load is an extension method on IQueryable, // defined in the System.Data.Entity namespace. // This method enumerates the results of the query, // similar to ToList but without creating a list. // When used with Linq to Entities, this method // creates entity objects and adds them to the context. context.Customers.Load(); // After the data is loaded, call the DbSet<T>.Local property // to use the DbSet<T> as a binding source. custViewSource.Source = context.Customers.Local; }Druk op F5-. U ziet nu de details voor de eerste klant die is opgehaald in CollectionViewSource. Je zou ook hun orders in het datagrid moeten zien. De opmaak is niet geweldig, dus laten we dat oplossen. U kunt ook een manier maken om de andere records weer te geven en basisbewerkingen voor maken, lezen, bijwerken en verwijderen (CRUD) uit te voeren.
Het paginaontwerp aanpassen en rasters toevoegen voor nieuwe klanten en orders
De standaardindeling die door Visual Studio wordt geproduceerd, is niet ideaal voor uw toepassing. Daarom geven we de uiteindelijke XAML hier om naar uw code te kopiëren. U hebt ook enkele 'formulieren' (die eigenlijk Rasters zijn) nodig om de gebruiker in staat te stellen een nieuwe klant of bestelling toe te voegen. Als u een nieuwe klant en bestelling wilt kunnen toevoegen, hebt u een afzonderlijke set tekstvakken nodig die niet aan de CollectionViewSourcezijn gebonden. U bepaalt op elk gewenst moment welk raster de gebruiker ziet door de eigenschap Visible in te stellen in de handlermethoden. Ten slotte voegt u een knop Verwijderen toe aan elke rij in het raster Orders, zodat de gebruiker een afzonderlijke order kan verwijderen.
Voeg eerst deze stijlen toe aan het element Windows.Resources in MainWindow.xaml:
<Style x:Key="Label" TargetType="{x:Type Label}" BasedOn="{x:Null}">
    <Setter Property="HorizontalAlignment" Value="Left"/>
    <Setter Property="VerticalAlignment" Value="Center"/>
    <Setter Property="Margin" Value="3"/>
    <Setter Property="Height" Value="23"/>
</Style>
<Style x:Key="CustTextBox" TargetType="{x:Type TextBox}" BasedOn="{x:Null}">
    <Setter Property="HorizontalAlignment" Value="Right"/>
    <Setter Property="VerticalAlignment" Value="Center"/>
    <Setter Property="Margin" Value="3"/>
    <Setter Property="Height" Value="26"/>
    <Setter Property="Width" Value="120"/>
</Style>
Vervang vervolgens het hele buitenste raster door deze markering:
<Grid>
     <Grid.RowDefinitions>
         <RowDefinition Height="auto"/>
         <RowDefinition Height="auto"/>
         <RowDefinition Height="*"/>
     </Grid.RowDefinitions>
     <Grid x:Name="existingCustomerGrid" Grid.Row="1" HorizontalAlignment="Left" Margin="5" Visibility="Visible" VerticalAlignment="Top" Background="AntiqueWhite" DataContext="{StaticResource customerViewSource}">
         <Grid.ColumnDefinitions>
             <ColumnDefinition Width="Auto" MinWidth="233"/>
             <ColumnDefinition Width="Auto" MinWidth="397"/>
         </Grid.ColumnDefinitions>
         <Grid.RowDefinitions>
             <RowDefinition Height="Auto"/>
             <RowDefinition Height="Auto"/>
             <RowDefinition Height="Auto"/>
             <RowDefinition Height="Auto"/>
             <RowDefinition Height="Auto"/>
             <RowDefinition Height="Auto"/>
         </Grid.RowDefinitions>
         <Label Content="Customer ID:" Grid.Row="0" Style="{StaticResource Label}"/>
         <TextBox x:Name="customerIDTextBox" Grid.Row="0" Style="{StaticResource CustTextBox}"
                  Text="{Binding CustomerID, Mode=TwoWay, NotifyOnValidationError=true, ValidatesOnExceptions=true}"/>
         <Label Content="Company Name:" Grid.Row="1" Style="{StaticResource Label}"/>
         <TextBox x:Name="companyNameTextBox" Grid.Row="1" Style="{StaticResource CustTextBox}"
                  Text="{Binding CompanyName, Mode=TwoWay, NotifyOnValidationError=true, ValidatesOnExceptions=true}"/>
         <Label Content="Contact Name:" Grid.Row="2" Style="{StaticResource Label}"/>
         <TextBox x:Name="contactNameTextBox" Grid.Row="2" Style="{StaticResource CustTextBox}"
                  Text="{Binding ContactName, Mode=TwoWay, NotifyOnValidationError=true, ValidatesOnExceptions=true}"/>
         <Label Content="Contact title:" Grid.Row="3" Style="{StaticResource Label}"/>
         <TextBox x:Name="contactTitleTextBox" Grid.Row="3" Style="{StaticResource CustTextBox}"
                  Text="{Binding ContactTitle, Mode=TwoWay, NotifyOnValidationError=true, ValidatesOnExceptions=true}"/>
         <Label Content="Address:" Grid.Row="4" Style="{StaticResource Label}"/>
         <TextBox x:Name="addressTextBox" Grid.Row="4" Style="{StaticResource CustTextBox}"
                  Text="{Binding Address, Mode=TwoWay, NotifyOnValidationError=true, ValidatesOnExceptions=true}"/>
         <Label Content="City:" Grid.Column="1" Grid.Row="0" Style="{StaticResource Label}"/>
         <TextBox x:Name="cityTextBox" Grid.Column="1" Grid.Row="0" Style="{StaticResource CustTextBox}"
                  Text="{Binding City, Mode=TwoWay, NotifyOnValidationError=true, ValidatesOnExceptions=true}"/>
         <Label Content="Country:" Grid.Column="1" Grid.Row="1" Style="{StaticResource Label}"/>
         <TextBox x:Name="countryTextBox" Grid.Column="1" Grid.Row="1" Style="{StaticResource CustTextBox}"
                  Text="{Binding Country, Mode=TwoWay, NotifyOnValidationError=true, ValidatesOnExceptions=true}"/>
         <Label Content="Fax:" Grid.Column="1" Grid.Row="2" Style="{StaticResource Label}"/>
         <TextBox x:Name="faxTextBox" Grid.Column="1" Grid.Row="2" Style="{StaticResource CustTextBox}"
                  Text="{Binding Fax, Mode=TwoWay, NotifyOnValidationError=true, ValidatesOnExceptions=true}"/>
         <Label Content="Phone:" Grid.Column="1" Grid.Row="3" Style="{StaticResource Label}"/>
         <TextBox x:Name="phoneTextBox" Grid.Column="1" Grid.Row="3" Style="{StaticResource CustTextBox}"
                  Text="{Binding Phone, Mode=TwoWay, NotifyOnValidationError=true, ValidatesOnExceptions=true}"/>
         <Label Content="Postal Code:" Grid.Column="1" Grid.Row="4" VerticalAlignment="Center" Style="{StaticResource Label}"/>
         <TextBox x:Name="postalCodeTextBox" Grid.Column="1" Grid.Row="4" Style="{StaticResource CustTextBox}"
                  Text="{Binding PostalCode, Mode=TwoWay, NotifyOnValidationError=true, ValidatesOnExceptions=true}"/>
         <Label Content="Region:" Grid.Column="1" Grid.Row="5" Style="{StaticResource Label}"/>
         <TextBox x:Name="regionTextBox" Grid.Column="1" Grid.Row="5" Style="{StaticResource CustTextBox}"
                  Text="{Binding Region, Mode=TwoWay, NotifyOnValidationError=true, ValidatesOnExceptions=true}"/>
     </Grid>
     <Grid x:Name="newCustomerGrid" Grid.Row="1" HorizontalAlignment="Left" VerticalAlignment="Top" Margin="5" DataContext="{Binding RelativeSource={RelativeSource FindAncestor, AncestorType={x:Type Window}}, Path=newCustomer, UpdateSourceTrigger=Explicit}" Visibility="Collapsed" Background="CornflowerBlue">
         <Grid.ColumnDefinitions>
             <ColumnDefinition Width="Auto" MinWidth="233"/>
             <ColumnDefinition Width="Auto" MinWidth="397"/>
         </Grid.ColumnDefinitions>
         <Grid.RowDefinitions>
             <RowDefinition Height="Auto"/>
             <RowDefinition Height="Auto"/>
             <RowDefinition Height="Auto"/>
             <RowDefinition Height="Auto"/>
             <RowDefinition Height="Auto"/>
             <RowDefinition Height="Auto"/>
         </Grid.RowDefinitions>
         <Label Content="Customer ID:" Grid.Row="0" Style="{StaticResource Label}"/>
         <TextBox x:Name="add_customerIDTextBox" Grid.Row="0" Style="{StaticResource CustTextBox}"
                  Text="{Binding CustomerID, Mode=TwoWay, NotifyOnValidationError=true, ValidatesOnExceptions=true}"/>
         <Label Content="Company Name:" Grid.Row="1" Style="{StaticResource Label}"/>
         <TextBox x:Name="add_companyNameTextBox" Grid.Row="1" Style="{StaticResource CustTextBox}"
                  Text="{Binding CompanyName, Mode=TwoWay, NotifyOnValidationError=true, ValidatesOnExceptions=true }"/>
         <Label Content="Contact Name:" Grid.Row="2" Style="{StaticResource Label}"/>
         <TextBox x:Name="add_contactNameTextBox" Grid.Row="2" Style="{StaticResource CustTextBox}"
                  Text="{Binding ContactName, Mode=TwoWay, NotifyOnValidationError=true, ValidatesOnExceptions=true}"/>
         <Label Content="Contact title:" Grid.Row="3" Style="{StaticResource Label}"/>
         <TextBox x:Name="add_contactTitleTextBox" Grid.Row="3" Style="{StaticResource CustTextBox}"
                  Text="{Binding ContactTitle, Mode=TwoWay, NotifyOnValidationError=true, ValidatesOnExceptions=true}"/>
         <Label Content="Address:" Grid.Row="4" Style="{StaticResource Label}"/>
         <TextBox x:Name="add_addressTextBox" Grid.Row="4" Style="{StaticResource CustTextBox}"
                  Text="{Binding Address, Mode=TwoWay, NotifyOnValidationError=true, ValidatesOnExceptions=true}"/>
         <Label Content="City:" Grid.Column="1" Grid.Row="0" Style="{StaticResource Label}"/>
         <TextBox x:Name="add_cityTextBox" Grid.Column="1" Grid.Row="0" Style="{StaticResource CustTextBox}"
                  Text="{Binding City, Mode=TwoWay, NotifyOnValidationError=true, ValidatesOnExceptions=true}"/>
         <Label Content="Country:" Grid.Column="1" Grid.Row="1" Style="{StaticResource Label}"/>
         <TextBox x:Name="add_countryTextBox" Grid.Column="1" Grid.Row="1" Style="{StaticResource CustTextBox}"
                  Text="{Binding Country, Mode=TwoWay, NotifyOnValidationError=true, ValidatesOnExceptions=true}"/>
         <Label Content="Fax:" Grid.Column="1" Grid.Row="2" Style="{StaticResource Label}"/>
         <TextBox x:Name="add_faxTextBox" Grid.Column="1" Grid.Row="2" Style="{StaticResource CustTextBox}"
                  Text="{Binding Fax, Mode=TwoWay, NotifyOnValidationError=true, ValidatesOnExceptions=true}"/>
         <Label Content="Phone:" Grid.Column="1" Grid.Row="3" Style="{StaticResource Label}"/>
         <TextBox x:Name="add_phoneTextBox" Grid.Column="1" Grid.Row="3" Style="{StaticResource CustTextBox}"
                  Text="{Binding Phone, Mode=TwoWay, NotifyOnValidationError=true, ValidatesOnExceptions=true}"/>
         <Label Content="Postal Code:" Grid.Column="1" Grid.Row="4" VerticalAlignment="Center" Style="{StaticResource Label}"/>
         <TextBox x:Name="add_postalCodeTextBox" Grid.Column="1" Grid.Row="4" Style="{StaticResource CustTextBox}"
                  Text="{Binding PostalCode, Mode=TwoWay, NotifyOnValidationError=true, ValidatesOnExceptions=true}"/>
         <Label Content="Region:" Grid.Column="1" Grid.Row="5" Style="{StaticResource Label}"/>
         <TextBox x:Name="add_regionTextBox" Grid.Column="1" Grid.Row="5" Style="{StaticResource CustTextBox}"
                  Text="{Binding Region, Mode=TwoWay, NotifyOnValidationError=true, ValidatesOnExceptions=true}"/>
     </Grid>
     <Grid x:Name="newOrderGrid" Grid.Row="1" HorizontalAlignment="Left" VerticalAlignment="Top" Margin="5" DataContext="{Binding Path=newOrder, Mode=TwoWay}" Visibility="Collapsed" Background="LightGreen">
         <Grid.ColumnDefinitions>
             <ColumnDefinition Width="Auto" MinWidth="233"/>
             <ColumnDefinition Width="Auto" MinWidth="397"/>
         </Grid.ColumnDefinitions>
         <Grid.RowDefinitions>
             <RowDefinition Height="Auto"/>
             <RowDefinition Height="Auto"/>
             <RowDefinition Height="Auto"/>
             <RowDefinition Height="Auto"/>
             <RowDefinition Height="Auto"/>
             <RowDefinition Height="Auto"/>
             <RowDefinition Height="Auto"/>
         </Grid.RowDefinitions>
         <Label Content="New Order Form" FontWeight="Bold"/>
         <Label Content="Employee ID:"  Grid.Row="1" Style="{StaticResource Label}"/>
         <TextBox x:Name="add_employeeIDTextBox" Grid.Row="1" Style="{StaticResource CustTextBox}"
                  Text="{Binding EmployeeID, Mode=TwoWay, NotifyOnValidationError=true, ValidatesOnExceptions=true}"/>
         <Label Content="Order Date:"  Grid.Row="2" Style="{StaticResource Label}"/>
         <DatePicker x:Name="add_orderDatePicker" Grid.Row="2"  HorizontalAlignment="Right" Width="120"
                 SelectedDate="{Binding OrderDate, Mode=TwoWay, NotifyOnValidationError=true, ValidatesOnExceptions=true, UpdateSourceTrigger=PropertyChanged}"/>
         <Label Content="Required Date:" Grid.Row="3" Style="{StaticResource Label}"/>
         <DatePicker x:Name="add_requiredDatePicker" Grid.Row="3" HorizontalAlignment="Right" Width="120"
                  SelectedDate="{Binding RequiredDate, Mode=TwoWay, NotifyOnValidationError=true, ValidatesOnExceptions=true, UpdateSourceTrigger=PropertyChanged}"/>
         <Label Content="Shipped Date:"  Grid.Row="4"  Style="{StaticResource Label}"/>
         <DatePicker x:Name="add_shippedDatePicker"  Grid.Row="4"  HorizontalAlignment="Right" Width="120"
                 SelectedDate="{Binding ShippedDate, Mode=TwoWay, NotifyOnValidationError=true, ValidatesOnExceptions=true, UpdateSourceTrigger=PropertyChanged}"/>
         <Label Content="Ship Via:"  Grid.Row="5" Style="{StaticResource Label}"/>
         <TextBox x:Name="add_ShipViaTextBox"  Grid.Row="5" Style="{StaticResource CustTextBox}"
                  Text="{Binding ShipVia, Mode=TwoWay, NotifyOnValidationError=true, ValidatesOnExceptions=true}"/>
         <Label Content="Freight"  Grid.Row="6" Style="{StaticResource Label}"/>
         <TextBox x:Name="add_freightTextBox" Grid.Row="6" Style="{StaticResource CustTextBox}"
                  Text="{Binding Freight, Mode=TwoWay, NotifyOnValidationError=true, ValidatesOnExceptions=true}"/>
     </Grid>
     <DataGrid x:Name="ordersDataGrid" SelectionUnit="Cell" SelectionMode="Single" AutoGenerateColumns="False" CanUserAddRows="false" IsEnabled="True" EnableRowVirtualization="True" Width="auto" ItemsSource="{Binding Source={StaticResource customerOrdersViewSource}}" Margin="10,10,10,10" Grid.Row="2" RowDetailsVisibilityMode="VisibleWhenSelected">
         <DataGrid.Columns>
             <DataGridTemplateColumn>
                 <DataGridTemplateColumn.CellTemplate>
                     <DataTemplate>
                         <Button Content="Delete" Command="{StaticResource DeleteOrderCommand}" CommandParameter="{Binding}"/>
                     </DataTemplate>
                 </DataGridTemplateColumn.CellTemplate>
             </DataGridTemplateColumn>
             <DataGridTextColumn x:Name="customerIDColumn" Binding="{Binding CustomerID}" Header="Customer ID" Width="SizeToHeader"/>
             <DataGridTextColumn x:Name="employeeIDColumn" Binding="{Binding EmployeeID}" Header="Employee ID" Width="SizeToHeader"/>
             <DataGridTextColumn x:Name="freightColumn" Binding="{Binding Freight}" Header="Freight" Width="SizeToHeader"/>
             <DataGridTemplateColumn x:Name="orderDateColumn" Header="Order Date" Width="SizeToHeader">
                 <DataGridTemplateColumn.CellTemplate>
                     <DataTemplate>
                         <DatePicker SelectedDate="{Binding OrderDate, Mode=TwoWay, NotifyOnValidationError=true, ValidatesOnExceptions=true, UpdateSourceTrigger=PropertyChanged}"/>
                     </DataTemplate>
                 </DataGridTemplateColumn.CellTemplate>
             </DataGridTemplateColumn>
             <DataGridTextColumn x:Name="orderIDColumn" Binding="{Binding OrderID}" Header="Order ID" Width="SizeToHeader"/>
             <DataGridTemplateColumn x:Name="requiredDateColumn" Header="Required Date" Width="SizeToHeader">
                 <DataGridTemplateColumn.CellTemplate>
                     <DataTemplate>
                         <DatePicker SelectedDate="{Binding RequiredDate, Mode=TwoWay, NotifyOnValidationError=true, ValidatesOnExceptions=true, UpdateSourceTrigger=PropertyChanged}"/>
                     </DataTemplate>
                 </DataGridTemplateColumn.CellTemplate>
             </DataGridTemplateColumn>
             <DataGridTextColumn x:Name="shipAddressColumn" Binding="{Binding ShipAddress}" Header="Ship Address" Width="SizeToHeader"/>
             <DataGridTextColumn x:Name="shipCityColumn" Binding="{Binding ShipCity}" Header="Ship City" Width="SizeToHeader"/>
             <DataGridTextColumn x:Name="shipCountryColumn" Binding="{Binding ShipCountry}" Header="Ship Country" Width="SizeToHeader"/>
             <DataGridTextColumn x:Name="shipNameColumn" Binding="{Binding ShipName}" Header="Ship Name" Width="SizeToHeader"/>
             <DataGridTemplateColumn x:Name="shippedDateColumn" Header="Shipped Date" Width="SizeToHeader">
                 <DataGridTemplateColumn.CellTemplate>
                     <DataTemplate>
                         <DatePicker SelectedDate="{Binding ShippedDate, Mode=TwoWay, NotifyOnValidationError=true, ValidatesOnExceptions=true, UpdateSourceTrigger=PropertyChanged}"/>
                     </DataTemplate>
                 </DataGridTemplateColumn.CellTemplate>
             </DataGridTemplateColumn>
             <DataGridTextColumn x:Name="shipPostalCodeColumn" Binding="{Binding ShipPostalCode}" Header="Ship Postal Code" Width="SizeToHeader"/>
             <DataGridTextColumn x:Name="shipRegionColumn" Binding="{Binding ShipRegion}" Header="Ship Region" Width="SizeToHeader"/>
             <DataGridTextColumn x:Name="shipViaColumn" Binding="{Binding ShipVia}" Header="Ship Via" Width="SizeToHeader"/>
         </DataGrid.Columns>
     </DataGrid>
 </Grid>
Knoppen toevoegen om te navigeren, toevoegen, bijwerken en verwijderen
In Windows Forms-toepassingen krijgt u een BindingNavigator-object met knoppen voor het navigeren door rijen in een database en het uitvoeren van eenvoudige CRUD-bewerkingen. WPF biedt geen BindingNavigator, maar het is eenvoudig genoeg om er een te maken. U doet dit met knoppen in een horizontaal StackPanel en koppelt de knoppen aan opdrachten die zijn gebonden aan methoden in de code erachter.
Er zijn vier delen in de opdrachtlogica: (1) de opdrachten, (2) de bindingen, (3) de knoppen en (4) de opdrachthandlers in de achterliggende code.
Opdrachten, bindingen en knoppen toevoegen in XAML
Voeg eerst de opdrachten toe in het bestand MainWindow.xaml in het element
Windows.Resources:<RoutedUICommand x:Key="FirstCommand" Text="First"/> <RoutedUICommand x:Key="LastCommand" Text="Last"/> <RoutedUICommand x:Key="NextCommand" Text="Next"/> <RoutedUICommand x:Key="PreviousCommand" Text="Previous"/> <RoutedUICommand x:Key="DeleteCustomerCommand" Text="Delete Customer"/> <RoutedUICommand x:Key="DeleteOrderCommand" Text="Delete Order"/> <RoutedUICommand x:Key="UpdateCommand" Text="Update"/> <RoutedUICommand x:Key="AddCommand" Text="Add"/> <RoutedUICommand x:Key="CancelCommand" Text="Cancel"/>Een CommandBinding wijst een
RoutedUICommandgebeurtenis toe aan een methode in de code achter. Voeg ditCommandBindingselement toe na deWindows.Resourcesafsluitende tag:<Window.CommandBindings> <CommandBinding Command="{StaticResource FirstCommand}" Executed="FirstCommandHandler"/> <CommandBinding Command="{StaticResource LastCommand}" Executed="LastCommandHandler"/> <CommandBinding Command="{StaticResource NextCommand}" Executed="NextCommandHandler"/> <CommandBinding Command="{StaticResource PreviousCommand}" Executed="PreviousCommandHandler"/> <CommandBinding Command="{StaticResource DeleteCustomerCommand}" Executed="DeleteCustomerCommandHandler"/> <CommandBinding Command="{StaticResource DeleteOrderCommand}" Executed="DeleteOrderCommandHandler"/> <CommandBinding Command="{StaticResource UpdateCommand}" Executed="UpdateCommandHandler"/> <CommandBinding Command="{StaticResource AddCommand}" Executed="AddCommandHandler"/> <CommandBinding Command="{StaticResource CancelCommand}" Executed="CancelCommandHandler"/> </Window.CommandBindings>Voeg nu de
StackPaneltoe met de knoppen navigatie, toevoegen, verwijderen en bijwerken. Voeg eerst deze stijl toe aanWindows.Resources:<Style x:Key="NavButton" TargetType="{x:Type Button}" BasedOn="{x:Null}"> <Setter Property="FontSize" Value="24"/> <Setter Property="FontFamily" Value="Segoe UI Symbol"/> <Setter Property="Margin" Value="2,2,2,0"/> <Setter Property="Width" Value="40"/> <Setter Property="Height" Value="auto"/> </Style>Plak vervolgens deze code vlak na de
RowDefinitionsvoor het buitensteGridelement, boven aan de XAML-pagina:<StackPanel Orientation="Horizontal" Margin="2,2,2,0" Height="36" VerticalAlignment="Top" Background="Gainsboro" DataContext="{StaticResource customerViewSource}" d:LayoutOverrides="LeftMargin, RightMargin, TopMargin, BottomMargin"> <Button Name="btnFirst" Content="|◄" Command="{StaticResource FirstCommand}" Style="{StaticResource NavButton}"/> <Button Name="btnPrev" Content="◄" Command="{StaticResource PreviousCommand}" Style="{StaticResource NavButton}"/> <Button Name="btnNext" Content="►" Command="{StaticResource NextCommand}" Style="{StaticResource NavButton}"/> <Button Name="btnLast" Content="►|" Command="{StaticResource LastCommand}" Style="{StaticResource NavButton}"/> <Button Name="btnDelete" Content="Delete Customer" Command="{StaticResource DeleteCustomerCommand}" FontSize="11" Width="120" Style="{StaticResource NavButton}"/> <Button Name="btnAdd" Content="New Customer" Command="{StaticResource AddCommand}" FontSize="11" Width="80" Style="{StaticResource NavButton}"/> <Button Content="New Order" Name="btnNewOrder" FontSize="11" Width="80" Style="{StaticResource NavButton}" Click="NewOrder_click"/> <Button Name="btnUpdate" Content="Commit" Command="{StaticResource UpdateCommand}" FontSize="11" Width="80" Style="{StaticResource NavButton}"/> <Button Content="Cancel" Name="btnCancel" Command="{StaticResource CancelCommand}" FontSize="11" Width="80" Style="{StaticResource NavButton}"/> </StackPanel>
Opdrachthandlers toevoegen aan de klasse MainWindow
De code-behind is minimaal, met uitzondering van de methoden voor toevoegen en verwijderen. Navigatie wordt uitgevoerd door methoden aan te roepen in de eigenschap View van de CollectionViewSource. In de DeleteOrderCommandHandler ziet u hoe u trapsgewijs verwijderen kunt uitvoeren op een order. We moeten eerst de Order_Details verwijderen die eraan zijn gekoppeld. De UpdateCommandHandler voegt een nieuwe klant of order toe aan de verzameling, of werkt alleen een bestaande klant of bestelling bij met de wijzigingen die de gebruiker in de tekstvakken heeft aangebracht.
Voeg deze handlermethoden toe aan de klasse MainWindow in MainWindow.xaml.cs. Als uw CollectionViewSource voor de tabel Klanten een andere naam heeft, moet u de naam in elk van deze methoden aanpassen:
private void LastCommandHandler(object sender, ExecutedRoutedEventArgs e)
{
    custViewSource.View.MoveCurrentToLast();
}

private void PreviousCommandHandler(object sender, ExecutedRoutedEventArgs e)
{
    custViewSource.View.MoveCurrentToPrevious();
}

private void NextCommandHandler(object sender, ExecutedRoutedEventArgs e)
{
    custViewSource.View.MoveCurrentToNext();
}

private void FirstCommandHandler(object sender, ExecutedRoutedEventArgs e)
{
    custViewSource.View.MoveCurrentToFirst();
}

private void DeleteCustomerCommandHandler(object sender, ExecutedRoutedEventArgs e)
{
    // If existing window is visible, delete the customer and all their orders.
    // In a real application, you should add warnings and allow the user to cancel the operation.
    var cur = custViewSource.View.CurrentItem as Customer;

    var cust = (from c in context.Customers
                where c.CustomerID == cur.CustomerID
                select c).FirstOrDefault();

    if (cust != null)
    {
        foreach (var ord in cust.Orders.ToList())
        {
            Delete_Order(ord);
        }
        context.Customers.Remove(cust);
    }
    context.SaveChanges();
    custViewSource.View.Refresh();
}

// Commit changes from the new customer form, the new order form,
// or edits made to the existing customer form.
private void UpdateCommandHandler(object sender, ExecutedRoutedEventArgs e)
{
    if (newCustomerGrid.IsVisible)
    {
        // Create a new object because the old one
        // is being tracked by EF now.
        Customer newCustomer = new Customer
        {
            Address = add_addressTextBox.Text,
            City = add_cityTextBox.Text,
            CompanyName = add_companyNameTextBox.Text,
            ContactName = add_contactNameTextBox.Text,
            ContactTitle = add_contactTitleTextBox.Text,
            Country = add_countryTextBox.Text,
            CustomerID = add_customerIDTextBox.Text,
            Fax = add_faxTextBox.Text,
            Phone = add_phoneTextBox.Text,
            PostalCode = add_postalCodeTextBox.Text,
            Region = add_regionTextBox.Text
        };

        // Perform very basic validation
        if (newCustomer.CustomerID.Length == 5)
        {
            // Insert the new customer at correct position:
            int len = context.Customers.Local.Count();
            int pos = len;
            for (int i = 0; i < len; ++i)
            {
                if (String.CompareOrdinal(newCustomer.CustomerID, context.Customers.Local[i].CustomerID) < 0)
                {
                    pos = i;
                    break;
                }
            }
            context.Customers.Local.Insert(pos, newCustomer);
            custViewSource.View.Refresh();
            custViewSource.View.MoveCurrentTo(newCustomer);
        }
        else
        {
            MessageBox.Show("CustomerID must have 5 characters.");
        }

        newCustomerGrid.Visibility = Visibility.Collapsed;
        existingCustomerGrid.Visibility = Visibility.Visible;
    }
    else if (newOrderGrid.IsVisible)
    {
        // Order ID is auto-generated so we don't set it here.
        // For CustomerID, address, etc we use the values from current customer.
        // User can modify these in the datagrid after the order is entered.

        Customer currentCustomer = (Customer)custViewSource.View.CurrentItem;

        Order newOrder = new Order()
        {
            OrderDate = add_orderDatePicker.SelectedDate,
            RequiredDate = add_requiredDatePicker.SelectedDate,
            ShippedDate = add_shippedDatePicker.SelectedDate,
            CustomerID = currentCustomer.CustomerID,
            ShipAddress = currentCustomer.Address,
            ShipCity = currentCustomer.City,
            ShipCountry = currentCustomer.Country,
            ShipName = currentCustomer.CompanyName,
            ShipPostalCode = currentCustomer.PostalCode,
            ShipRegion = currentCustomer.Region
        };

        try
        {
            newOrder.EmployeeID = Int32.Parse(add_employeeIDTextBox.Text);
        }
        catch
        {
            MessageBox.Show("EmployeeID must be a valid integer value.");
            return;
        }

        try
        {
            // Exercise for the reader if you are using Northwind:
            // Add the Northwind Shippers table to the model.

            // Acceptable ShipperID values are 1, 2, or 3.
            if (add_ShipViaTextBox.Text == "1" || add_ShipViaTextBox.Text == "2"
                || add_ShipViaTextBox.Text == "3")
            {
                newOrder.ShipVia = Convert.ToInt32(add_ShipViaTextBox.Text);
            }
            else
            {
                MessageBox.Show("Shipper ID must be 1, 2, or 3 in Northwind.");
                return;
            }
        }
        catch
        {
            MessageBox.Show("Ship Via must be convertible to int");
            return;
        }

        try
        {
            newOrder.Freight = Convert.ToDecimal(add_freightTextBox.Text);
        }
        catch
        {
            MessageBox.Show("Freight must be convertible to decimal.");
            return;
        }

        // Add the order into the EF model
        context.Orders.Add(newOrder);
        ordViewSource.View.Refresh();
    }

    // Save the changes, either for a new customer, a new order
    // or an edit to an existing customer or order.
    context.SaveChanges();
}

// Sets up the form so that user can enter data. Data is later
// saved when user clicks Commit.
private void AddCommandHandler(object sender, ExecutedRoutedEventArgs e)
{
    existingCustomerGrid.Visibility = Visibility.Collapsed;
    newOrderGrid.Visibility = Visibility.Collapsed;
    newCustomerGrid.Visibility = Visibility.Visible;

    // Clear all the text boxes before adding a new customer.
    foreach (var child in newCustomerGrid.Children)
    {
        var tb = child as TextBox;
        if (tb != null)
        {
            tb.Text = "";
        }
    }
}

private void NewOrder_click(object sender, RoutedEventArgs e)
{
    var cust = custViewSource.View.CurrentItem as Customer;
    if (cust == null)
    {
        MessageBox.Show("No customer selected.");
        return;
    }

    existingCustomerGrid.Visibility = Visibility.Collapsed;
    newCustomerGrid.Visibility = Visibility.Collapsed;
    newOrderGrid.UpdateLayout();
    newOrderGrid.Visibility = Visibility.Visible;
}

// Cancels any input into the new customer form
private void CancelCommandHandler(object sender, ExecutedRoutedEventArgs e)
{
    add_addressTextBox.Text = "";
    add_cityTextBox.Text = "";
    add_companyNameTextBox.Text = "";
    add_contactNameTextBox.Text = "";
    add_contactTitleTextBox.Text = "";
    add_countryTextBox.Text = "";
    add_customerIDTextBox.Text = "";
    add_faxTextBox.Text = "";
    add_phoneTextBox.Text = "";
    add_postalCodeTextBox.Text = "";
    add_regionTextBox.Text = "";

    existingCustomerGrid.Visibility = Visibility.Visible;
    newCustomerGrid.Visibility = Visibility.Collapsed;
    newOrderGrid.Visibility = Visibility.Collapsed;
}

private void Delete_Order(Order order)
{
    // Find the order in the EF model.
    var ord = (from o in context.Orders.Local
               where o.OrderID == order.OrderID
               select o).FirstOrDefault();

    // Delete all the order_details that have
    // this Order as a foreign key
    foreach (var detail in ord.Order_Details.ToList())
    {
        context.Order_Details.Remove(detail);
    }

    // Now it's safe to delete the order.
    context.Orders.Remove(ord);
    context.SaveChanges();

    // Update the data grid.
    ordViewSource.View.Refresh();
}

private void DeleteOrderCommandHandler(object sender, ExecutedRoutedEventArgs e)
{
    // Get the Order in the row in which the Delete button was clicked.
    Order obj = e.Parameter as Order;
    Delete_Order(obj);
}
De toepassing uitvoeren
Druk op F5om foutopsporing te starten. U ziet dat de klant- en ordergegevens in het raster zijn ingevuld en dat de navigatieknoppen werken zoals verwacht. Klik op Commit om een nieuwe klant of order toe te voegen aan het model nadat u de gegevens hebt ingevoerd. Klik op Annuleren om een nieuwe klant of een nieuw bestelformulier af te breken zonder de gegevens op te slaan. U kunt wijzigingen aanbrengen aan bestaande klanten en orders rechtstreeks in de tekstvakken en deze wijzigingen worden automatisch naar het model geschreven.