Oefening: een opslagaccount en -database seeden
U hebt uw werkstroom bijgewerkt om de toepassing van uw website te bouwen en te implementeren in de Azure-app Service-app die is gedefinieerd in uw Bicep-bestand, maar de betrouwbaarheidstesttaak mislukt omdat de database nog niet werkt. In deze les implementeert u een nieuwe logische Azure SQL-server en -database en configureert u uw werkstroom voor het bouwen en implementeren van het schema van de database. U werkt uw werkstroom ook bij om enkele voorbeeldproductgegevens toe te voegen voor uw testomgeving, zodat uw team de website kan uitproberen.
In het proces gaat u het volgende doen:
- Voeg een blobcontainer toe aan het Azure-opslagaccount.
- Voeg een logische Azure SQL-server en -database toe.
- Werk de buildtaak bij om het databaseproject in een DACPAC-bestand te bouwen.
- Voeg nieuwe variabelen en geheimen toe voor de logische Azure SQL-server en -database.
- Werk uw werkstroom bij om de nieuwe variabelen en geheimen te gebruiken.
- Voeg nieuwe werkstroomstappen toe om uw DACPAC-bestand te implementeren.
- Voer de werkstroom uit en bekijk de website.
Een opslagcontainer toevoegen
Uw Bicep-bestand definieert al een opslagaccount, maar er wordt geen blobcontainer gedefinieerd. Hier voegt u een blobcontainer toe aan uw Bicep-bestand. U geeft ook de naam van het opslagaccount en de blobcontainer op voor de toepassing met behulp van de configuratie-instellingen. Op die manier weet de app welk opslagaccount moet worden geopend.
Open in Visual Studio Code het bestand main.bicep in de implementatiemap .
Voeg onder de variabelen die resourcenamen definiëren (in de buurt van regel 27) een nieuwe variabeledefinitie toe voor de naam van de blobopslagcontainer:
var storageAccountImagesBlobContainerName = 'toyimages'Werk de
storageAccountresource bij om de blobcontainer te definiëren:resource storageAccount 'Microsoft.Storage/storageAccounts@2022-09-01' = { name: storageAccountName location: location kind: 'StorageV2' sku: environmentConfigurationMap[environmentType].storageAccount.sku resource blobService 'blobServices' = { name: 'default' resource storageAccountImagesBlobContainer 'containers' = { name: storageAccountImagesBlobContainerName properties: { publicAccess: 'Blob' } } } }Werk de eigenschap van
appSettingsde app bij om twee nieuwe toepassingsinstellingen toe te voegen, één voor de naam van het opslagaccount en een voor de naam van de blobcontainer:resource appServiceApp 'Microsoft.Web/sites@2022-03-01' = { name: appServiceAppName location: location properties: { serverFarmId: appServicePlan.id httpsOnly: true siteConfig: { appSettings: [ { name: 'APPINSIGHTS_INSTRUMENTATIONKEY' value: applicationInsights.properties.InstrumentationKey } { name: 'APPLICATIONINSIGHTS_CONNECTION_STRING' value: applicationInsights.properties.ConnectionString } { name: 'ReviewApiUrl' value: reviewApiUrl } { name: 'ReviewApiKey' value: reviewApiKey } { name: 'StorageAccountName' value: storageAccount.name } { name: 'StorageAccountBlobEndpoint' value: storageAccount.properties.primaryEndpoints.blob } { name: 'StorageAccountImagesContainerName' value: storageAccount::blobService::storageAccountImagesBlobContainer.name } ] } } }Voeg aan het einde van de bestandsinhoud nieuwe uitvoer toe om de namen van het opslagaccount en de blobcontainer beschikbaar te maken:
output storageAccountName string = storageAccount.name
output storageAccountImagesBlobContainerName string = storageAccount::blobService::storageAccountImagesBlobContainer.name
Sla de wijzigingen in het bestand op.
Voer uw wijzigingen door in uw Git-opslagplaats, maar push ze nog niet. Voer in de Visual Studio Code-terminal de volgende opdrachten uit:
git add .
git commit -m "Add storage container"
Een logische Azure SQL-server en -database toevoegen
Uw Bicep-bestand implementeert momenteel geen logische Azure SQL-server of -database. In deze sectie voegt u deze resources toe aan uw Bicep-bestand.
Voeg in het bestand main.bicep twee nieuwe parameters toe onder de
reviewApiKeyparameter boven aan het bestand:@description('The administrator login username for the SQL server.') param sqlServerAdministratorLogin string @secure() @description('The administrator login password for the SQL server.') param sqlServerAdministratorLoginPassword stringVoeg onder de variabelen die resourcenamen definiëren nieuwe variabelen toe om de namen van uw logische Azure SQL-server en -database te definiëren:
var sqlServerName = 'toy-website-${resourceNameSuffix}'
var sqlDatabaseName = 'Toys'
Definieer onder de variabelen die u zojuist hebt toegevoegd een nieuwe variabele waarmee een verbindingsreeks wordt gemaakt voor de toepassing voor toegang tot de database:
// Define the connection string to access Azure SQL.
var sqlDatabaseConnectionString = 'Server=tcp:${sqlServer.properties.fullyQualifiedDomainName},1433;Initial Catalog=${sqlDatabase.name};Persist Security Info=False;User ID=${sqlServerAdministratorLogin};Password=${sqlServerAdministratorLoginPassword};MultipleActiveResultSets=False;Encrypt=True;TrustServerCertificate=False;Connection Timeout=30;'
Notitie
Ter vereenvoudiging gebruikt de toepassing de aanmelding en het wachtwoord van de beheerder om toegang te krijgen tot de database. Dit is echter geen goede gewoonte voor een productieoplossing. Het is beter om een door App Service beheerde identiteit te gebruiken voor toegang tot de database en de beheerde identiteit de minimale machtigingen te verlenen die nodig zijn voor de toepassing. We koppelen een koppeling naar meer informatie op de overzichtspagina van deze module.
Voeg aan het einde van de bestandsinhoud boven de uitvoer de logische Azure SQL-server- en databasebronnen toe:
resource sqlServer 'Microsoft.Sql/servers@2022-05-01-preview' = {
  name: sqlServerName
  location: location
  properties: {
    administratorLogin: sqlServerAdministratorLogin
    administratorLoginPassword: sqlServerAdministratorLoginPassword
  }
}

resource sqlServerFirewallRule 'Microsoft.Sql/servers/firewallRules@2022-05-01-preview' = {
  parent: sqlServer
  name: 'AllowAllWindowsAzureIps'
  properties: {
    endIpAddress: '0.0.0.0'
    startIpAddress: '0.0.0.0'
  }
}

resource sqlDatabase 'Microsoft.Sql/servers/databases@2022-05-01-preview' = {
  parent: sqlServer
  name: sqlDatabaseName
  location: location
  sku: environmentConfigurationMap[environmentType].sqlDatabase.sku
}
Werk de
environmentConfigurationMapvariabele bij om de SKU's te definiëren die voor uw database voor elke omgeving moeten worden gebruikt:var environmentConfigurationMap = { Production: { appServicePlan: { sku: { name: 'S1' capacity: 1 } } storageAccount: { sku: { name: 'Standard_LRS' } } sqlDatabase: { sku: { name: 'Standard' tier: 'Standard' } } } Test: { appServicePlan: { sku: { name: 'F1' } } storageAccount: { sku: { name: 'Standard_GRS' } } sqlDatabase: { sku: { name: 'Standard' tier: 'Standard' } } } }Voeg een andere app-instelling toe aan uw App Service-app voor de database verbindingsreeks:
resource appServiceApp 'Microsoft.Web/sites@2022-03-01' = {
  name: appServiceAppName
  location: location
  properties: {
    serverFarmId: appServicePlan.id
    httpsOnly: true
    siteConfig: {
      appSettings: [
        {
          name: 'APPINSIGHTS_INSTRUMENTATIONKEY'
          value: applicationInsights.properties.InstrumentationKey
        }
        {
          name: 'APPLICATIONINSIGHTS_CONNECTION_STRING'
          value: applicationInsights.properties.ConnectionString
        }
        {
          name: 'ReviewApiUrl'
          value: reviewApiUrl
        }
        {
          name: 'ReviewApiKey'
          value: reviewApiKey
        }
        {
          name: 'StorageAccountName'
          value: storageAccount.name
        }
        {
          name: 'StorageAccountBlobEndpoint'
          value: storageAccount.properties.primaryEndpoints.blob
        }
        {
          name: 'StorageAccountImagesContainerName'
          value: storageAccount::blobService::storageAccountImagesBlobContainer.name
        }
        {
          name: 'SqlDatabaseConnectionString'
          value: sqlDatabaseConnectionString
        }
      ]
    }
  }
}
Voeg onder aan het bestand uitvoer toe om de hostnaam van de logische Azure SQL-server en de naam van de database beschikbaar te maken:
output appServiceAppName string = appServiceApp.name
output appServiceAppHostName string = appServiceApp.properties.defaultHostName
output storageAccountName string = storageAccount.name
output storageAccountImagesBlobContainerName string = storageAccount::blobService::storageAccountImagesBlobContainer.name
output sqlServerFullyQualifiedDomainName string = sqlServer.properties.fullyQualifiedDomainName
output sqlDatabaseName string = sqlDatabase.name
Sla de wijzigingen in het bestand op.
Nieuwe buildstappen voor het databaseproject toevoegen
Uw websiteontwikkelaars hebben een Visual Studio-databaseproject voorbereid dat uw websitedatabasetabel implementeert en configureert. Hier werkt u de werkstroombuild bij met de naam werkstroom om het databaseproject in een DACPAC-bestand te bouwen en te uploaden als een werkstroomartefact.
Open het bestand build.yml in de map .github/workflows .
Als u het Visual Studio-databaseproject wilt bouwen en het gegenereerde DACPAC-bestand wilt uploaden als een werkstroomartefact, voegt u de build-databasetaak toe:
name: build-website

on:
  workflow_call:

jobs:
  build-application:
    name: Build application
    runs-on: ubuntu-latest
    steps:
    - uses: actions/checkout@v3

    - name: Install .NET Core
      uses: actions/setup-dotnet@v3
      with:
        dotnet-version: 3.1

    - name: Build publishable website
      run: |
        dotnet publish --configuration Release
      working-directory: ./src/ToyCompany/ToyCompany.Website

    - name: Zip publishable website
      run: |
        zip -r publish.zip .
      working-directory: ./src/ToyCompany/ToyCompany.Website/bin/Release/netcoreapp3.1/publish

    - name: Upload website as workflow artifact
      uses: actions/upload-artifact@v3
      with:
        name: website
        path: ./src/ToyCompany/ToyCompany.Website/bin/Release/netcoreapp3.1/publish/publish.zip

  build-database:
    name: Build database
    runs-on: windows-latest
    steps:
    - uses: actions/checkout@v3

    - name: Prepare MSBuild
      uses: microsoft/setup-msbuild@v1.1

    - name: Build database project
      working-directory: ./src/ToyCompany/ToyCompany.Database
      run: MSBuild.exe ToyCompany.Database.sqlproj -property:Configuration=Release

    - name: Upload website as workflow artifact
      uses: actions/upload-artifact@v3
      with:
        name: database
        path: ./src/ToyCompany/ToyCompany.Database/bin/Release/ToyCompany.Database.dacpac
De build-databasetaak maakt gebruik van een Windows-runner. Momenteel moeten Visual Studio-databaseprojecten worden gebouwd op het Windows-besturingssysteem.
Sla de wijzigingen in het bestand op.
De geheimen definiëren
U moet het beheerderswachtwoord van uw logische Azure SQL-server veilig opslaan voor elke omgeving. U besluit GitHub-geheimen te gebruiken om de gegevens te beveiligen.
Ga in uw browser naar >>en variabelenacties.
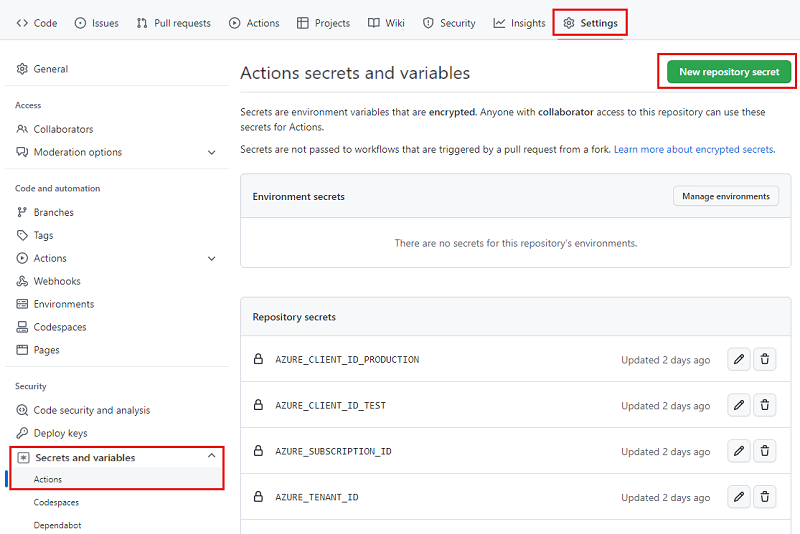
Selecteer de knop Nieuw opslagplaatsgeheim .
Voer SQL_SERVER_ADMINISTRATOR_LOGIN_PASSWORD_TEST in als de geheime naam en SecurePassword!111 als de waarde.
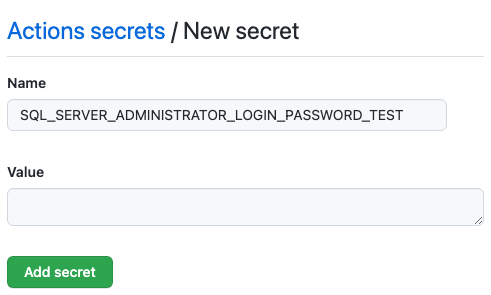
Selecteer Geheim toevoegen.
Herhaal het proces om een ander geheim toe te voegen met de naam SQL_SERVER_ADMINISTRATOR_LOGIN_PASSWORD_PRODUCTION als de geheime naam en SecurePassword!999 als de waarde. Selecteer Geheim toevoegen.
De geheimen en invoer toevoegen aan uw werkstroom
Open in Visual Studio Code het bestand deploy.yml in de map .github/workflows .
Definieer boven aan het bestand een nieuwe invoer met de naam
sqlServerAdministratorLoginen een nieuw geheim met de naamsqlServerAdministratorLoginPassword:name: deploy on: workflow_call: inputs: environmentType: required: true type: string resourceGroupName: required: true type: string reviewApiUrl: required: true type: string sqlServerAdministratorLogin: required: true type: string secrets: AZURE_CLIENT_ID: required: true AZURE_TENANT_ID: required: true AZURE_SUBSCRIPTION_ID: required: true reviewApiKey: required: true sqlServerAdministratorLoginPassword: required: trueSla de wijzigingen in het bestand op.
Open het bestand workflow.yml .
Definieer in de definitie deploy-test een waarde voor de
sqlServerAdministratorLogininvoer en geef de waarde voor hetsqlServerAdministratorLoginPasswordgeheim door:# Deploy to the test environment. deploy-test: uses: ./.github/workflows/deploy.yml needs: [build, lint] with: environmentType: Test resourceGroupName: ToyWebsiteTest reviewApiUrl: https://sandbox.contoso.com/reviews sqlServerAdministratorLogin: TestToyCompanyAdmin secrets: AZURE_CLIENT_ID: ${{ secrets.AZURE_CLIENT_ID_TEST }} AZURE_TENANT_ID: ${{ secrets.AZURE_TENANT_ID }} AZURE_SUBSCRIPTION_ID: ${{ secrets.AZURE_SUBSCRIPTION_ID }} reviewApiKey: ${{ secrets.REVIEW_API_KEY_TEST }} sqlServerAdministratorLoginPassword: ${{ secrets.SQL_SERVER_ADMINISTRATOR_LOGIN_PASSWORD_TEST }}Herhaal het proces in de definitie van de implementatieproductie met de waarden van de productieomgeving:
# Deploy to the production environment. deploy-production: uses: ./.github/workflows/deploy.yml needs: - lint - build - deploy-test with: environmentType: Production resourceGroupName: ToyWebsiteProduction reviewApiUrl: https://api.contoso.com/reviews sqlServerAdministratorLogin: ToyCompanyAdmin secrets: AZURE_CLIENT_ID: ${{ secrets.AZURE_CLIENT_ID_PRODUCTION }} AZURE_TENANT_ID: ${{ secrets.AZURE_TENANT_ID }} AZURE_SUBSCRIPTION_ID: ${{ secrets.AZURE_SUBSCRIPTION_ID }} reviewApiKey: ${{ secrets.REVIEW_API_KEY_PRODUCTION }} sqlServerAdministratorLoginPassword: ${{ secrets.SQL_SERVER_ADMINISTRATOR_LOGIN_PASSWORD_PRODUCTION }}Sla de wijzigingen in het bestand op.
Parameterwaarden en uitvoer toevoegen
Het Bicep-bestand heeft nu twee nieuwe verplichte parameters: sqlServerAdministratorLogin en sqlServerAdministratorLoginPassword. Hier kunt u deze parameterwaarden doorgeven vanuit uw werkstroominvoer en -geheimen voor de validatie en implementatie van taken. U geeft ook de uitvoer van de Bicep-implementaties door aan de uitvoer van de taak.
Open het bestand deploy.yml .
Werk de stap uitvoeren van de preflight-validatiestap van de validatietaak bij om de nieuwe parameters toe te voegen:
jobs: validate: runs-on: ubuntu-latest steps: - uses: actions/checkout@v3 - uses: azure/login@v1 name: Sign in to Azure with: client-id: ${{ secrets.AZURE_CLIENT_ID }} tenant-id: ${{ secrets.AZURE_TENANT_ID }} subscription-id: ${{ secrets.AZURE_SUBSCRIPTION_ID }} - if: inputs.environmentType != 'Production' uses: azure/arm-deploy@v1 name: Run preflight validation with: deploymentName: ${{ github.run_number }} resourceGroupName: ${{ inputs.resourceGroupName }} template: ./deploy/main.bicep parameters: > environmentType=${{ inputs.environmentType }} reviewApiUrl=${{ inputs.reviewApiUrl }} reviewApiKey=${{ secrets.reviewApiKey }} sqlServerAdministratorLogin=${{ inputs.sqlServerAdministratorLogin }} sqlServerAdministratorLoginPassword=${{ secrets.sqlServerAdministratorLoginPassword }} deploymentMode: ValidateWerk de wat-als-stap uitvoeren bij om de nieuwe parameters toe te voegen:
- if: inputs.environmentType == 'Production' uses: azure/arm-deploy@v1 name: Run what-if with: failOnStdErr: false resourceGroupName: ${{ inputs.resourceGroupName }} template: ./deploy/main.bicep parameters: > environmentType=${{ inputs.environmentType }} reviewApiUrl=${{ inputs.reviewApiUrl }} reviewApiKey=${{ secrets.reviewApiKey }} sqlServerAdministratorLogin=${{ inputs.sqlServerAdministratorLogin }} sqlServerAdministratorLoginPassword=${{ secrets.sqlServerAdministratorLoginPassword }} additionalArguments: --what-ifWerk de stap Deploy Bicep-bestand van de implementatietaakbij om de nieuwe parameters toe te voegen:
deploy: needs: validate environment: ${{ inputs.environmentType }} runs-on: ubuntu-latest outputs: appServiceAppName: ${{ steps.deploy.outputs.appServiceAppName }} appServiceAppHostName: ${{ steps.deploy.outputs.appServiceAppHostName }} steps: - uses: actions/checkout@v3 - uses: azure/login@v1 name: Sign in to Azure with: client-id: ${{ secrets.AZURE_CLIENT_ID }} tenant-id: ${{ secrets.AZURE_TENANT_ID }} subscription-id: ${{ secrets.AZURE_SUBSCRIPTION_ID }} - uses: azure/arm-deploy@v1 id: deploy name: Deploy Bicep file with: failOnStdErr: false deploymentName: ${{ github.run_number }} resourceGroupName: ${{ inputs.resourceGroupName }} template: ./deploy/main.bicep parameters: > environmentType=${{ inputs.environmentType }} reviewApiUrl=${{ inputs.reviewApiUrl }} reviewApiKey=${{ secrets.reviewApiKey }} sqlServerAdministratorLogin=${{ inputs.sqlServerAdministratorLogin }} sqlServerAdministratorLoginPassword=${{ secrets.sqlServerAdministratorLoginPassword }}Voeg in de definitie van de implementatietaak nieuwe uitvoer toe voor de uitvoer van het Bicep-bestand:
deploy: needs: validate environment: ${{ inputs.environmentType }} runs-on: ubuntu-latest outputs: appServiceAppName: ${{ steps.deploy.outputs.appServiceAppName }} appServiceAppHostName: ${{ steps.deploy.outputs.appServiceAppHostName }} storageAccountName: ${{ steps.deploy.outputs.storageAccountName }} storageAccountImagesBlobContainerName: ${{ steps.deploy.outputs.storageAccountImagesBlobContainerName }} sqlServerFullyQualifiedDomainName: ${{ steps.deploy.outputs.sqlServerFullyQualifiedDomainName }} sqlDatabaseName: ${{ steps.deploy.outputs.sqlDatabaseName }}
Database- en gegevens seed-taken toevoegen
In deze sectie definieert u de stappen die nodig zijn om de databaseonderdelen van uw website te implementeren. Eerst voegt u een stap toe om het DACPAC-bestand te implementeren dat de werkstroom eerder heeft gebouwd. Vervolgens voegt u voorbeeldgegevens toe aan de database en het opslagaccount, maar alleen voor niet-productieomgevingen.
Voeg onder de taak deploy-website een nieuwe taak toe om het DACPAC-bestand te implementeren:
deploy-database: needs: deploy environment: ${{ inputs.environmentType }} runs-on: ubuntu-latest steps: - uses: actions/download-artifact@v3 - uses: azure/login@v1 name: Sign in to Azure with: client-id: ${{ secrets.AZURE_CLIENT_ID }} tenant-id: ${{ secrets.AZURE_TENANT_ID }} subscription-id: ${{ secrets.AZURE_SUBSCRIPTION_ID }} - uses: azure/sql-action@v1.2 name: Deploy DACPAC to database with: server-name: ${{ needs.deploy.outputs.sqlServerFullyQualifiedDomainName }} connection-string: ${{ format('Server={0};Initial Catalog={1};User Id={2};Password={3};', needs.deploy.outputs.sqlServerFullyQualifiedDomainName, needs.deploy.outputs.sqlDatabaseName, inputs.sqlServerAdministratorLogin, secrets.sqlServerAdministratorLoginPassword) }} dacpac-package: database/ToyCompany.Database.dacpacDefinieer onder de taak die u zojuist hebt toegevoegd en boven de betrouwbaarheidstesttaak een nieuwe taak om de database te seeden met voorbeeldgegevens.
seed-database: needs: - deploy - deploy-database environment: ${{ inputs.environmentType }} runs-on: ubuntu-latest steps: - uses: actions/checkout@v3 - uses: azure/login@v1 name: Sign in to Azure with: client-id: ${{ secrets.AZURE_CLIENT_ID }} tenant-id: ${{ secrets.AZURE_TENANT_ID }} subscription-id: ${{ secrets.AZURE_SUBSCRIPTION_ID }} - if: inputs.environmentType != 'Production' uses: azure/sql-action@v1.2 name: Add test data to database with: server-name: ${{ needs.deploy.outputs.sqlServerFullyQualifiedDomainName }} connection-string: ${{ format('Server={0};Initial Catalog={1};User Id={2};Password={3};', needs.deploy.outputs.sqlServerFullyQualifiedDomainName, needs.deploy.outputs.sqlDatabaseName, inputs.sqlServerAdministratorLogin, secrets.sqlServerAdministratorLoginPassword) }} sql-file: 'deploy/sample-data/Toys.sql'U ziet dat in de stap Testgegevens toevoegen aan de database een voorwaarde is toegepast. Dat wil gezegd, het wordt alleen uitgevoerd voor niet-productieomgevingen. De voorwaarde wordt toegepast op de stap, niet op de hele taak, zodat latere taken afhankelijk kunnen zijn van deze taak, ongeacht het omgevingstype.
Definieer onder de taak die u zojuist hebt toegevoegd en boven de betrouwbaarheidstesttaak een andere taak om een aantal voorbeeldafbeeldingen van speelgoed te uploaden naar de blobcontainer met behulp van Azure CLI:
seed-storage-account: needs: deploy environment: ${{ inputs.environmentType }} runs-on: ubuntu-latest steps: - uses: actions/checkout@v3 - uses: azure/login@v1 name: Sign in to Azure with: client-id: ${{ secrets.AZURE_CLIENT_ID }} tenant-id: ${{ secrets.AZURE_TENANT_ID }} subscription-id: ${{ secrets.AZURE_SUBSCRIPTION_ID }} - if: inputs.environmentType != 'Production' uses: azure/CLI@v1 name: Upload sample images with: inlineScript: | az storage blob upload-batch \ --account-name ${{ needs.deploy.outputs.storageAccountName }} \ --destination ${{ needs.deploy.outputs.storageAccountImagesBlobContainerName }} \ --source 'deploy/sample-data/toyimages'Deze taak maakt gebruik van een Ubuntu-runner, omdat voor de
azure/cliactie Linux moet worden uitgevoerd, maar debuild-databasetaak die u eerder hebt gedefinieerd, maakt gebruik van een Windows-runner om het databaseproject te bouwen. Deze werkstroom is een goed voorbeeld van het gebruik van verschillende besturingssystemen om aan uw vereisten te voldoen.
De afhankelijkheden voor de betrouwbaarheidstesttaak bijwerken
Werk de afhankelijkheden van de betrouwbaarheidstesttaak bij om ervoor te zorgen dat deze wordt uitgevoerd nadat alle implementatiestappen zijn voltooid:
smoke-test: runs-on: ubuntu-latest needs: - deploy - deploy-website - deploy-database - seed-database - seed-storage-account steps: - uses: actions/checkout@v3 - run: | $container = New-PesterContainer ` -Path 'deploy/Website.Tests.ps1' ` -Data @{ HostName = '${{needs.deploy.outputs.appServiceAppHostName}}' } Invoke-Pester ` -Container $container ` -CI name: Run smoke tests shell: pwshSla de wijzigingen in het bestand op.
Bestanden verifiëren en uw wijzigingen doorvoeren
Controleer of uw bestand main.bicep er als volgt uitziet:
@description('The location into which your Azure resources should be deployed.') param location string = resourceGroup().location @description('Select the type of environment you want to provision. Allowed values are Production and Test.') @allowed([ 'Production' 'Test' ]) param environmentType string @description('A unique suffix to add to resource names that need to be globally unique.') @maxLength(13) param resourceNameSuffix string = uniqueString(resourceGroup().id) @description('The URL to the product review API.') param reviewApiUrl string @secure() @description('The API key to use when accessing the product review API.') param reviewApiKey string @description('The administrator login username for the SQL server.') param sqlServerAdministratorLogin string @secure() @description('The administrator login password for the SQL server.') param sqlServerAdministratorLoginPassword string // Define the names for resources. var appServiceAppName = 'toy-website-${resourceNameSuffix}' var appServicePlanName = 'toy-website' var logAnalyticsWorkspaceName = 'workspace-${resourceNameSuffix}' var applicationInsightsName = 'toywebsite' var storageAccountName = 'mystorage${resourceNameSuffix}' var storageAccountImagesBlobContainerName = 'toyimages' var sqlServerName = 'toy-website-${resourceNameSuffix}' var sqlDatabaseName = 'Toys' // Define the connection string to access Azure SQL. var sqlDatabaseConnectionString = 'Server=tcp:${sqlServer.properties.fullyQualifiedDomainName},1433;Initial Catalog=${sqlDatabase.name};Persist Security Info=False;User ID=${sqlServerAdministratorLogin};Password=${sqlServerAdministratorLoginPassword};MultipleActiveResultSets=False;Encrypt=True;TrustServerCertificate=False;Connection Timeout=30;' // Define the SKUs for each component based on the environment type. var environmentConfigurationMap = { Production: { appServicePlan: { sku: { name: 'S1' capacity: 1 } } storageAccount: { sku: { name: 'Standard_LRS' } } sqlDatabase: { sku: { name: 'Standard' tier: 'Standard' } } } Test: { appServicePlan: { sku: { name: 'F1' } } storageAccount: { sku: { name: 'Standard_GRS' } } sqlDatabase: { sku: { name: 'Standard' tier: 'Standard' } } } } resource appServicePlan 'Microsoft.Web/serverfarms@2022-03-01' = { name: appServicePlanName location: location sku: environmentConfigurationMap[environmentType].appServicePlan.sku } resource appServiceApp 'Microsoft.Web/sites@2022-03-01' = { name: appServiceAppName location: location properties: { serverFarmId: appServicePlan.id httpsOnly: true siteConfig: { appSettings: [ { name: 'APPINSIGHTS_INSTRUMENTATIONKEY' value: applicationInsights.properties.InstrumentationKey } { name: 'APPLICATIONINSIGHTS_CONNECTION_STRING' value: applicationInsights.properties.ConnectionString } { name: 'ReviewApiUrl' value: reviewApiUrl } { name: 'ReviewApiKey' value: reviewApiKey } { name: 'StorageAccountName' value: storageAccount.name } { name: 'StorageAccountBlobEndpoint' value: storageAccount.properties.primaryEndpoints.blob } { name: 'StorageAccountImagesContainerName' value: storageAccount::blobService::storageAccountImagesBlobContainer.name } { name: 'SqlDatabaseConnectionString' value: sqlDatabaseConnectionString } ] } } } resource logAnalyticsWorkspace 'Microsoft.OperationalInsights/workspaces@2022-10-01' = { name: logAnalyticsWorkspaceName location: location } resource applicationInsights 'Microsoft.Insights/components@2020-02-02' = { name: applicationInsightsName location: location kind: 'web' properties: { Application_Type: 'web' Request_Source: 'rest' Flow_Type: 'Bluefield' WorkspaceResourceId: logAnalyticsWorkspace.id } } resource storageAccount 'Microsoft.Storage/storageAccounts@2022-09-01' = { name: storageAccountName location: location kind: 'StorageV2' sku: environmentConfigurationMap[environmentType].storageAccount.sku resource blobService 'blobServices' = { name: 'default' resource storageAccountImagesBlobContainer 'containers' = { name: storageAccountImagesBlobContainerName properties: { publicAccess: 'Blob' } } } } resource sqlServer 'Microsoft.Sql/servers@2022-05-01-preview' = { name: sqlServerName location: location properties: { administratorLogin: sqlServerAdministratorLogin administratorLoginPassword: sqlServerAdministratorLoginPassword } } resource sqlServerFirewallRule 'Microsoft.Sql/servers/firewallRules@2022-05-01-preview' = { parent: sqlServer name: 'AllowAllWindowsAzureIps' properties: { endIpAddress: '0.0.0.0' startIpAddress: '0.0.0.0' } } resource sqlDatabase 'Microsoft.Sql/servers/databases@2022-05-01-preview' = { parent: sqlServer name: sqlDatabaseName location: location sku: environmentConfigurationMap[environmentType].sqlDatabase.sku } output appServiceAppName string = appServiceApp.name output appServiceAppHostName string = appServiceApp.properties.defaultHostName output storageAccountName string = storageAccount.name output storageAccountImagesBlobContainerName string = storageAccount::blobService::storageAccountImagesBlobContainer.name output sqlServerFullyQualifiedDomainName string = sqlServer.properties.fullyQualifiedDomainName output sqlDatabaseName string = sqlDatabase.nameAls dit niet het probleem is, werkt u deze bij zodat deze overeenkomt met de inhoud van het bestand.
Controleer of uw deploy.yml-bestand er als volgt uitziet:
name: deploy on: workflow_call: inputs: environmentType: required: true type: string resourceGroupName: required: true type: string reviewApiUrl: required: true type: string sqlServerAdministratorLogin: required: true type: string secrets: AZURE_CLIENT_ID: required: true AZURE_TENANT_ID: required: true AZURE_SUBSCRIPTION_ID: required: true reviewApiKey: required: true sqlServerAdministratorLoginPassword: required: true jobs: validate: runs-on: ubuntu-latest steps: - uses: actions/checkout@v3 - uses: azure/login@v1 name: Sign in to Azure with: client-id: ${{ secrets.AZURE_CLIENT_ID }} tenant-id: ${{ secrets.AZURE_TENANT_ID }} subscription-id: ${{ secrets.AZURE_SUBSCRIPTION_ID }} - if: inputs.environmentType != 'Production' uses: azure/arm-deploy@v1 name: Run preflight validation with: deploymentName: ${{ github.run_number }} resourceGroupName: ${{ inputs.resourceGroupName }} template: ./deploy/main.bicep parameters: > environmentType=${{ inputs.environmentType }} reviewApiUrl=${{ inputs.reviewApiUrl }} reviewApiKey=${{ secrets.reviewApiKey }} sqlServerAdministratorLogin=${{ inputs.sqlServerAdministratorLogin }} sqlServerAdministratorLoginPassword=${{ secrets.sqlServerAdministratorLoginPassword }} deploymentMode: Validate - if: inputs.environmentType == 'Production' uses: azure/arm-deploy@v1 name: Run what-if with: failOnStdErr: false resourceGroupName: ${{ inputs.resourceGroupName }} template: ./deploy/main.bicep parameters: > environmentType=${{ inputs.environmentType }} reviewApiUrl=${{ inputs.reviewApiUrl }} reviewApiKey=${{ secrets.reviewApiKey }} sqlServerAdministratorLogin=${{ inputs.sqlServerAdministratorLogin }} sqlServerAdministratorLoginPassword=${{ secrets.sqlServerAdministratorLoginPassword }} additionalArguments: --what-if deploy: needs: validate environment: ${{ inputs.environmentType }} runs-on: ubuntu-latest outputs: appServiceAppName: ${{ steps.deploy.outputs.appServiceAppName }} appServiceAppHostName: ${{ steps.deploy.outputs.appServiceAppHostName }} storageAccountName: ${{ steps.deploy.outputs.storageAccountName }} storageAccountImagesBlobContainerName: ${{ steps.deploy.outputs.storageAccountImagesBlobContainerName }} sqlServerFullyQualifiedDomainName: ${{ steps.deploy.outputs.sqlServerFullyQualifiedDomainName }} sqlDatabaseName: ${{ steps.deploy.outputs.sqlDatabaseName }} steps: - uses: actions/checkout@v3 - uses: azure/login@v1 name: Sign in to Azure with: client-id: ${{ secrets.AZURE_CLIENT_ID }} tenant-id: ${{ secrets.AZURE_TENANT_ID }} subscription-id: ${{ secrets.AZURE_SUBSCRIPTION_ID }} - uses: azure/arm-deploy@v1 id: deploy name: Deploy Bicep file with: failOnStdErr: false deploymentName: ${{ github.run_number }} resourceGroupName: ${{ inputs.resourceGroupName }} template: ./deploy/main.bicep parameters: > environmentType=${{ inputs.environmentType }} reviewApiUrl=${{ inputs.reviewApiUrl }} reviewApiKey=${{ secrets.reviewApiKey }} sqlServerAdministratorLogin=${{ inputs.sqlServerAdministratorLogin }} sqlServerAdministratorLoginPassword=${{ secrets.sqlServerAdministratorLoginPassword }} deploy-website: needs: deploy environment: ${{ inputs.environmentType }} runs-on: ubuntu-latest steps: - uses: actions/download-artifact@v3 - uses: azure/login@v1 name: Sign in to Azure with: client-id: ${{ secrets.AZURE_CLIENT_ID }} tenant-id: ${{ secrets.AZURE_TENANT_ID }} subscription-id: ${{ secrets.AZURE_SUBSCRIPTION_ID }} - uses: azure/webapps-deploy@v2 name: Deploy website with: app-name: ${{ needs.deploy.outputs.appServiceAppName }} package: website/publish.zip deploy-database: needs: deploy environment: ${{ inputs.environmentType }} runs-on: ubuntu-latest steps: - uses: actions/download-artifact@v3 - uses: azure/login@v1 name: Sign in to Azure with: client-id: ${{ secrets.AZURE_CLIENT_ID }} tenant-id: ${{ secrets.AZURE_TENANT_ID }} subscription-id: ${{ secrets.AZURE_SUBSCRIPTION_ID }} - uses: azure/sql-action@v1.2 name: Deploy DACPAC to database with: server-name: ${{ needs.deploy.outputs.sqlServerFullyQualifiedDomainName }} connection-string: ${{ format('Server={0};Initial Catalog={1};User Id={2};Password={3};', needs.deploy.outputs.sqlServerFullyQualifiedDomainName, needs.deploy.outputs.sqlDatabaseName, inputs.sqlServerAdministratorLogin, secrets.sqlServerAdministratorLoginPassword) }} dacpac-package: database/ToyCompany.Database.dacpac seed-database: needs: - deploy - deploy-database environment: ${{ inputs.environmentType }} runs-on: ubuntu-latest steps: - uses: actions/checkout@v3 - uses: azure/login@v1 name: Sign in to Azure with: client-id: ${{ secrets.AZURE_CLIENT_ID }} tenant-id: ${{ secrets.AZURE_TENANT_ID }} subscription-id: ${{ secrets.AZURE_SUBSCRIPTION_ID }} - if: inputs.environmentType != 'Production' uses: azure/sql-action@v1.2 name: Add test data to database with: server-name: ${{ needs.deploy.outputs.sqlServerFullyQualifiedDomainName }} connection-string: ${{ format('Server={0};Initial Catalog={1};User Id={2};Password={3};', needs.deploy.outputs.sqlServerFullyQualifiedDomainName, needs.deploy.outputs.sqlDatabaseName, inputs.sqlServerAdministratorLogin, secrets.sqlServerAdministratorLoginPassword) }} sql-file: 'deploy/sample-data/Toys.sql' seed-storage-account: needs: deploy environment: ${{ inputs.environmentType }} runs-on: ubuntu-latest steps: - uses: actions/checkout@v3 - uses: azure/login@v1 name: Sign in to Azure with: client-id: ${{ secrets.AZURE_CLIENT_ID }} tenant-id: ${{ secrets.AZURE_TENANT_ID }} subscription-id: ${{ secrets.AZURE_SUBSCRIPTION_ID }} - if: inputs.environmentType != 'Production' uses: azure/CLI@v1 name: Upload sample images with: inlineScript: | az storage blob upload-batch \ --account-name ${{ needs.deploy.outputs.storageAccountName }} \ --destination ${{ needs.deploy.outputs.storageAccountImagesBlobContainerName }} \ --source 'deploy/sample-data/toyimages' smoke-test: runs-on: ubuntu-latest needs: - deploy - deploy-website - deploy-database - seed-database - seed-storage-account steps: - uses: actions/checkout@v3 - run: | $container = New-PesterContainer ` -Path 'deploy/Website.Tests.ps1' ` -Data @{ HostName = '${{needs.deploy.outputs.appServiceAppHostName}}' } Invoke-Pester ` -Container $container ` -CI name: Run smoke tests shell: pwshAls dit niet het probleem is, werkt u deze bij zodat deze overeenkomt met de inhoud van het bestand.
Sla de wijzigingen in het bestand op.
Voer uw wijzigingen door en push deze naar uw Git-opslagplaats. Voer in de Visual Studio Code-terminal de volgende opdrachten uit:
git add .
git commit -m "Add SQL database"
git push
De werkstroom uitvoeren
Ga in uw browser naar de werkstroomuitvoeringen.
Selecteer de meest recente uitvoering.
Wacht totdat alle taken voor de testomgeving zijn voltooid. U ziet dat de betrouwbaarheidstest nu ook slaagt.
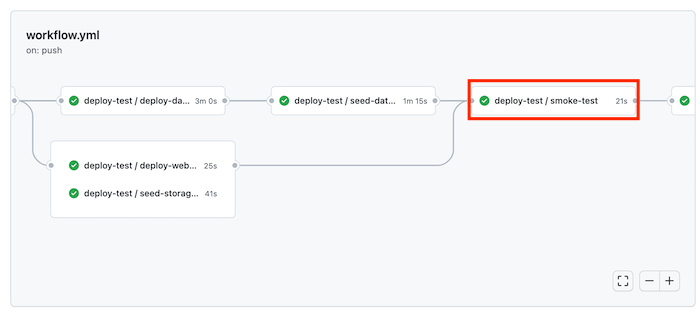
Wacht totdat de werkstroom is voltooid, inclusief de productie-implementatie.
De website weergeven
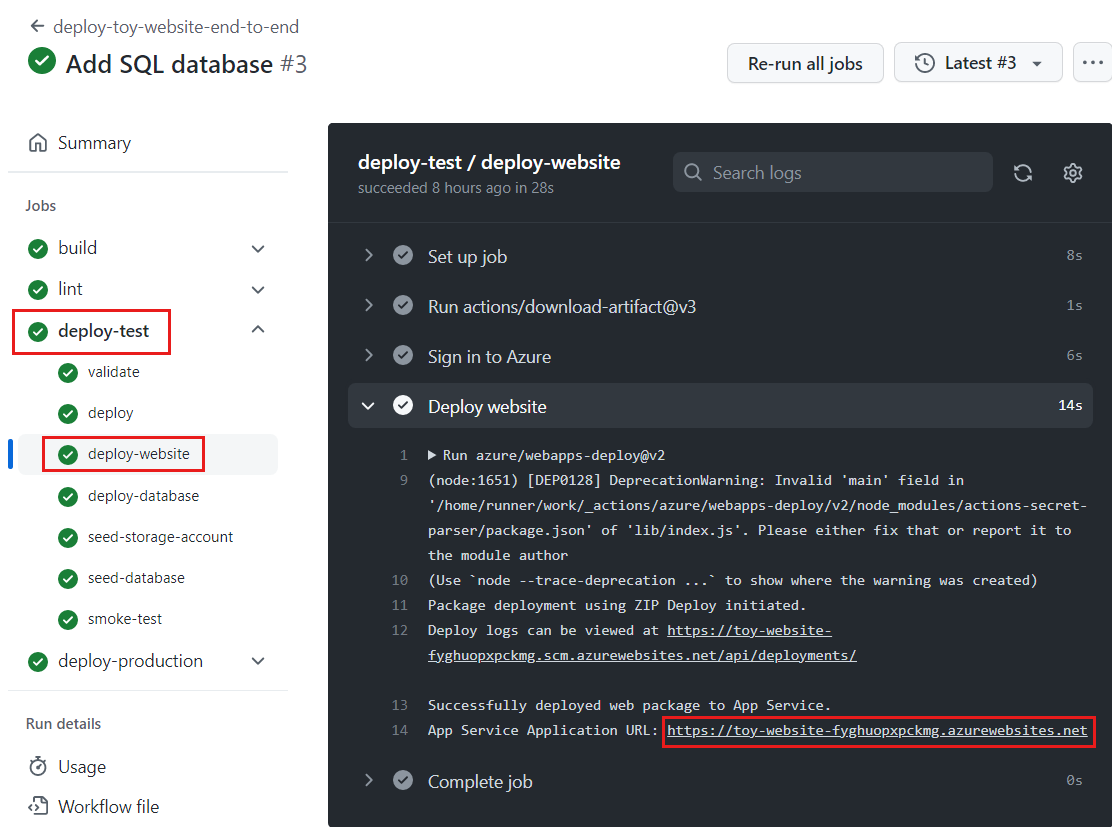
Selecteer de taak deploy-test/deploy-website om het werkstroomlogboek te openen.
Selecteer de stap Website implementeren.
Houd Ctrl ingedrukt (⌘ in macOS) en selecteer de URL van de App Service-app om deze te openen op een nieuw browsertabblad.
Selecteer Speelgoed.

U ziet dat voorbeeldgegevens worden weergegeven in de testomgeving.
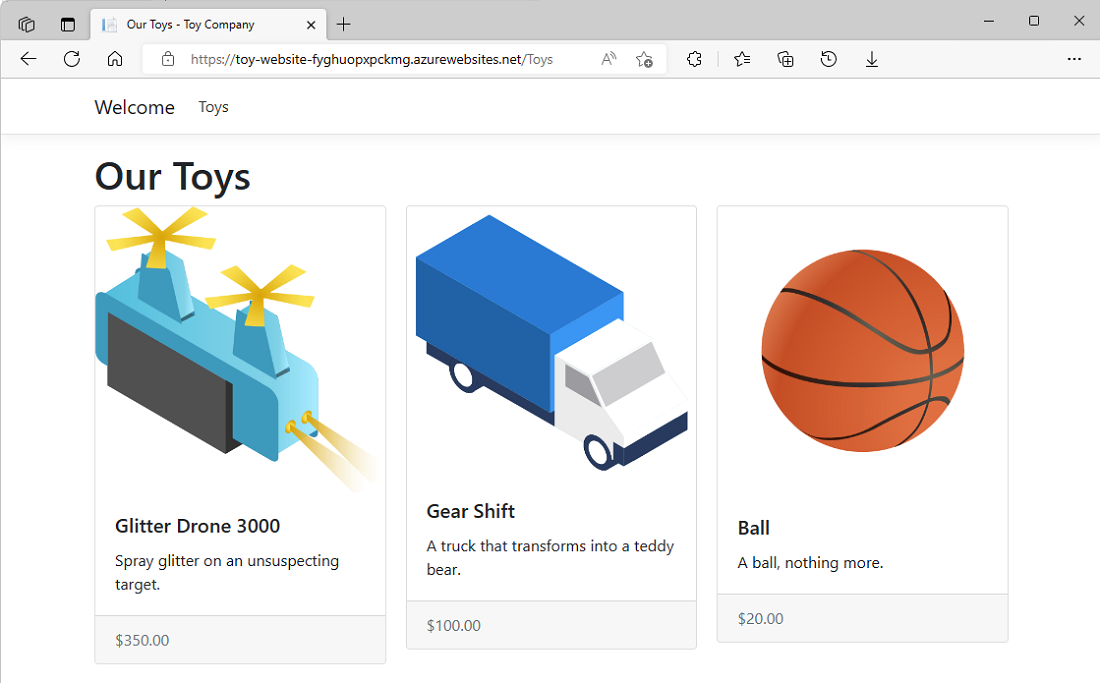
Herhaal het voorgaande proces voor de app van de taak deploy-production/deploy-website .
U ziet dat er geen voorbeeldgegevens worden weergegeven in de productieomgeving.

Resources opschonen
Nu u de oefening hebt voltooid, wilt u de Azure-resources verwijderen, zodat u er geen kosten voor in rekening worden gebracht.
Voer in de Visual Studio Code-terminal de volgende opdrachten uit:
az group delete --resource-group ToyWebsiteTest --yes --no-wait
az group delete --resource-group ToyWebsiteProduction --yes --no-wait
De resourcegroep wordt op de achtergrond verwijderd.
Remove-AzResourceGroup -Name ToyWebsiteTest -Force
Remove-AzResourceGroup -Name ToyWebsiteProduction -Force