Tutorial: Create a free form report (Report Builder)
In this tutorial, you create a paginated report that acts as a newsletter. Each page displays static text, summary visuals, and detailed sample sales data.
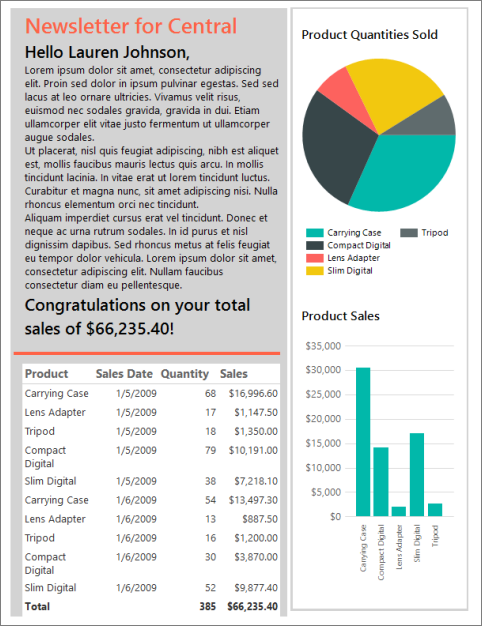
The report groups information by territory and displays the name of the sales manager for the territory as well as detailed and summary sales information. You start with a list data region as the foundation for the free form report. Then you add a decorative panel with an image, static text with data inserted, a table to show detailed information, and optionally, pie and column charts to display summary information.
Estimated time to complete this tutorial: 20 minutes.
Requirements
For more information about requirements, see Prerequisites for tutorials (Report Builder).
1. Create a blank report, data source, and dataset
Note
In this tutorial, the query contains the data values so that it does not need an external data source. This makes the query quite long. In a business environment, a query would not contain the data. This is for learning purposes only.
Create a blank report
Start Report Builder either from your computer, the Reporting Services web portal, or SharePoint integrated mode.
The New Report or Dataset dialog box opens.
If you don't see the New Report or Dataset dialog box, on the File menu > New.
In the left pane, make sure New Report is selected.
In the right pane, select Blank Report.
Create a new data source
In the Report Data pane, select New > Data Source.
In the Name box, enter: ListDataSource
Select Use a connection embedded in my report.
Verify that the connection type is Microsoft SQL Server, and then in the Connection string box enter: Data Source = <servername>
<servername>, for example Report001, specifies a computer on which an instance of the SQL Server Database Engine is installed. Because the data for this report isn't extracted from a SQL Server database, you need not include the name of a database. The default database on the specified server is only used to parse the query.
Select Credentials, and enter the credentials needed to connect to the instance of the SQL Server Database Engine.
Select OK.
Create a new dataset
In the Report Data pane, select New > Dataset.
In the Name box, enter: ListDataset.
Select Use a dataset embedded in my report, and verify that the data source is ListDataSource.
Verify that the Text query type is selected, and then choose Query Designer.
Select Edit as Text.
Copy and paste the following query into the query pane:
SELECT CAST('2009-01-05' AS date) as SalesDate, 'Lauren Johnson' as FullName,'Central' as Territory, 'Accessories' as Subcategory,'Carrying Case' as Product, CAST(16996.60 AS money) AS Sales, 68 as Quantity
UNION SELECT CAST('2009-01-05' AS date) as SalesDate, 'Warren Pal' as FullName,'North' as Territory, 'Accessories' as Subcategory, 'Carrying Case' as Product, CAST(13747.25 AS money) AS Sales, 55 as Quantity
UNION SELECT CAST('2009-01-05' AS date) as SalesDate, 'Fernando Ross' as FullName,'South' as Territory, 'Accessories' as Subcategory,'Carrying Case' as Product, CAST(9248.15 AS money) As Sales, 37 as Quantity
UNION SELECT CAST('2009-01-05' AS date) as SalesDate, 'Lauren Johnson' as FullName,'Central' as Territory, 'Accessories' as Subcategory,'Tripod' as Product, CAST(1350.00 AS money) AS Sales, 18 as Quantity
UNION SELECT CAST('2009-01-05' AS date) as SalesDate, 'Warren Pal' as FullName,'North' as Territory, 'Accessories' as Subcategory,'Tripod' as Product, CAST(1800.00 AS money) AS Sales, 24 as Quantity
UNION SELECT CAST('2009-01-05' AS date) as SalesDate, 'Fernando Ross' as FullName,'South' as Territory, 'Accessories' as Subcategory,'Tripod' as Product, CAST(1125.00 AS money) AS Sales, 15 as Quantity
UNION SELECT CAST('2009-01-05' AS date) as SalesDate, 'Lauren Johnson' as FullName,'Central' as Territory, 'Accessories' as Subcategory,'Lens Adapter' as Product, CAST(1147.50 AS money) AS Sales, 17 as Quantity
UNION SELECT CAST('2009-01-05' AS date) as SalesDate, 'Warren Pal' as FullName,'North' as Territory, 'Accessories' as Subcategory,  'Lens Adapter' as Product, CAST(742.50 AS money) AS Sales, 11 as Quantity
UNION SELECT CAST('2009-01-05' AS date) as SalesDate, 'Fernando Ross' as FullName,'South' as Territory, 'Accessories' as Subcategory,'Lens Adapter' as Product, CAST(1417.50 AS money) AS Sales, 21 as Quantity
UNION SELECT CAST('2009-01-06' AS date) as SalesDate, 'Lauren Johnson' as FullName,'Central' as Territory, 'Accessories' as Subcategory, 'Carrying Case' as Product, CAST(13497.30 AS money) AS Sales, 54 as Quantity
UNION SELECT CAST('2009-01-06' AS date) as SalesDate, 'Warren Pal' as FullName,'North' as Territory, 'Accessories' as Subcategory, 'Carrying Case' as Product, CAST(11997.60 AS money) AS Sales, 48 as Quantity
UNION SELECT CAST('2009-01-06' AS date) as SalesDate, 'Fernando Ross' as FullName,'South' as Territory, 'Accessories' as Subcategory, 'Carrying Case' as Product, CAST(10247.95 AS money) As Sales, 41 as Quantity
UNION SELECT CAST('2009-01-06' AS date) as SalesDate, 'Lauren Johnson' as FullName,'Central' as Territory, 'Accessories' as Subcategory, 'Tripod' as Product, CAST(1200.00 AS money) AS Sales, 16 as Quantity
UNION SELECT CAST('2009-01-06' AS date) as SalesDate, 'Warren Pal' as FullName,'North' as Territory, 'Accessories' as Subcategory,'Tripod' as Product, CAST(2025.00 AS money) AS Sales, 27 as Quantity
UNION SELECT CAST('2009-01-06' AS date) as SalesDate, 'Fernando Ross' as FullName,'South' as Territory, 'Accessories' as Subcategory,'Tripod' as Product, CAST(1425.00 AS money) AS Sales, 19 as Quantity
UNION SELECT CAST('2009-01-06' AS date) as SalesDate, 'Lauren Johnson' as FullName,'Central' as Territory, 'Accessories' as Subcategory,'Lens Adapter' as Product, CAST(887.50 AS money) AS Sales, 13 as Quantity
UNION SELECT CAST('2009-01-06' AS date) as SalesDate, 'Warren Pal' as FullName,'North' as Territory, 'Accessories' as Subcategory, 'Lens Adapter' as Product, CAST(607.50 AS money) AS Sales, 9 as Quantity
UNION SELECT CAST('2009-01-06' AS date) as SalesDate, 'Fernando Ross' as FullName,'South' as Territory, 'Accessories' as Subcategory,'Lens Adapter' as Product, CAST(1215.00 AS money) AS Sales, 18 as Quantity
UNION SELECT CAST('2009-01-05' AS date) as SalesDate,  'Lauren Johnson' as FullName,'Central' as Territory, 'Digital' as Subcategory,'Compact Digital' as Product, CAST(10191.00 AS money) AS Sales, 79 as Quantity
UNION SELECT CAST('2009-01-05' AS date) as SalesDate,  'Warren Pal' as FullName,'North' as Territory, 'Digital' as Subcategory, 'Compact Digital' as Product, CAST(8772.00 AS money) AS Sales, 68 as Quantity
UNION SELECT CAST('2009-01-05' AS date) as SalesDate,  'Fernando Ross' as FullName,'South' as Territory, 'Digital' as Subcategory, 'Compact Digital' as Product, CAST(10578.00 AS money) AS Sales, 82 as Quantity
UNION SELECT CAST('2009-01-05' AS date) as SalesDate, 'Lauren Johnson' as FullName,'Central' as Territory,'Digital' as Subcategory, 'Slim Digital' as Product, CAST(7218.10 AS money) AS Sales, 38 as Quantity
UNION SELECT CAST('2009-01-05' AS date) as SalesDate, 'Warren Pal' as FullName,'North' as Territory,'Digital' as Subcategory, 'Slim Digital' as Product, CAST(8357.80 AS money) AS Sales, 44 as Quantity
UNION SELECT CAST('2009-01-05' AS date) as SalesDate, 'Fernando Ross' as FullName,'South' as Territory,'Digital' as Subcategory,'Slim Digital' as Product, CAST(9307.55 AS money) AS Sales, 49 as Quantity
UNION SELECT CAST('2009-01-06' AS date) as SalesDate,  'Lauren Johnson' as FullName,'Central' as Territory, 'Digital' as Subcategory,'Compact Digital' as Product, CAST(3870.00 AS money) AS Sales, 30 as Quantity
UNION SELECT CAST('2009-01-06' AS date) as SalesDate,  'Warren Pal' as FullName,'North' as Territory, 'Digital' as Subcategory,'Compact Digital' as Product, CAST(5805.00 AS money) AS Sales, 45 as Quantity
UNION SELECT CAST('2009-01-06' AS date) as SalesDate,  'Fernando Ross' as FullName,'South' as Territory, 'Digital' as Subcategory, 'Compact Digital' as Product, CAST(8643.00 AS money) AS Sales, 67 as Quantity
UNION SELECT CAST('2009-01-06' AS date) as SalesDate, 'Lauren Johnson' as FullName,'Central' as Territory, 'Digital' as Subcategory, 'Slim Digital' as Product, CAST(9877.40 AS money) AS Sales, 52 as Quantity
UNION SELECT CAST('2009-01-06' AS date) as SalesDate, 'Warren Pal' as FullName,'North' as Territory, 'Digital' as Subcategory, 'Slim Digital' as Product, CAST(12536.70 AS money) AS Sales, 66 as Quantity
UNION SELECT CAST('2009-01-06' AS date) as SalesDate, 'Fernando Ross' as FullName,'South' as Territory, 'Digital' as Subcategory, 'Slim Digital' as Product, CAST(6648.25 AS money) AS Sales, 35 as Quantity
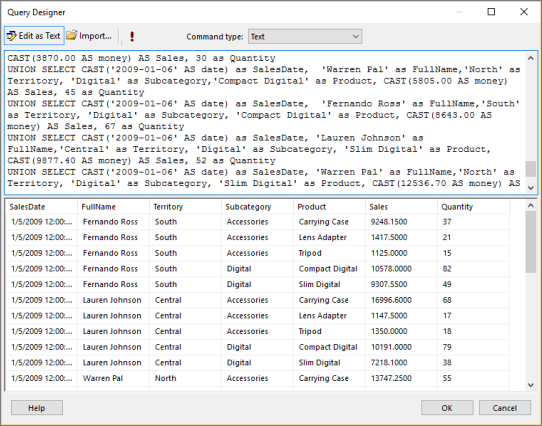
Select the Run icon (!) to run the query.
The query results are the data available to display in your report.
Select OK.
2. Add and configure a list
In Reporting Services, the list data region is ideal for creating free form reports. It's based on the tablix data region, as are tables and matrixes. For more information, see Create invoices and forms with lists in a paginated report (Report Builder).
In this tutorial, you use a list to display the sales information for sales territories in a report formatted like a newsletter. The information is grouped by territory. You also add a new row group that groups data by territory, and then delete the built-in Details row group.
Add a list
On the Insert tab, go to Data Regions > List.
Select in the report body (between the title and footer areas) and drag to make the list box. Make the list box 7 inches tall and 6.25 inches wide. To get the exact size, in the Properties pane under Position, enter values for the Width and Height properties.
Note
This report uses the paper size Letter (8.5 X11) and 1 inch margins. A list box taller than 9 inches or wider than 6.5 inches might generate blank pages.
Select inside the list box, right-click the bar at the top of the list, and choose Tablix Properties.
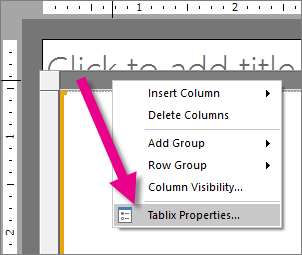
In the Dataset name drop-down list, select ListDataset.
Select OK.
Right-click inside the list, and then select Rectangle Properties.
On the General tab, select the Add a page break after check box.
Select OK.
Add a new row group and to delete the Details group
In the Row Groups pane, right-click the Details group, point to Add Group, and then select Parent Group.
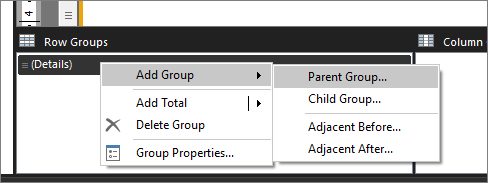
In the Group by list, select
[Territory].Select OK.
A column containing the cell
[Territory]is added to the list.Right-click the Territory column in the list, and then select Delete Columns.
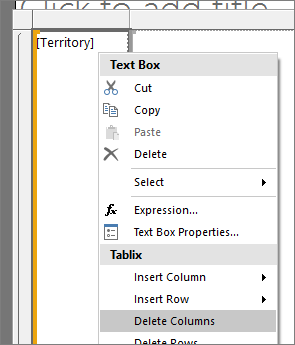
Select Delete Columns only.
In the Row Groups pane, right-click the Details group > Delete Group.
Select Delete Group only.
Select OK.
3. Add graphic elements
One advantage of list data regions is that you can add report items such as rectangles and text boxes anywhere, instead of being limited to a tabular layout. You can enhance the appearance of the report by adding a graphic (a rectangle filled with a color).
Add graphic elements to the report
On the Insert tab, select Rectangle.
Select in the upper left corner of the list and drag to make the rectangle 7 inches tall and 3.5 inches wide. Again, to get the exact size, in the Properties pane under Position, enter values for Width and Height.
Right-click the rectangle > Rectangle Properties.
Select the Fill tab.
In Fill color, select Light Gray.
Select OK.
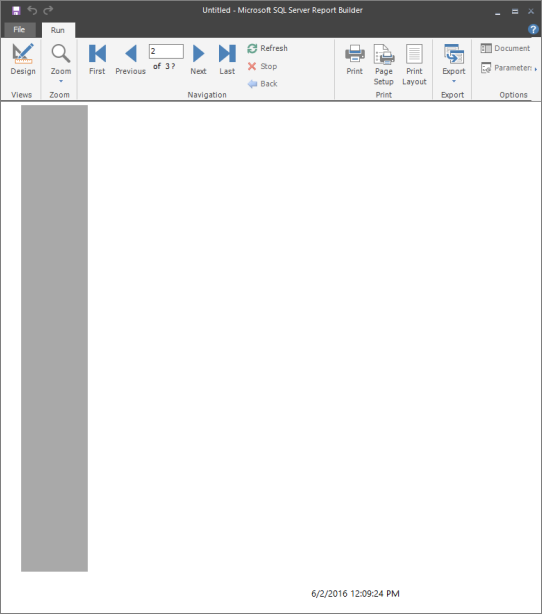
Select Run to preview the report.
The left side of the report now has vertical graphic that consists of a light gray rectangle, as shown in the following image.
4. Add free form text
You can add text boxes to display static text that is repeated on each report page and data fields.
Add text to the report
Select Design to return to design view.
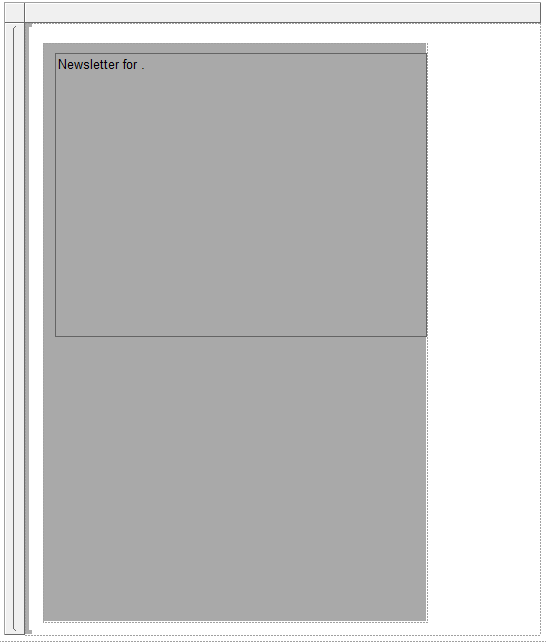
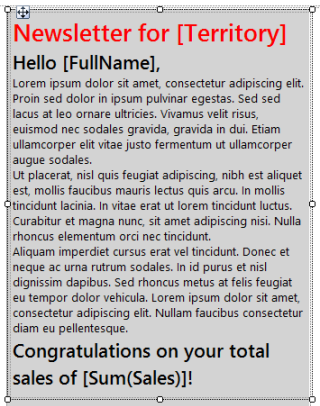
On the Insert tab, go to Text Box. Select the upper left corner of the list, inside of the rectangle you added previously, and drag to make the text box about 3.45 inches wide and 5 inches tall.
With the cursor in the text box and enter: Newsletter for. Include a space after the word "for", to separate the text from the field you add in the next step.
Drag the
[Territory]field from ListDataSet in the Report Data pane to the text box and place it after "Newsletter for ".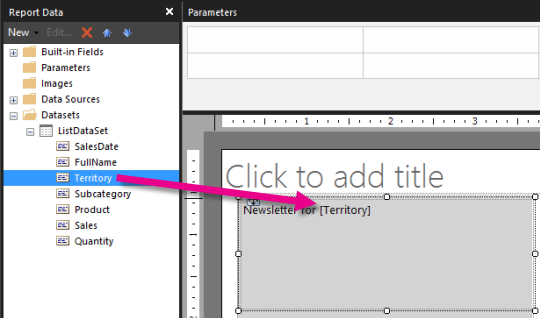
Select the text and the
[Territory]field.On the Home tab > Font, select:
- Segoe Semibold.
- 20 pt.
- Tomato.
Place the cursor below the text you entered in step 3 and enter: Hello with a space after the word, to separate the text and the field that you add in the next step.
Drag the
[FullName]field from ListDataSet in the Report Data pane to the text box and place it after "Hello ", then enter a comma (,).Select the text you added in the previous steps.
On the Home tab > Font, select:
- Segoe Semibold.
- 16 pt.
- Black.
Place the cursor below the text you added in steps 9 through 13, and then copy and paste the following meaningless text:
Lorem ipsum dolor sit amet, consectetur adipiscing elit. Proin sed dolor in ipsum pulvinar egestas. Sed sed lacus at leo ornare ultricies. Vivamus velit risus, euismod nec sodales gravida, gravida in dui. Etiam ullamcorper elit vitae justo fermentum ut ullamcorper augue sodales.
Ut placerat, nisl quis feugiat adipiscing, nibh est aliquet est, mollis faucibus mauris lectus quis arcu. In mollis tincidunt lacinia. In vitae erat ut lorem tincidunt luctus. Curabitur et magna nunc, sit amet adipiscing nisi. Nulla rhoncus elementum orci nec tincidunt.
Aliquam imperdiet cursus erat vel tincidunt. Donec et neque ac urna rutrum sodales. In id purus et nisl dignissim dapibus. Sed rhoncus metus at felis feugiat eu tempor dolor vehicula. Lorem ipsum dolor sit amet, consectetur adipiscing elit. Nullam faucibus consectetur diam eu pellentesque.
Select the text you just added.
On the Home tab > Font, select:
- Segoe UI.
- 10 pt.
- Black.
Place the cursor inside the text box, below the meaningless text and enter: Congratulations on your total sales of, with a space after the word to separate the text and the field you add in the next step.
Drag the Sales field to the text box, place it after the text you entered in the previous step, then enter an exclamation mark (!).
Select the text and the field you just added.
On the Home tab > Font, select:
- Segoe Semibold.
- 16 pt.
- Black.
Select just the
[Sales]field, right-click the field > Expression.In the Expression box, change the expression to include the Sum function as follows:
=Sum(Fields!Sales.value)Select OK.
With
[Sum(Sales)]still selected, on the Home tab > Number group > Currency.Right-click the text box with the "Click to add title" text, and then select Delete.
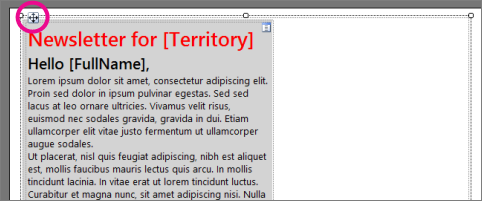
Select the list box. Choose the two double-headed arrows and move it to the top of the page.
Select Run to preview the report.
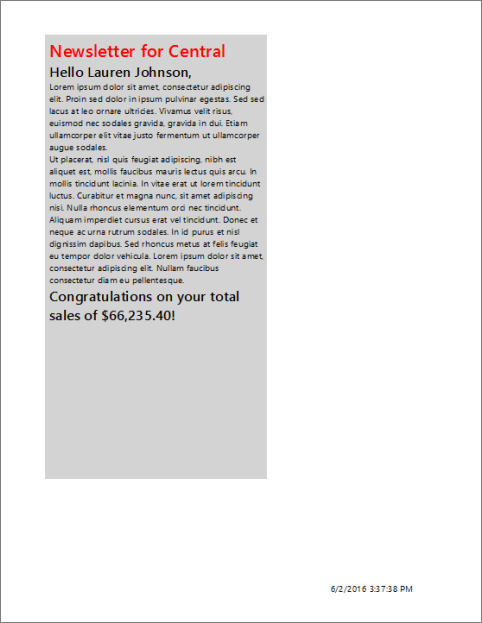
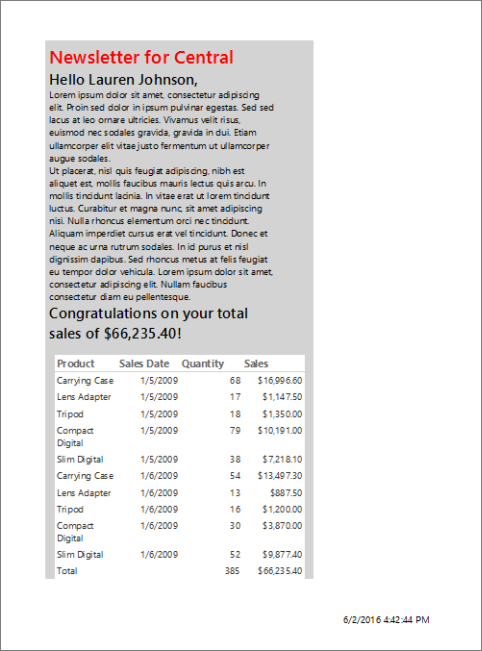
The report displays static text and each report page includes data that pertains to a territory. Sales are formatted as currency.
5. Add a table to show sales details
Use the New Table and Matrix Wizard to add a table to the free form report. After you complete the wizard, you manually add a row for totals.
Add a table
On the Insert tab, go to Data Regions area > Table > Table Wizard.
On the Choose a dataset page, select ListDataset > Next.
On the Arrange fields page, drag the Product field from Available fields to Values.
Repeat step 3 for SalesDate, Quantity, and Sales. Place SalesDate after Product, Quantity after SalesDate, and Sales after SalesDate.
Select Next.
On the Choose the layout page, view the layout of the table.
The table is simple: five columns with no row or column groups. Because it has no groups, the layout options related to groups, aren't available. You manually update the table to include a total later in the tutorial.
Select Next.
Select Finish.
Drag the table to below the text box that you added in lesson 4.
Note
Make sure the table is inside the list box and inside the gray rectangle.
With the table selected, in the Row Group pane, right-click Details > Add Total > After.
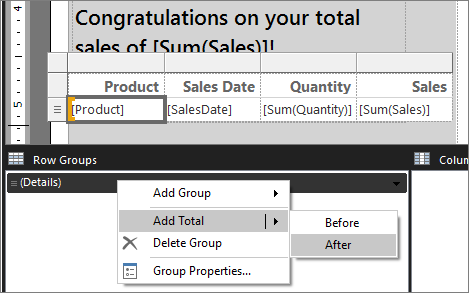
Select the cell in the Product column and enter Total.

Select the [SalesDate] field. On the Home tab > Number, change Default to Date.
Select the [Sum(Sales)] fields. On the Home tab > Number, change Default to Currency.
Select Run to preview the report.
The report displays a table with sales details and totals.
6. Save the report
You can save reports to a report server, SharePoint library, or your computer.
In this tutorial, save the report to a report server. If you don't have access to a report server, save the report to your computer.
Save the report on a report server
From the Report Builder button, select Save As.
Select Recent Sites and Servers.
Select or enter the name of the report server where you have permission to save reports.
The message "Connecting to report server" appears. When the connection is complete, you see the contents of the report folder that the report server administrator specified as the default location for reports.
In Name, replace the default name with SalesInformationByTerritory.
Select Save.
The report is saved to the report server. The name of the report server that you're connected to appears in the status bar at the bottom of the window.
Save the report on your computer
From the Report Builder button, select Save As.
Select Desktop, My Documents, or My computer, and then browse to the folder where you want to save the report.
In Name, replace the default name with SalesInformationByTerritory.
Select Save.
7. (Optional) Add a line to separate areas of the report
Add a line to separate the editorial and details areas of the report.
Add a line
Select Design to return to design view.
On the Insert tab, go to Report Items > Line.
Draw a line below the text box you added in lesson 4.
Select the line, and on the Home tab > Border, select:
- Width select 3 pt.
- Color select Tomato.
8. (Optional) Add summary data visualizations
Rectangles help you control how the report renders. Place a pie and column chart inside a rectangle to ensure that the report renders the way you want.
Add a rectangle
Select Design to return to design view.
On the Insert tab, go to Report Items > Rectangle. Drag the rectangle inside the list box to the right of the table to make a rectangle about 2.25 inches wide and 7.9 inches tall.
With the new rectangle selected, in the Properties pane, make BorderColor LightGrey, BorderStyle Solid, and BorderWidth 2 pt.
Align the tops of the rectangle and the table.
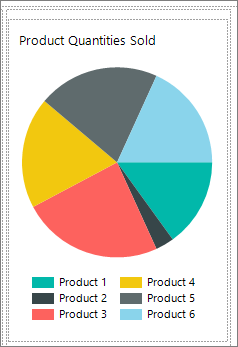
Add a pie chart
On the Insert tab, go to Data Visualizations > Chart > Chart Wizard.
On the Choose a dataset page, select ListDataset > Next.
Select Pie > Next.
On the arrange chart fields page, drag Product to Categories.
Drag Quantity to Values, then select Next.
Select Finish.
Resize the chart that appears in the upper left corner of the report to be about 2.25 inches wide and 3.6 inches tall.
Drag the chart inside the rectangle.
Select the chart title and enter: Product Quantities Sold.
On the Home tab > Font, make the title:
- Font Segoe UI Semibold.
- Size 12 pt.
- Color Black.
Right-click the legend > Legend Properties.
On the General tab, under Legend position, select the center dot at the bottom.
Select OK.
Drag to make the chart region taller, if necessary.
Add a column chart
On the Insert tab > Data Visualizations > Chart, > Chart Wizard.
On the Choose a dataset page, select ListDataset, then choose Next.
Select Column, then choose Next.
On the Arrange chart fields page, drag the Product field to Categories.
Drag Sales to Values, and then select Next.
Values display on the vertical axis.
Select Finish.
A column chart is added to the upper left corner of the report.
Resize the chart to be about 2.25 inches wide and almost 4 inches tall.
Drag the chart inside the rectangle, below the pie chart.
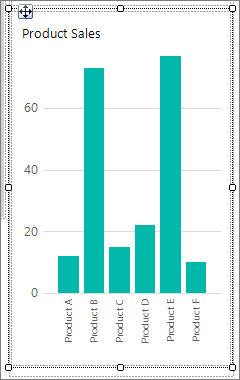
Select the chart title and enter: Product Sales.
On the Home tab > Font, make the title:
- Font Segoe UI Semibold.
- Size 12 pt.
- Color Black.
Right-click the legend, and then select Delete Legend.
Note
Removing the legend makes the chart more readable when the chart is small.
Select the chart axis, and on the Home tab > Number > Currency.
Select Decrease Decimal two times, so the number shows just dollars and no cents.
Verify the charts are inside the rectangle
You can use rectangles as containers for other items on a report page. Read more about rectangles as containers.
Select the rectangle you created and added the charts to, earlier in this lesson.
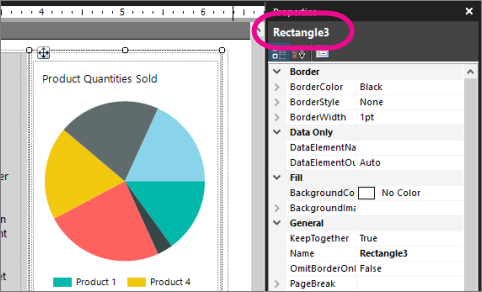
In the Properties pane, the Name property displays the name of the rectangle.
Select the pie chart.
In the Properties pane, verify that the Parent property contains the name of the rectangle.
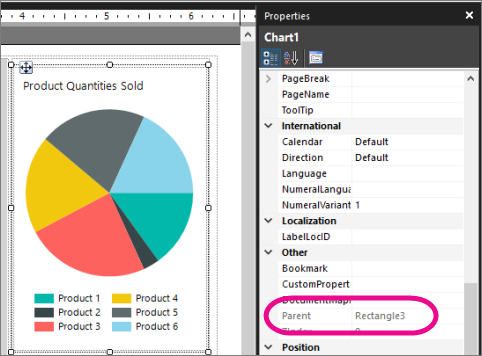
Select the column chart and repeat step 3.
Note
If the charts are not inside the rectangle, the rendered report does not display the charts together.
Make the charts the same size
Select the pie chart, press the Ctrl key, and then choose the column chart.
With both charts selected, right-click > Layout > Make Same Width.
Note
The item you select first determines the width of all the selected items.
Select Run to preview the report.
The report now displays summary sales data in pie and column charts.
Related content
- Report Builder tutorials
- Tables, matrices, and lists in paginated reports (Report Builder)
- Create invoices and forms with lists in a paginated report (Report Builder)
- Cells, rows, & columns in a tablix in a paginated report (Report Builder)
- Query design tools (SSRS)
- Text-based query designer user interface (Report Builder)