Manage transactions
Important
Fundraising and Engagement is being retired. Support for Fundraising and Engagement will end at 11:59 PM Pacific Time on December 31, 2026. For more information, go to What’s new in Fundraising and Engagement.
Transactions capture gifts received by your organization. A transaction can be a donation (a gift directly from a constituent) or a soft credit (a gift that a constituent influenced, such as a matching gift).
A transaction record represents a payment or donation of goods to your nonprofit organization from a contact or an organization account. Transaction records track key information about the transferred revenue or items. You can apply a transaction to a donor commitment, a designation plan, or a new designation credit.
To work with transaction records, follow these steps:
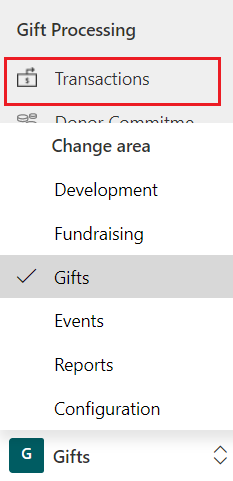
- On the navigation pane, select Gifts from the Change area menu.
- Under Gift Processing, select Transactions.
Add a new transaction
In the Gifts area, under Gift Processing select Transactions.
In the view that opens, select New on the action pane.

The new transaction record displays the Single Donation Form tab.
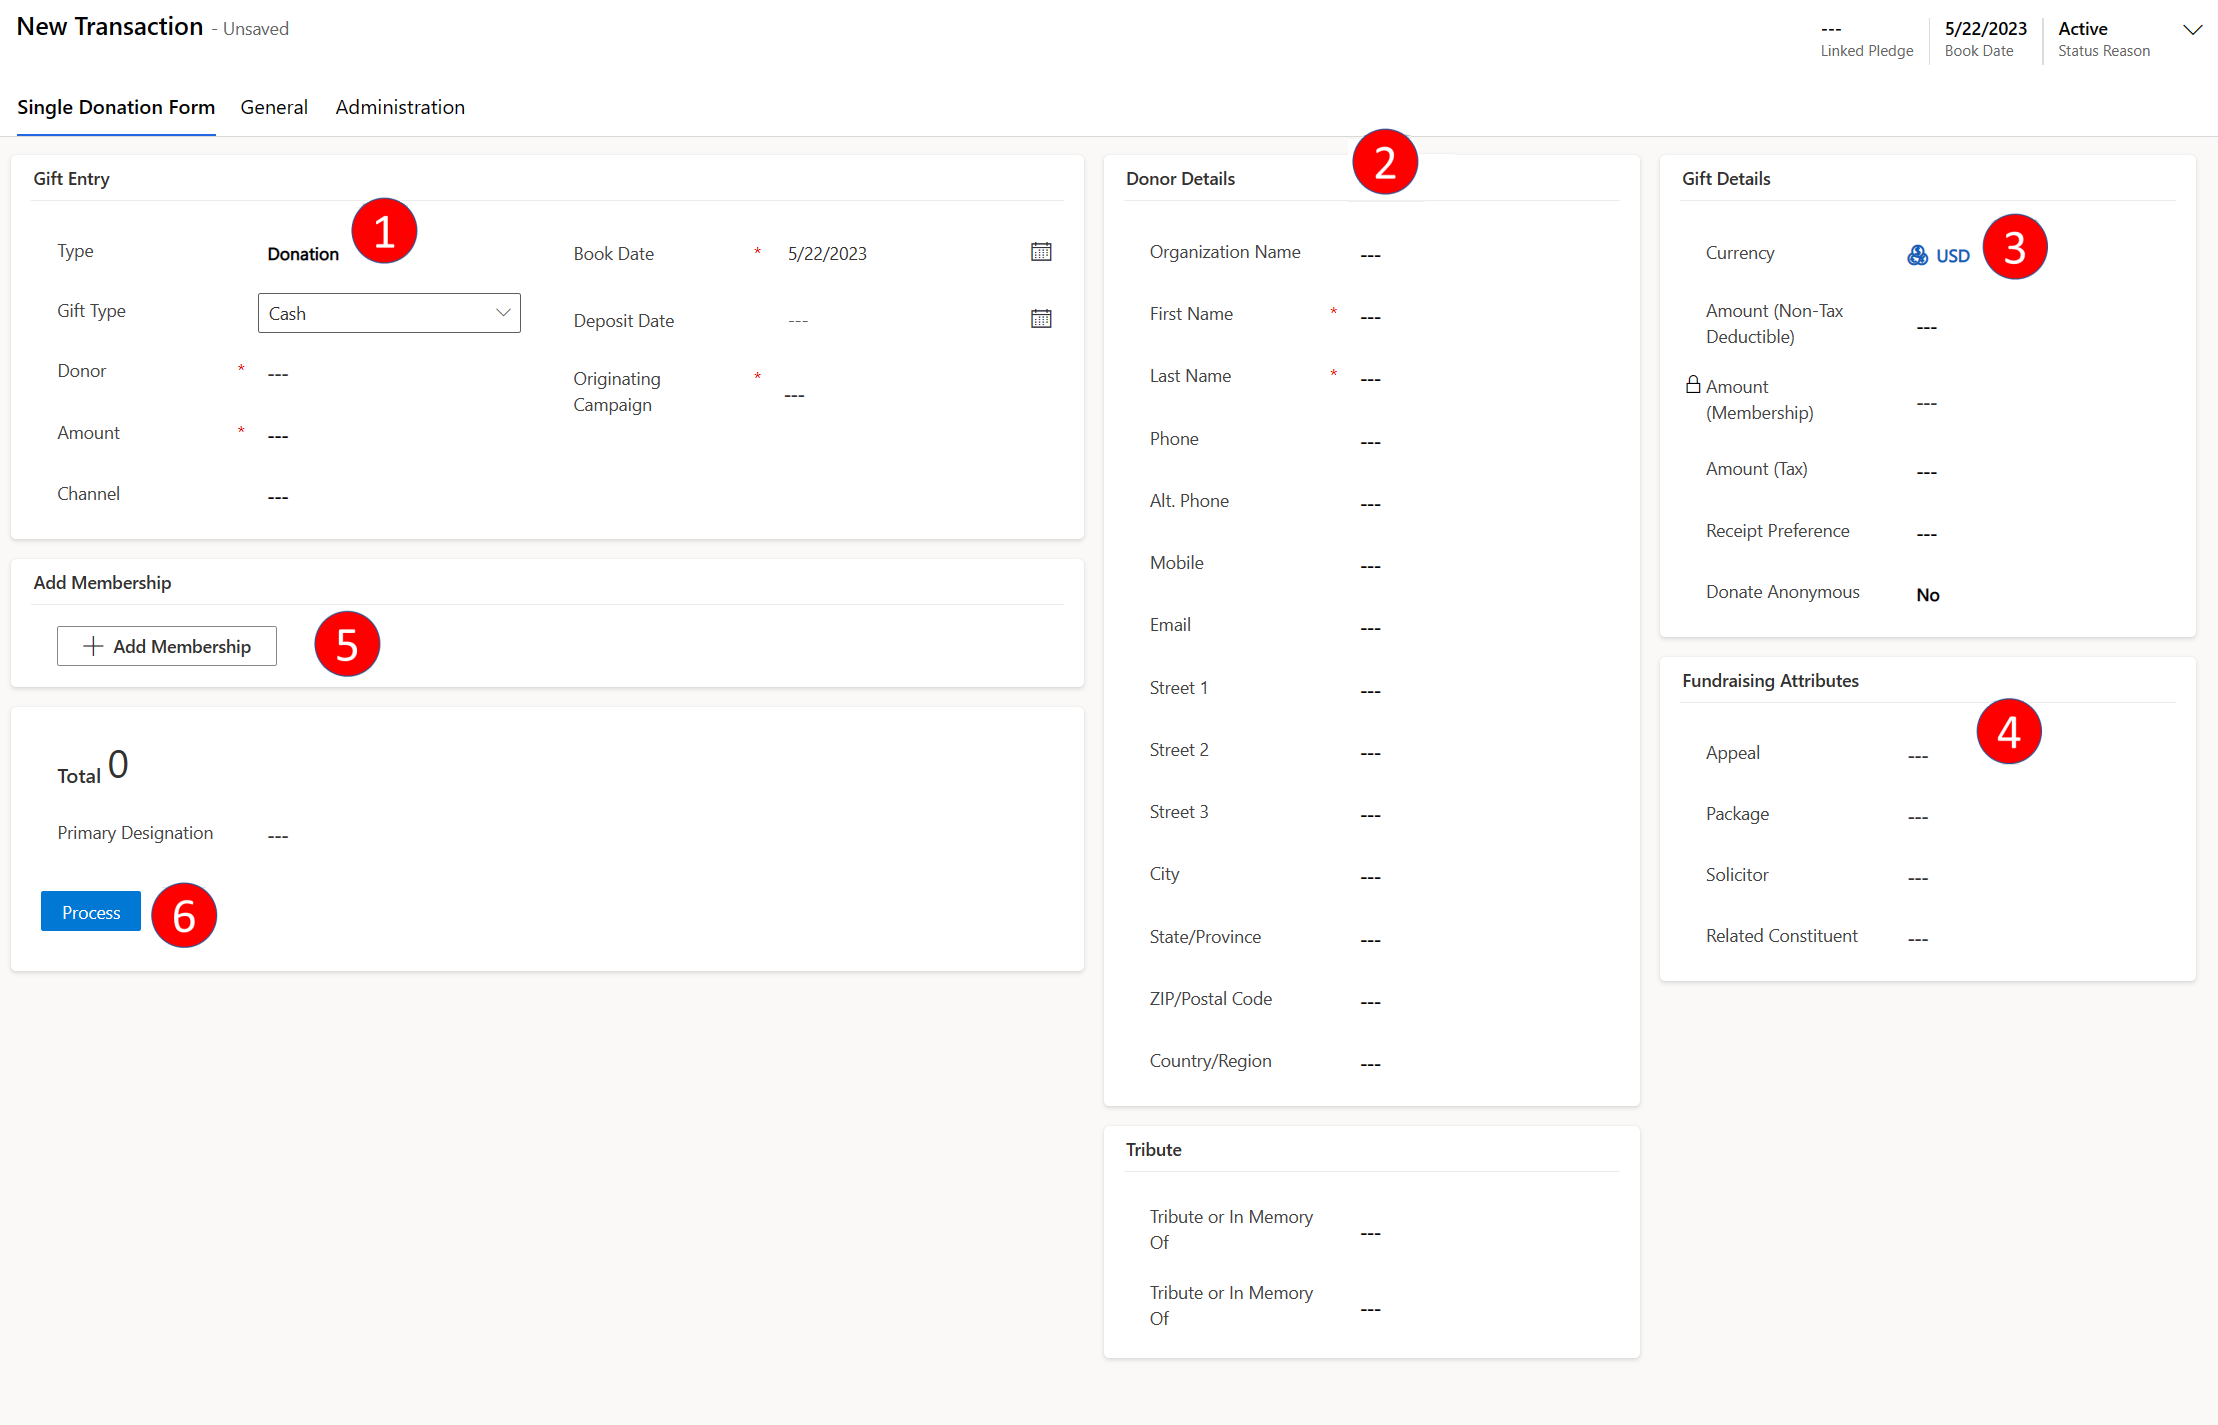
# Area 1 Gift Entry 2 Donor Details 3 Gift Details 4 Fundraising Attributes 5 Add Membership 6 Add Designation 7 Process Complete the sections as follows:
Gift Entry
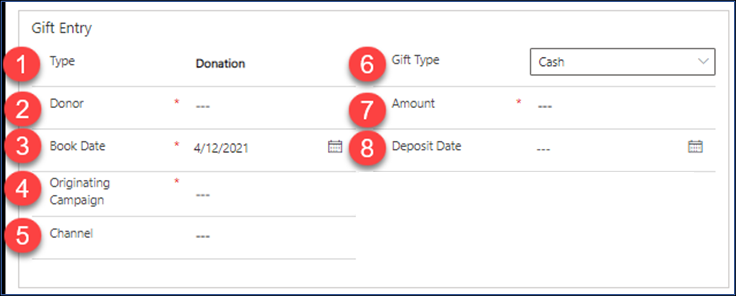
| # | Field | Description |
|---|---|---|
| 1 | Type | Indicates whether the transaction is a Donation (directly from the constituent) or a Soft Credit (credit for a gift in-kind). IMPORTANT: You can't create receipts for soft credits. |
| 2 | Donor | Use the lookup to select the contact or organization account who's making the transaction. When you select a constituent, their contact information appears under Donor Details. |
| 3 | Book Date | Automatically set to the current date, but you can change it if the transaction already occurred or will happen in the future. |
| 4 | Originating Campaign | Look up the campaign that elicited the gift. |
| 5 | Channel | Choose an option to record how you received the gift. Online means that the gift was received online (for example, third-party website or e-transfer). Social: Indicates that the gift was received through social media. |
| 6 | Gift Type | Choose the payment method. Your organization configures these options. If you select something other than Cash, a section appears below the Gift Entry section where you can add the relevant details. For example, if you choose Credit/Debit, a Credit Card Information section appears so you can add the card to charge. |
| 7 | Amount | The amount of the donation. Denomination is the currency shown in the Gift Details section of the form. If you add a membership, this amount changes to reflect the cost of joining. |
| 8 | Deposit Date | Automatically set to the date when you process the donation, but you can edit to indicate that the deposit occurs on a different date. |
Donor Details
This area displays the donor's contact information. This area populates automatically when you specify a Donor in the Gift Entry area.
Gift Details
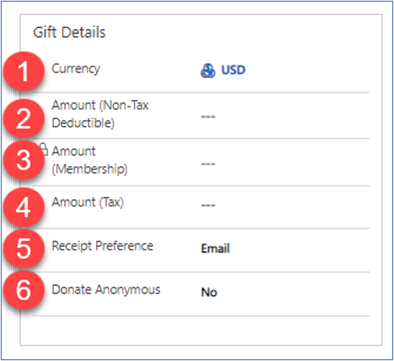
| # | Field | Description |
|---|---|---|
| 1 | Currency | The currency of the donation. |
| 2 | Amount (Non-Tax Deductible) | Tax authorities such as the IRS require that a charitable donation's receipt list the value of any goods or services the donor receives in return for their gift. For example, if a donor gives you $100 and receives a concert ticket valued at $40, the Amount (Non-Tax Deductible) is $40. If you enter an amount, a Description field appears just below the Amount (Non-Tax Deductible). The description appears on any receipt, and is mandatory. Memberships are accounted separately. |
| 3 | Amount (Membership) | Automatically set when you add a membership to the donation. |
| 4 | Amount (Tax) | The tax-deductible amount of the gift (total amount minus the value of Amount (Non-Tax Deductible) and Amount (Membership)). |
| 5 | Receipt Preference | This field represents the receipt preferences from the account or contact. You can set or change them at the transaction level. The receipt preference option appears in the Contact, Account, Transaction and Event Registration records, and it specifies how Gifts should be receipted. Do Not Receipt: Indicates the donor doesn't want a receipt for their donation. Email: Indicates the donor would like to receive a receipt for their donation via email. Print: Indicates the donor would like to receive a printed receipt for their donation. Both: Indicates the donor would like to receive a printed receipt and a receipt via email. The receipt preference defaults to the preference set on the Contact or Account record. |
| 6 | Donate Anonymous | Indicates whether the contact wants to be excluded from a list of donors included in any marketing material for this particular donation. |
Fundraising Attributes
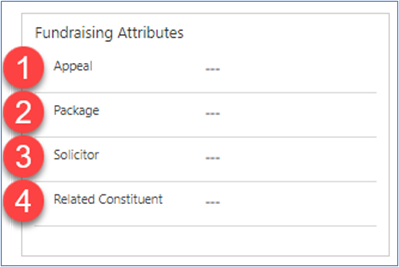
| # | Field | Description |
|---|---|---|
| 1 | Appeal | Look up the appeal that elicited this gift. Values reflect the Originating Campaign from the Gift Entry section. |
| 2 | Package | Look up the package that elicited this gift. Values reflect the Appeal. |
| 3 | Solicitor | A lookup field to identify who to credit for obtaining the gift. |
| 4 | Related Constituent | A lookup field to identify a contact/constituent related to the gift. For example, an organization might be the donor and the related constituent is the individual associated with the organization’s gift. |
Add Membership
Select Add Membership if the donor wants to join a membership as part of the donation process. The cost of the membership is automatically added to the Amount and the Amount (Membership).

For more information, go to Add a membership in a Transaction record.
Add Designation
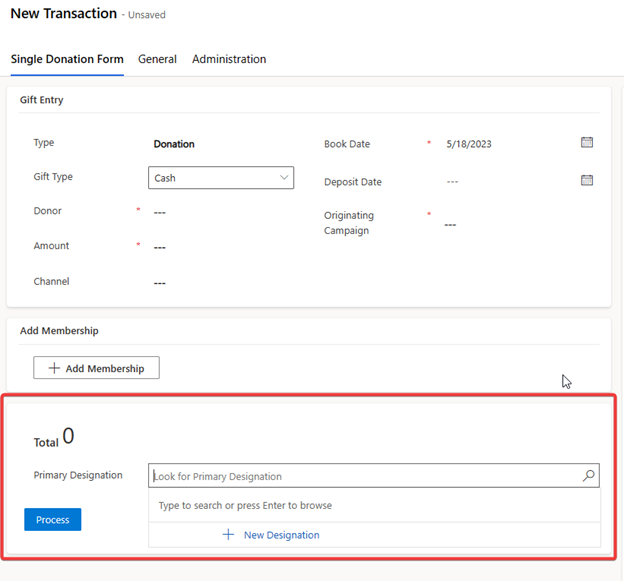
This setting is automatically set to the designation of the originating campaign, but you can choose a different designation. The designation reflects how the constituent wants your organization to spend their donation. To display details including a description, select the designation's name to open the record.
You can also add more designations and assign parts of the donation to them. Select the transaction's Designation tab to begin.
If you select the primary designation, the designated credit is created. A designated credit is always associated with a designation. The designated credit represents how the amount of a transaction was split into designations.
Process
When the Single Donation Form is complete, select Process to complete the transaction.
Note
Before you can process a transaction, a configuration record must be completed to activate various processes necessary to complete credit card transactions, donations and integrations. The details of the configuration record may make some features unavailable. For more information, go to Primary Configuration Record.
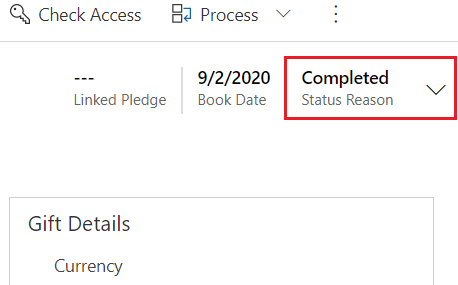
When processing completes, the Status Reason at the top right of the donation record changes from Active to Completed.
Add a transaction from a constituent's record
Note
Existing transactions for a contact record or organization account record appear on the Donation Information tab.
To process a donation from a contact record or an organization account record, follow these steps:
In the navigation pane, under Relationships select Contacts or Organizations.
In the view that opens, search for the contact or organization. You can also switch views first if needed.
Select the contact or organization to add the transaction.
On the Donation Information tab, select New Transaction.

Complete the sections on the Single Donation Form tab, beginning with Gift Entry.
Add a credit or debit card
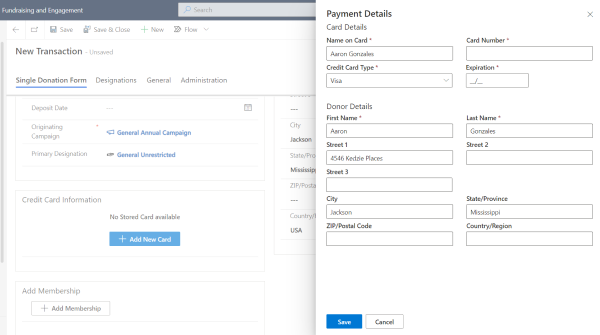
When you set a transaction's Gift Type to Credit/Debit, the Credit Card Information section appears below the Gift Entry section. If the donor already has a credit card in your solution, you can select it. You can also add a new card, for example if the donor wants to use a different one.
In the Credit Card Information section, select Add New Card.
Complete the required fields (marked with an asterisk), and then select Save.
If you get an error occur when adding a credit card, ensure that the payment configuration is correct. Perform the following steps and then try again:
Run the correct configuration script for the payment processor you're using.
Run the import script to associate the payment processor with the configuration record.
Delete a nonusable credit or debit card
The Fundraising and Engagement solution creates a nonreusable payment method record when you add a credit or debit card to the system on the Transaction form. When the transaction processes, this payment method record is deleted from the system. If the payment service isn't accessible, or if you add a credit or debit card and don't process the transaction, the payment method might stay in the system.
While importing Fundraising and Engagement, bulk deletion job F&E: Delete non reusable payment methods is imported to the environment. The job is used for deleting nonreusable payment methods that stayed in Fundraising and Engagement. The default retention of these payment methods is one day.
Note
In Fundraising and Engagement version 2.1.3.0 and lower, you could create payment schedules with non-reusable payment methods. In this case, the bulk deletion job will import with a future start date so it won't delete payment methods that are still in use.
Update recurrence of F&E: Delete non reusable payment methods bulk deletion job
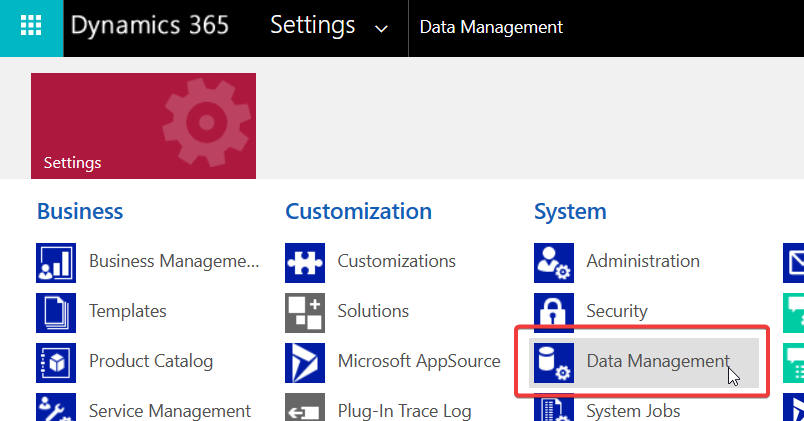
To update the start date or recurrence of the bulk deletion job, go to Advanced Settings in Fundraising and Engagement.

Navigate to Data Management.
Go to Bulk Record Deletion and search for F&E: Delete non reusable payment methods.

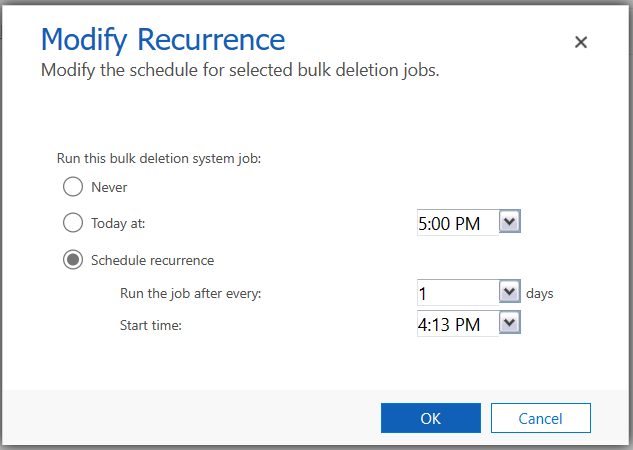
Select the job, go to More Actions, and then select Modify Recurrence. Edit the recurrence and select OK.
Generate a receipt
You can generate a receipt for a completed transaction.
Open the transaction record.
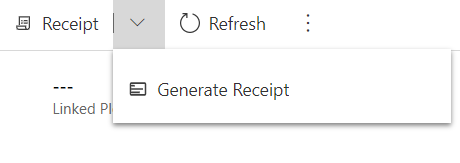
Select Generate Receipt on the action pane.
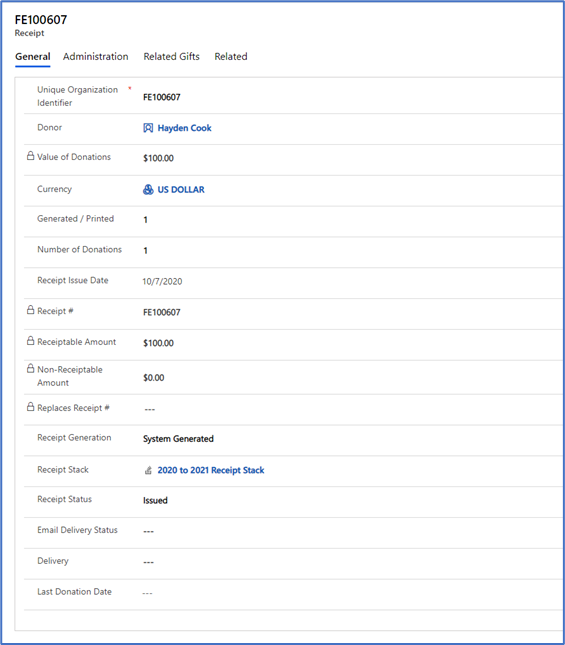
When the receipt is ready, a link to the receipt record appears in the Receipt# field of the Gift Details section of the transaction's Single Donation Form tab.

Select the link to review the receipt record.
For information on generating a physical receipt using a Word template, see Generate receipts and thank-you letters.
Void or reissue a receipt
For a refunded or voided gift, select Void (Reissued) or Void on the action pane. Both actions generate a new receipt and create a receipt log.
Refund a gift
Note
When you refund a gift, if the transaction has a receipt, be sure to void it. Fundraising and Engagement doesn't void it automatically.
Open the transaction record.
Select Refund Gift on the action pane.
Do one of the following steps:
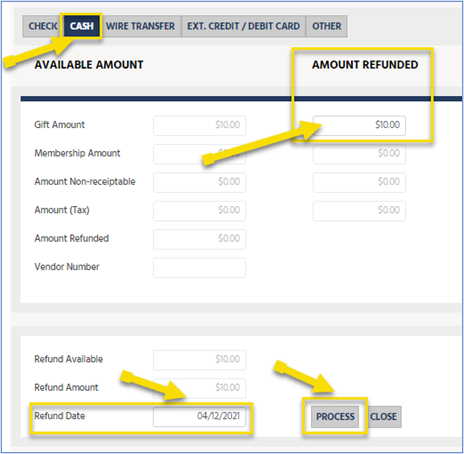
To refund the whole amount, confirm the information for the refund, and then select Process.
Note
Refund options are split between integrated and nonintegrated. The form the refund takes may be limited by the payment method of the original transaction.
To make a partial refund, update Gift Amount, Refund Available, and Refund Amount to reflect the partial refund, and then select Process.
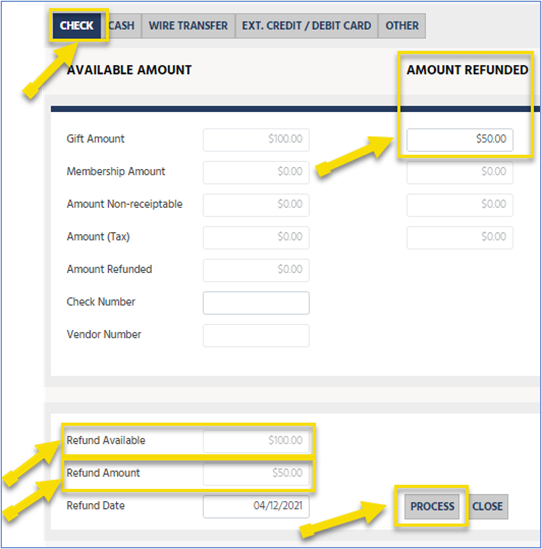
The date that the refund was processed and the amount refunded is now confirmed. The Amount (Gift) field shows the remainder of the partial refund.
Note
The refund shows "$0 Available to Refund" if the maximum refund amount has already been refunded.
When the refund finishes processing, the transaction's Status Reason changes to Refund.
Nonintegrated refund types
Nonintegrated refunds don't rely on a third-party authorization such as a payment gateway or bank to process the refund. These refunds always complete successfully. These refund types are nonintegrated:
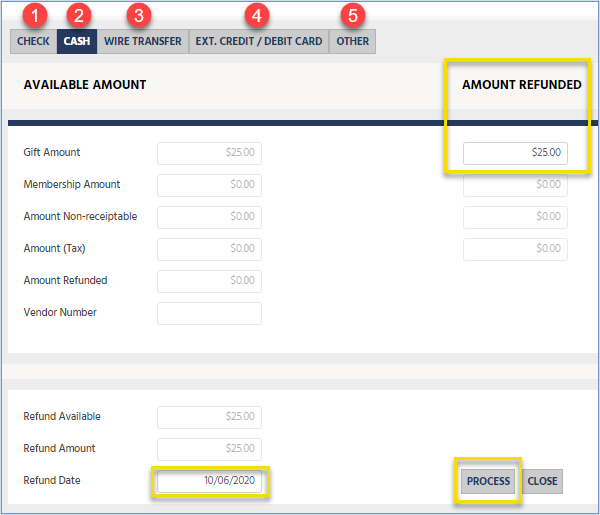
- Check
- Cash
- Wire Transfer
- Ext. Credit/Debit Card (use when the refund already took place via the gateway or other third-party device)
- Other
Integrated refund types
An integrated refund relies on a payment gateway provider, which means it might fail after Fundraising and Engagement updates the transaction record. The following refund types are integrated:
- Credit Card: Only visible when the original gift was processed with a credit card.
- Bank Run: You can make a refund, but not with a bank run.
To refund a Credit Card transaction:
- Open the gift transaction in Fundraising and Engagement.
- Select Refund Gift. The refund process completes, and Fundraising and Engagement updates the transaction record as if the refund has succeeded.
- A service in Azure confirms whether the refund was accepted. This confirmation takes up to 24 hours.
- If the refund succeeds, the refund record's Verified field changes to show the date/time the refund was accepted.
- If the refund fails, the refund record is set to Inactive, and the changes to the transaction record are reversed.
To refund a Bank Run transaction:
- Establish a method of refunding the money to the client, because you can't automatically refund bank run payments in Fundraising and Engagement. Your organization must decide on how to issue refunds of this type.
- To manually update the records to show that a refund has completed, open the relevant gift transaction in Fundraising and Engagement.
- Select Refund Gift.
- The status changes to Refund and the records correctly updated, but no money is refunded.
Issues that can occur during refunds
- Gift Records not set to "Refunded" status: An error in the gateway has caused the refund record to save. However, the process that completes the refund and updates the gift didn't complete. Check the payment gateway and that the original amount hasn't already been refunded outside of Fundraising and Engagement.
- Error on "Credit/Debit Card" refunds: The gateway rejects or continues to reject the request for refunds. Error messages from third-party gateways are sometimes ambiguous and can cause refund records to be created but not completed. In this case, remove the incomplete refund records and try to refund the gift again.
Credit/debit card responses
If a credit or debit payment fails, the payment gateway provider sends a response code. Payment gateway providers have their own unique response codes, typically indicated by a numeric value. All payment gateway provider responses are in the Credit/Debit Card Responses record.
To review the reason for the error:
On the navigation pane, select the Change area menu.
Select Configuration.
Under Settings, select Credit/Debit Card Responses.
Note
This feature is only available for credit/debit cards.
Find the failed payment in the response Identifier or Created On column, and then select the payment to open the record.

Review the Response for Donation record:
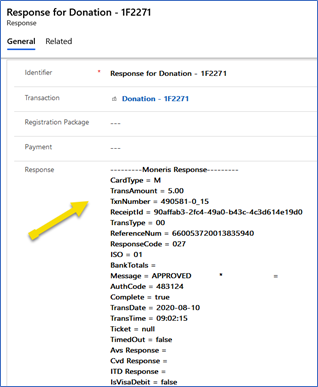
- Identifier: The ID of the transaction process.
- Transaction: A unique identifier. You can select the transaction number to open the initial transaction.
- Response: Details out the summary of the response received from the payment gateway.
Note
You may need to take different actions to troubleshoot a payment error, depending on the response code and details provided by each payment gateway provider. If you need additional information about a response, communicate with the payment gateway service desk directly (for example, Moneris, iATS or Stripe).